Advanced
Creating notification groups
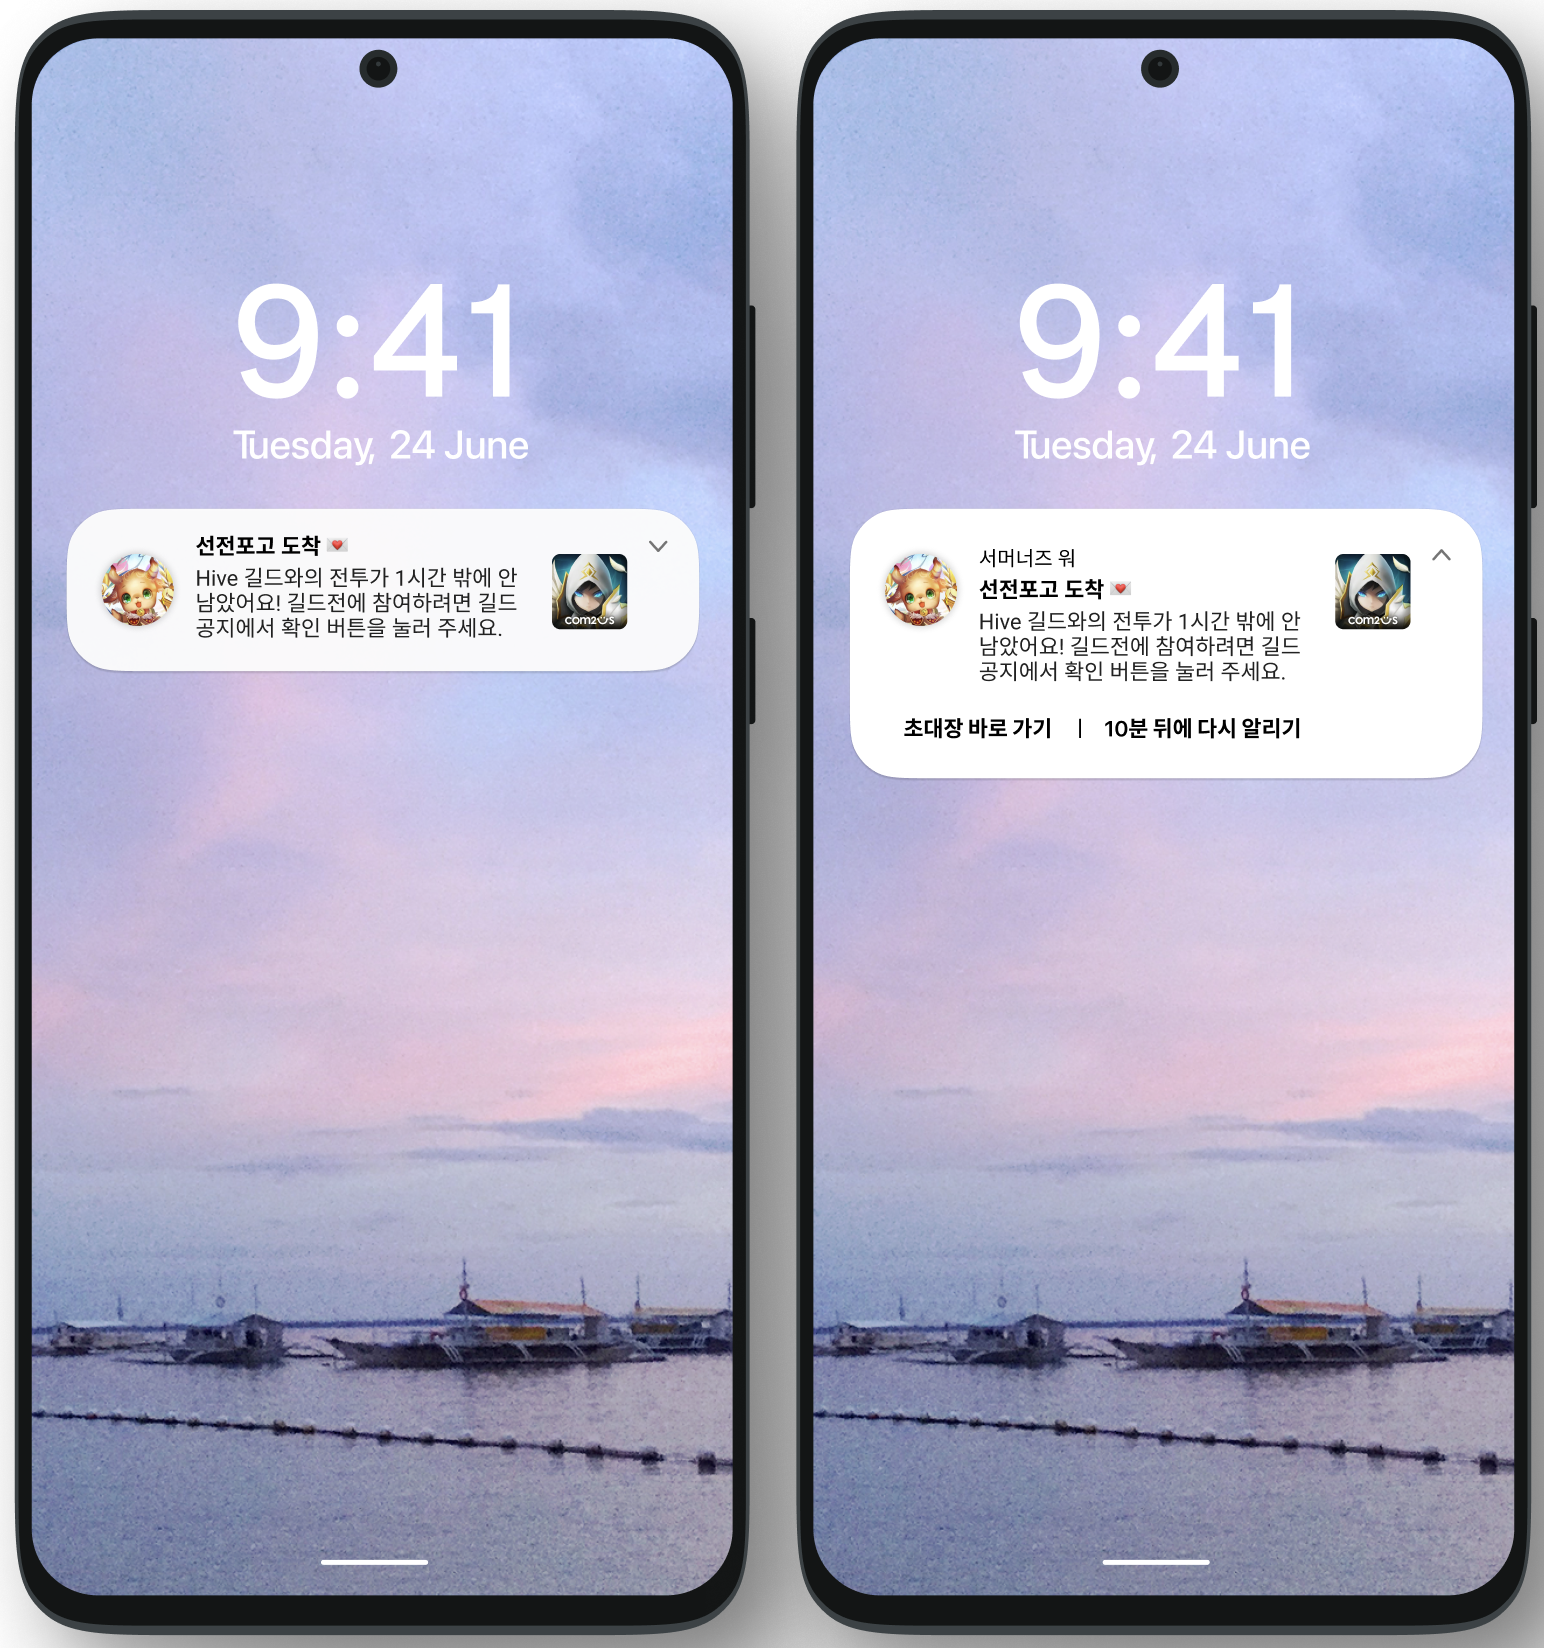
You can display notifications as groups in the notification center. Notifications that correspond to the same event can be grouped and displayed in a collapsed form. The collapsed notification group can be expanded again by the user, and individual notifications (each notification belonging to the group) can be executed separately.
Notification groups can be created by changing the group key to enabled and adding key values in Hive Console > Notification > Push v4 > Register Push Campaign > Campaign Registration > Options > Group Key. After creating a group in Hive Console, you can apply the notification group with groupId when sending local push and remote push notifications. When the group is applied, the notifications will be displayed collapsed by group as shown below.
| | |
 |  |
</tbody>
iOS media Notification
By utilizing Apple's UserNotifications framework, you can add media files such as images and videos to Notifications.
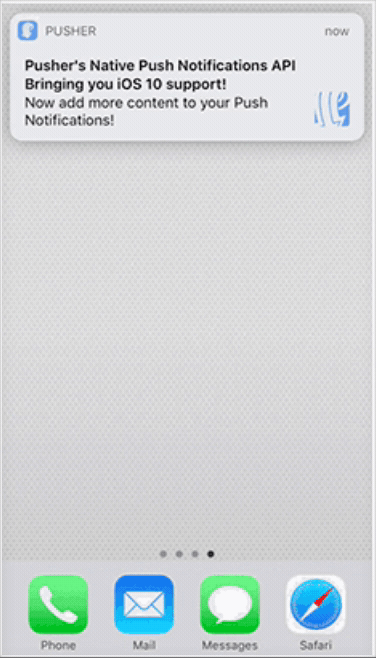 | 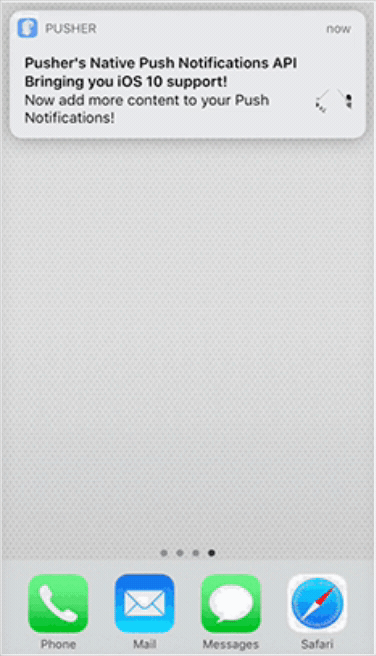 | 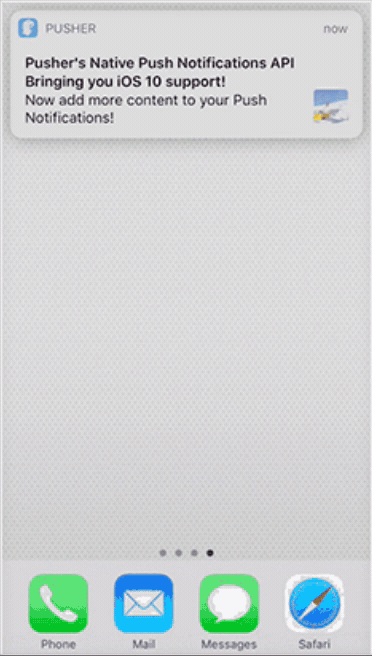 |
Operation process
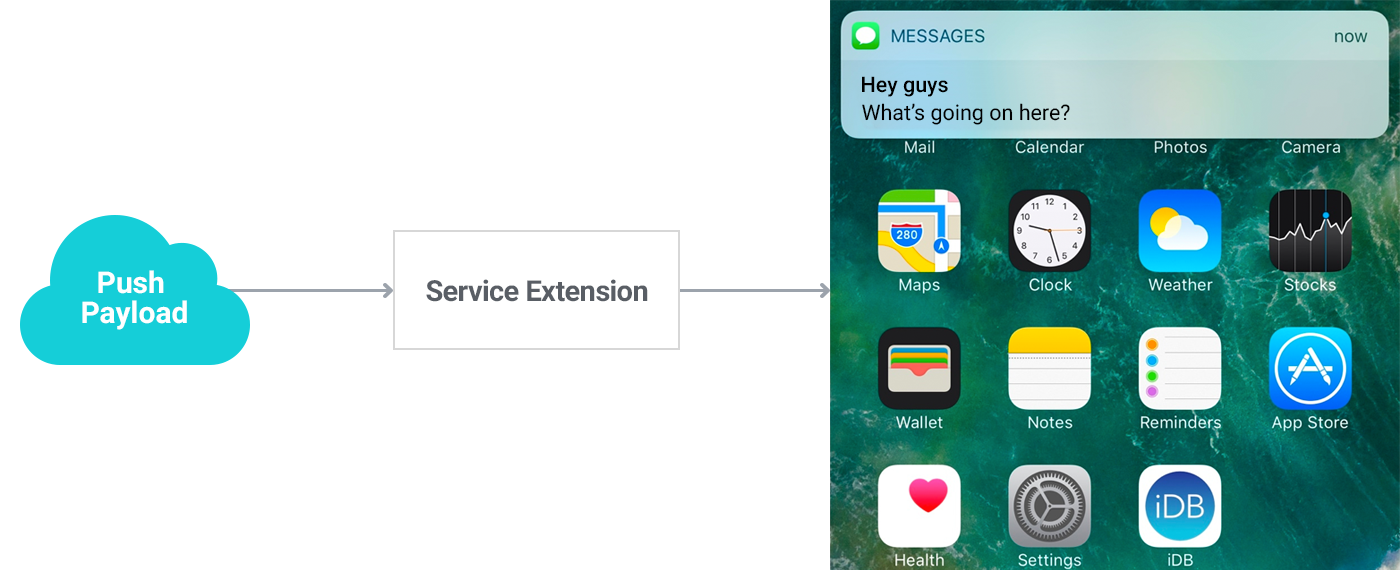
The media Notification feature operates using iOS's Notification Service Extension (hereinafter referred to as Extension).
The Notification Service Extension is a type of App Extension that allows you to modify the Payload before a Remote Notification is delivered to the user, enabling the use of processes (UI or functionality) from other apps without switching contexts. For more details, please refer to more.
- Process of delivering Remote Notification after applying Extension
File size and type limitations
There is a size limit when attaching media files, and detailed information can be found in UNNotificationAttachment.
Warning
We found an issue where the main screen (Springboard) reboots when audio delivered via push is sent while apps that use AVAudioSession, such as YouTube and various mobile games (e.g., Summoners War, Dragon Blaze, Chain Strike), are running. This occurs regardless of iOS version or device type, and we confirmed that the conflict occurs within the Apple system independently of the Hive platform. We have inquired with Apple about this issue as of December 20, 2018, and until a response is prepared, stop using the audio transmission feature via media push.
| Category | Type | Size Limit |
|---|---|---|
| Image | JPG, JPEG, PNG, GIF | 10MB |
| Video | MP4, AVI | 50MB |
- If a timeout occurs due to poor network conditions, the user will receive a regular Notification without media.
- On very slow networks, downloads can take up to 10 minutes, so it is necessary to consider the network conditions in the area and use media with an appropriate size.
Implementation and utilization
To download media and reconstruct the Notification object for delivery to the user, several settings and additional source code are required.
Note
Notification Service Extension cannot be distributed by being included in a library or framework, so to use the Extension, you must configure it based on the guide provided by the Hive platform.
Adding extension
To use the media Notification feature, you need to add a Notification Service Extension to your project. Instead of directly adding or overriding classes, add a new target to the project.
When you add a target, a template is automatically created.
Add a target in a Unity project
In the Unity editor, the Hive SDK automatically performs a series of processes, such as adding targets and writing Info.plist, through the PostProcess feature. You only need to check whether to use media push; no other work is required.
- In the top menu bar of the Unity editor, go to Hive > Build project post process settings > iOS
- Enable Push Media Contents
Add a target in environments other than Unity
Before you begin, check the following items first.
- To use the push extension target, make sure the provisioning profile includes the
aps-environmententitlement. If necessary, reissue the provisioning profile and certificate. - If you directly added the target in the Xcode GUI, the default minimum deployment target version for the extension target may be set to the latest OS. Make sure this value does not exceed the minimum deployment target version of the main game app target.
The method for adding a target is as follows.
- In Xcode project settings, click the Add target button (the + button at the bottom left)

- Select Notification Service Extension, then click Next
(Since Xcode 8, Notification Service Extension can be added as a target in a project)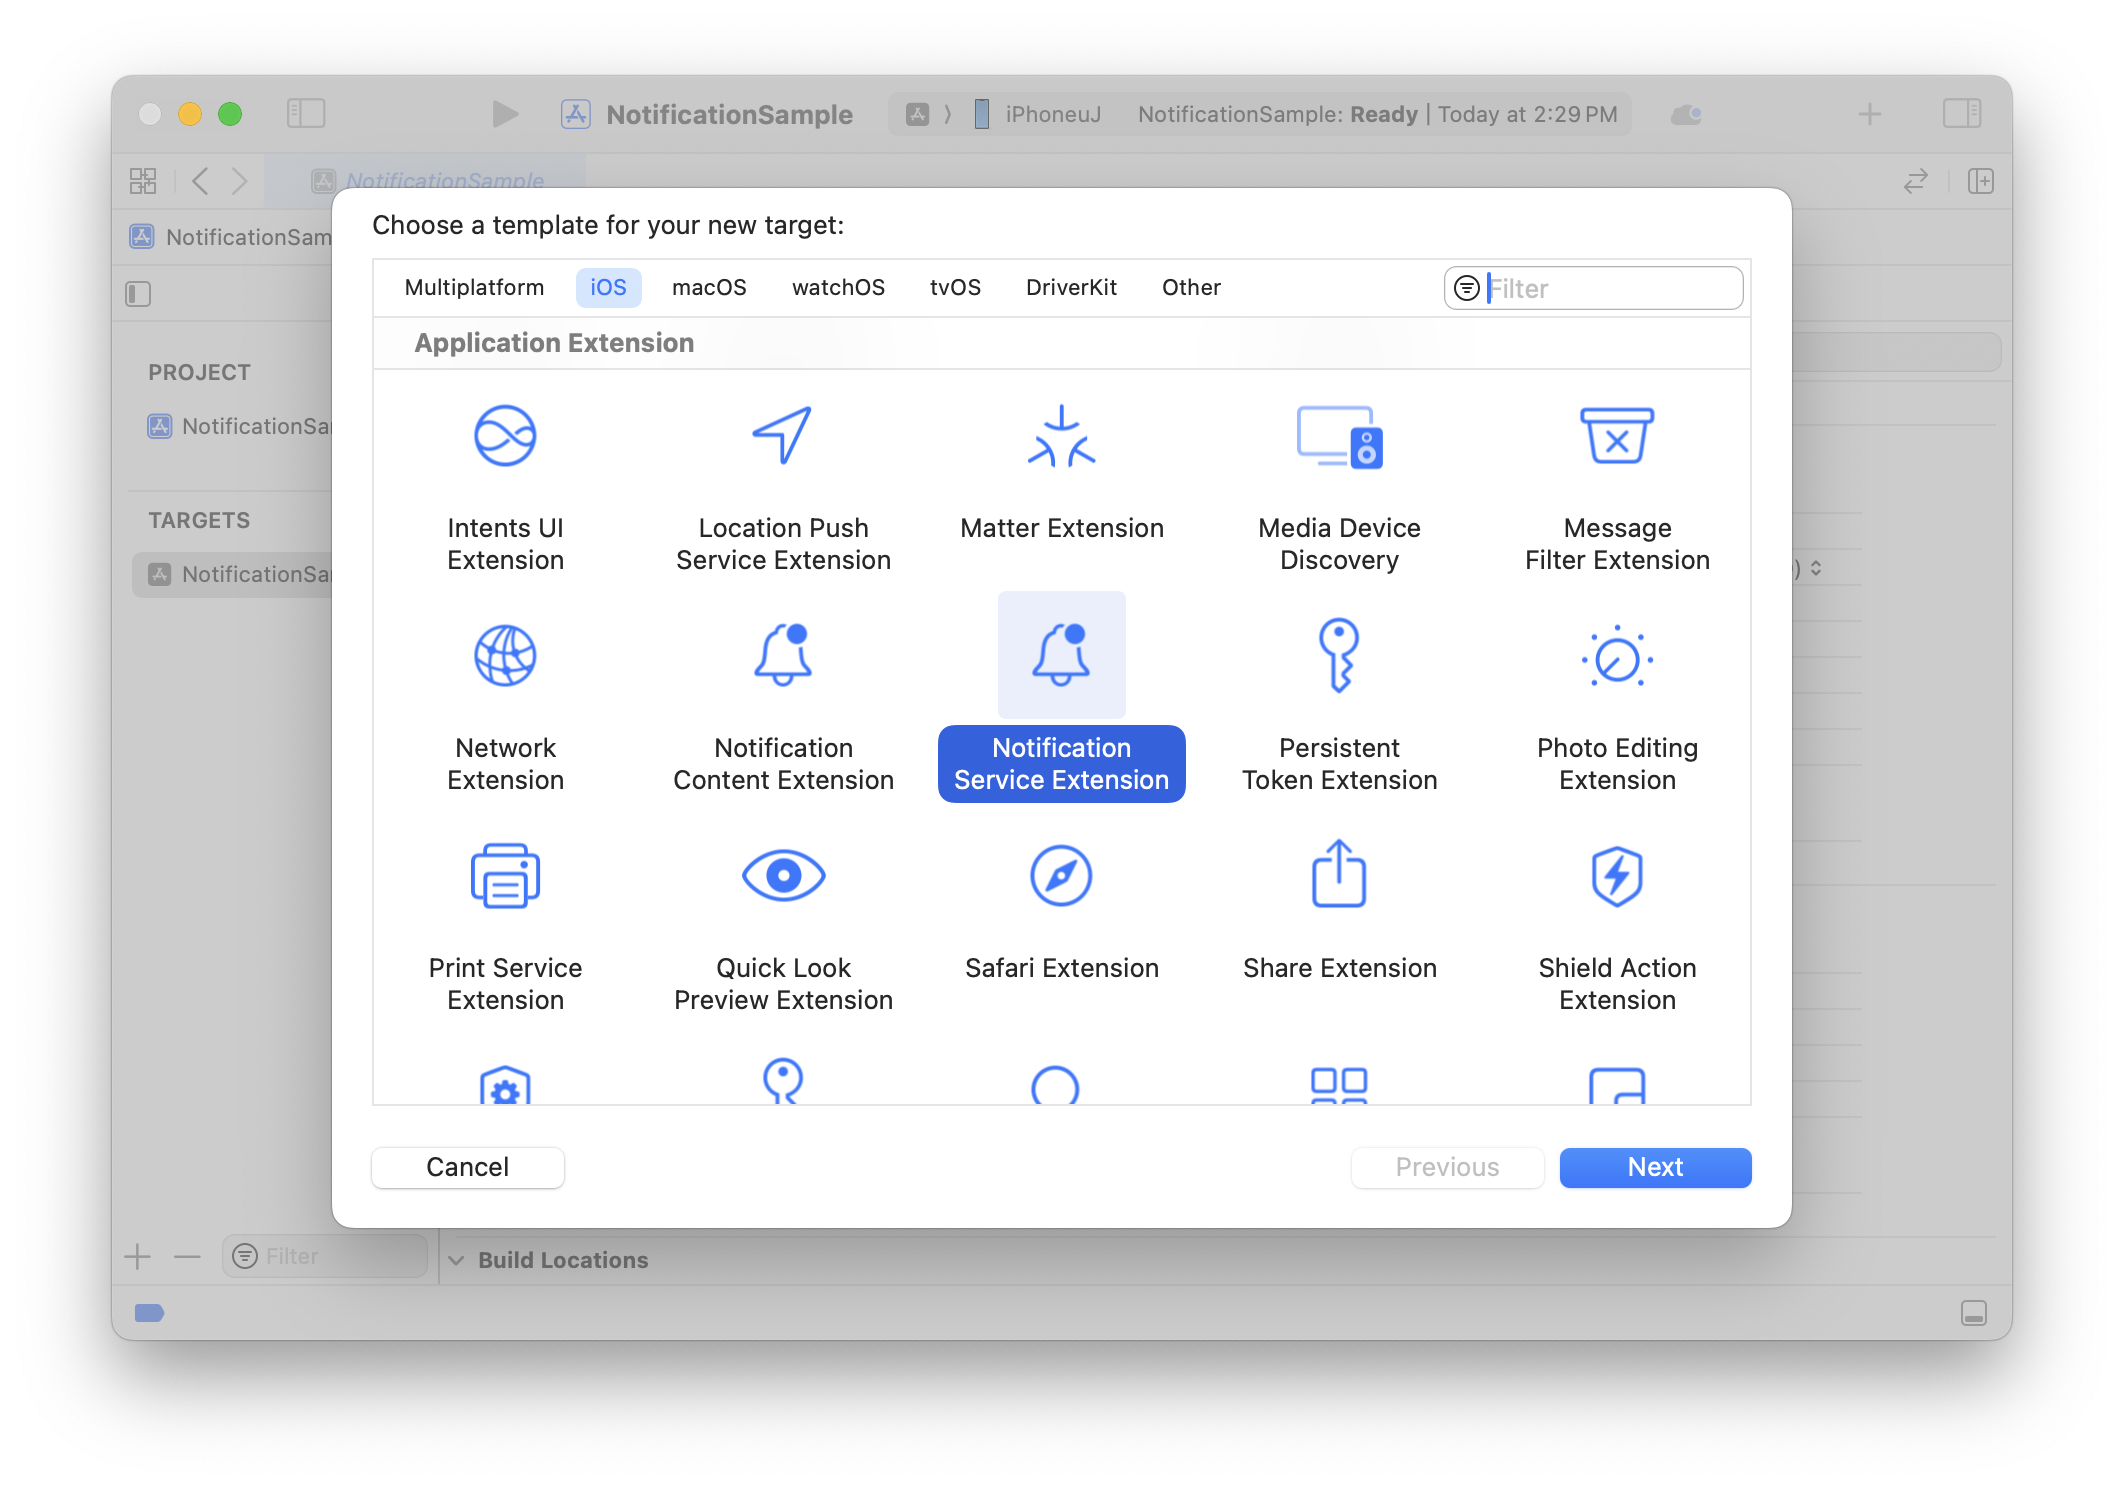
- Enter Product Name
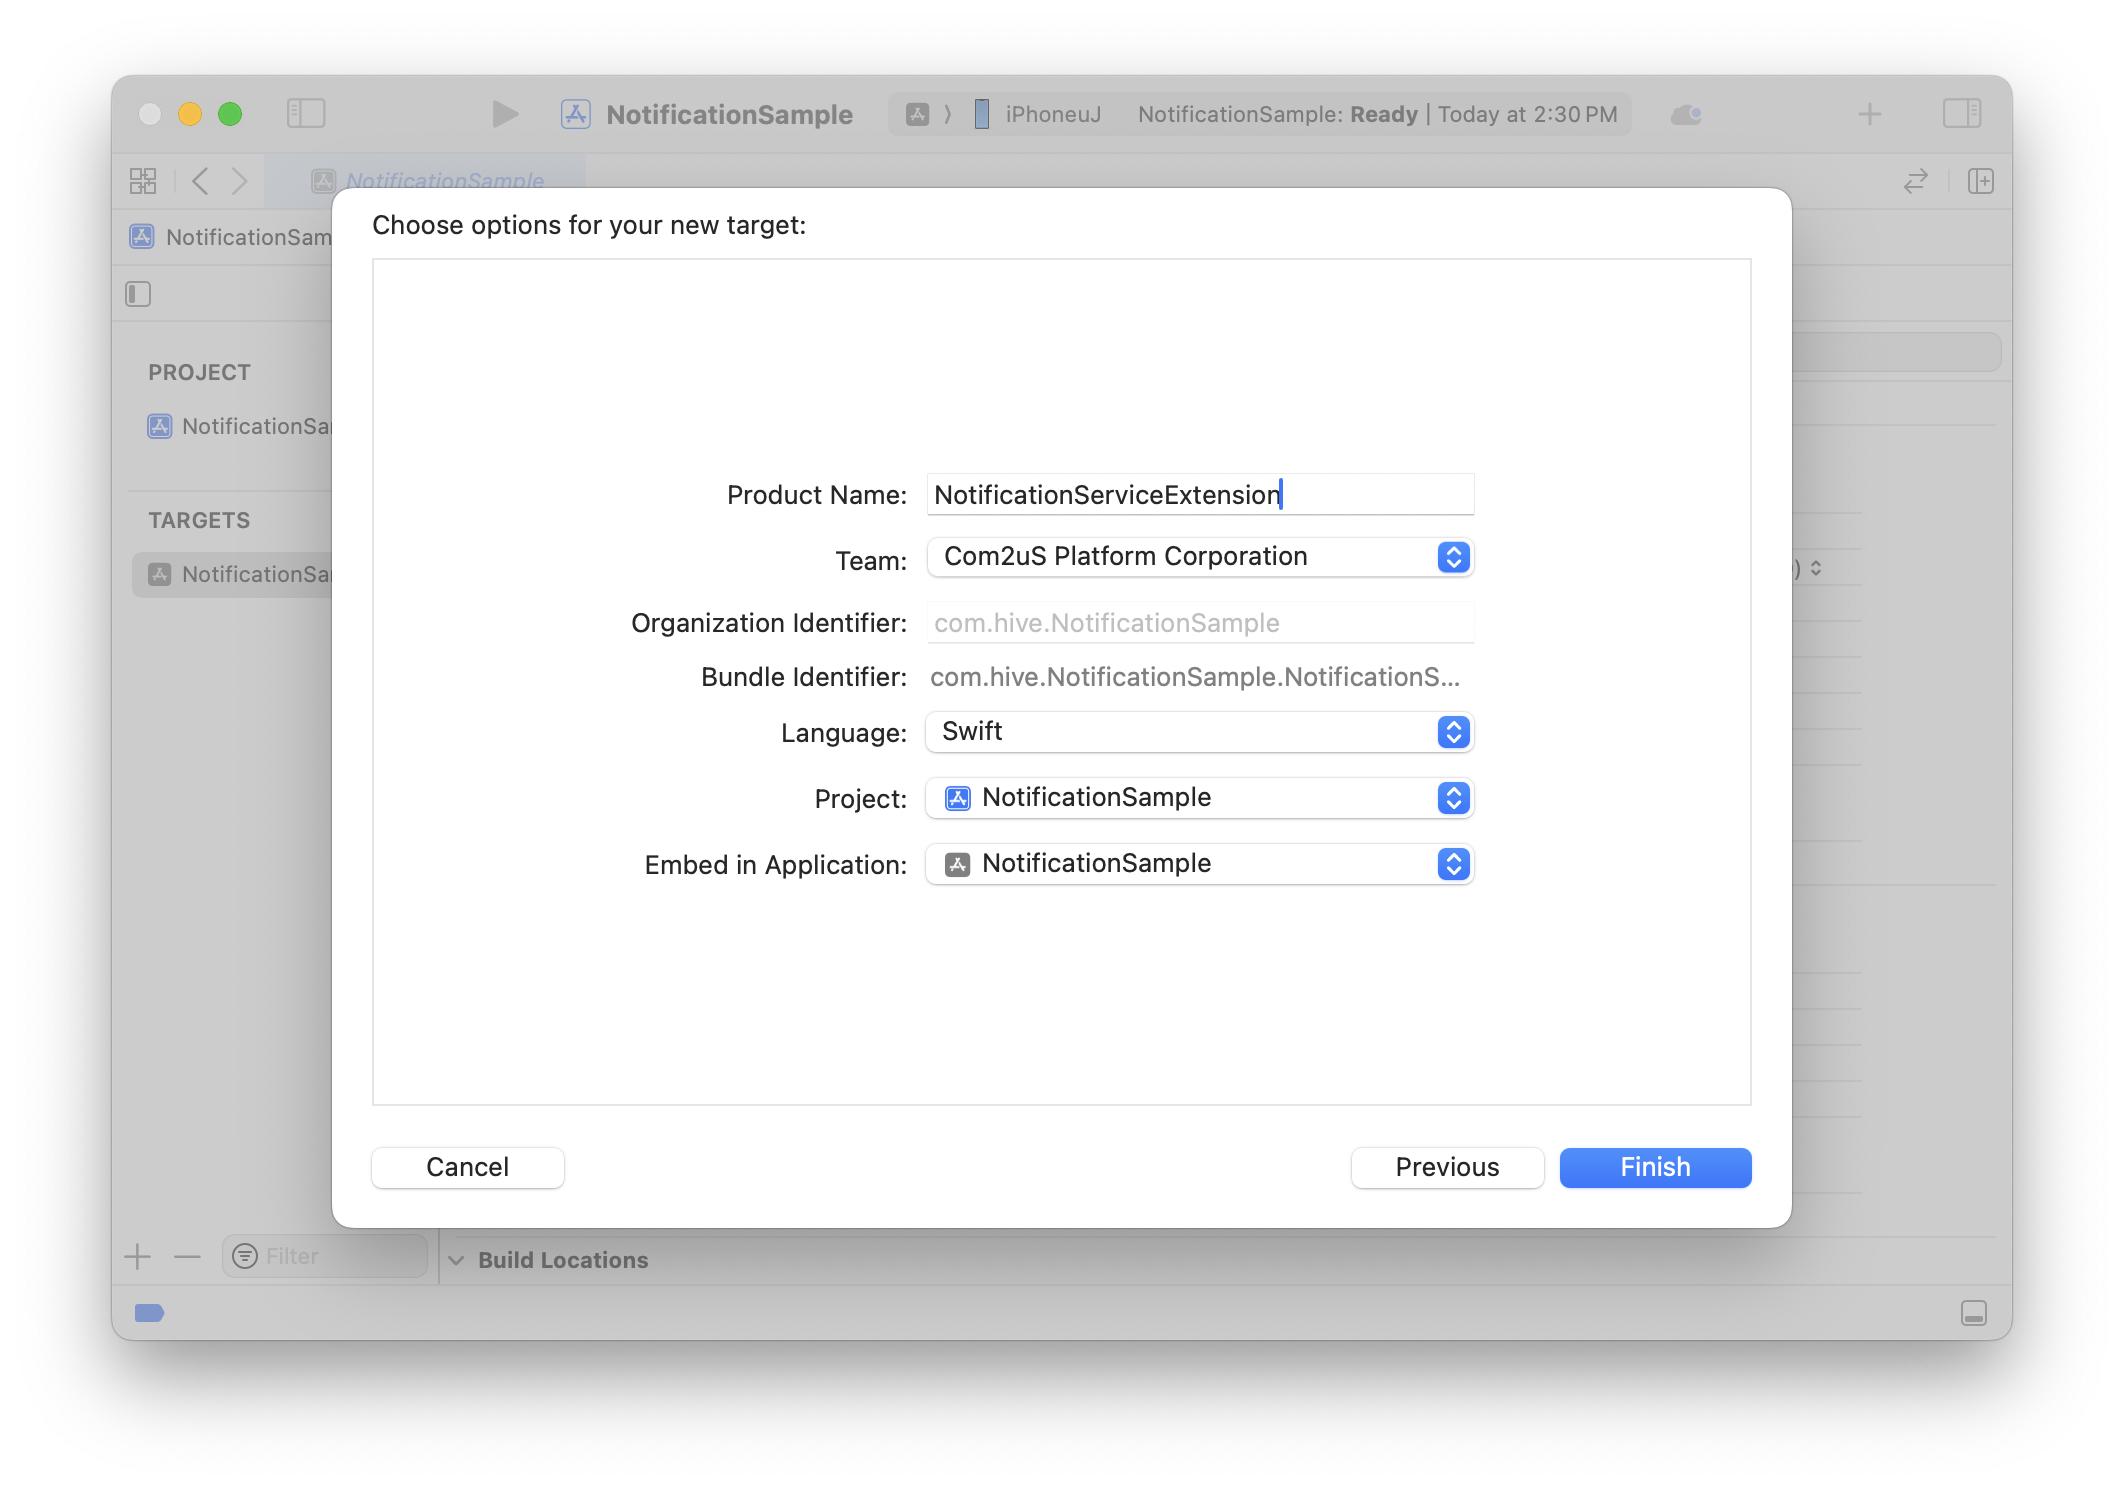
- If the following pop-up appears, click Activate
The Extension is automatically embedded in the current project, and a scheme for building is added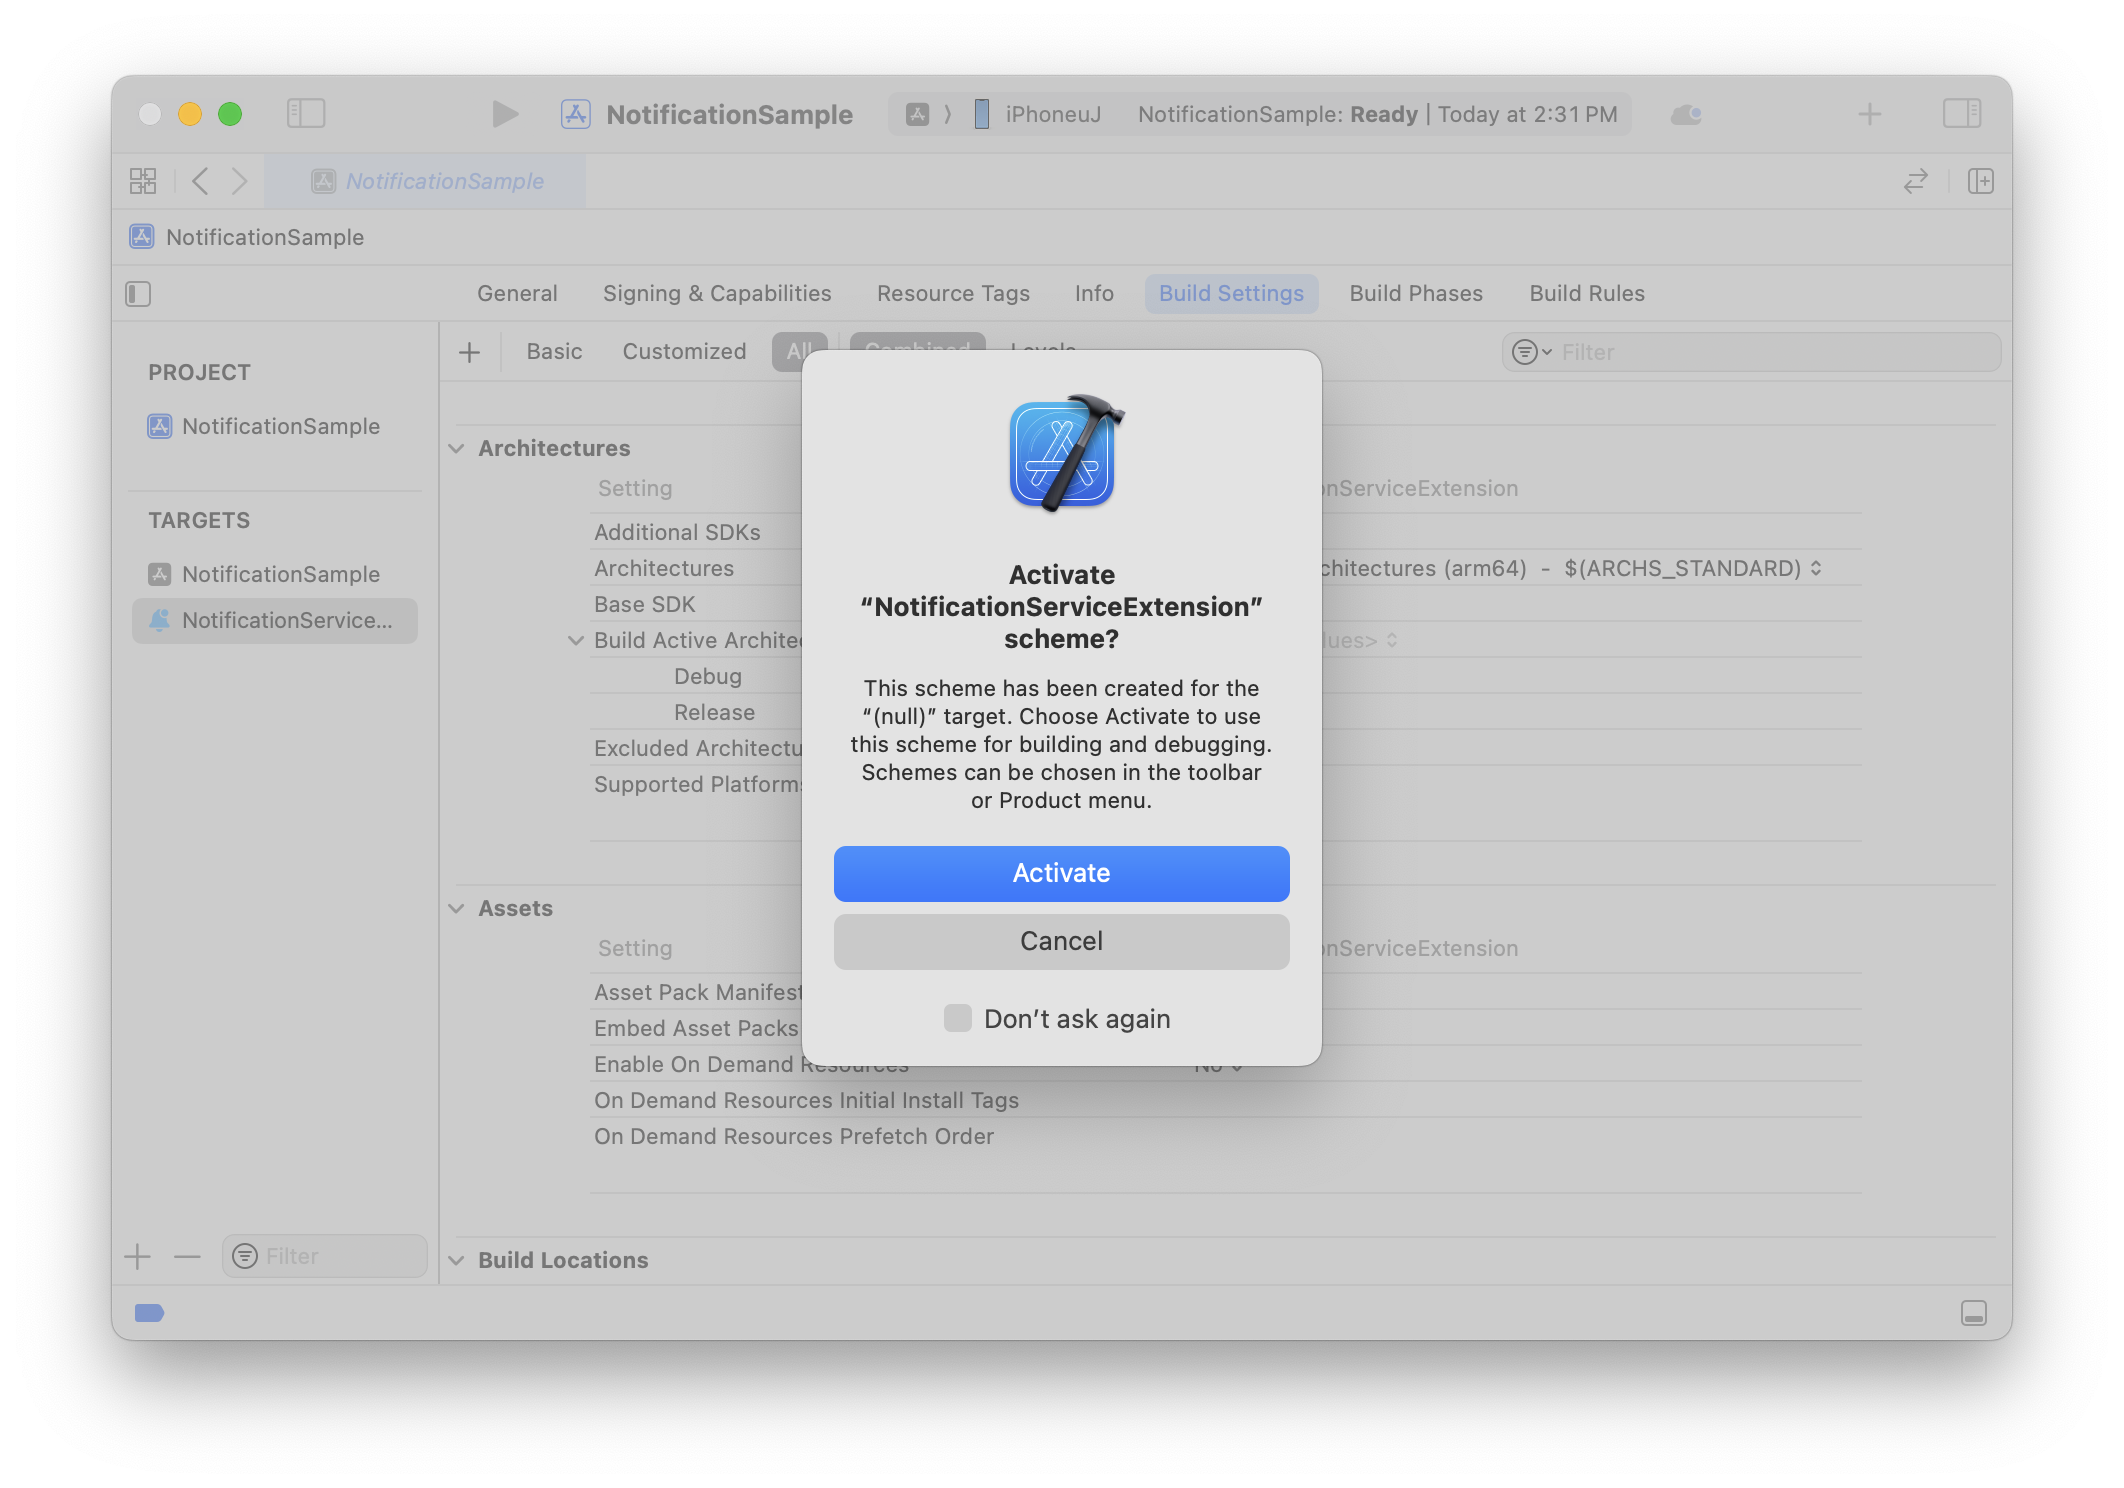
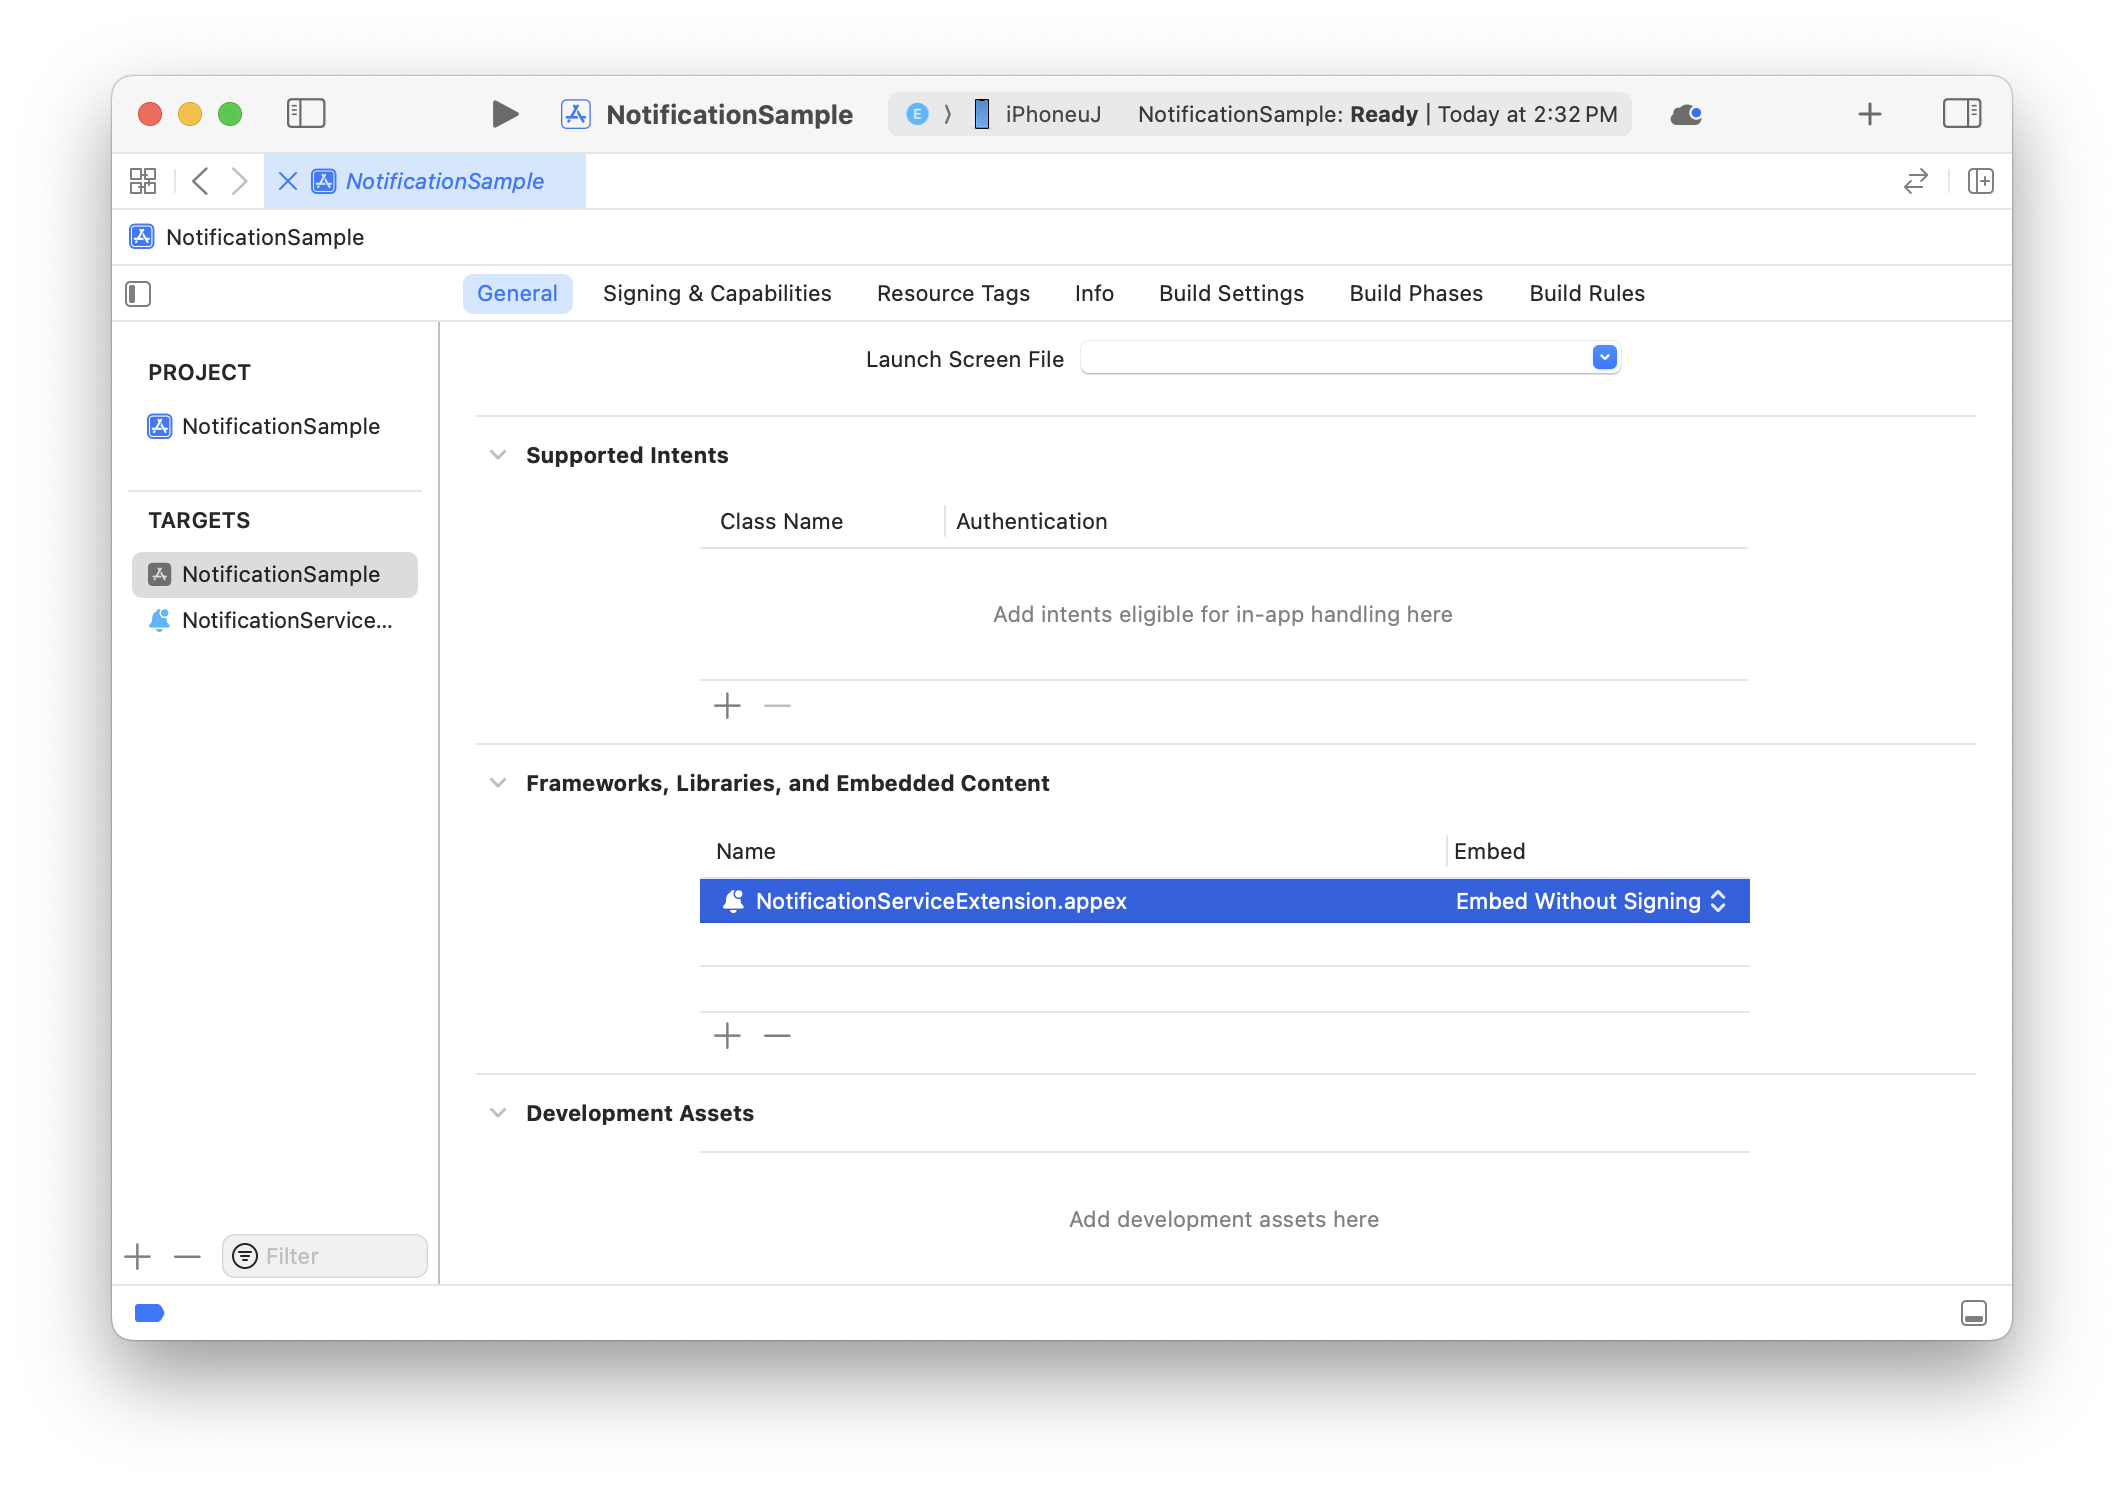
- In the General tab, confirm that Extension has been added to the project
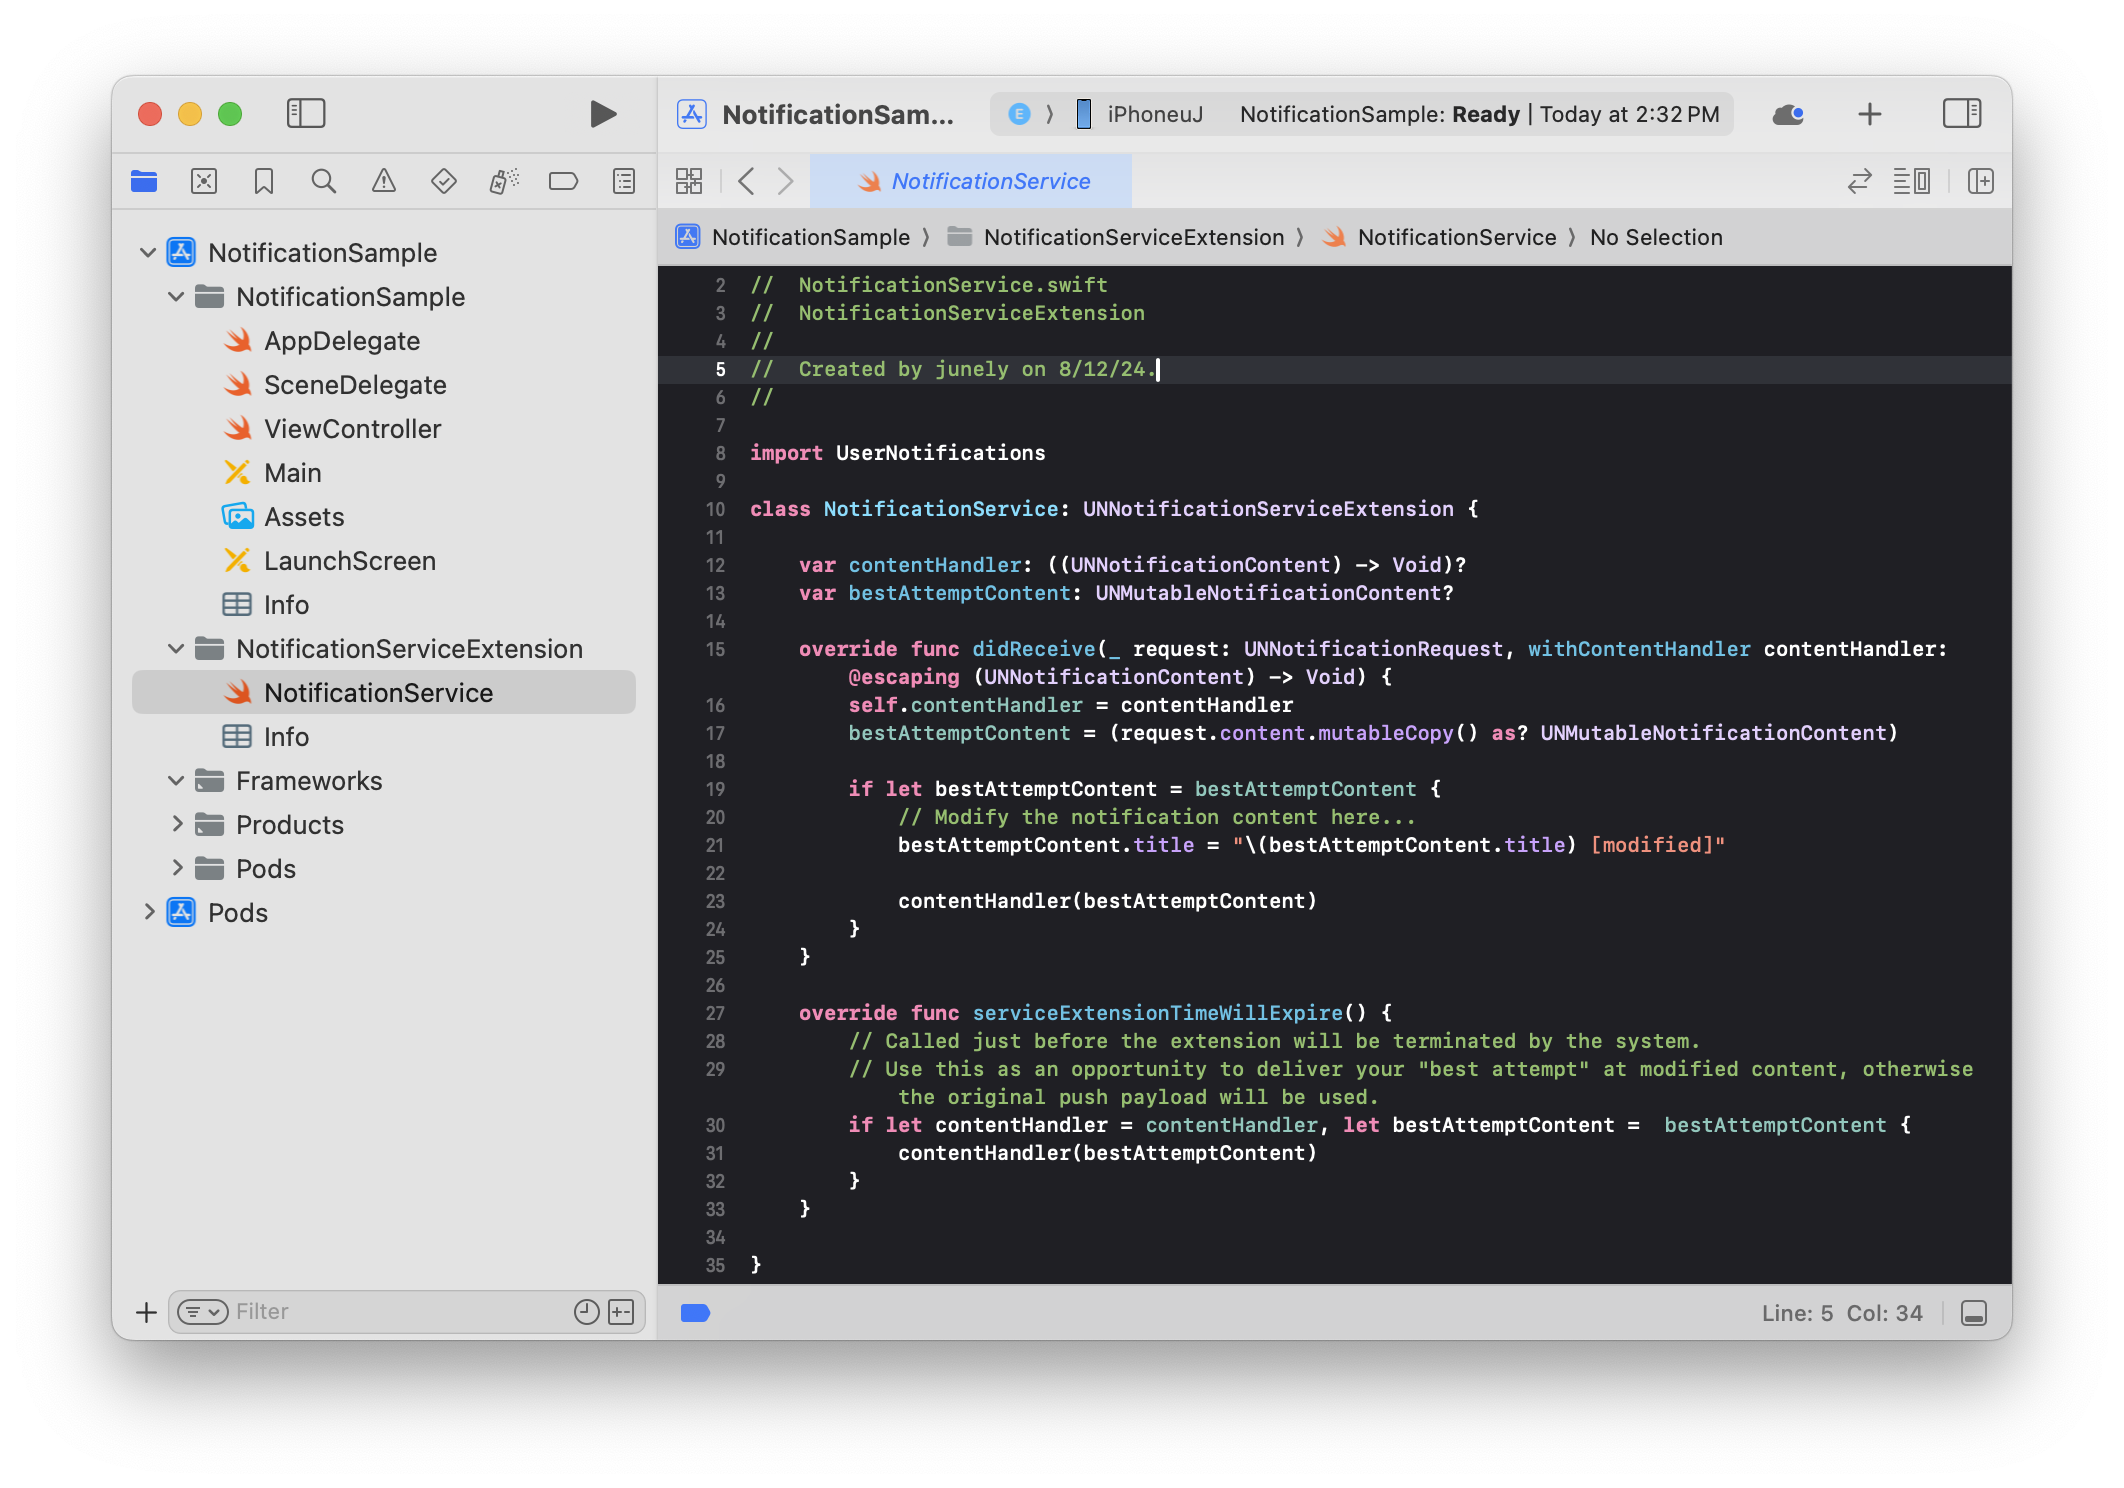
- Confirm that the NotificationService template class has been added to the project
Adding HIVEExtensions.framework
You can easily download media using the HIVEExtensions.framework provided by the Hive Platform.
The method to add HIVEExtensions.framework is as follows:
-
Hive SDK supports CocoaPods. If there is no Podfile in your project directory, run
pod init.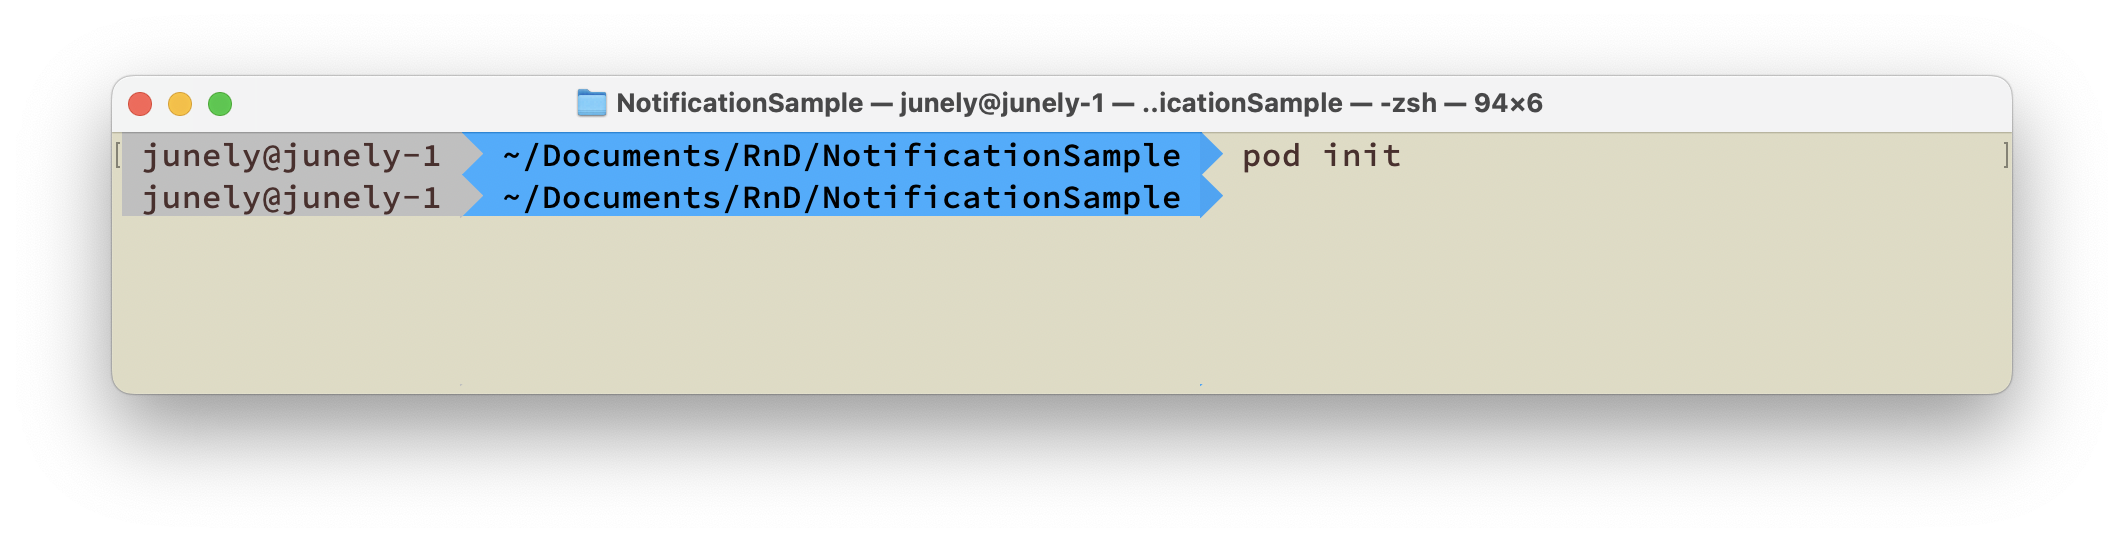

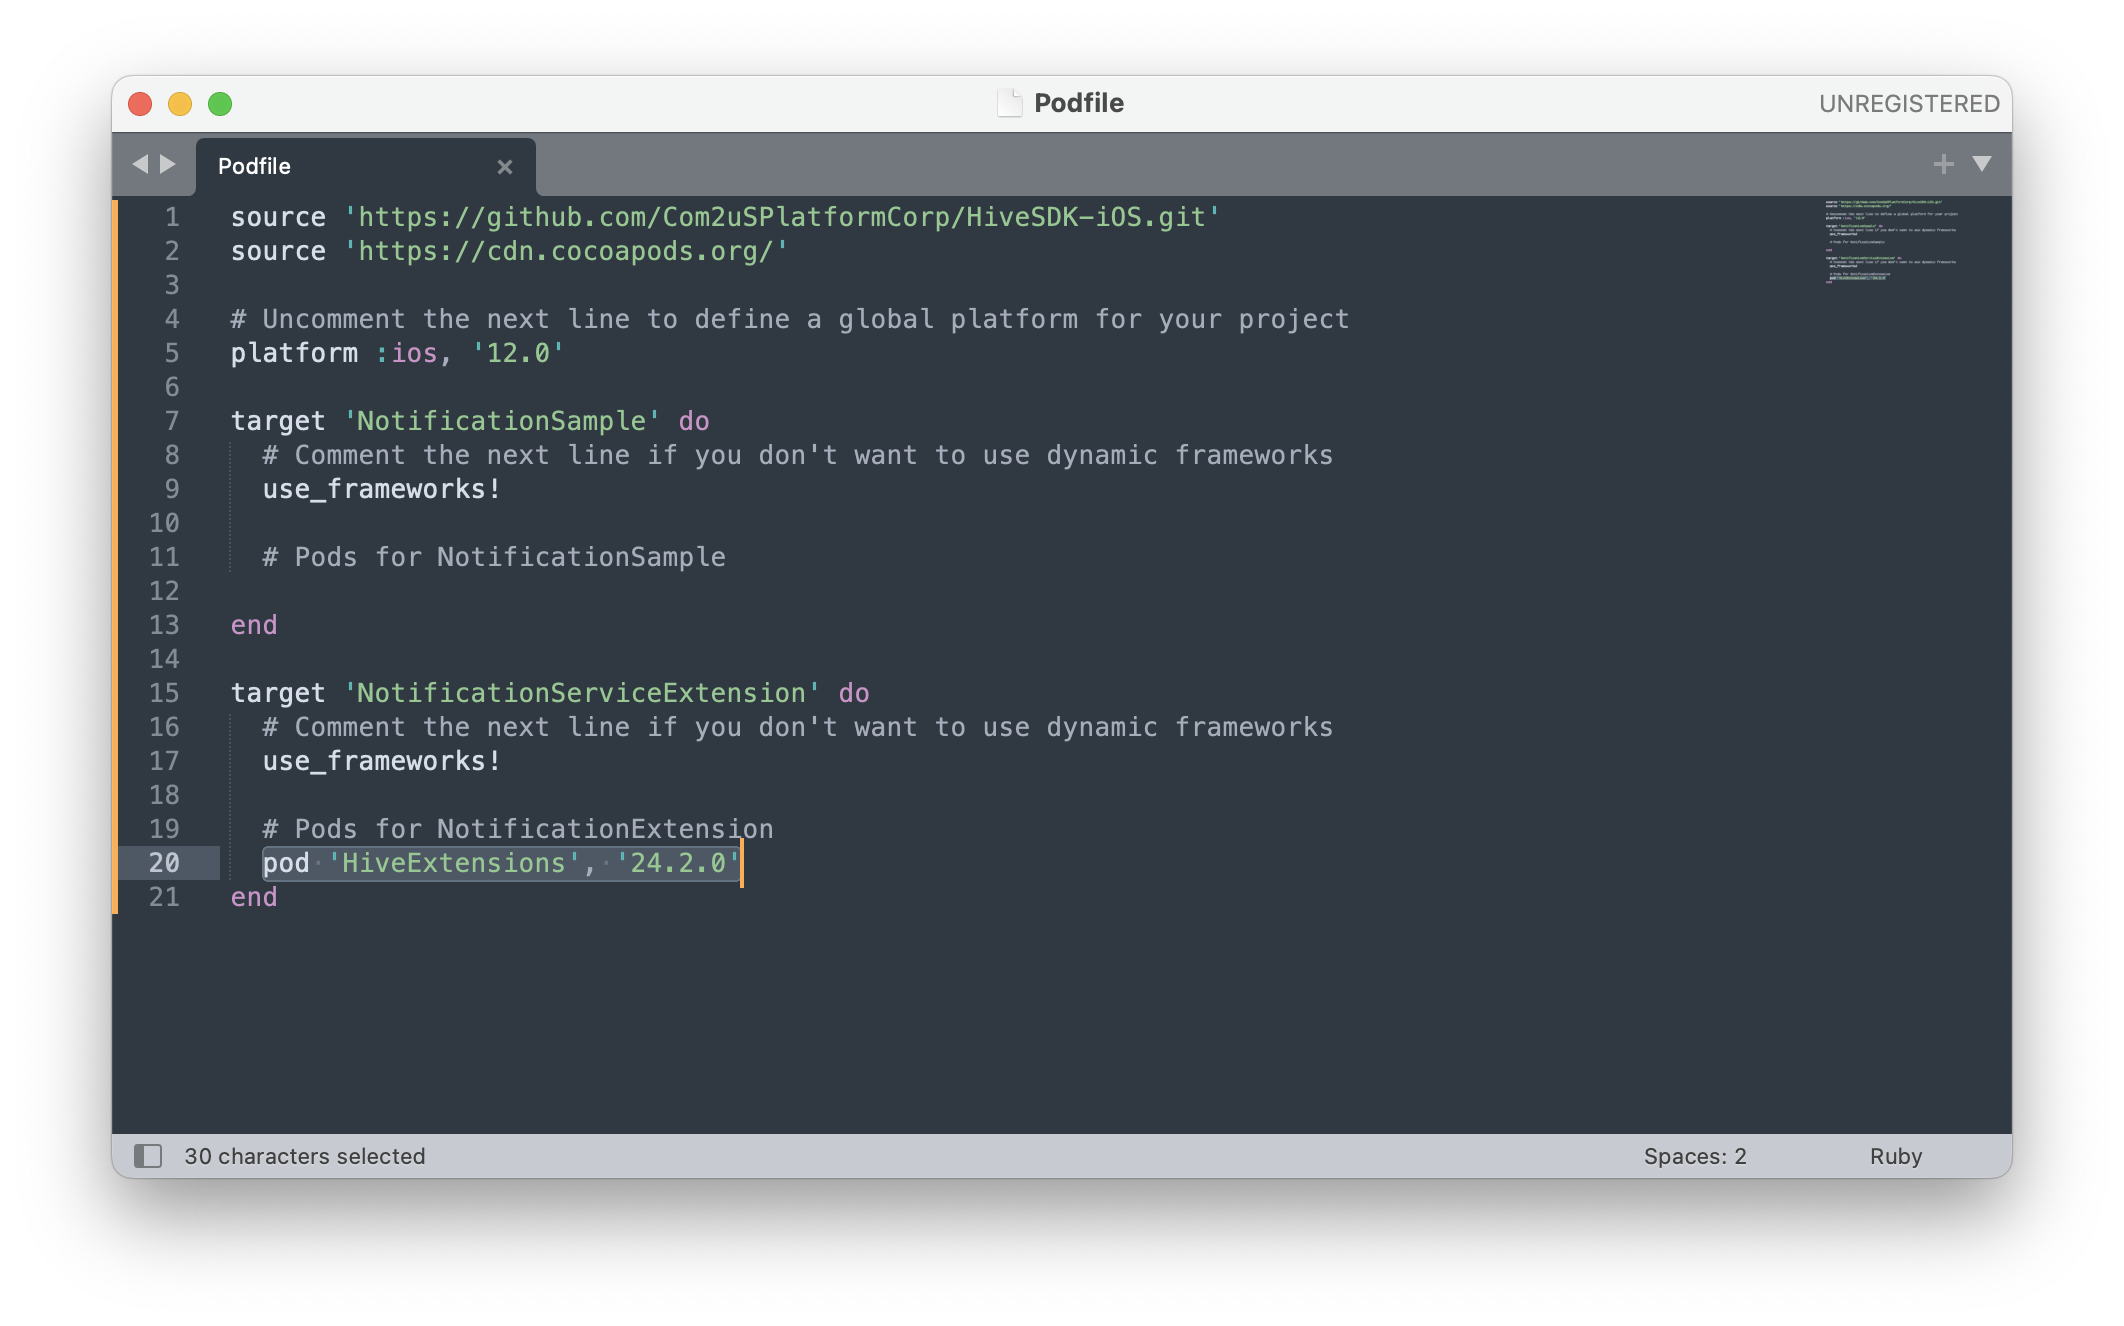
If you already have a Podfile, open the file and add the target 'NotificationServiceExtension (example target name)' do-end statement.
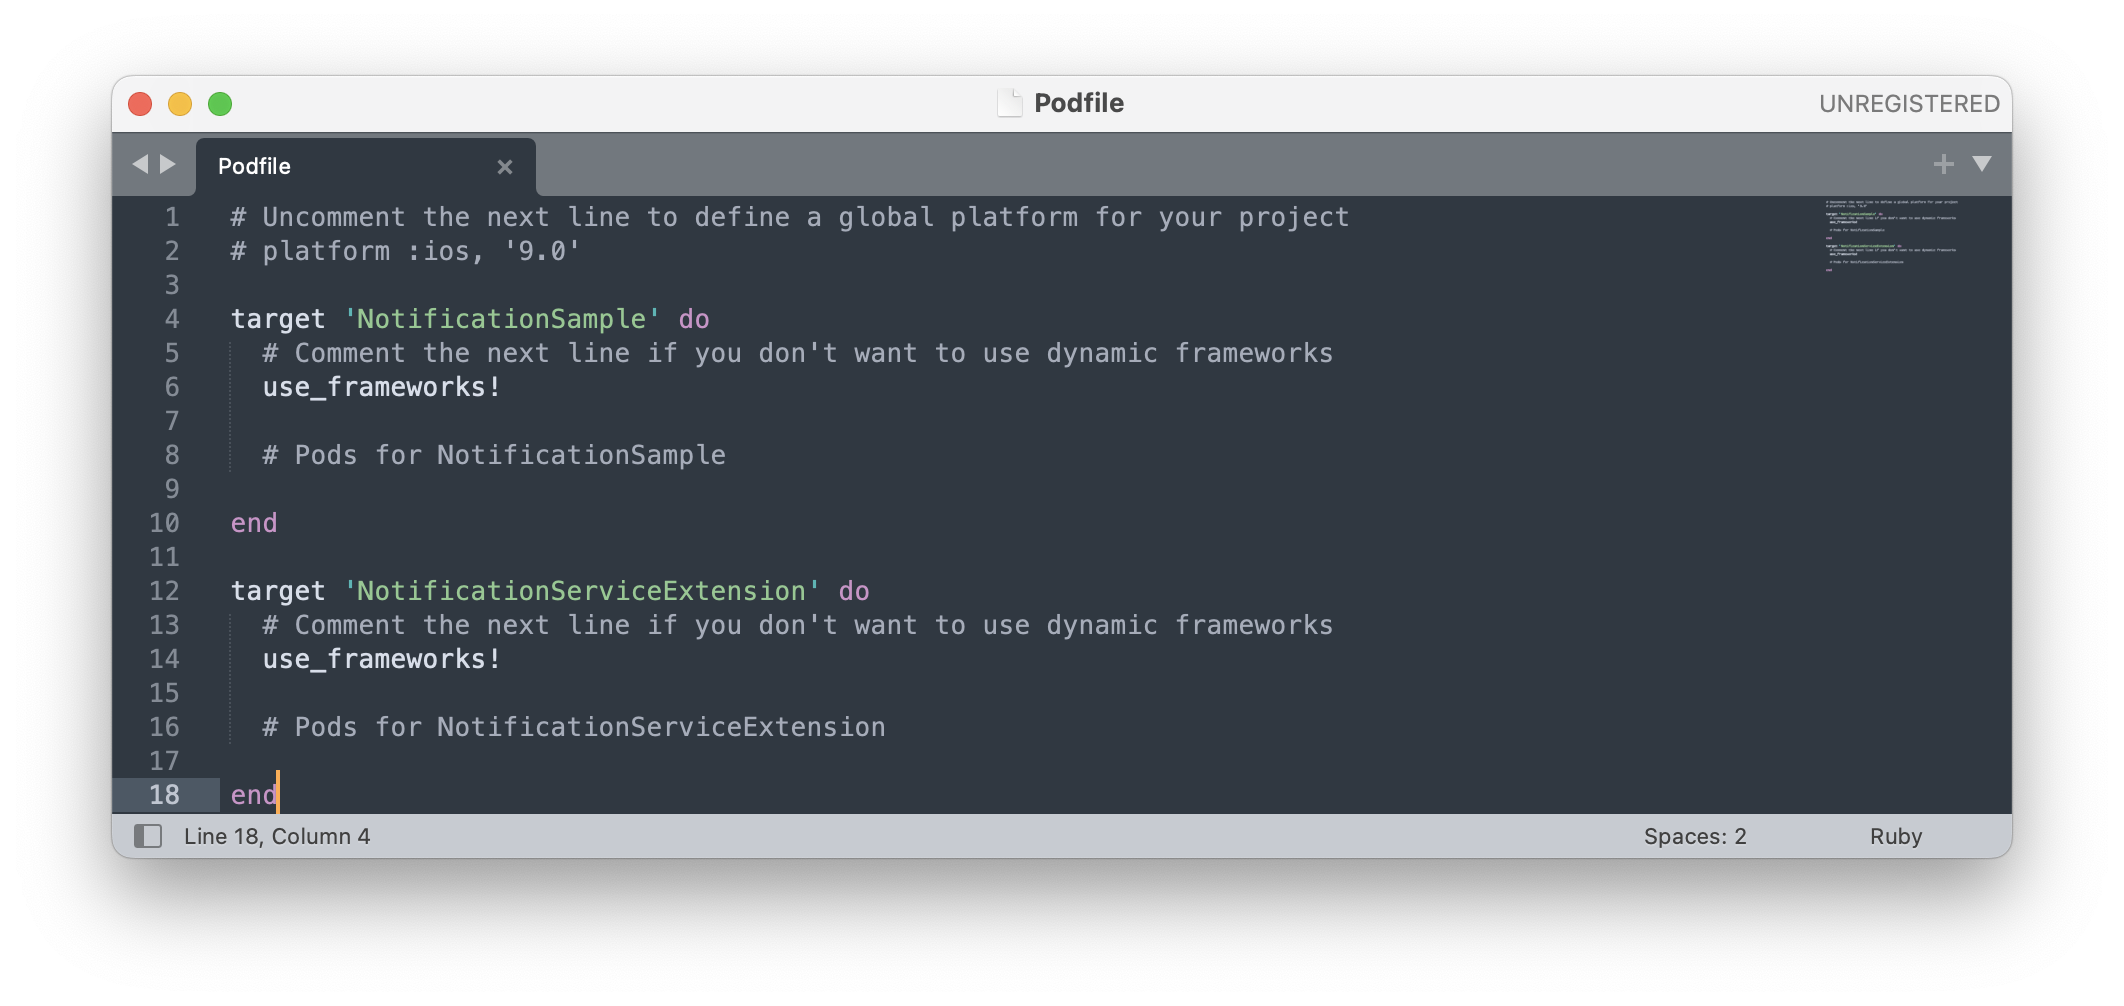
-
Refer to the screenshot and write the pod statement.
-
Close the Podfile and run
pod installin your project directory.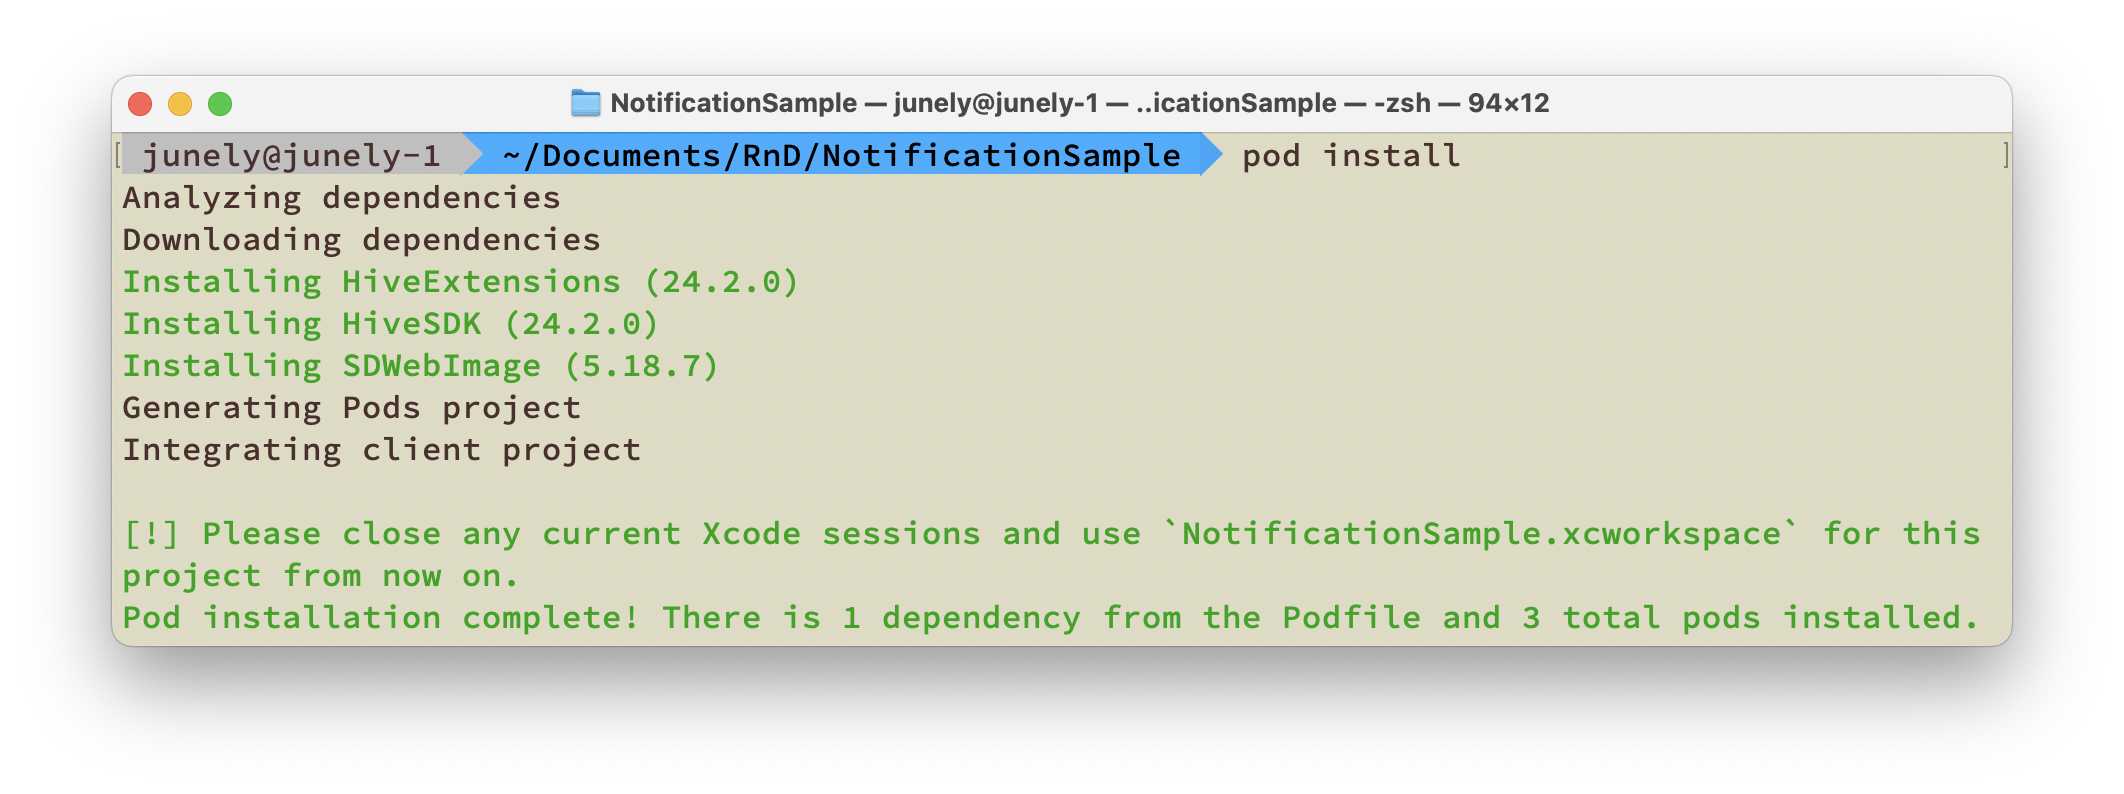
-
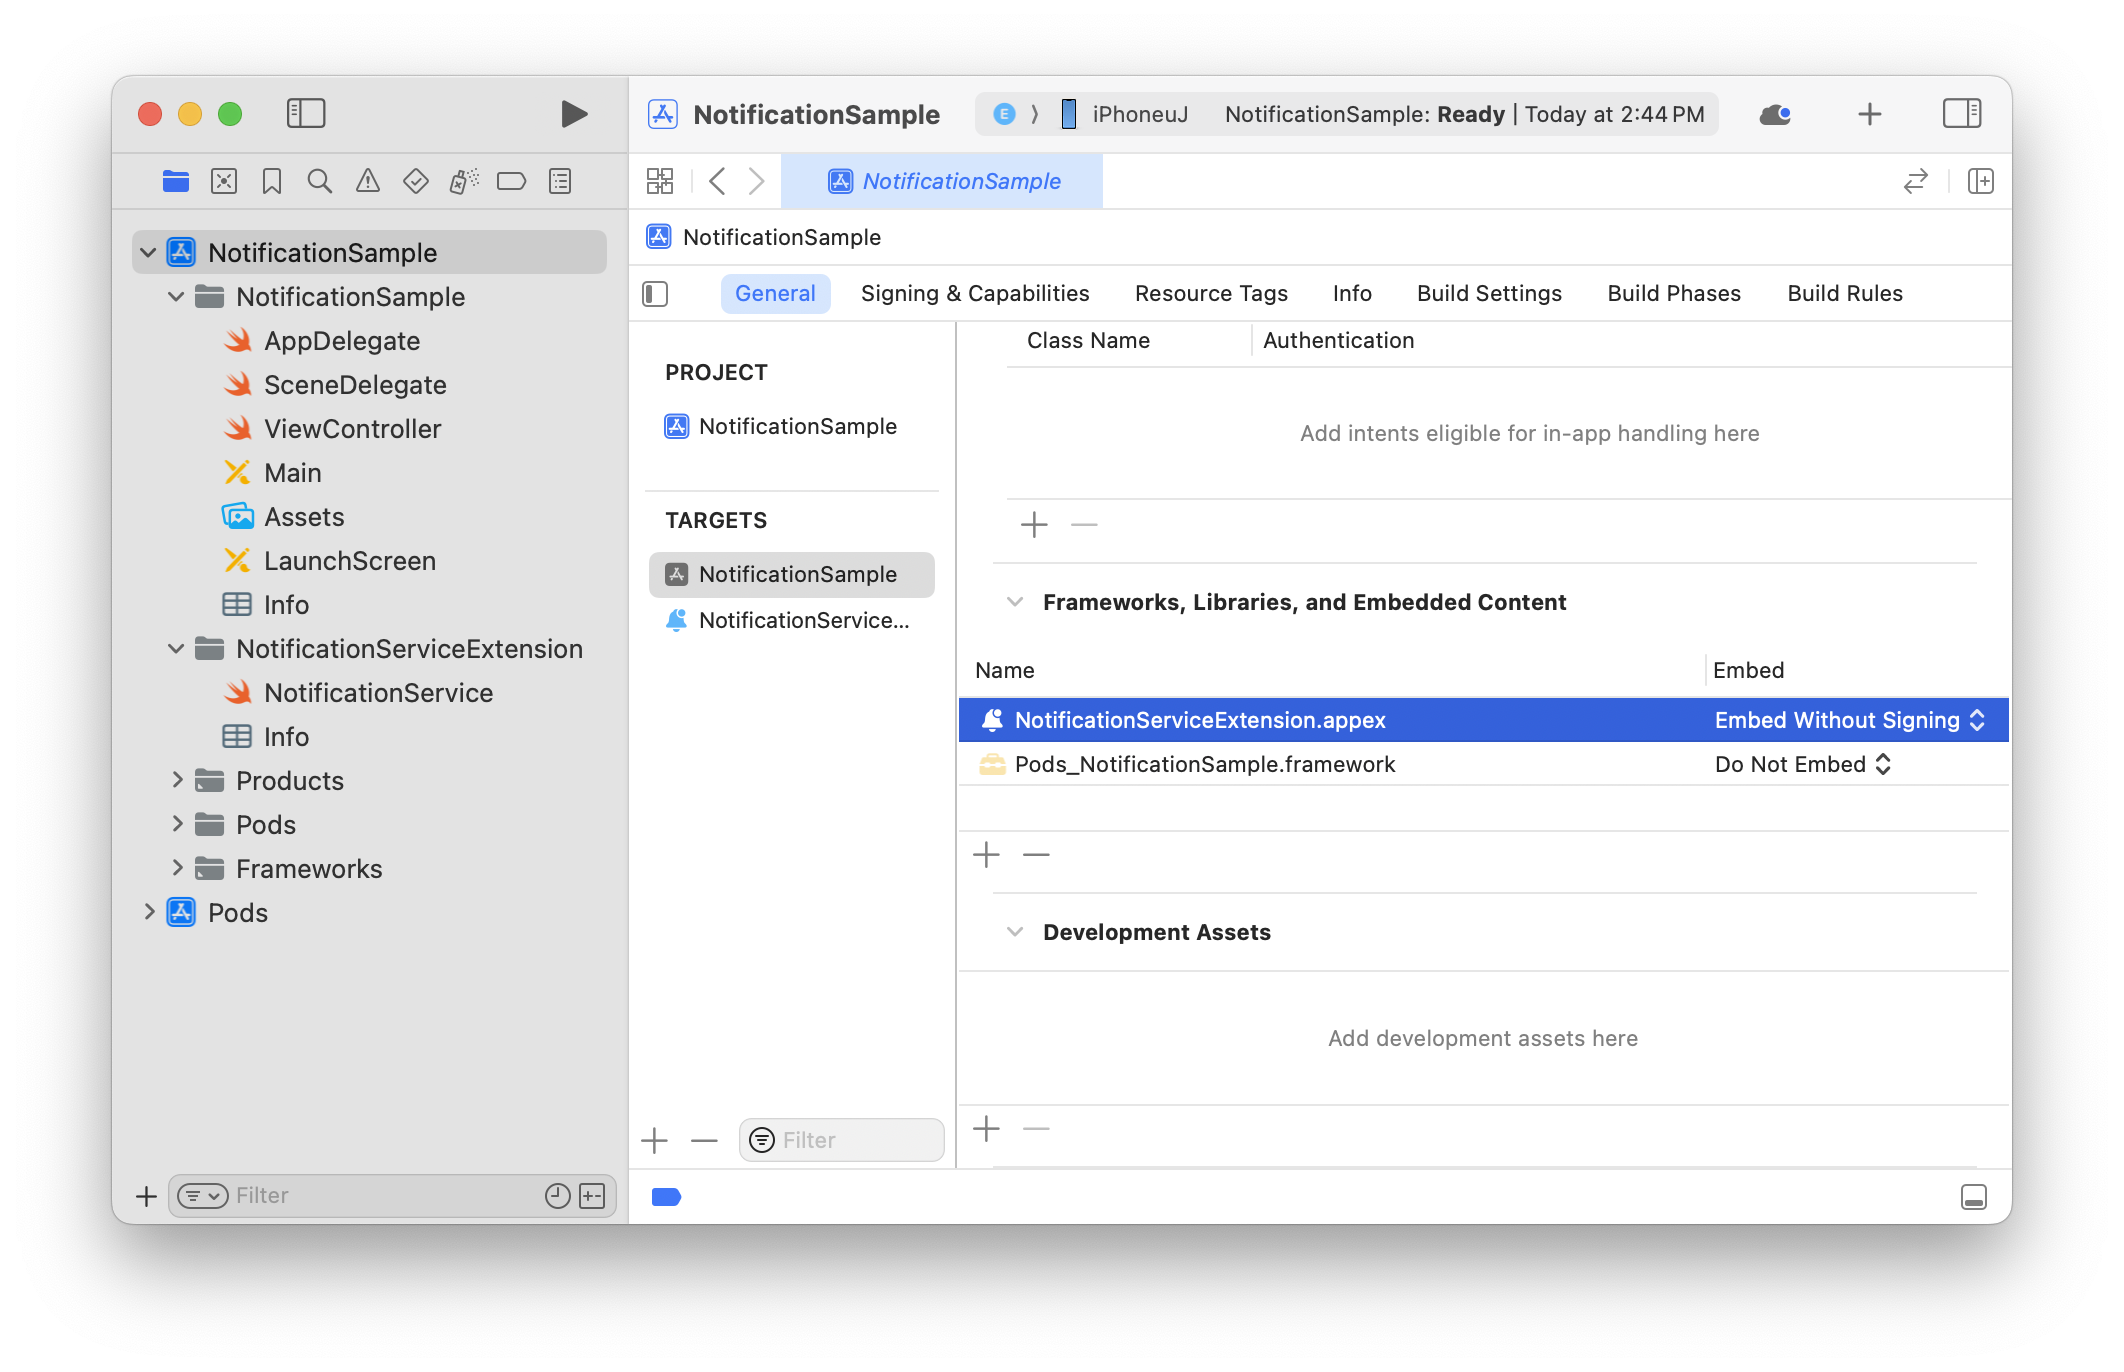
When you open NotificationSample (example project name).xcworkspace, you will see that the Pods project has been added as shown below. You can now import HIVEExtensions in both the NotificationSample and NotificationServiceExtension targets.
Applying the framework
Import the framework in the NotificationService.swift file as shown in the example. Implement the method provided in the template to call the methods provided by HIVEExtensions.framework and delete the original template code that was inside the method.
import HIVEExtensions

func didReceiveNotificationRequest(request: UNNotificationRequest, with contentHandler: (UNNotificationContent) -> Void) {
    HIVENotificationService.didReceive(request) { content in
        guard let content else { return }
        contentHandler(content)
    }
}

func serviceExtensionTimeWillExpire() {
    HIVENotificationService.serviceExtensionTimeWillExpire()
}
#import <HIVEExtensions/HIVEExtensions.h>

- (void)didReceiveNotificationRequest:(UNNotificationRequest *)request withContentHandler:(void (^)(UNNotificationContent * _Nonnull))contentHandler {
[HIVENotificationService didReceiveNotificationRequest:request withContentHandler:contentHandler];
}

- (void)serviceExtensionTimeWillExpire {
[HIVENotificationService serviceExtensionTimeWillExpire];
}
Precautions for application
Difference in sending and receiving time
After all tasks in the Extension are completed, the Notification is delivered to the user, which may result in a difference between the sending time and the receiving time, and the client will display the time based on when the server sent it.
For example, if a Notification is sent at 15:00 and the download is completed at 15:05, the Notification will be displayed as having arrived at 15:00.
Device capacity
The media received through push Notifications is stored on the user's device and then exposed through the push, and the received media is stored in the device's internal cache data space, occupying the internal capacity of the user's device. The cache data space is automatically cleared by the OS if the internal storage capacity of the user's device is insufficient.
User's mobile data usage
The media received through push Notifications will use the user's mobile data for downloading, and the download will proceed without the user's consent, which may incur data usage costs during the download.
In cases where audio/video files are delivered via push, check the user's network connection status before downloading. If the user is not connected to Wi-Fi, do not proceed with the download and instead display a push Notification without media.
At this time, the type of media received through the push is confirmed by the extension specified at the end of the media URL, and only the extensions specified in the [File Size and Type Limit] section will be displayed correctly.
| Received URL | wifi | LTE / 3G |
| http://xxx/notimovie.mp4 | Media is always exposed after download | Since it has the extension corresponding to a video file (mp4), it is exposed without media download |
| http://xxx/notimovie | Media is always exposed after download | It is not an audio/media file, so media is exposed after download |
| http://xxx/notisound.wav | Media is always exposed after download | Since it has the extension corresponding to an audio file (wav), it is exposed without media download |
| http://xxx/notiimage.jpg | Media is always exposed after download | It is not an audio/media file, so media is exposed after download |
App transport security settings
Apple's default policy allows server communication performed by all apps to use https, and the URLs received through Notifications are also affected by this policy. If you want to communicate using an Http domain, you need to set up an App Transport Security (ATS) exception.
Even if your game app has ATS exception handling, you must set up the ATS exception in the Extension to use http domains for the URLs transmitted via push Notifications. 
When media is not delivered in Unity
Hub connection error Error Domain=NSCocoaErrorDomain Code=4097 "connection to service named com.com2us.hivesdk.normal.freefull.apple.global.ios.universal.NotificationServiceExtension" UserInfo={NSDebugDescription=connection to service named com.com2us.hivesdk.normal.freefull.apple.global.ios.universal.NotificationServiceExtension}
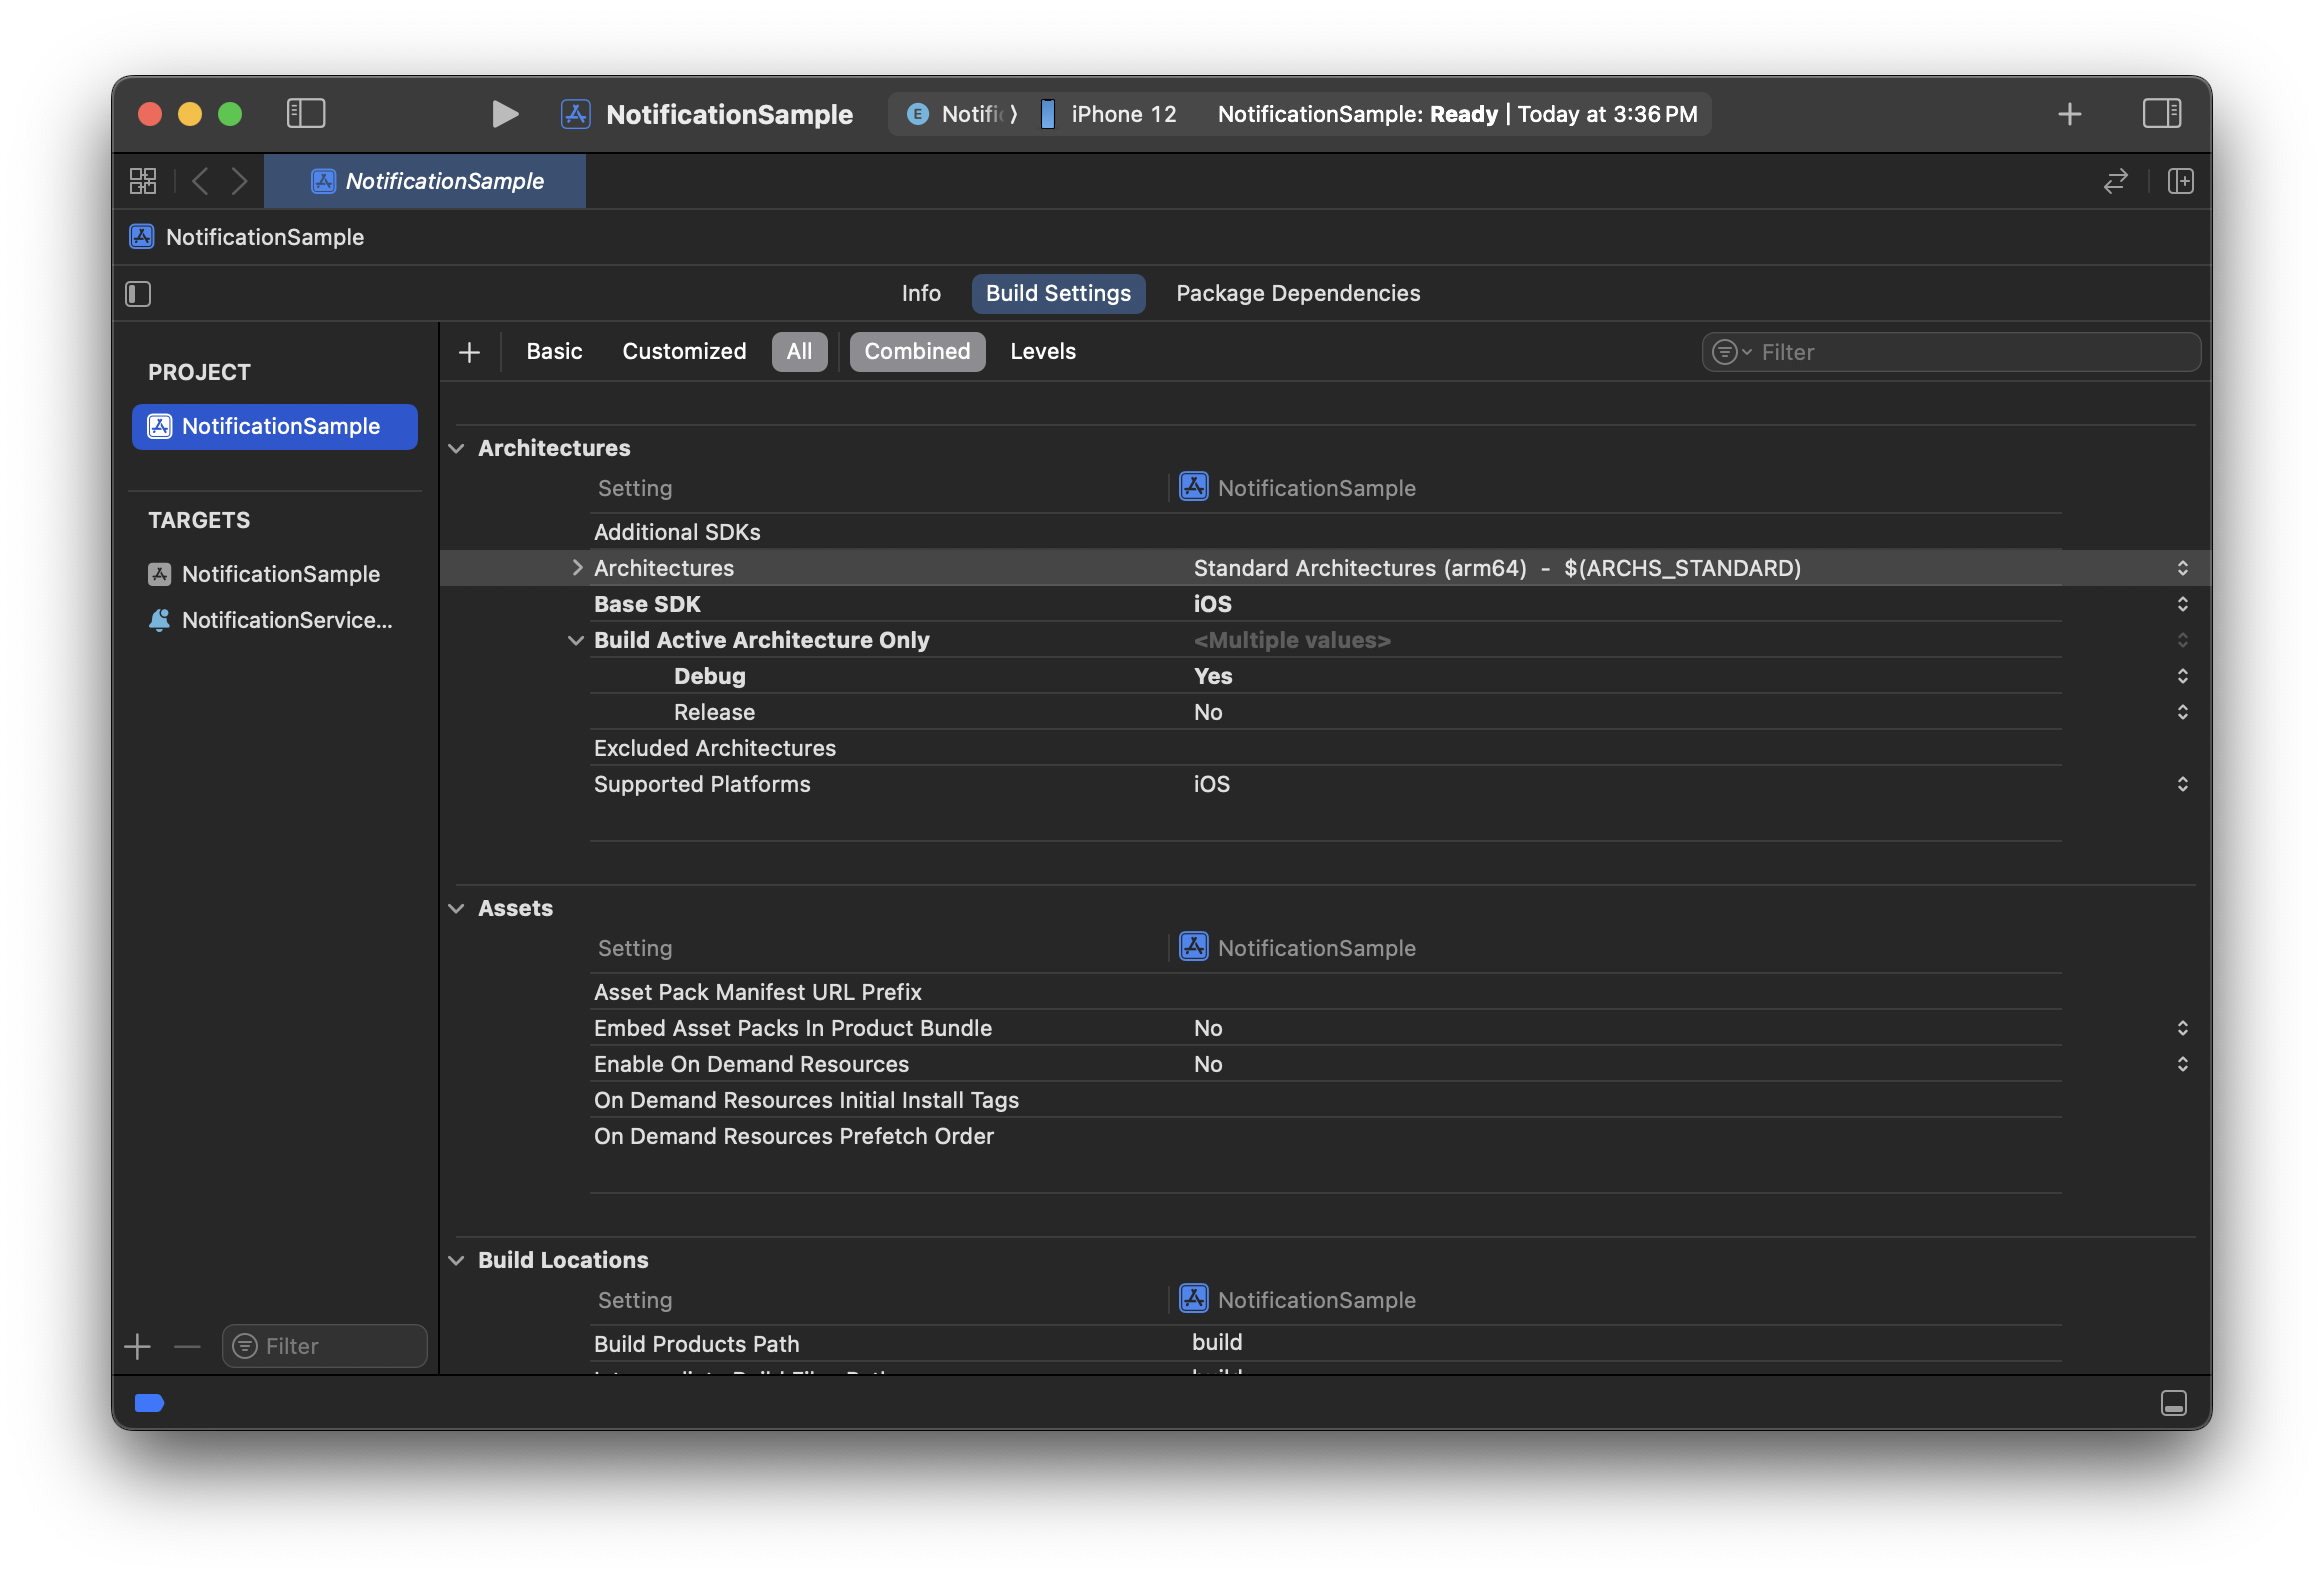
In Unity, there may be cases where media is not delivered while displaying error logs like the one above. In this case, please check whether both armv7 and arm64 values are included in the Architectures of the created Extension Target. 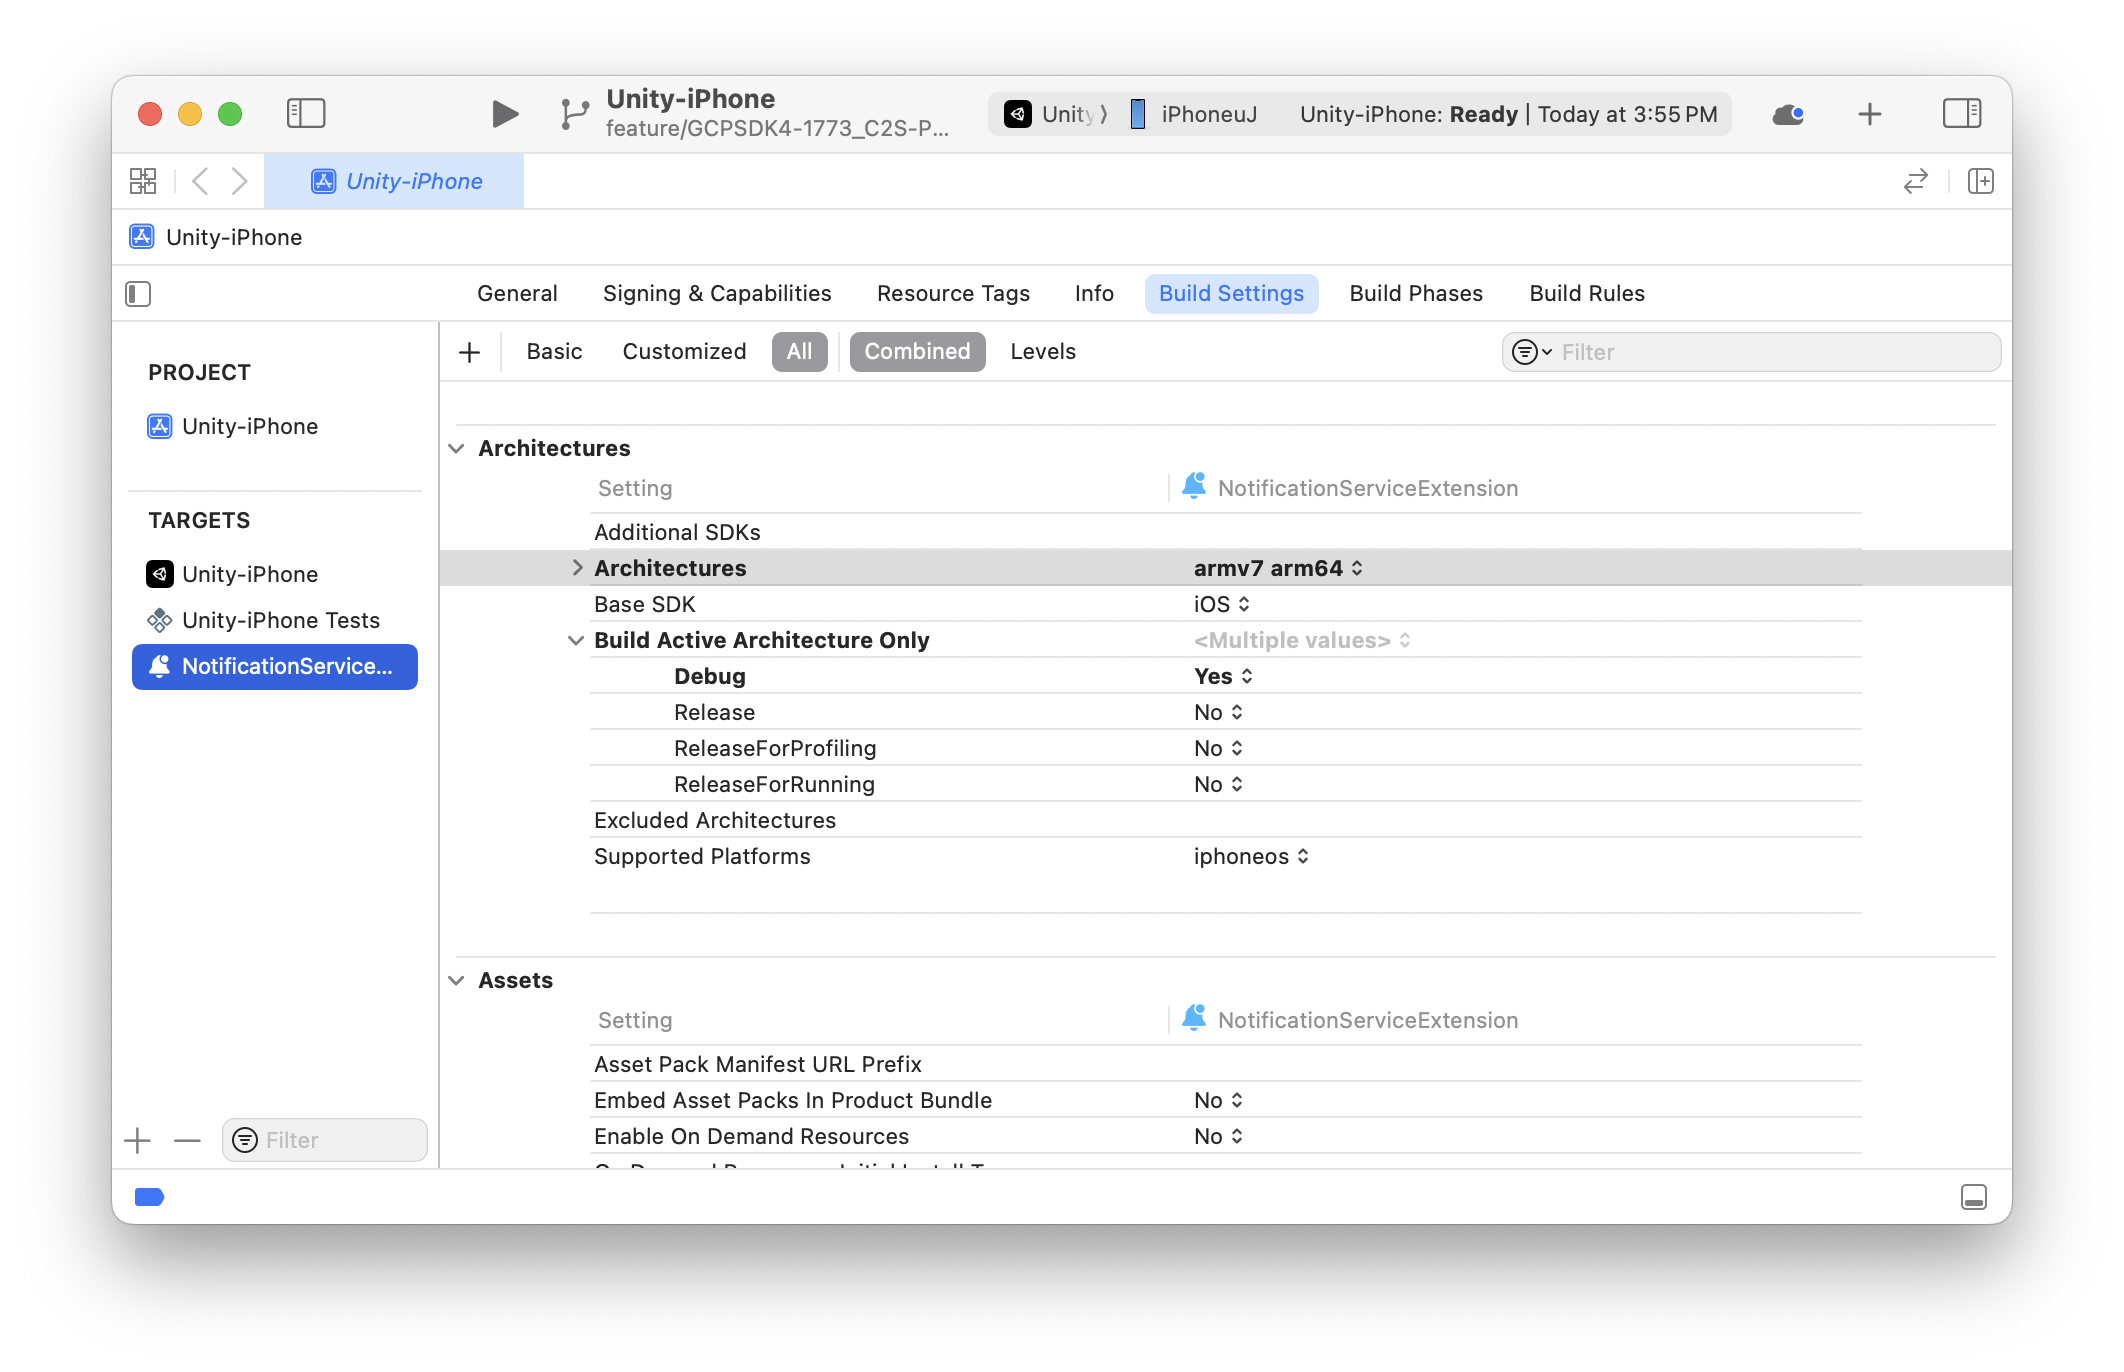
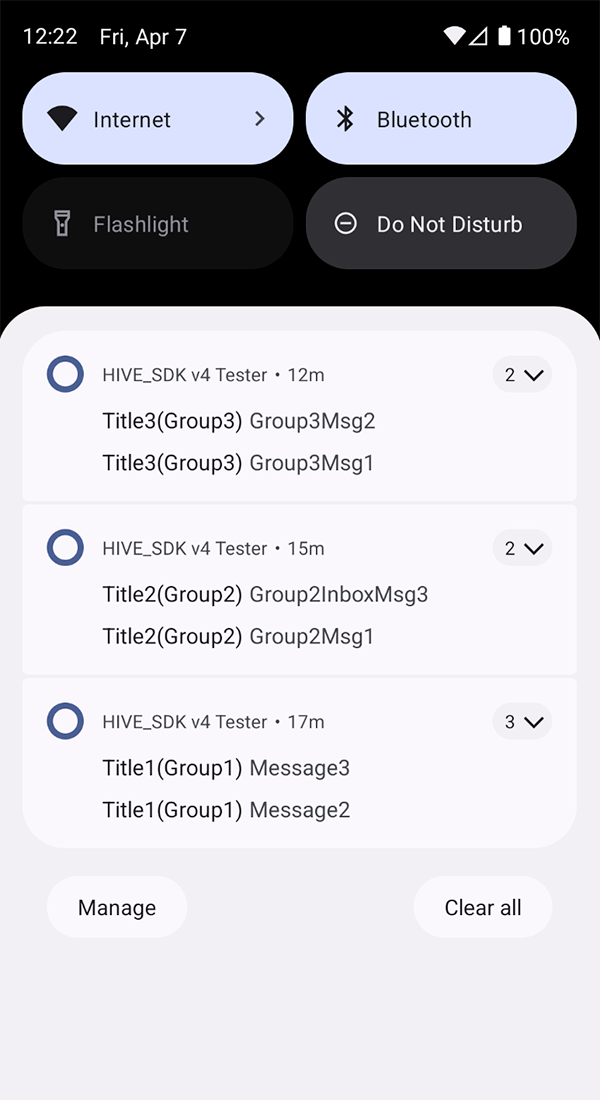
Push action buttons
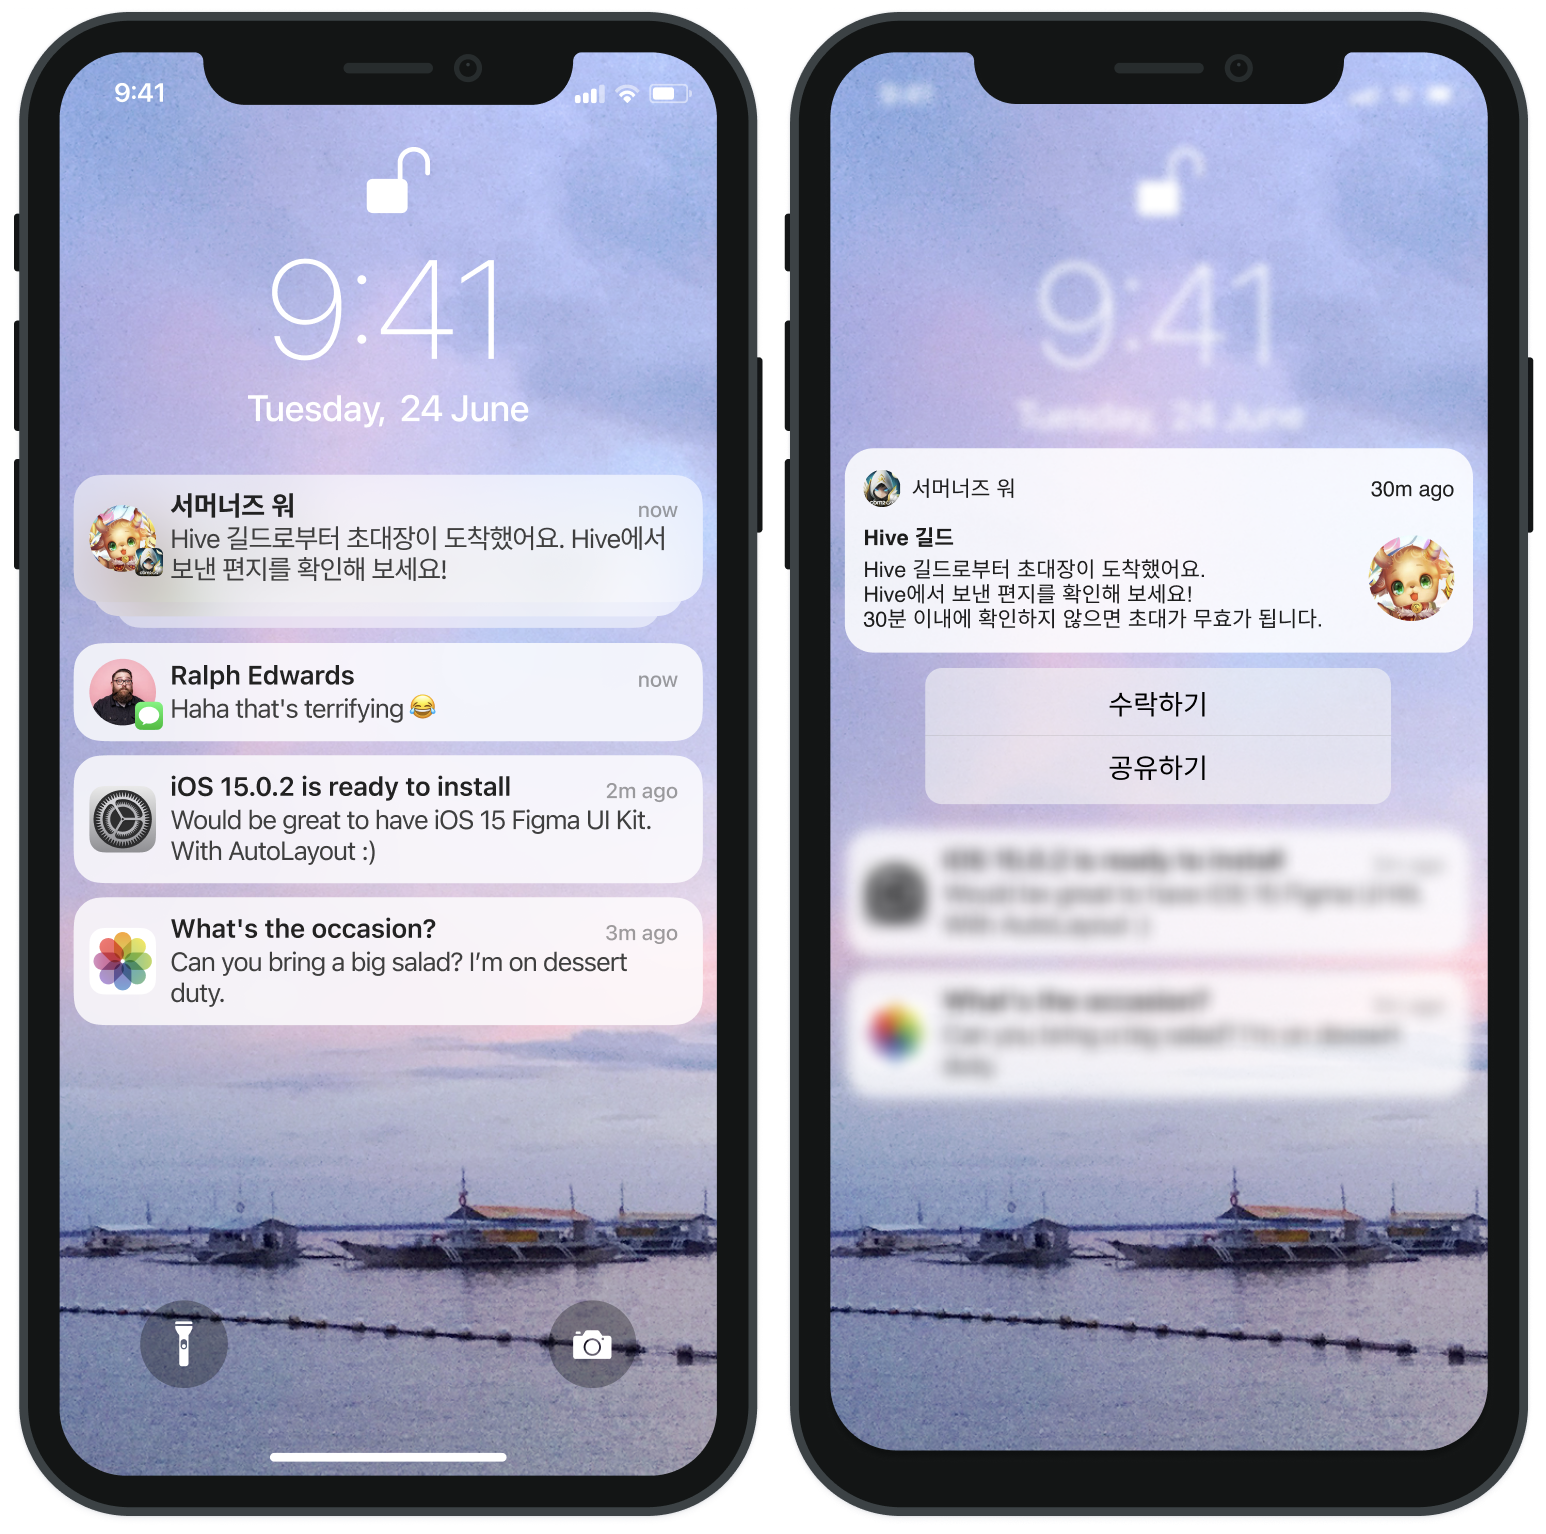
Push action buttons are system buttons that appear when you long-press a push notification, as shown below. By exposing these additional buttons in push notifications, you can encourage user interaction.
With the Hive SDK, you can easily implement push action buttons with simple configuration.
| Android | iOS |
|---|---|
 |  |
Note
No additional setup is required for push action buttons in Hive SDK Android. Refer to the Single Push API - ActionPayload Guide for details on using action button features. In Hive SDK iOS, you can implement push action buttons using either the basic or advanced implementation methods.
Warning
When using push action buttons together with iOS Media Notification in Hive SDK iOS, the media Notification feature may not work properly. When sending a push, use only one feature at a time—either 'media URL' or 'action push'. If both are used simultaneously, only the media thumbnail will be shown on receipt, and the expanded viewer will not appear when long-pressed.
Warning
To use iOS push actions in Unreal Engine, you must build the iOS app using Modern Build, which is provided starting from Unreal Engine 5.3.2 (tested in Unreal Engine 5.6.0 / Xcode 16.1 / macOS 15.5).
Basic implementation (iOS)
The Hive SDK provides a default set of push action buttons based on frequently used patterns, such as 'Confirm', 'Decline', etc. These built-in button combinations can be quickly applied, and you can also define and extend custom action button sets as needed. The default push action button sets are listed below.
- Confirm
- Close
- Confirm, Close
- Execute, Cancel
- Accept All, Close
- Claim Now, Close
- Purchase, Decline
- Sell, Decline
- Accept, Reject, Hold
| Category~(Category Identifier)~ | Button Name~(Action Identifier)~ |
|---|---|
| Confirm(INFO_CATEGORY) | Confirm(CONFIRM_ID) |
| Close(CLOSE_CATEGORY) | Close(CLOSE_ID) |
| Confirm Selection(CONFIRM_CATEGORY) | Confirm(CONFIRM_ID), Close(CLOSE_ID) |
| Execute(EXECUTE_CATEGORY) | Execute(EXECUTE_ID), Cancel(CANCEL_ID) |
| Batch Accept(ACCEPT_ALL_CATEGORY) | Accept All(ACCEPT_ALL_ID), Close(CLOSE_ID) |
| Immediate Claim(ACCEPT_NOW_CATEGORY) | Claim Now(ACCEPT_NOW_ID), Close(CLOSE_ID) |
| Purchase Decision(PURCHASE_CATEGORY) | Purchase(PURCHASE_ID), Decline(DECLINE_ID) |
| Sale Request(SALE_CATEGORY) | Sell(SALE_ID), Decline(DECLINE_ID) |
| Decision(ACCEPT_DECISION_CATEGORY) | Accept(ACCEPT_ID), Reject(REJECT_ID), Hold(HOLDING_ID) |
No additional code is required to apply these push action button sets, but you must add a Notification Content Extension target to your project. Refer to the 'Push Action Button Set Application Guide' below for your development environment to add the target and activate push action buttons.
Apply a push action button set in Unity
In the Unity editor, the Hive SDK automatically performs a series of processes, such as adding targets and writing Info.plist, through the PostProcess feature. You only need to check whether to use push action buttons; no other work is required.
- In the top menu bar of the Unity editor, go to Hive > Build project post process settings > iOS.
- Enable Push Action Buttons.
The list shown when the button is enabled is a preview of the categories field list in the hive_push_actions.json file used in Advanced implementation method below. If you proceed with the default implementation without that file, it is displayed as 'none'.
Apply a push action button set in environments other than Unity
Before you begin, please check the following items first.
- To use the push extension target, make sure the provisioning profile includes the
aps-environmententitlement. If necessary, reissue the provisioning profile and certificate. - If you directly added the target in the Xcode GUI, the default minimum deployment target version for the extension target may be set to the latest OS. Make sure this value does not exceed the minimum deployment target version of the main game app target.
Next, after generating the Xcode project (.xcodeproj), proceed in the following order.
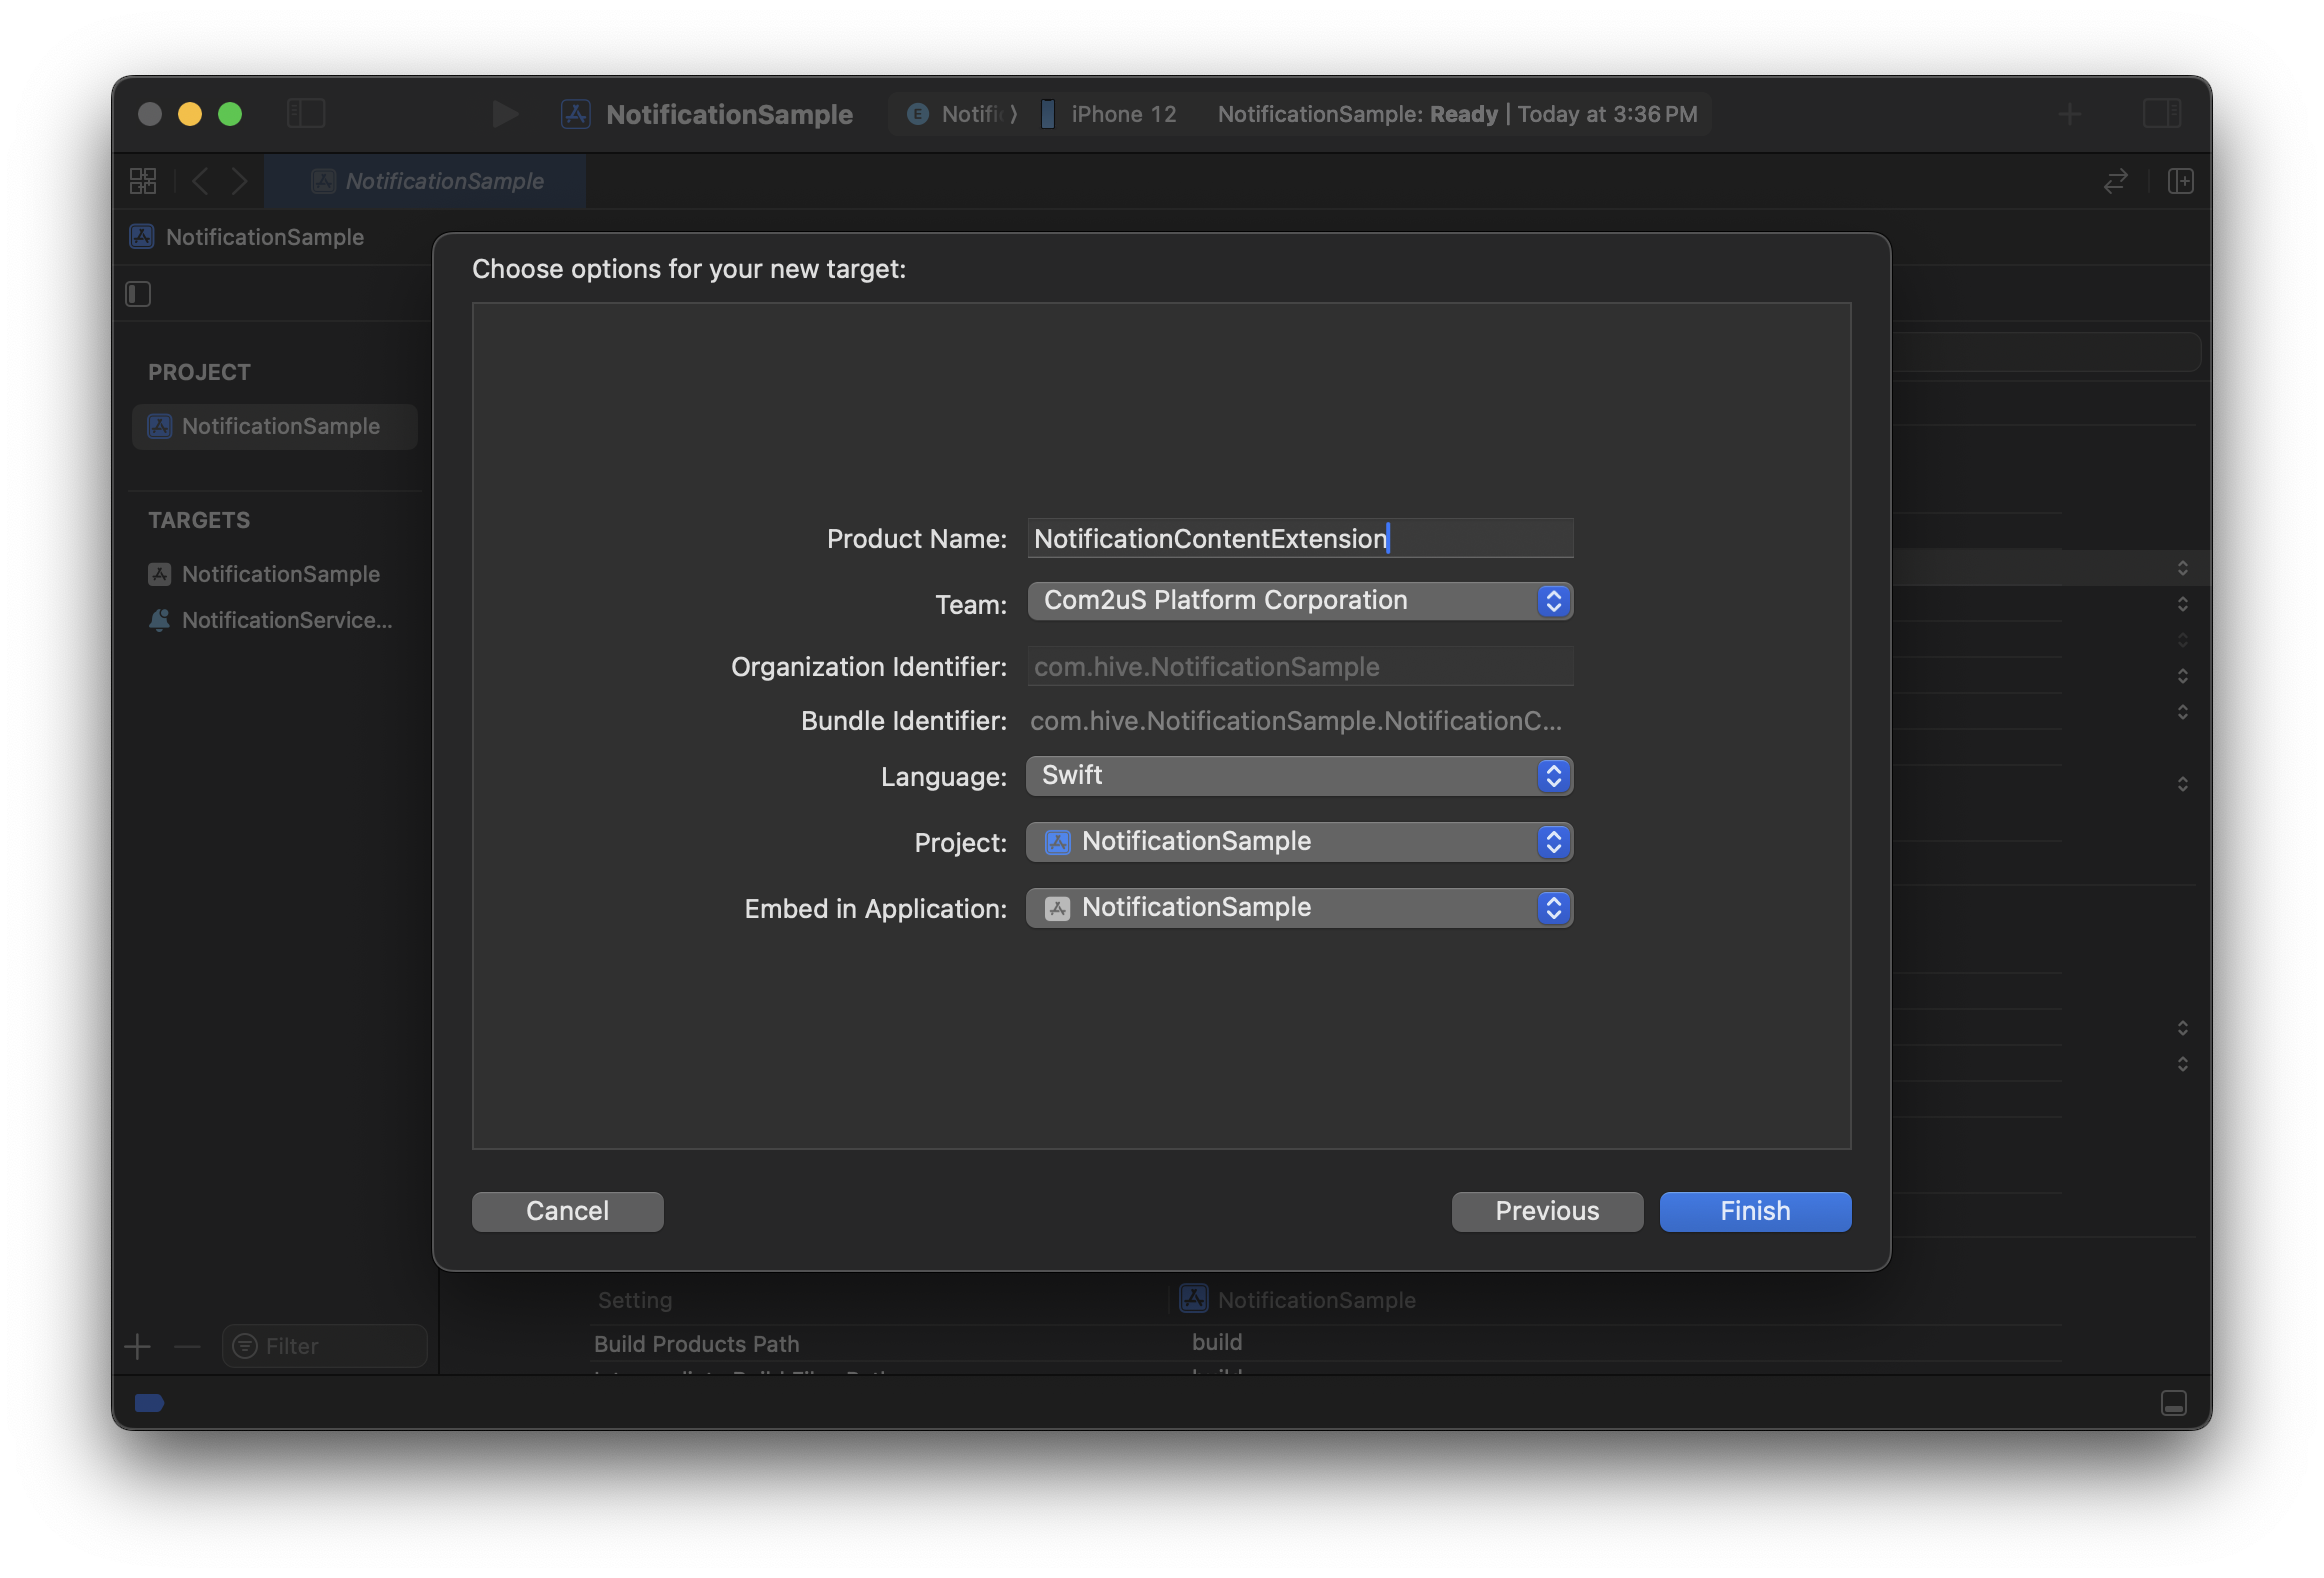
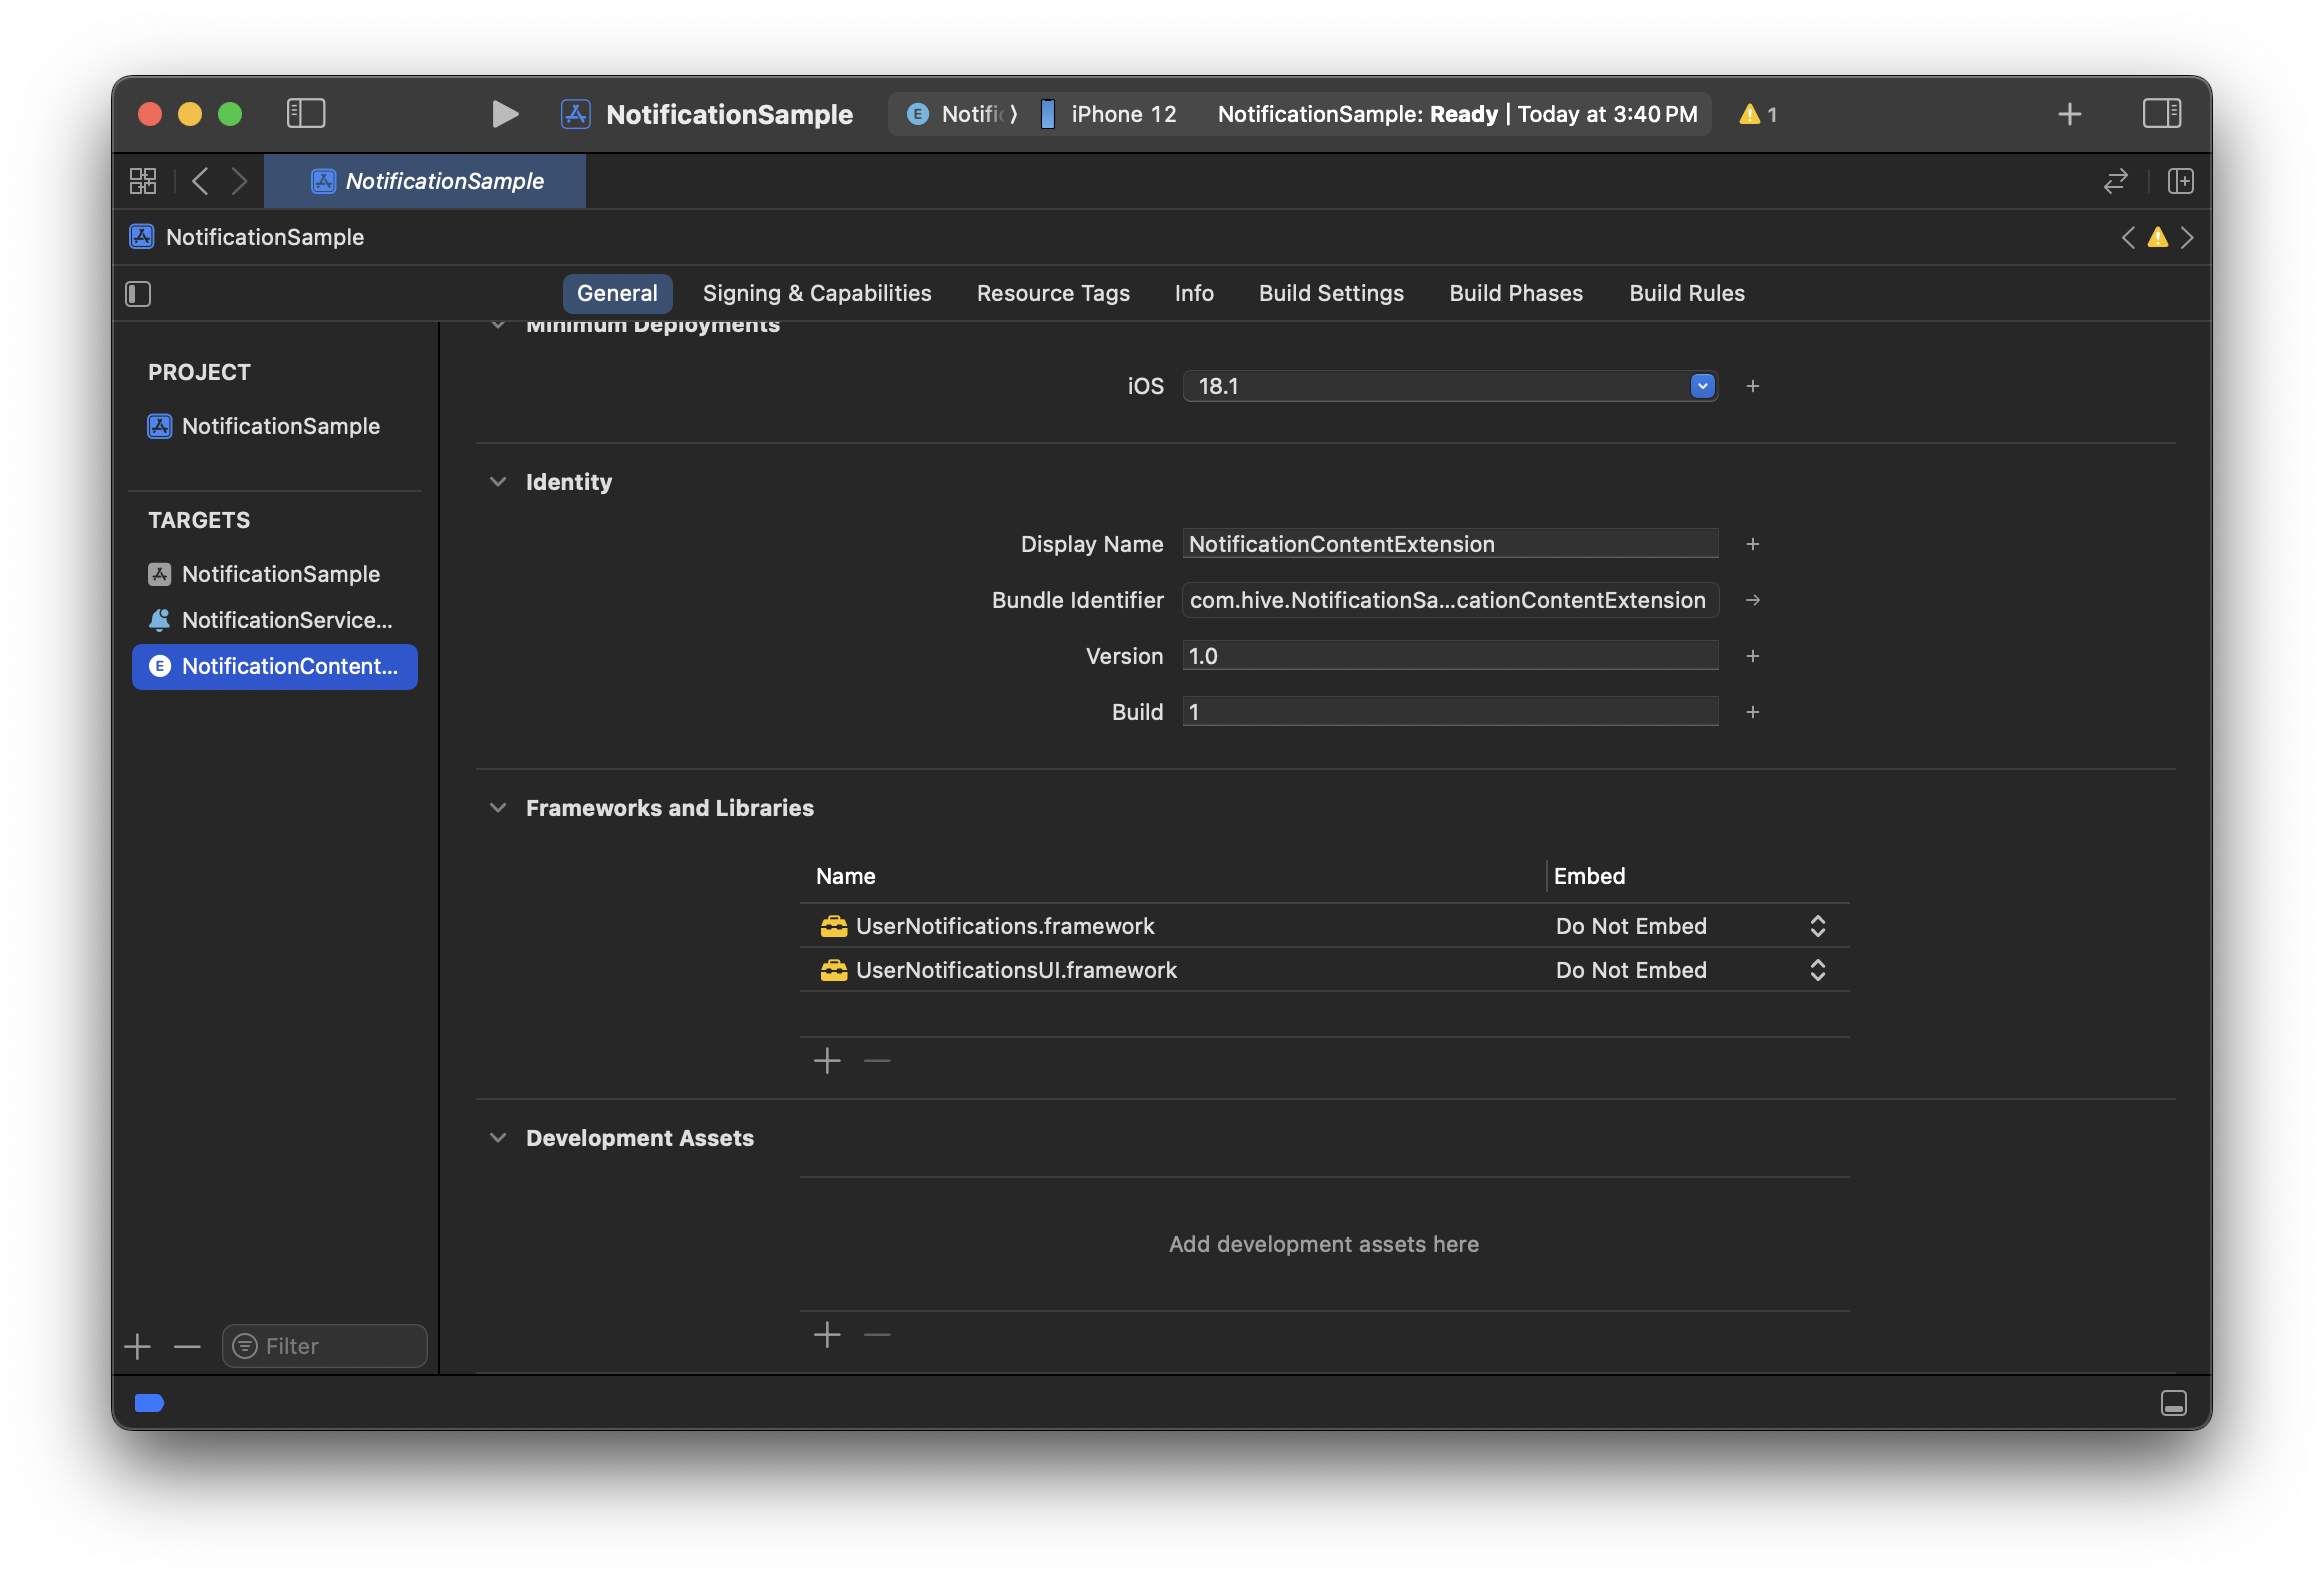
Step 1. Add a push extension target
Create a new extension target in the following order and connect it to the app target.
- In Xcode project settings, press the + button at the bottom left to add a target.
- Select Notification Content Extension, then click Next.
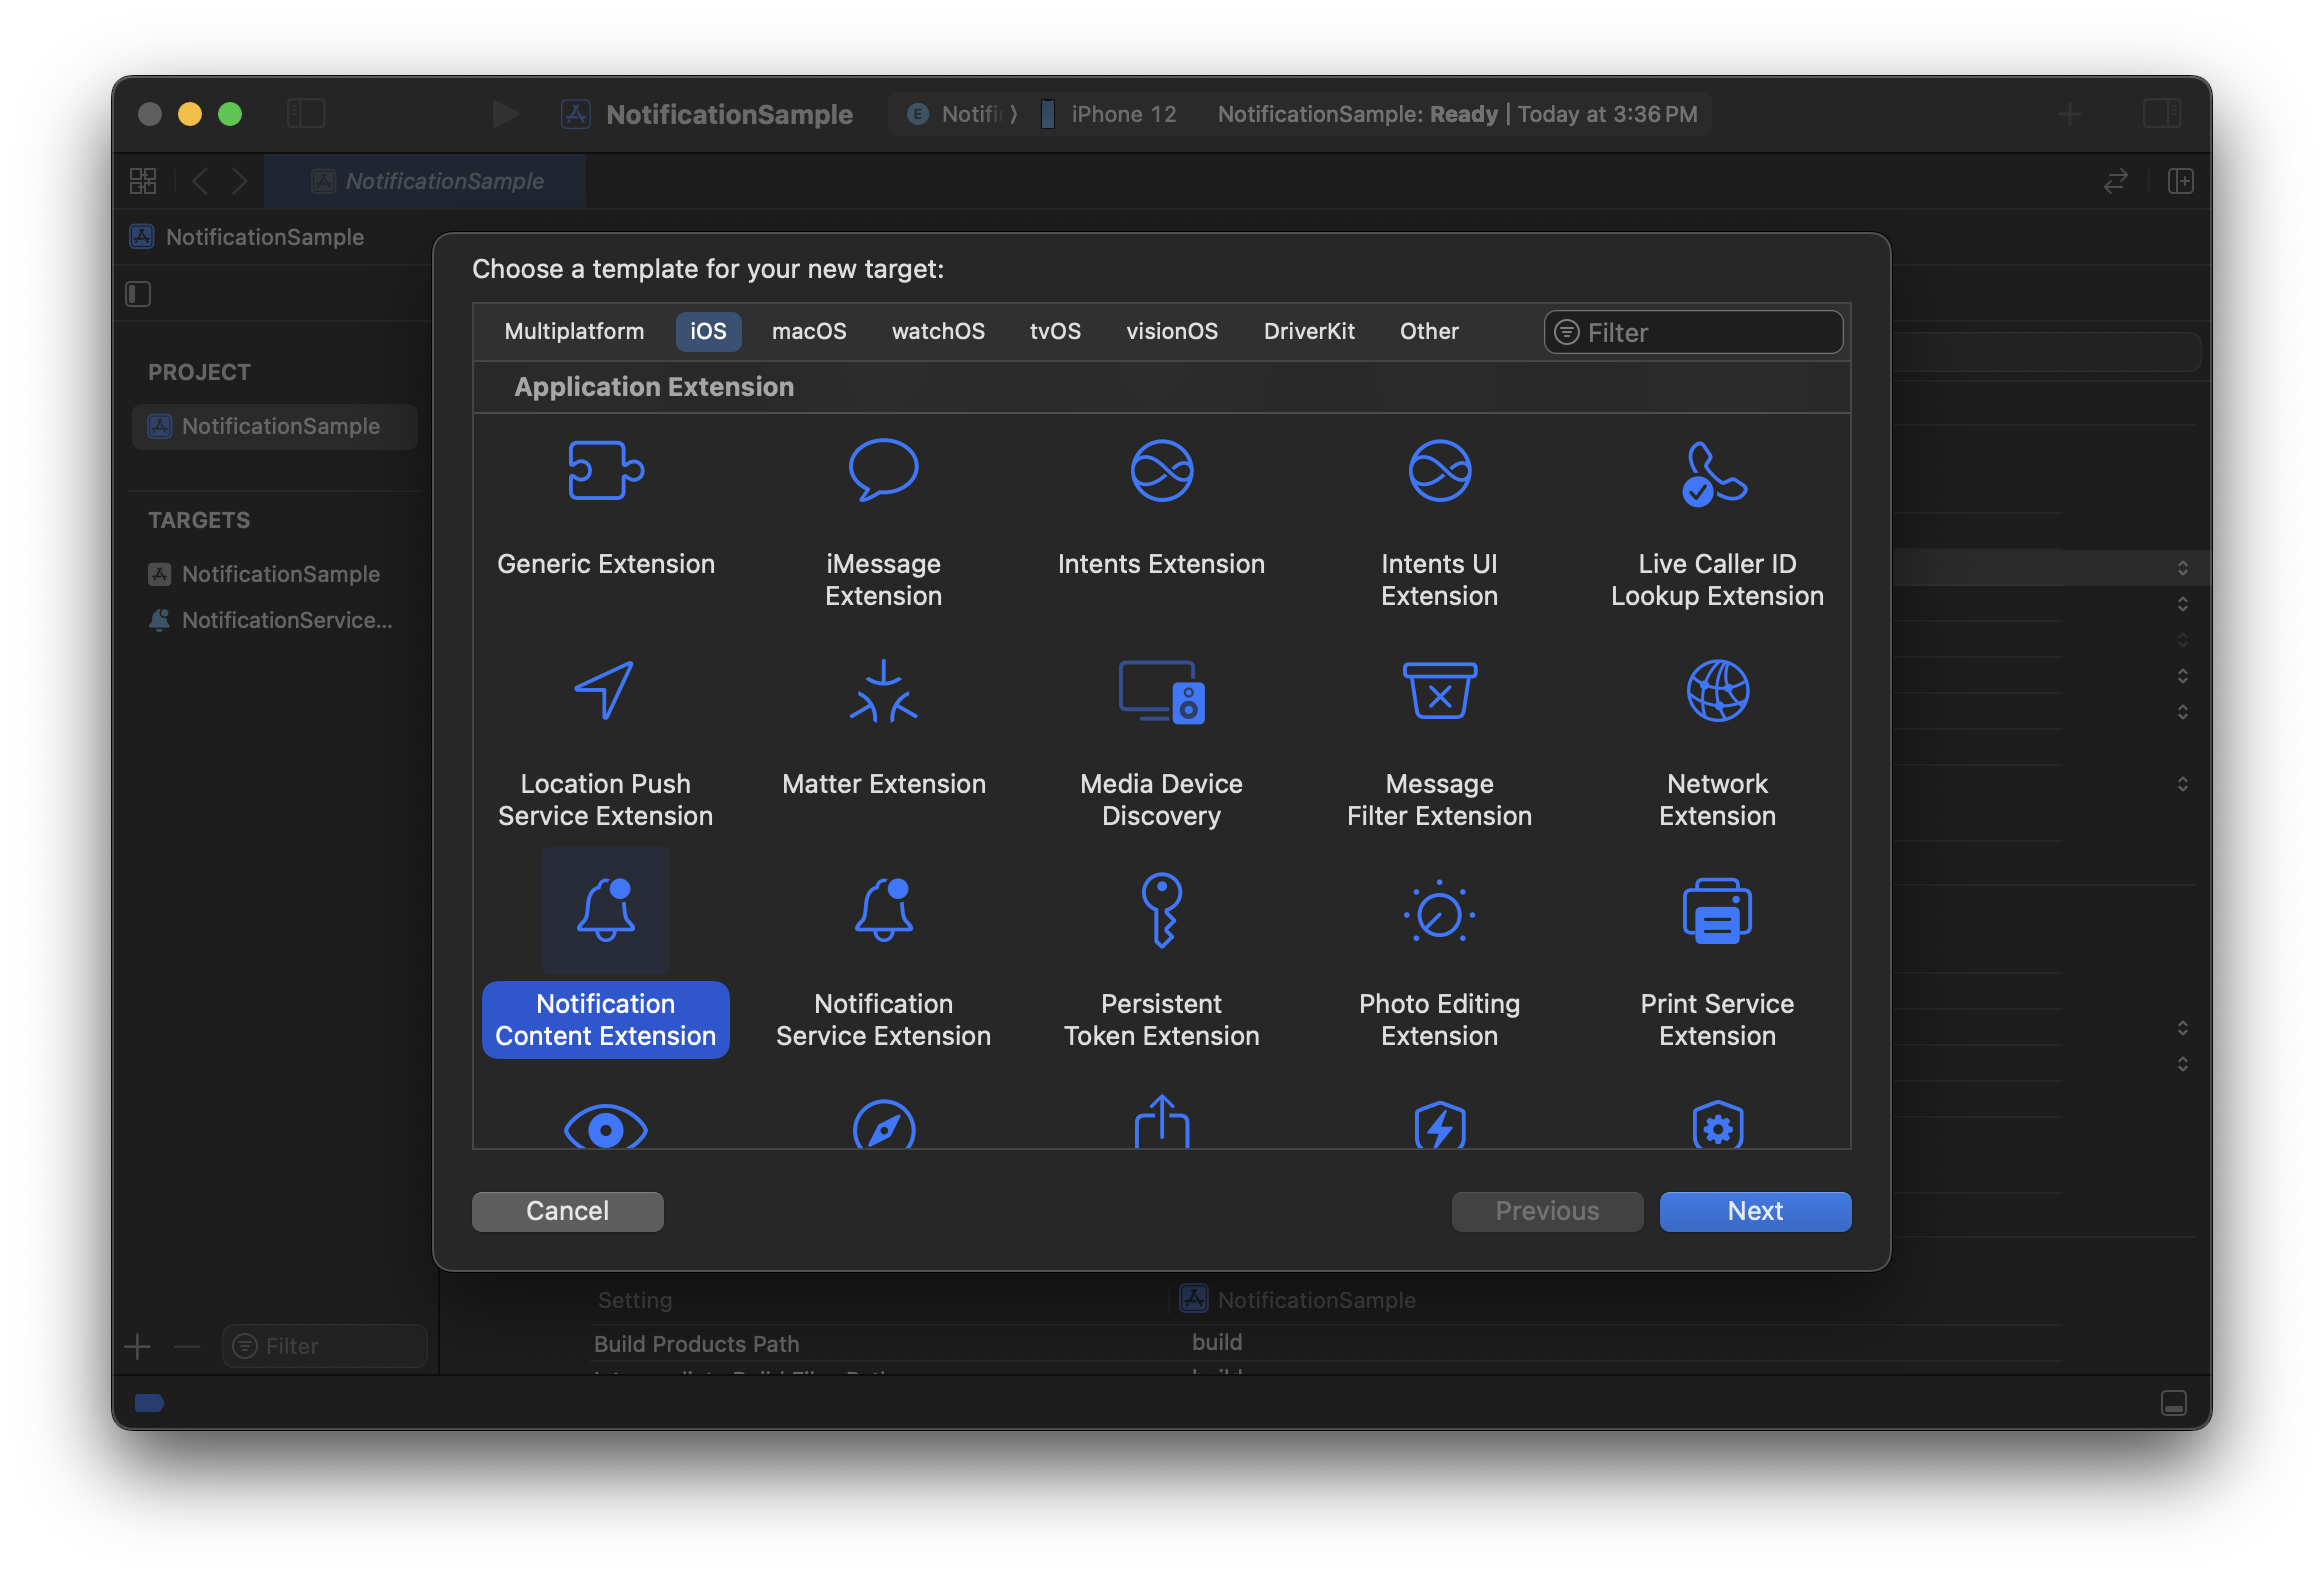
- Enter Product Name, and assign the main game app target to Embed in Application.
- If the following pop-up appears, click Activate. The Extension is automatically embedded in the current project, and a scheme for building is added.
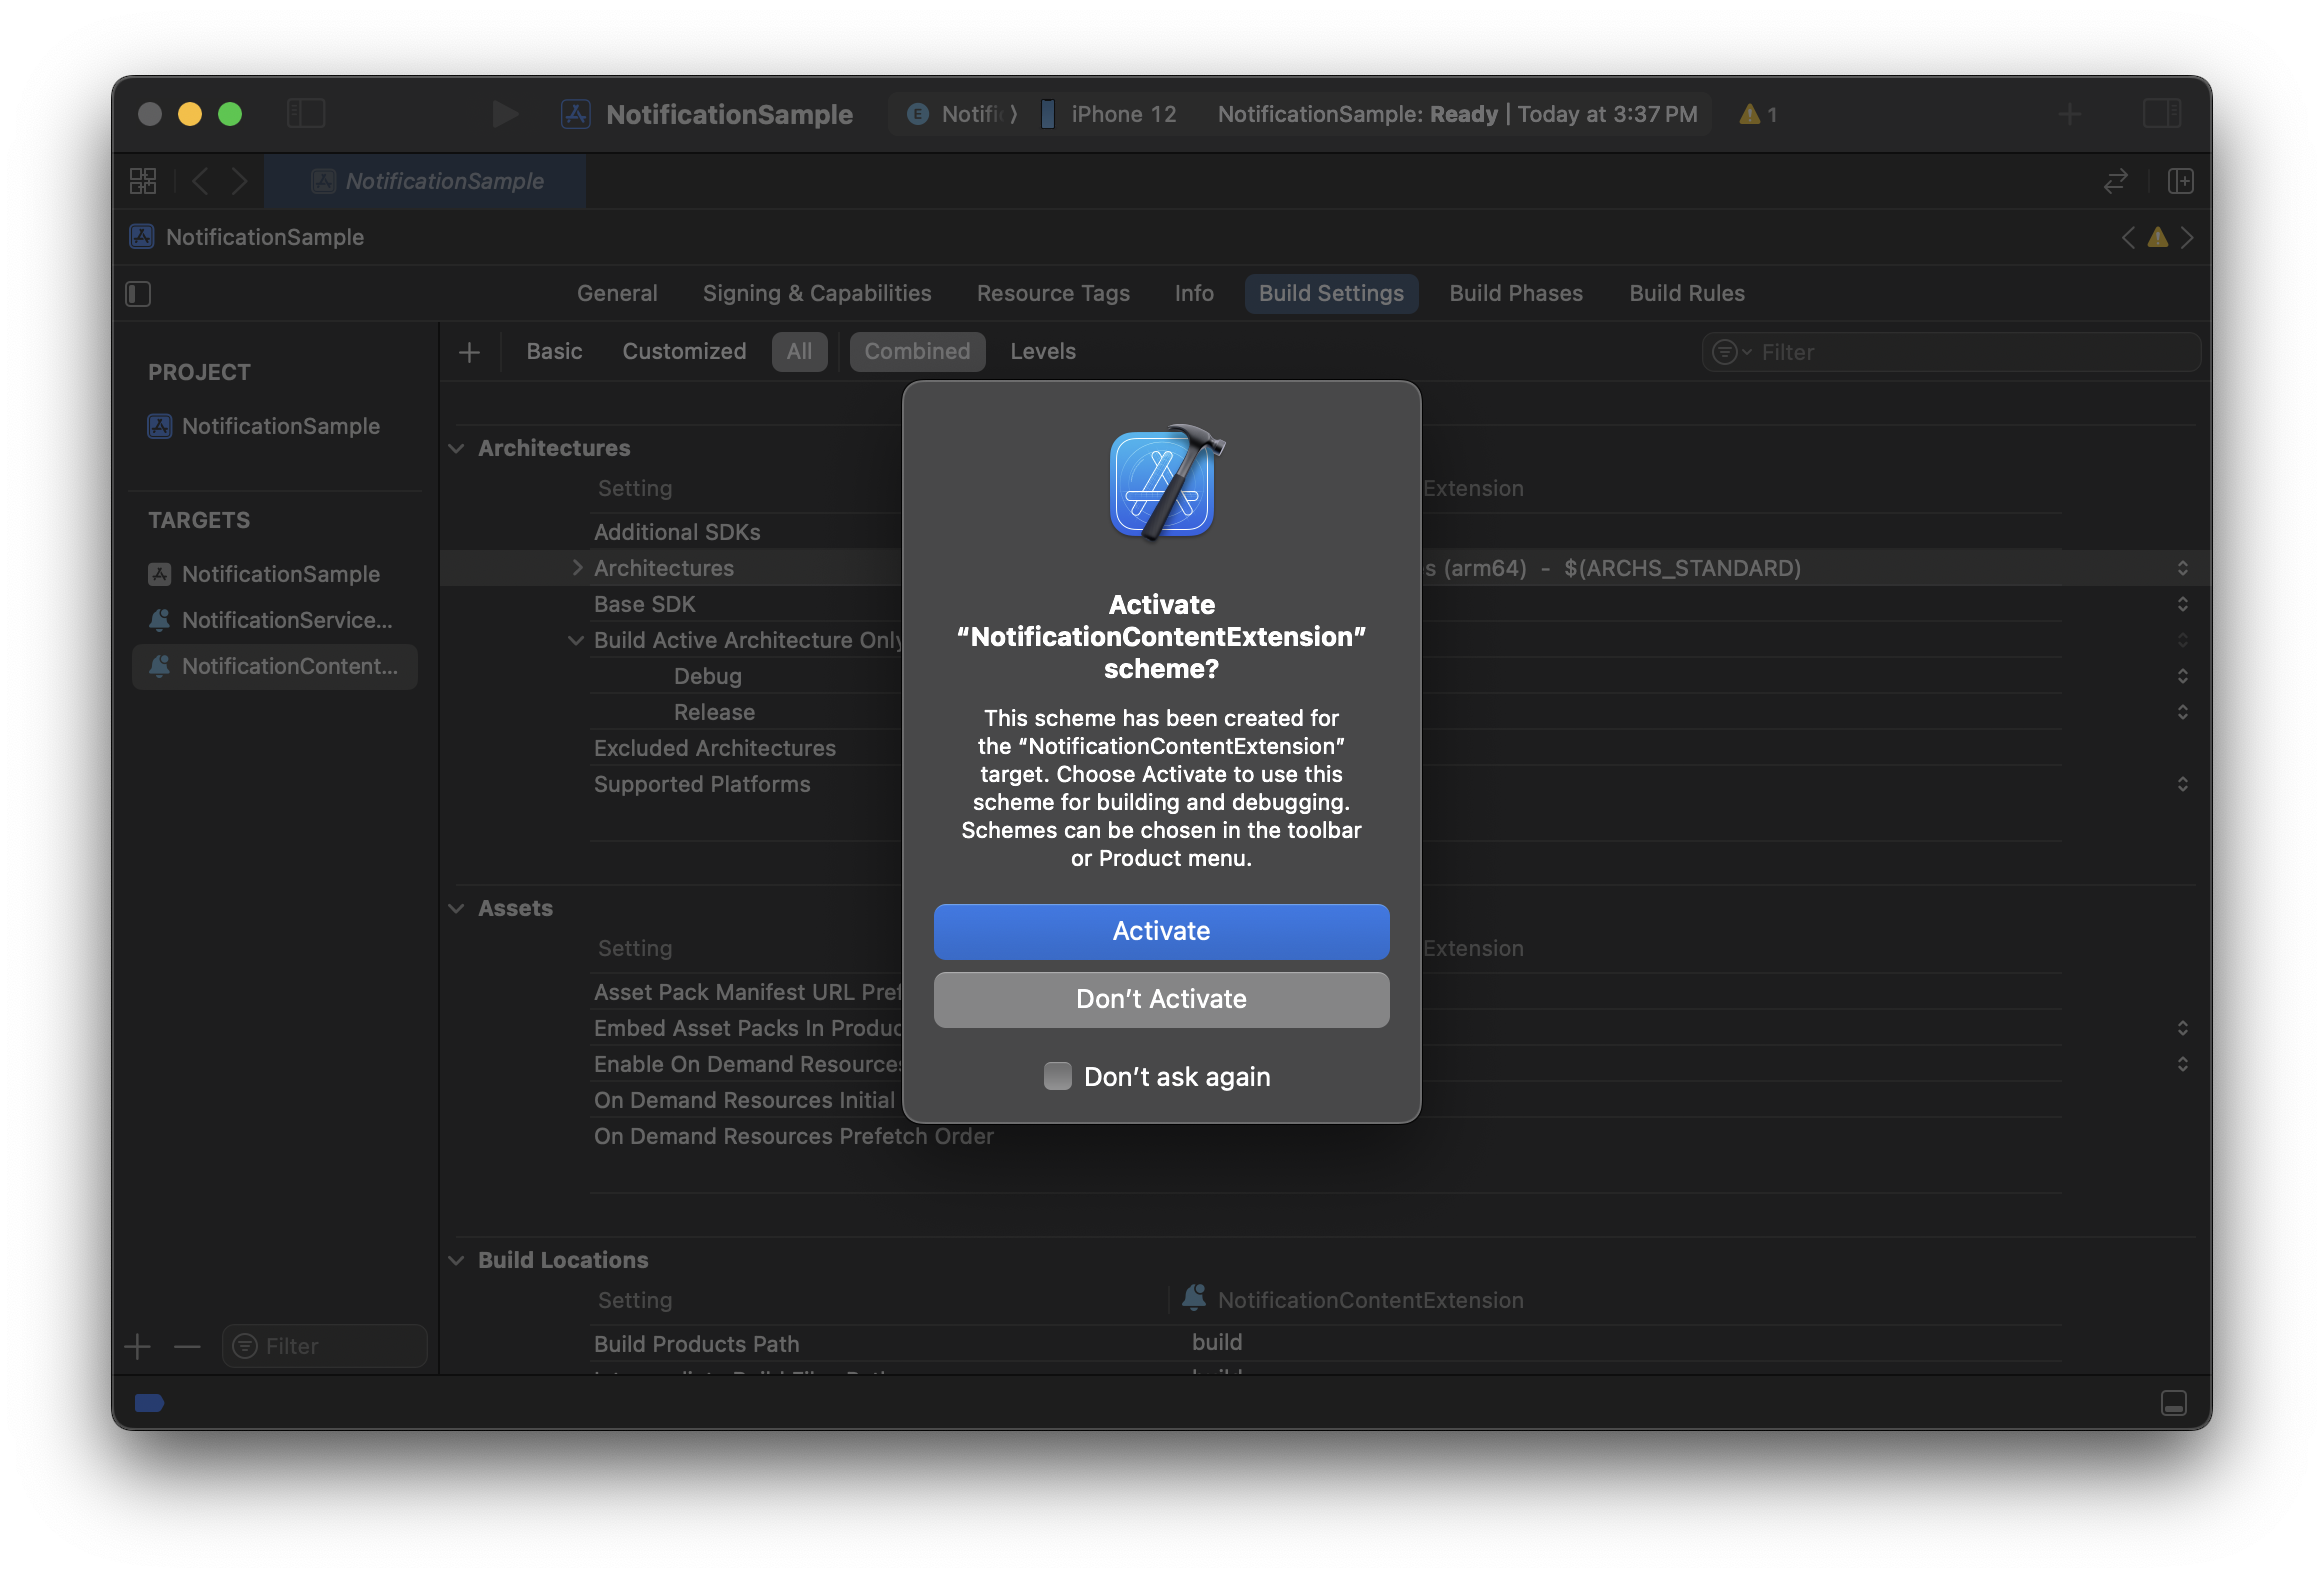
- In the main game app target's General > Frameworks, Libraries, and Embedded Content, confirm that the Product Name entered above has been added.

Step 2. Customize auto-generated files
For each of the following three files automatically generated in the Product Name group, perform the corresponding task below.
Remove MainInterface.storyboard
Remove Product Name/MainInterface.storyboard.
Modify NotificationViewController.swift
Modify Product Name/NotificationViewController.swift.
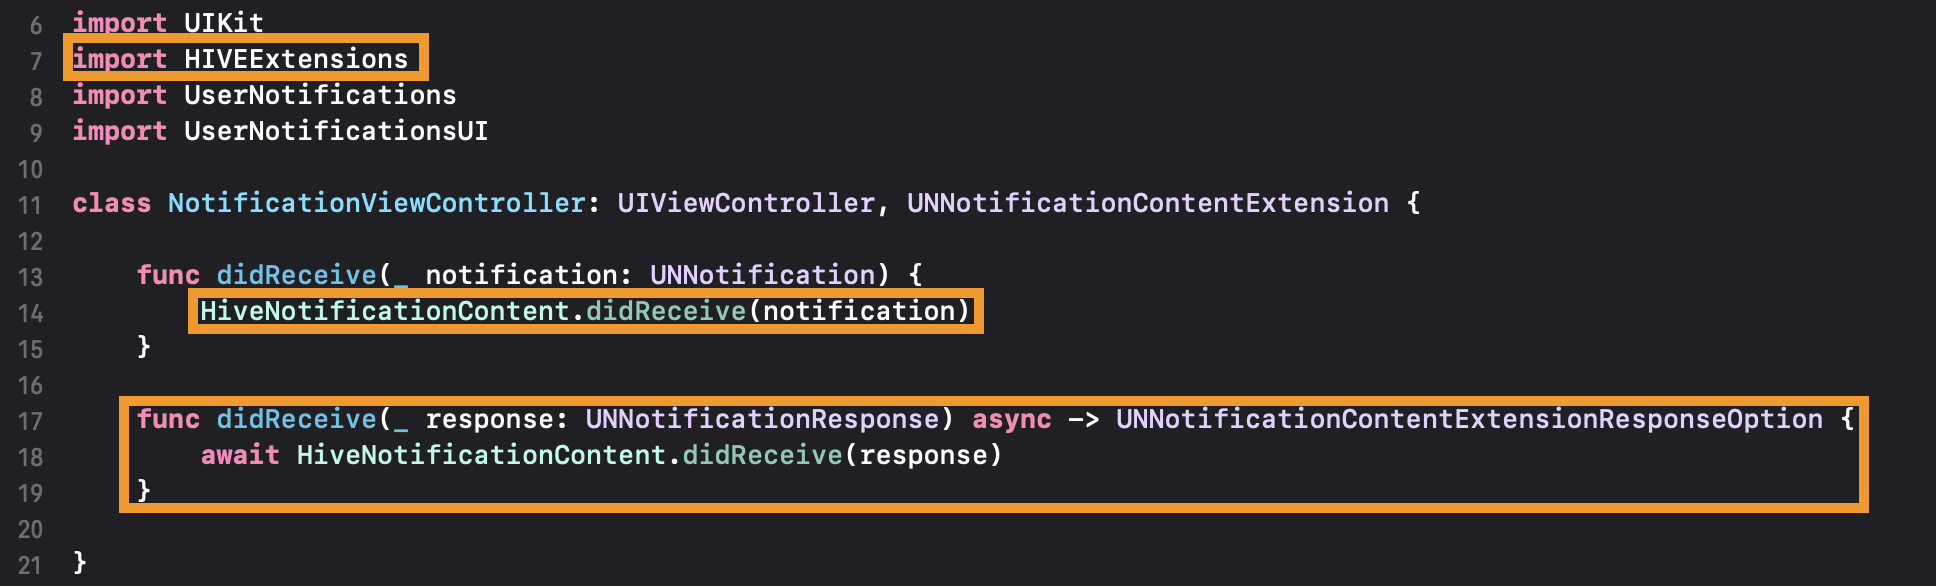
As shown above, modify the body of the auto-generated template class file as follows. You can copy and use the code block below, or add the lines highlighted in orange in the image.
import UIKit
import HIVEExtensions
import UserNotifications
import UserNotificationsUI

class NotificationViewController: UIViewController, UNNotificationContentExtension {

    func didReceive(_ notification: UNNotification) {
        HiveNotificationContent.didReceive(notification)
    }

    func didReceive(_ response: UNNotificationResponse) async -> UNNotificationContentExtensionResponseOption {
        await HiveNotificationContent.didReceive(response)
    }

}

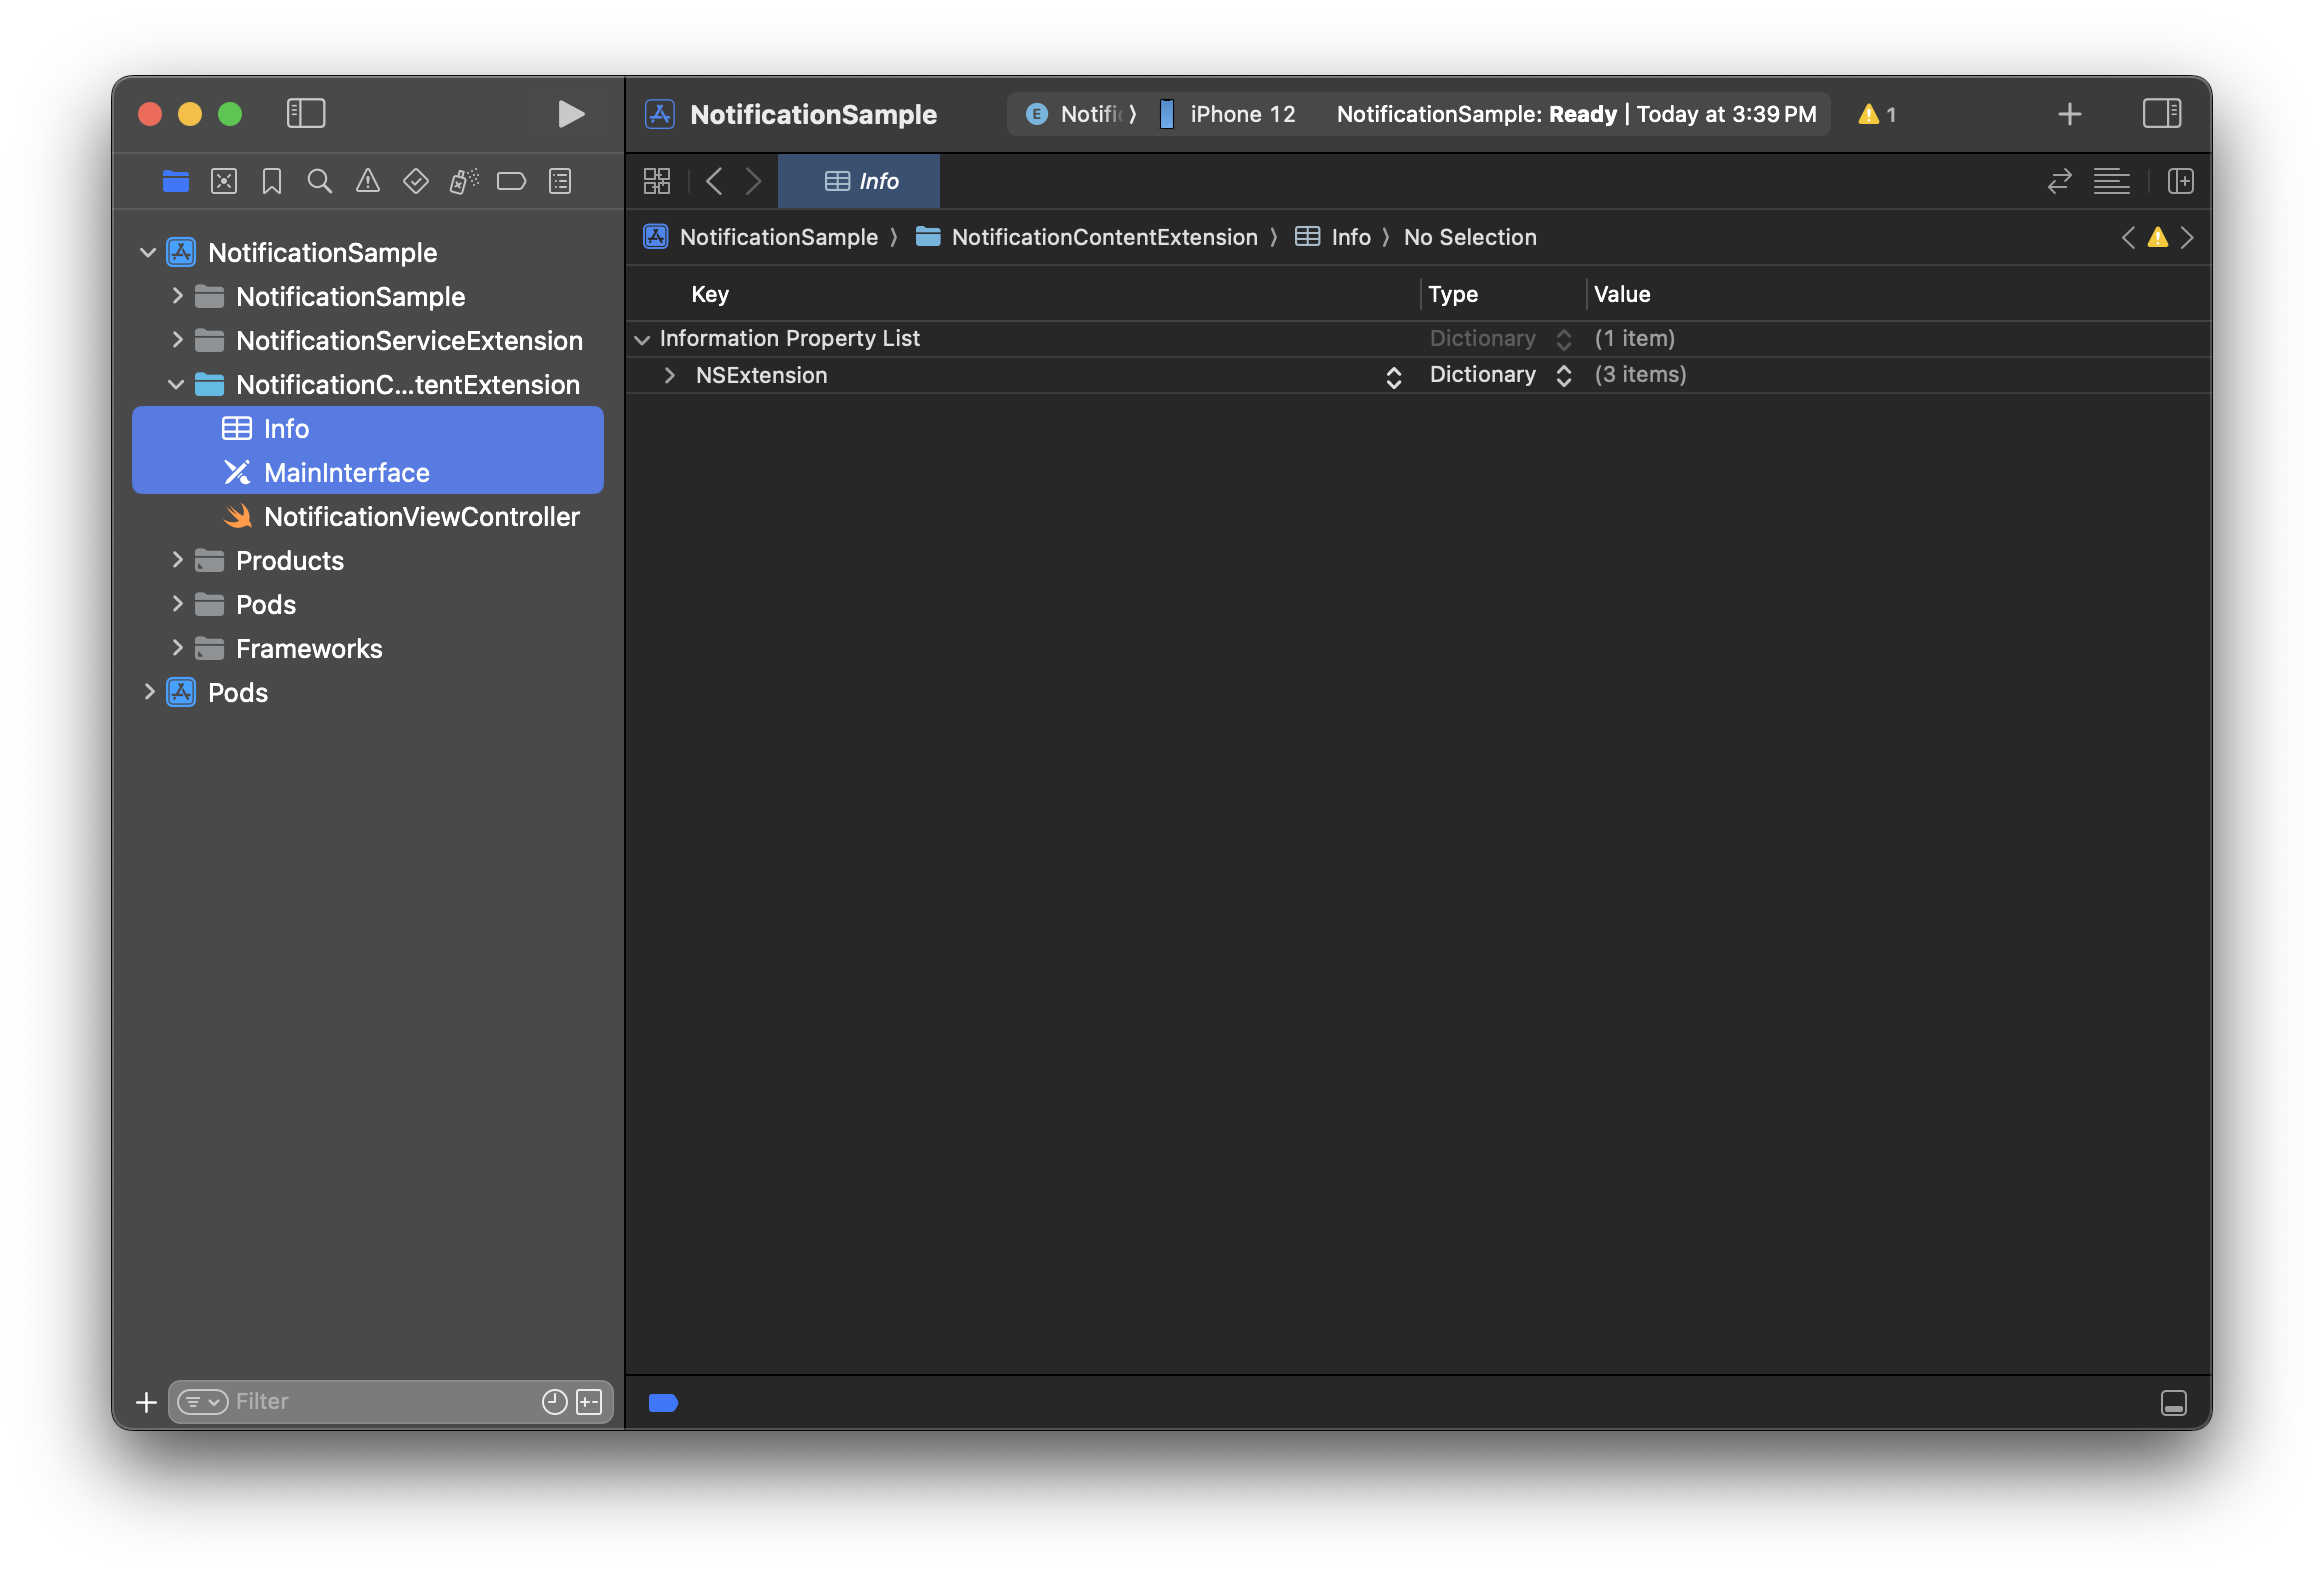
Modify Info.plist
Modify Product Name/Info.plist.
In the following order, paste the code below under the top-level Information Property List row (the root dictionary, highlighted in orange in the image).
- Expand the top-level
Information Property Listrow, then remove its child itemNSExtension. - Collapse the same row, right-click it, and then select Paste.
<?xml version="1.0" encoding="UTF-8"?>
<!DOCTYPE plist PUBLIC "-//Apple//DTD PLIST 1.0//EN" "http://www.apple.com/DTDs/PropertyList-1.0.dtd">
<plist version="1.0">
<dict>
    <key>NSExtension</key>
    <dict>
    <key>NSExtensionAttributes</key>
    <dict>
        <key>UNNotificationExtensionInitialContentSizeRatio</key>
        <integer>0</integer>
        <key>UNNotificationExtensionCategory</key>
        <array>
        <string>INFO_CATEGORY</string>
        <string>CLOSE_CATEGORY</string>
        <string>CONFIRM_CATEGORY</string>
        <string>EXECUTE_CATEGORY</string>
        <string>ACCEPT_ALL_CATEGORY</string>
        <string>ACCEPT_NOW_CATEGORY</string>
        <string>PURCHASE_CATEGORY</string>
        <string>SALE_CATEGORY</string>
        <string>ACCEPT_DECISION_CATEGORY</string>
        </array>
    </dict>
    <key>NSExtensionPrincipalClass</key>
    <string>$(PRODUCT_NAME).NotificationViewController</string>
    <key>NSExtensionPointIdentifier</key>
    <string>com.apple.usernotifications.content-extension</string>
    </dict>
</dict>
</plist>
Step 3. Enter custom categories
The UNNotificationExtensionCategory values in Info.plist modified in the previous step are the default categories provided by the Hive SDK introduced earlier. If there are custom categories written in hive_push_actions.json by following Advanced implementation method below, add them as elements of the array as well.
Step 4. Add dependencies
Connect the dependencies required for the push extension target. If they were already added right after project generation through CocoaPods or similar tools, you can skip this step.
- Add by using a dependency management tool
- Add manually
- Add it manually in the Xcode GUI or connect it by writing a build pipeline script
- Since Unreal Engine does not support a separate dependency management tool, proceed with this method
- Add
HIVEExtensions.frameworkto General > Frameworks and Libraries in the extension target settings
Once you have applied the push action button set in your development environment, specify the actions when sending a push from Hive Console.
When specifying actions, use the category and action identifiers from the detailed list above.
For more details on Console settings, refer to the Console guide.
Advanced implementation (iOS)
Define the values for actions and categories in the hive_push_actions.json file. After defining, include the hive_push_actions.json file in your target and build the game app. When the game app runs, the Hive SDK automatically parses the file and registers the actions and categories in the notification center.
An example of the hive_push_actions.json file is shown below.
hive_push_actions.json Example
{
    "actions": {
        "ACCEPT_ALL_ID": { ... },
        "ACCEPT_ID": { ... },
        "ACCEPT_NOW_ID": { ... },
        "CANCEL_ID": { ... },
        "CLOSE_ID": { ... },
        "CONFIRM_ID": { ... },
        "DECLINE_ID": { ... },
        "EXECUTE_ID": { ... },
        "HOLDING_ID": { ... },
        "PURCHASE_ID": { ... },
        "REJECT_ID": { ... },
        "SALE_ID": { ... }
    },
    "categories": {
        "INFO_CATEGORY": ["CONFIRM_ID"],
        "CLOSE_CATEGORY": ["CLOSE_ID"],
        "CONFIRM_CATEGORY": ["CONFIRM_ID", "CLOSE_ID"],
        "EXECUTE_CATEGORY": ["EXECUTE_ID", "CANCEL_ID"],
        "ACCEPT_ALL_CATEGORY": ["ACCEPT_ALL_ID", "CLOSE_ID"],
        "ACCEPT_NOW_CATEGORY": ["ACCEPT_NOW_ID", "CLOSE_ID"],
        "PURCHASE_CATEGORY": ["PURCHASE_ID", "DECLINE_ID"],
        "SALE_CATEGORY": ["SALE_ID", "DECLINE_ID"]
    }
}
Notes for writing the file:
- The maximum number of buttons per category (set) is 3.
- The example above defines the default button sets. For custom action buttons, do not use duplicate identifiers; use unique, distinguishable strings.
- Multi-language support follows the game language, and you can enter up to 16 languages supported by the SDK. English (
"en") is required as the default value for multi-language strings.
Note
Unity PostProcess is supported. If you add the hive_push_actions.json file to the same path as hive_config.xml in your Unity project, it will be automatically added to the game app target when building the Xcode project.
Warning
After writing the file, add the keys from the "categories" field in the file to UNNotificationExtensionCategory in the Notification Content Extension's Info.plist.
In Unity, this is done automatically by analyzing the file.
FAQ
If custom action buttons do not appear even after including the file
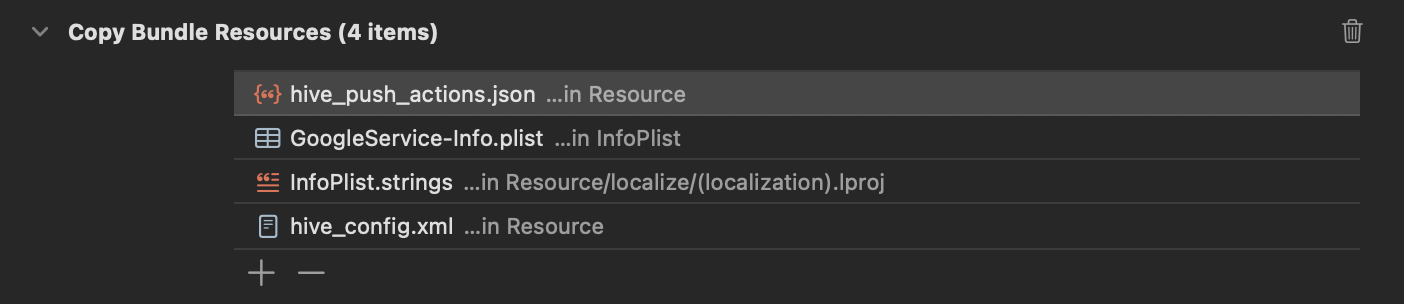
- Check that the file name is 'hive_push_actions.json'.
- Make sure it is included in Copy Bundle Resources.