iOS
This guide provides instructions for setting up the Hive SDK Authentication feature on iOS.
Add features
Add the Authentication feature framework to the Podfile in the project directory. Only add the Authentication features you want to use.
To use Device Management, add the following framework.
To use Google reCAPTCHA in guest login, add the following framework.
pod 'HiveGoogleRecaptcha', $HIVE_SDK_VERSION # 게스트 로그인시 봇 점수 기반의 Google reCAPTCHA Enterprise 기능을 사용하기 위한 프레임워크
Based on the [Notice on Stricter Management of Minors' Online Game Addiction] and other related regulations announced by the National Press and Publication Administration of China, in order to use the function that requires users accessing from China to undergo Real Name Verification, only games that have received a Chinese license must add the framework below.
After saving the Podfile with the added framework, run the command below to install the framework in the project.
Add IdPs
Add the IdP framework to the Podfile in the project directory. Only add the IdP you will use.
Below is an example of adding frameworks to the Podfile of the project directory. The guest login feature can be used without adding any frameworks.
pod 'HiveAuthV4ProviderAppleSignIn', $HIVE_SDK_VERSION # Sign in with Apple login
pod 'HiveAuthV4ProviderFacebook', $HIVE_SDK_VERSION # Facebook IdP, Social feature
pod 'HiveAuthV4ProviderQQ', $HIVE_SDK_VERSION # QQ IdP
pod 'HiveAuthV4ProviderVK', $HIVE_SDK_VERSION # VK IdP
pod 'HiveAuthV4ProviderWechat', $HIVE_SDK_VERSION # WeChat IdP
pod 'HiveAuthV4ProviderGoogle', $HIVE_SDK_VERSION # Google IdP
pod 'HiveAuthV4ProviderAppleGameCenter', $HIVE_SDK_VERSION # Apple Game Center IdP
pod 'HiveAuthV4ProviderHive', $HIVE_SDK_VERSION # Membership login, Social feature
pod 'HiveAuthV4ProviderWeverse', $HIVE_SDK_VERSION # Weverse IdP
pod 'HiveAuthV4ProviderSteam', $HIVE_SDK_VERSION # Steam IdP
pod 'HiveAuthV4ProviderX', $HIVE_SDK_VERSION # X IdP
pod 'HiveAuthV4ProviderTelegram', $HIVE_SDK_VERSION # Telegram IdP
When using LINE IdP, if the target is below iOS 13, only add the following framework.
If you are using iOS 13 or later, add the following frameworks.
pod 'HiveAuthV4ProviderLine', $HIVE_SDK_VERSION # LINE IdP
pod 'HiveAuthV4ProviderLine/LineSDKSwift11', $HIVE_SDK_VERSION # LINE IdP (5.11.0 / iOS 13 and later)
After saving the Podfile with the added framework, run the command below to install the framework in the project.
Enter the key values for each IdP in hive_config.xml
Enter the key values obtained from each IdP console in hive_config.xml. For more details, please refer to Authentication Prerequisites.
Additional settings by IdP
Additional configuration is required depending on the IdP.
Sign in with Apple IdP settings
This guide provides instructions for setting up Sign in with Apple IdP. Follow the steps below to add Apple login to the IdP list.
- Select your project in the project navigator of the Xcode project window.
- Choose your app from the TARGETS list.
- Click on the Signing & Capabilities tab.
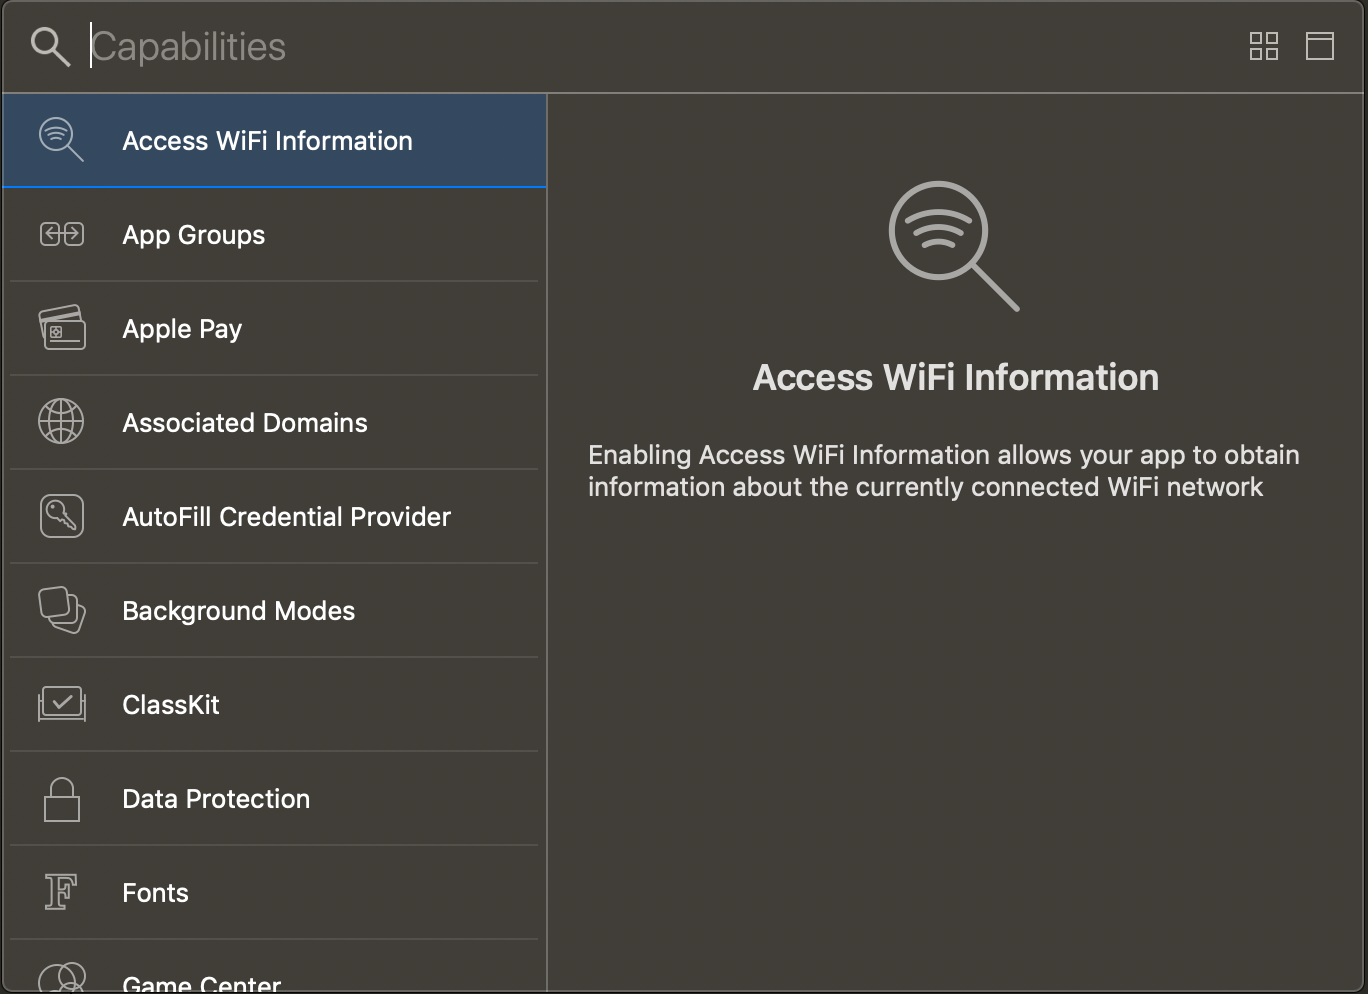
- Click the + Capability button at the top left of the Signing & Capabilities tab.
-
Select Sign In with Apple from the list to add it.
 6. You can see Sign In with Apple added to the Signing & Capabilities list.
Apple Game Center IdP settings
This is a guide for setting up Apple Game Center IdP. Follow the steps below to add Apple Game Center login to the IdP list.
- In the Xcode project window, select your project in the project navigator.
- Choose your app from the TARGETS list.
- Click on the Signing & Capabilities tab.
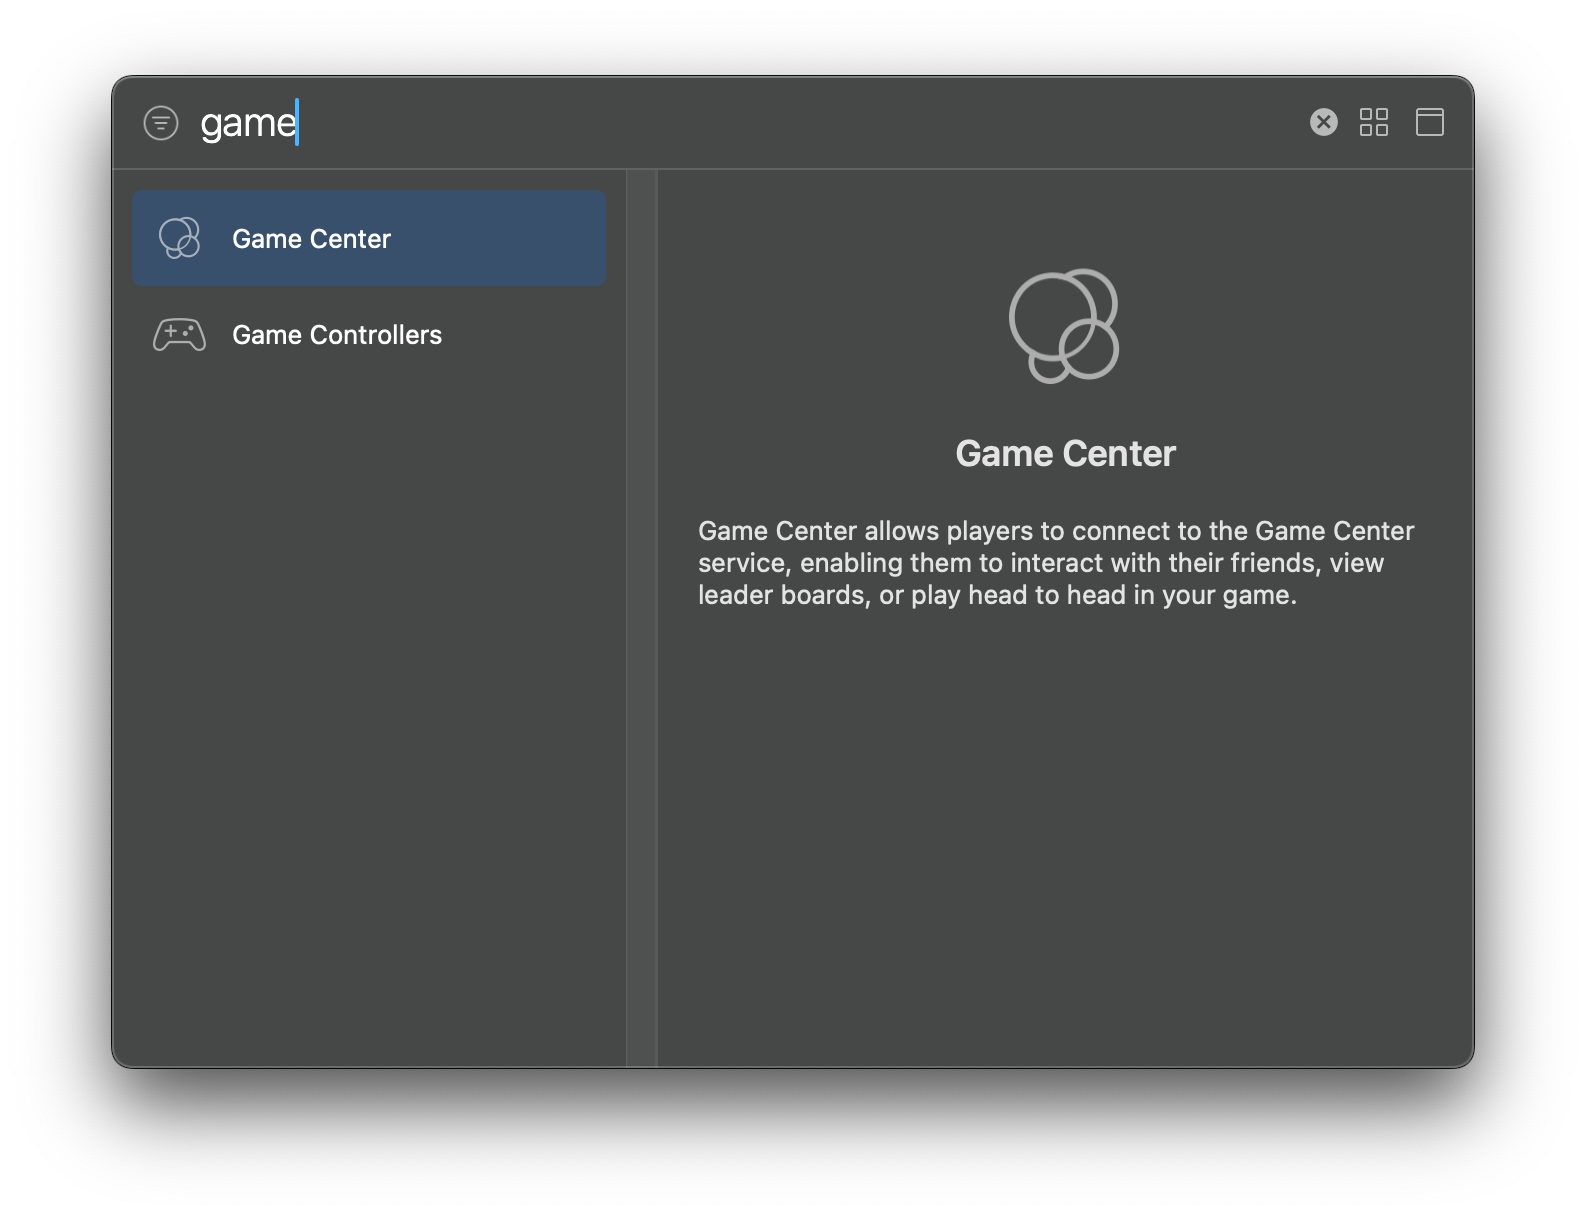
- Click the + Capability button at the top left of the Signing & Capabilities tab.
-
Select GameCenter from the list to add it.
You can check the Game Center added to the Signing & Capabilities list.
Facebook IdP configuration
This is a guide for setting up Facebook IdP.
Enter Facebook AppID and client token
Follow the instructions below to enter the Facebook AppID and ClientToken in your Xcode project.
The Facebook client token can be found in the Facebook console under App Settings > Advanced Settings.
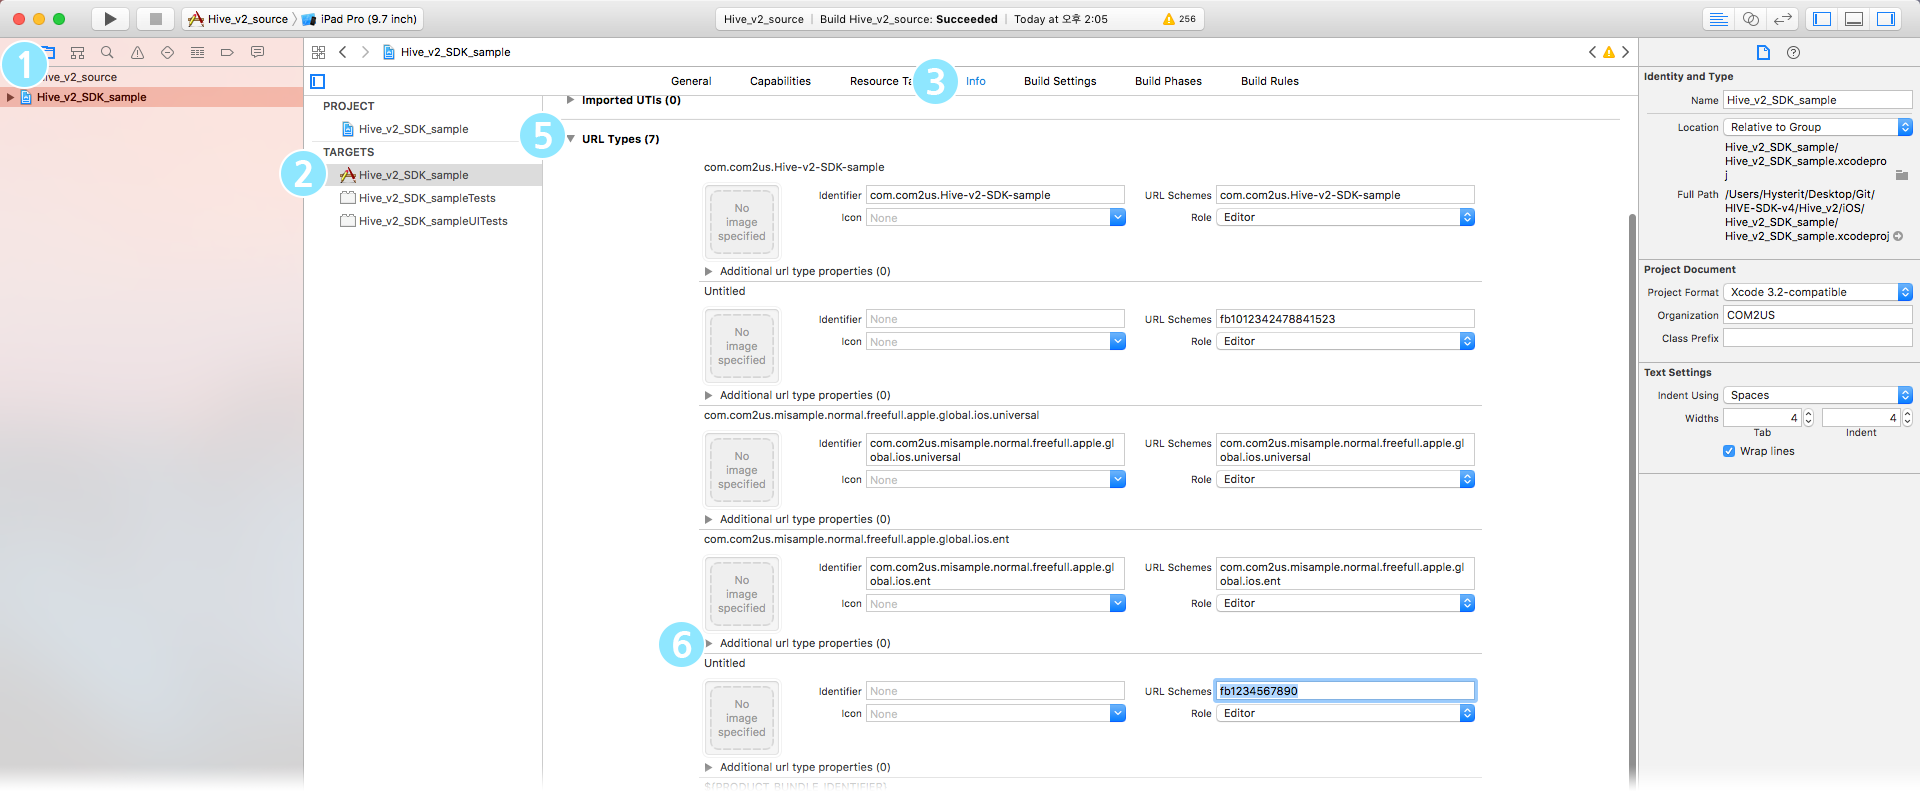
- Select your project in the project navigator of the Xcode project window.
- Choose your app from the TARGETS list.
- Click on the Info tab.
-
In the Info tab, click on the Custom iOS Target Properties item and enter the Facebook App ID in the FacebookAppID property.
 5. In the Facebook console App Dashboard, go to Settings > Advanced > Security > Client Token to check the FacebookClientToken. 6. Click on the Custom iOS Target Properties section in the Info tab and enter the FacebookClientToken in the FacebookClientToken property. 7. Click on the URL Types section in the Info tab, then click the + icon to create Additional url type properties. 8. In the URL Schemes field of the Additional url type properties section, enter the Facebook AppID with fb prefixed (e.g.,
 fb012342478841523).
Add Facebook scheme to whitelist
To add the Facebook Scheme to the whitelist, you can use the project window or directly add the code to the Info.plist file.
Note
Starting from iOS 9, switching to external apps is only allowed for schemes added to the whitelist. In the iOS 9 environment, when a user logs into Facebook from your game, the Hive Platform utilizes the Safari view controller to perform Facebook login through the Safari web view. Therefore, switching from the game app to the Facebook app does not occur, and login can be handled using the in-app browser. Facebook recommends that the Facebook scheme be registered by default in the whitelist. View Facebook SDK Documentation
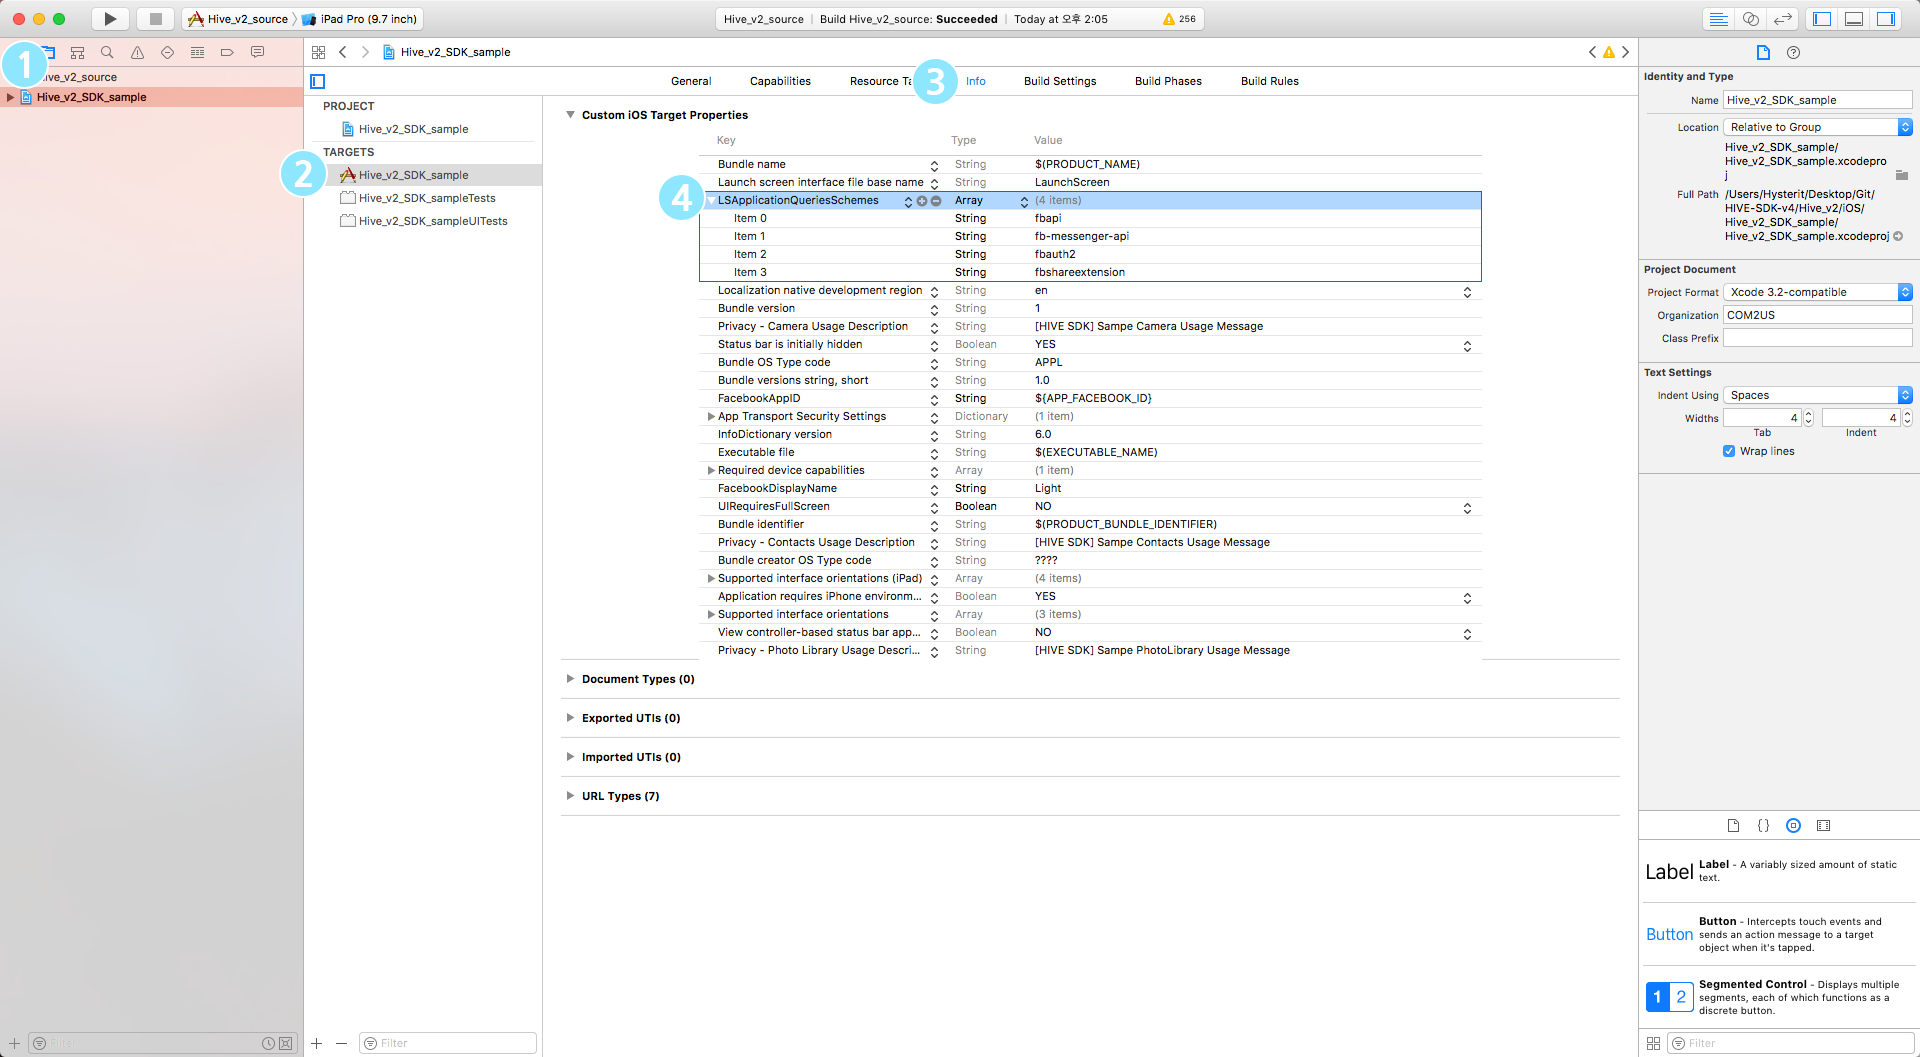
- In the Xcode project window, select your project from the project navigator.
- Select your app from the TARGETS list.
- Click on the Info tab.
- In the Info tab, click on LSApplicationQueriesSchemes and click the + button to add the following two schemes.
- fbapi
- fb-messenger-share-api
There is also a way to directly add the code below to Info.plist.
QQ IdP settings
This is a guide for setting up QQ IdP.
Add QQ scheme to the whitelist
To add the QQ Scheme to the whitelist, you can use the project window or directly add the code to the Info.plist file.
- In the Xcode project window, select your project in the project navigator.
- Select your app from the TARGETS list.
- Click on the Info tab.
- In the Info tab, click on LSApplicationQueriesSchemes and click the + button to add the following schemes.
- mqqOpensdkSSoLogin
- mqqopensdkapiV2
- mqqopensdkapiV3
- wtloginmqq2
- mqq
- mqqapi
- mqqopensdknopasteboard
- mqqopensdknopasteboardios16
There is also a way to directly add the following code to Info.plist.
"LSApplicationQueriesSchemes" : [
 "mqqOpensdkSSoLogin",
 "mqqopensdkapiV2",
 "mqqopensdkapiV3",
 "wtloginmqq2",
 "mqq",
 "mqqapi"
]
VK IdP configuration
This is a guide for setting up VK IdP.
Enter VK AppID
Follow the instructions below to enter the VK AppID in the Xcode project.
- Select your project in the project navigator of the Xcode project window.
- Choose your app from the TARGETS list.
- Click on the Info tab.
- In the Info tab, click on the Custom iOS Target Properties item and add VK data to LSApplicationQueriesSchemes (
vkauthorize,vk-share,vk). - In the Info tab, click on the URL Types item, then click the + icon to create an Additional url type properties item.
- Under the Additional url type properties item, enter the VK AppID with the vk prefix in the URL Schemes field (e.g.,
Vk1231234).
WeChat IdP configuration
This is a guide for setting up WeChat IdP.
Enter WeChat AppID
Follow the instructions below to enter the WeChat AppID in the Xcode project.
- In the Xcode project window, select your project in the project navigator.
- Select your app from the TARGETS list.
- Click on the Info tab.
- In the Info tab, click on the URL Types section and then click the + icon to create an Additional url type properties entry.
- In the URL Schemes field under the Additional url type properties entry, enter Identifier: weixin, weixinULAPI, URL Schemes: APP_ID.
Note
When using WeChat IdP and Promotion together, you must apply the Universal Link.
Google IdP configuration
This is a guide for setting up Google IdP.
Enter the reversed client ID
Follow the instructions below to enter the Reversed Client ID in your Xcode project.
- In the Xcode project window, select your project in the project navigator.
- Select your app in the TARGETS list.
- Click on the Info tab.
- Click on the URL Types section within the Info tab, then click the + icon to create an Additional url type properties entry.
- Under the Additional url type properties entry, enter Identifier as a space, and URL Schemes as reversed client ID.
LINE IdP settings
This provides guidance for setting up LINE IdP.
Modify the Podfile
When using LINE IdP, you need to add the following content to the post_install code in the Podfile of the project directory.
post_install do |installer|
   installer.pods_project.targets.each do |target|
       target.build_configurations.each do |config|
            ...
            # Linesdkswift 사용 시 pod project 설정 변경필요
           if ['LineSDKSwift'].include? target.name
               config.build_settings['BUILD_LIBRARY_FOR_DISTRIBUTION'] = 'YES'
           # Xcode 14 에서 발생하는 CocoaPods bundle 타겟에 대한 code signing 컴파일 에러 이슈 대응
           elsif config.build_settings['WRAPPER_EXTENSION'] == 'bundle'
               config.build_settings['CODE_SIGNING_ALLOWED'] = 'NO'
           end
            ...
       end
   end
end
After saving the modified Podfile as shown above, run the command below to install the framework in the project.
Enter the app bundle ID (LINE)
Follow the instructions below to enter the app bundle ID in the Xcode project.
- In the Xcode project window, select your project in the project navigator.
- Select your app from the TARGETS list.
- Click on the Info tab.
- In the Info tab, click on the Custom iOS Target Properties item and add LINE data (
lineauth2) to LSApplicationQueriesSchemes. - In the Info tab, click on the URL Types item, then click the + icon to create an Additional url type properties item.
- In the URL Schemes field under the Additional url type properties item, enter the app bundle ID with the
line3rdpprefix (e.g.,line3rdp.$(PRODUCT\_BUNDLE\_IDENTIFIER)).
Warning
After implementing the login feature with LINE, you must also add it to the IdP integration status information.
X IdP configuration
This is a guide for setting up X IdP.
Enter the app bundle ID (X)
Follow the instructions below to enter the app bundle AppID in the Xcode project.
- In the Xcode project window, select your project from the project navigator.
- Select your app from the TARGETS list.
- Click on the Info tab.
- Click on the URL Types item within the Info tab, then click the + icon to create an Additional url type properties item.
- In the URL Schemes field under the Additional url type properties item, enter the app bundle ID with the
hive.xprefix (e.g.,hive.x.$(PRODUCT\_BUNDLE\_IDENTIFIER)).


