Unity
Add the Hive SDK features you want to use as an external library. Hive SDK provides various features such as Authentication, Billing, Notification, and ad banners. You must select and install only the features you want to use. Here, we will guide you on how to use the most basic features: Authentication and Billing.
Hive SDK is distributed with the External-Dependency-Manager for Unity (EDM4U) package included in the UnityPackage version. It is configured to automatically install/distribute the necessary libraries for the build with EDM4U settings. If the build environment where EDM4U can operate is not prepared, it must be set up. This can be done using the GUI provided by EDM4U or through the Unix shell, Bash, i.e., the Command Line Interface (CLI).
Notes for manual installation/update
Starting from Hive SDK 24.3.0, when installing or updating Hive SDK Unity via the Unity package instead of the SDK Manager, you must delete all HIVESDK_{library_name}Dependencies.xml files located in the paths below before building the game app.
- Assets/Hive_SDK_v4/Dependencies
- Assets/Hive_SDK_v4/Editor
The files to be deleted are as follows:
- HIVESDK_DefaultDependencies.xml
- HIVESDK_HerculesDependencies.xml
- HIVESDK_HiveAnalyticsConsentModeDependencies.xml
- HIVESDK_HiveDataStoreDependencies.xml
- HIVESDK_HiveDeviceManagementDependencies.xml
- HIVESDK_HiveGoogleInAppReviewDependencies.xml
- HIVESDK_HiveGoogleInAppUpdateDependencies.xml
- HIVESDK_HivePromotionDependencies.xml
- HIVESDK_HiveRealNameVerificationDependencies.xml
- HIVESDK_MarketAmazonDependencies.xml
- HIVESDK_MarketAppleDependencies.xml
- HIVESDK_MarketGoogleDependencies.xml
- HIVESDK_MarketHiveStoreDependencies.xml
- HIVESDK_MarketHuaweiDependencies.xml
- HIVESDK_MarketLebiDependencies.xml
- HIVESDK_MarketOneStoreDependencies.xml
- HIVESDK_MarketSamsungDependencies.xml
- HIVESDK_ProviderAdjustDependencies.xml
- HIVESDK_ProviderAppleDependencies.xml
- HIVESDK_ProviderAppleSignInDependencies.xml
- HIVESDK_ProviderAppsFlyerDependencies.xml
- HIVESDK_ProviderFacebookDependencies.xml
- HIVESDK_ProviderFirebaseDependencies.xml
- HIVESDK_ProviderGoogleDependencies.xml
- HIVESDK_ProviderGooglePlayGamesDependencies.xml
- HIVESDK_ProviderHiveMembershipDependencies.xml
- HIVESDK_ProviderHuaweiDependencies.xml
- HIVESDK_ProviderLineDependencies.xml
- HIVESDK_ProviderQQDependencies.xml
- HIVESDK_ProviderRecaptchaDependencies.xml
- HIVESDK_ProviderSingularDependencies.xml
- HIVESDK_ProviderVKDependencies.xml
- HIVESDK_ProviderWechatDependencies.xml
- HIVESDK_ProviderWeverseDependencies.xml
- HIVESDK_PushAmazonAdmDependencies.xml
- HIVESDK_PushGoogleFcmDependencies.xml
Android
This is the guide on how to install each product of Hive SDK in Unity Android.
Android resolver settings
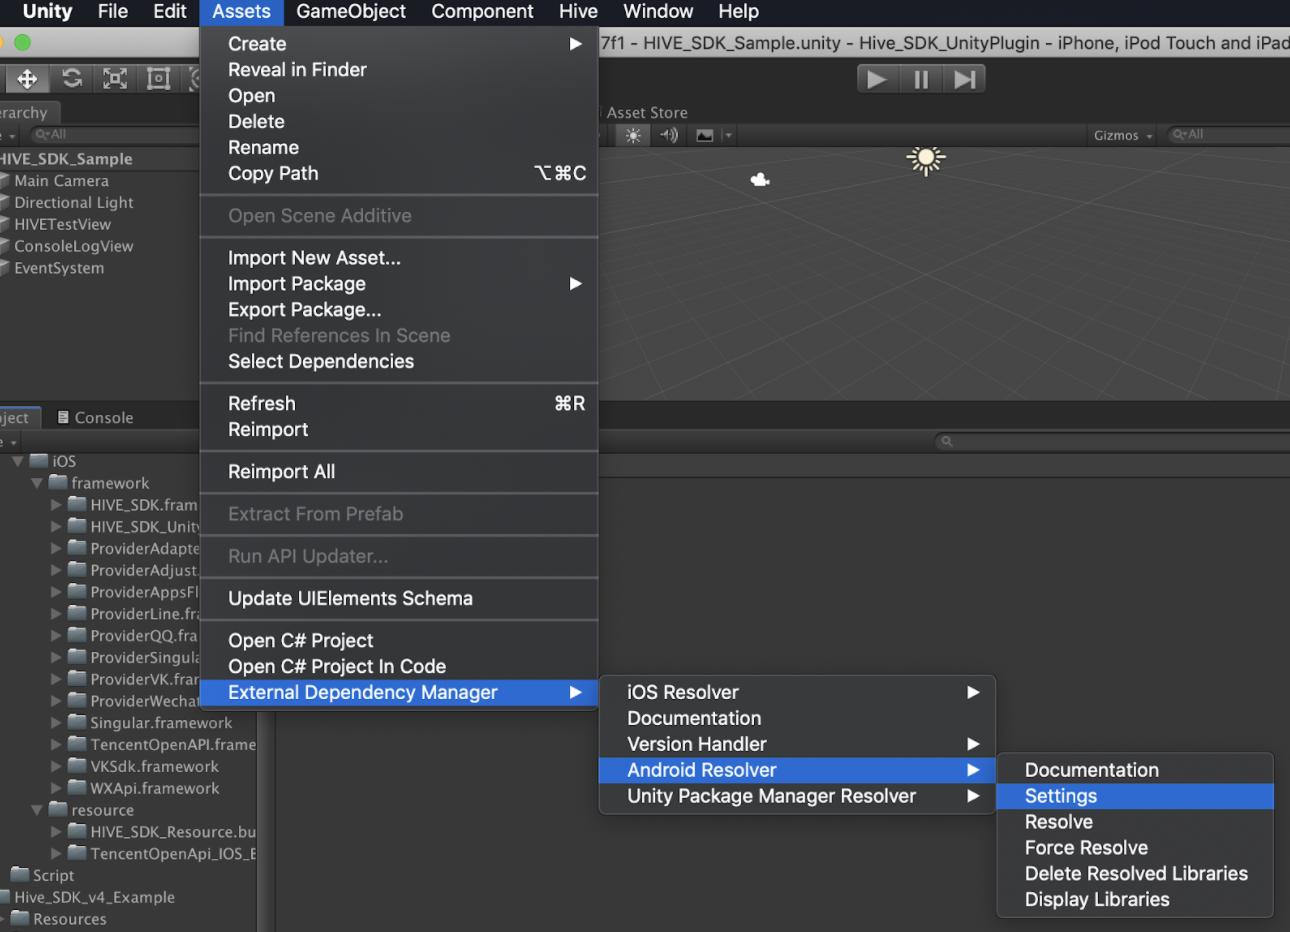
Run Unity and click on the Asset > External Dependency Manager > Android Resolver > Settings menu.
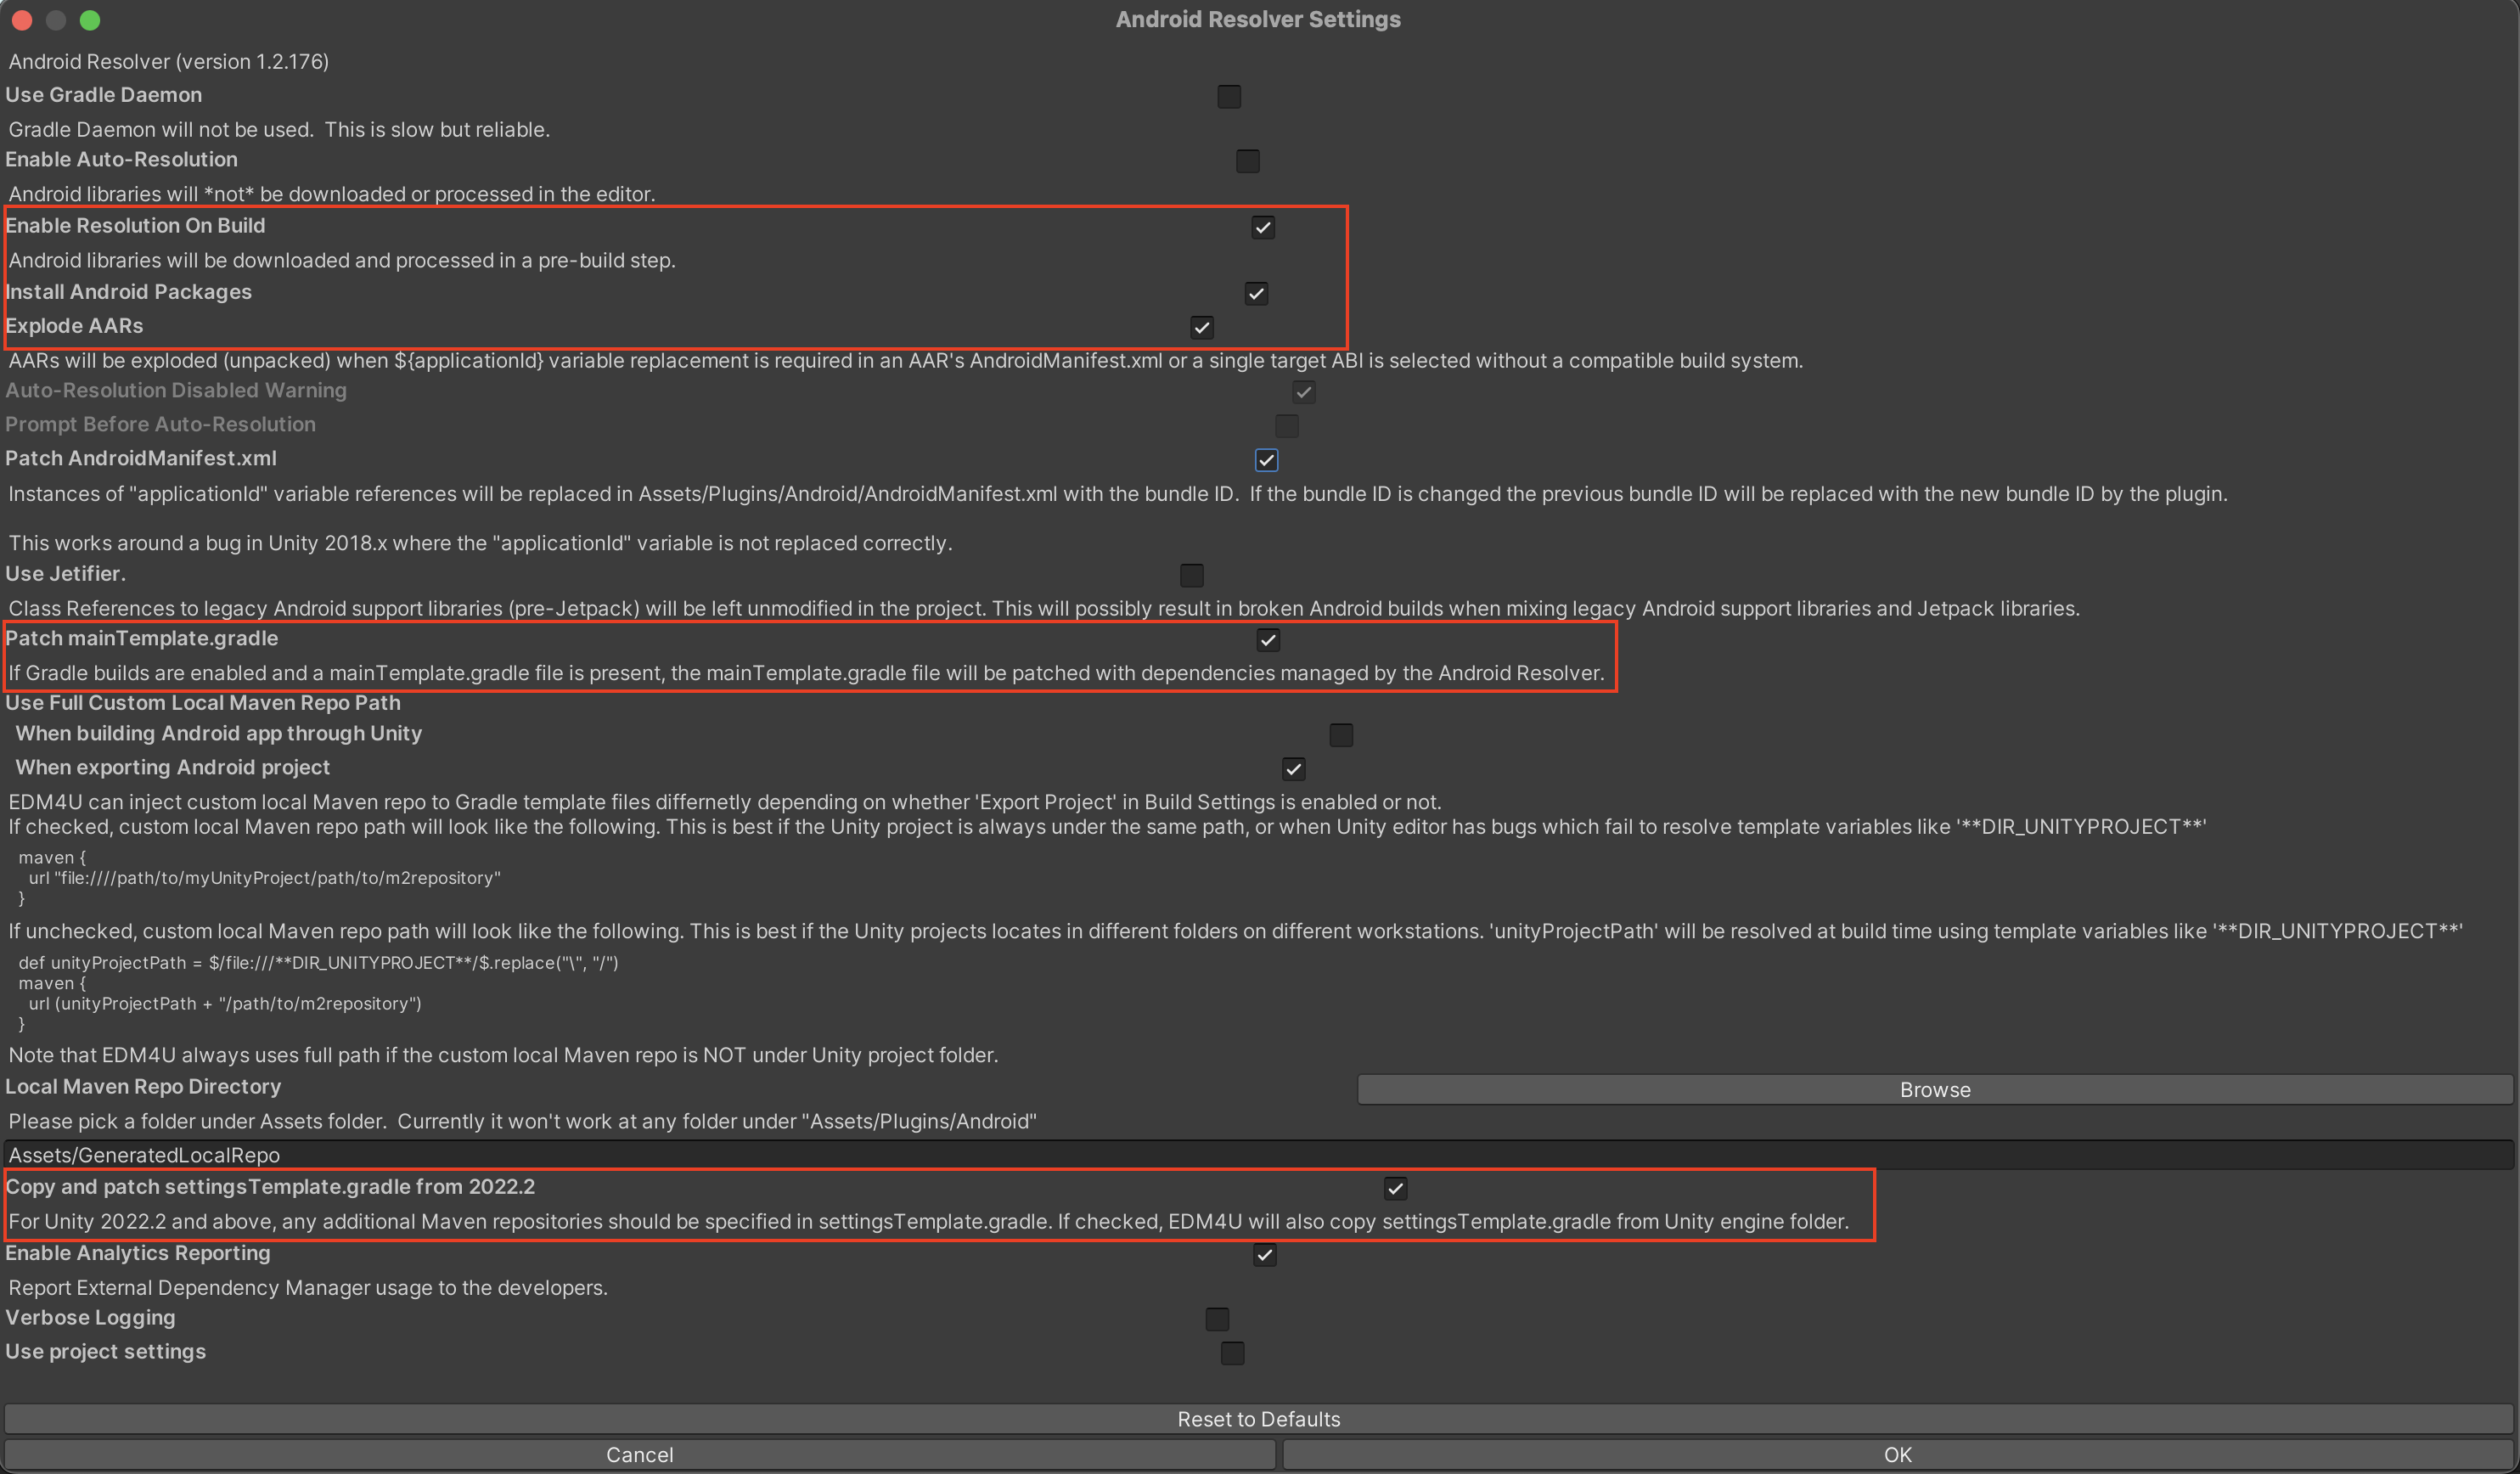
When the Android Resolver Settings window appears, check the items marked in red as the default settings.
Check the Copy and patch settingsTemplate.gradle from 2022.2 item only if you are using Unity version 2022.2 or later. The Use Jetifier feature is automatically supported by Hive SDK, so it is recommended to deselect it.
If you select Use Jetifier in the latest version of Unity, you need to create a Custom Gradle Properties Template according to the Unity guide.
Hive Dependencies
In Hive Dependencies, you can enable or disable the services provided by Hive SDK. Select Hive > Hive Dependencies (ExternalDependency).
When the settings window appears, select the features you want to use. For example, to use Google Authentication and Google Play Store Billing features, select Google Sign-In in Auth Settings and Google Play Store in Market Settings. After selecting the features you want to use, click Save to complete your selection.
Hive Module Settings
| Feature | Description |
|---|---|
| Promotion | Provides features to effectively expose new news or events of the game. |
| Google InAppReview | Provides the ability to leave Google Play reviews. (Android) |
| Device Management | This service allows game entry only for devices registered by the user. |
| Real Name Verification | Provides functionality for users accessing from China to perform real-name verification. |
| Hercules | Provides game abuse detection and tracking services targeted at Hive Platform games. |
| reCAPTCHA | Provides functionality to control account creation by determining whether the user is a robot using Google reCAPTCHA. |
| Game Data Store | This service provides a storage system that allows data generated in the game to be easily saved and read in key-value format. |
| Google InAppUpdate | Provides the ability to update the game app in the background without closing it. (Android) |
| Analytics Consent-Mode | Provides functionality to display a consent banner to check whether consent for personal data collection has been obtained. |
| Matchmaking | Provides matching features that connect users to play together. |
| Chat | Provides chat features for users, including real-time chat, group chat, and 1:1 chat. |
Auth Settings
| Feature | Description |
|---|---|
| Membership | Provides 'Login with Hive' IdP. |
| Google Sign-In | Provides 'Login with Google' IdP. |
| Google Play Games | Provides 'Login with Google Play' IdP. (Android) |
| Provides 'Login with Facebook' IdP. | |
| Apple Game Center | Provides 'Login with Game Center' IdP. (iOS) |
| Apple SignIn | Provides 'Login with Apple' IdP. |
| LINE | Provides 'Login with LINE' IdP. |
| VK | Provides 'Login with VK' IdP. |
| Provides 'Login with QQ' IdP. | |
| Provides 'Login with WeChat' IdP. | |
| Weverse | Provides 'Login with Weverse' IdP. |
| Steam | Provides 'Login with Steam' IdP. |
| X | Provides 'Login with X' IdP. |
| Telegram | Provides 'Login with Telegram' IdP. |
| Huawei | Provides 'Login with Huawei' IdP. (Android) |
Push Settings
| Feature | Description |
|---|---|
| Google FCM | Provides Firebase Cloud Messaging Notification functionality. (Android) |
| Apple APNs | Provides Apple Push Notification Service functionality. (iOS) |
| Amazon ADM | Provides Amazon Device Messaging Notification functionality. (Android) |
Market Settings
| Feature | Description |
|---|---|
| Google Play Store | Provides Google Play Store Billing functionality. (Android) |
| Apple App Store | Provides Apple App Store Billing functionality. (iOS) |
| OneStore | Provides OneStore Billing functionality. (Android) |
| Amazon Appstore | Provides Amazon Appstore Billing functionality. (Android) |
| Lebi | Provides Lebi Billing functionality (China). (Android) |
| Hive Store | Provides PG Billing functionality. (Android) |
| Samsung Galaxy Store | Provides Samsung Galaxy Store Billing functionality. (Android) |
| Huawei AppGallery | Provides Huawei AppGallery Billing functionality. (Android) |
Analytics Settings
| Feature | Description |
|---|---|
| Adjust | Provides Marketing Attribution functionality through Adjust. |
| Airbridge | Provides Marketing Attribution functionality through Airbridge. |
| AppsFlyer | Provides Marketing Attribution functionality through AppsFlyer. |
| Singular | Provides Marketing Attribution functionality through Singular. |
| Firebase | Provides Marketing Attribution functionality through Firebase. |
iOS
This guide explains how to install each product of Hive SDK Unity iOS.
Install CocoaPods
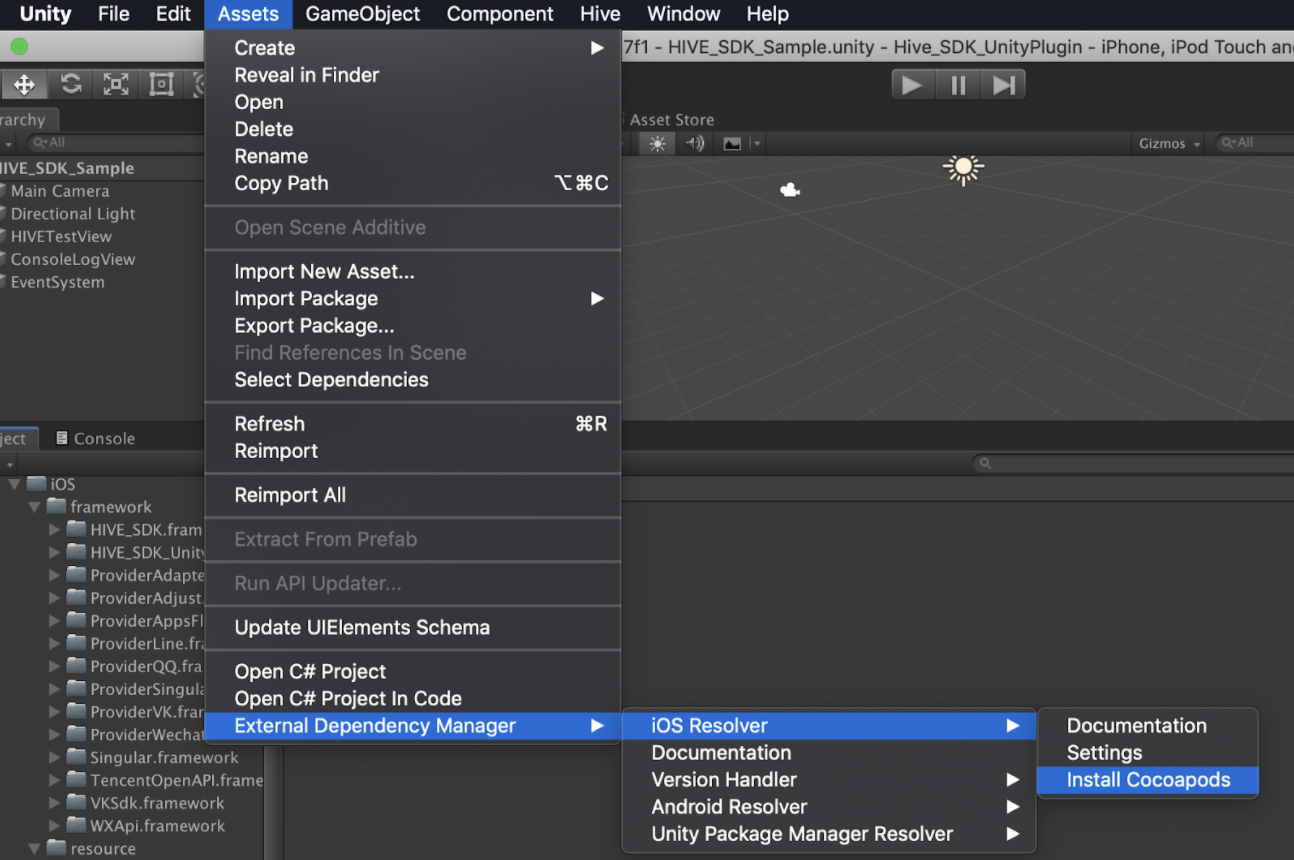
First, install CocoaPods. Run Unity and click the Asset > External Dependency Manager > iOS Resolver > Install CocoaPods menu.
You can also install it using the CLI (Bash-shell).
If the result appears as below, the installation is complete.
iOS resolver settings
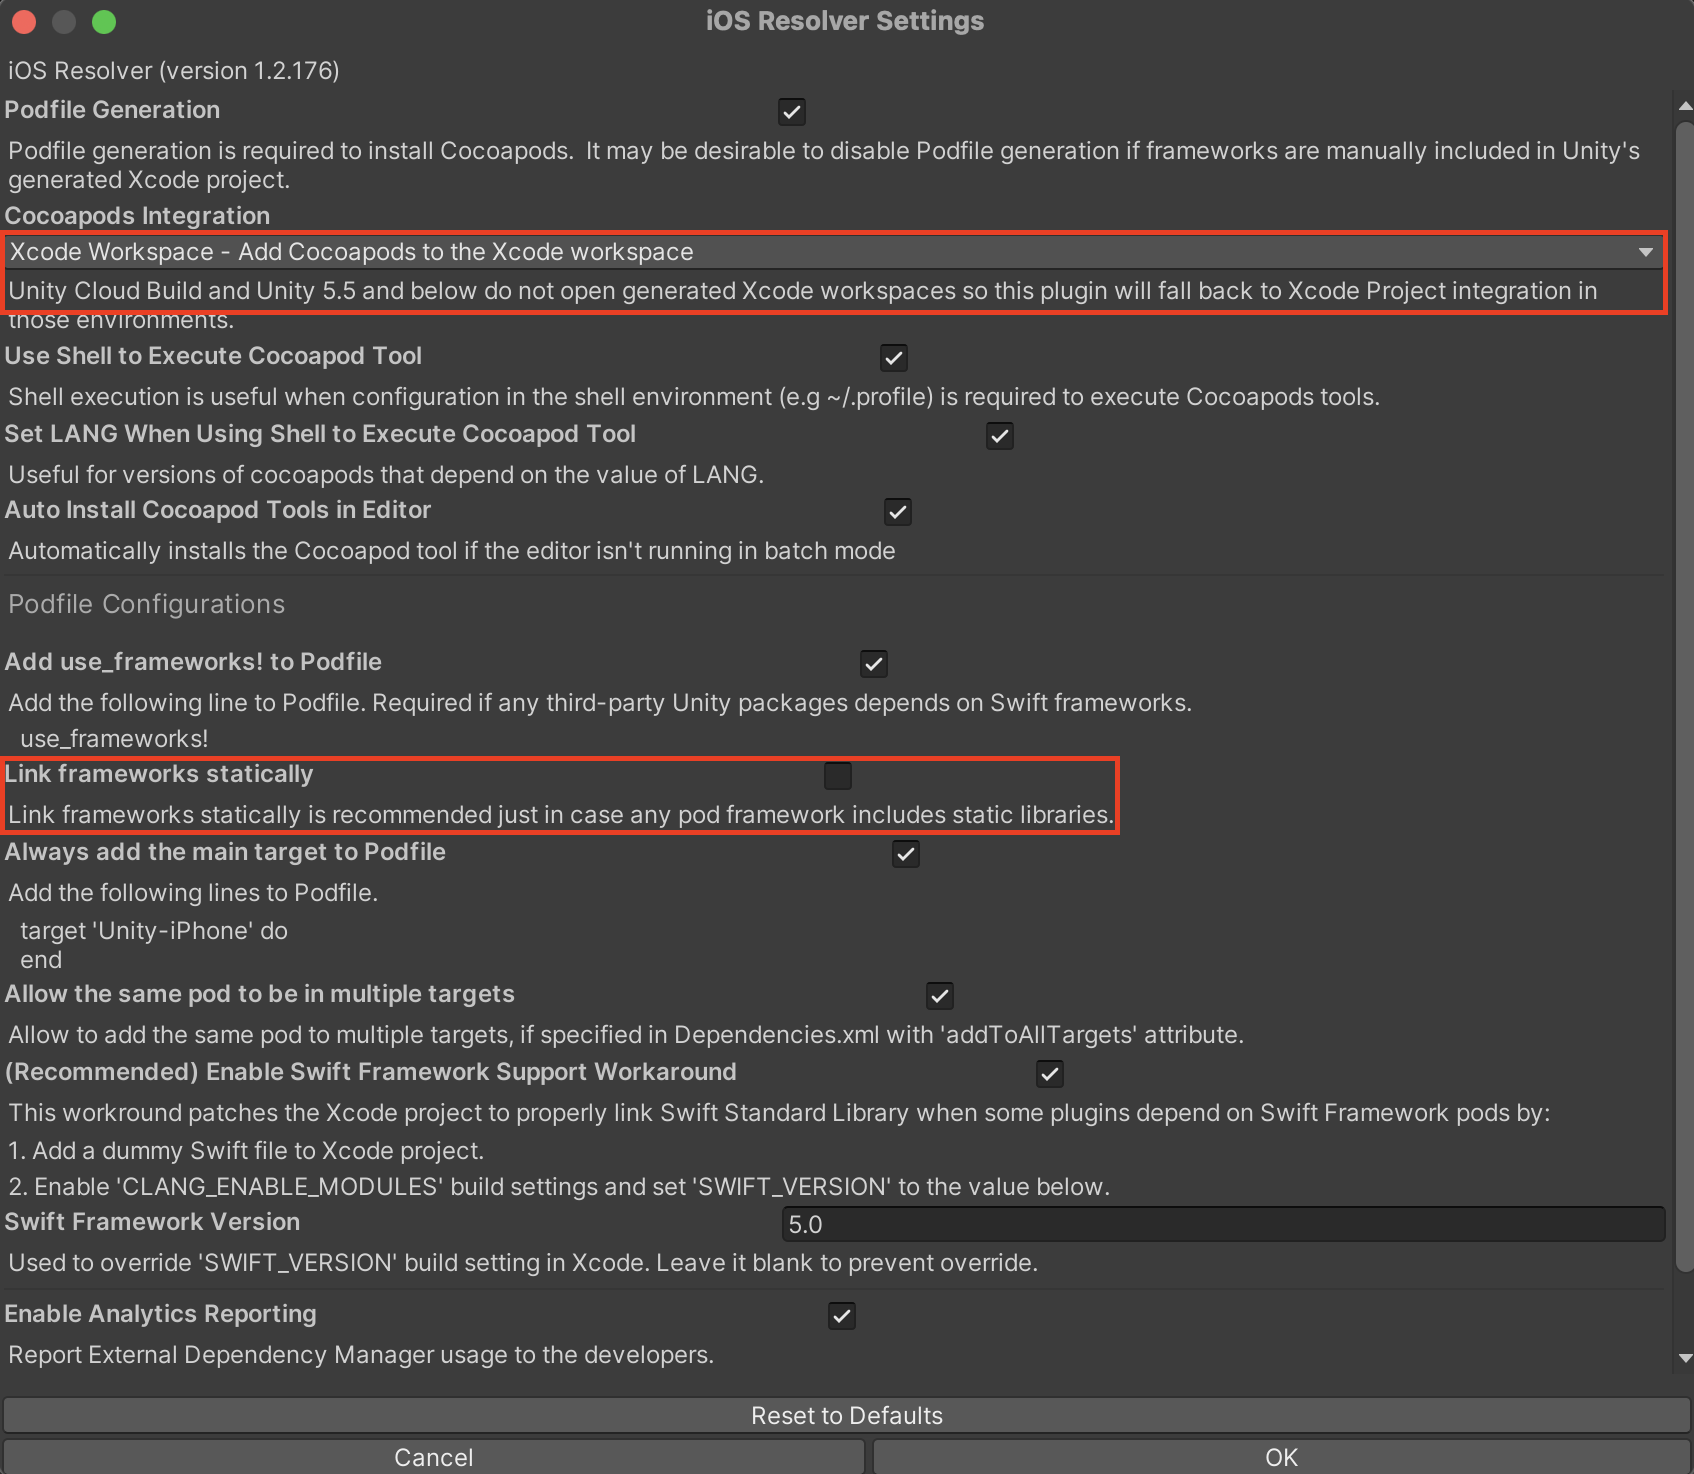
Next, configure CocoaPods. When providing external libraries for iOS using CocoaPods, the existing .xcodeproj file extension is changed to .xcworkspace. If you cannot proceed with the build in the .xcworkspace form, try changing the settings using the GUI. The method of applying CocoaPods performed in Unity on the build PC has changed and can be executed.
-
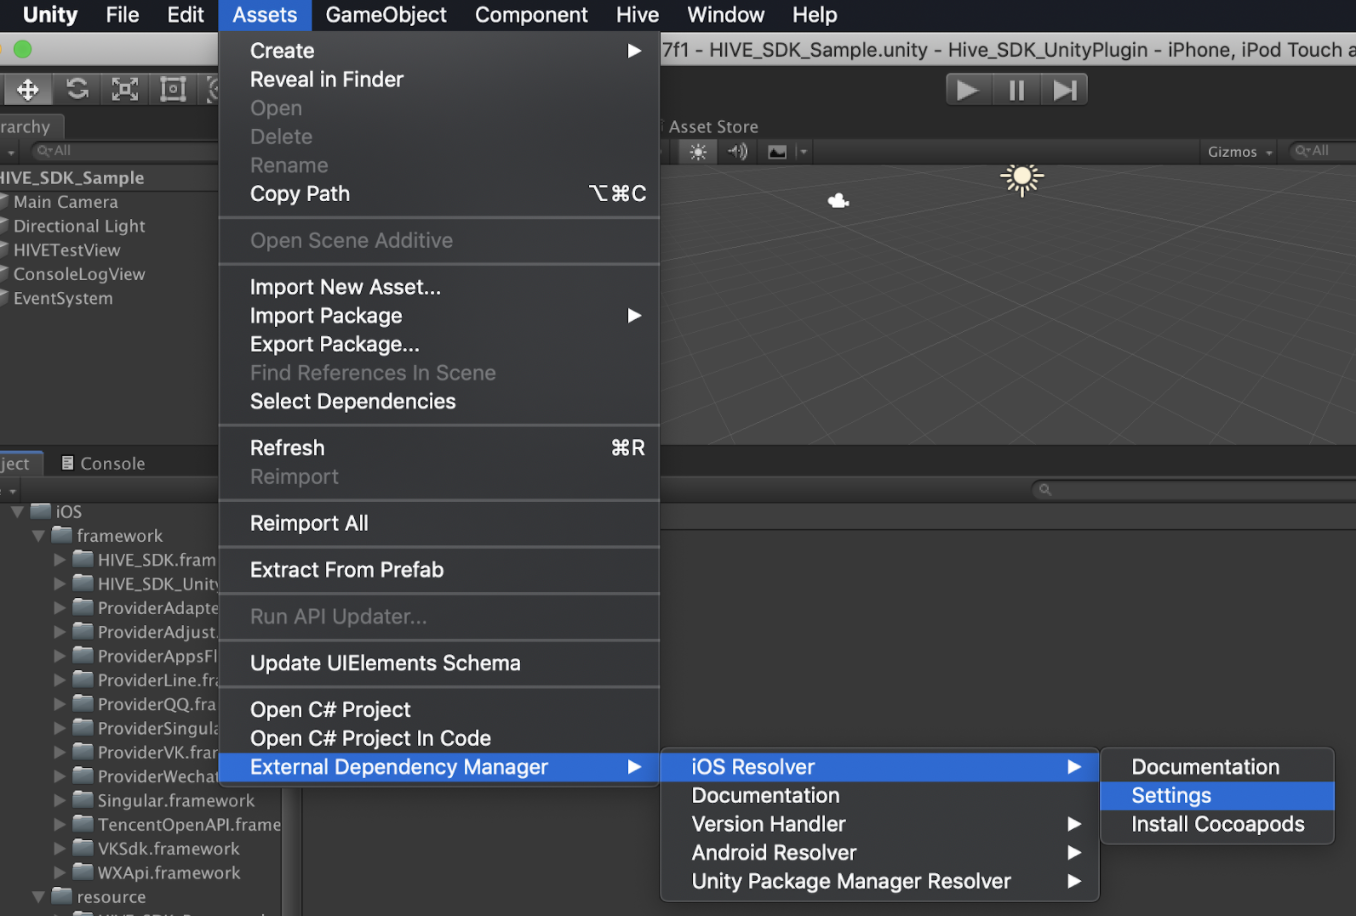
Run Unity and click the Asset > External Dependency Manager > iOS Resolver > Settings menu.
-
When the iOS Resolver Settings window appears, set the Cocoapods Integration item to .xcworkspace, and uncheck Link framework statically to avoid forcing the framework to be referenced statically.
Hive Dependencies
In Hive Dependencies, you can enable or disable the services provided by Hive SDK. Select Hive > Hive Dependencies (ExternalDependency).
When the settings window appears, select the features you want to use. For example, to use Google Authentication and Apple App Store Billing features, select Google Sign-In in Auth Settings and Apple App Store in Market Settings. After selecting the features you want to use, click Save to complete your selection.
Hive Module Settings
| Feature | Description |
|---|---|
| Promotion | Provides features to effectively expose new news or events of the game. |
| Google InAppReview | Provides the ability to leave Google Play reviews. (Android) |
| Device Management | This service allows game entry only for devices registered by the user. |
| Real Name Verification | Provides functionality for users accessing from China to perform real-name verification. |
| Hercules | Provides game abuse detection and tracking services targeted at Hive Platform games. |
| reCAPTCHA | Provides functionality to control account creation by determining whether the user is a robot using Google reCAPTCHA. |
| Game Data Store | This service provides a storage system that allows data generated in the game to be easily saved and read in key-value format. |
| Google InAppUpdate | Provides the ability to update the game app in the background without closing it. (Android) |
| Analytics Consent-Mode | Provides functionality to display a consent banner to check whether consent for personal data collection has been obtained. |
| Matchmaking | Provides matching features that connect users to play together. |
| Chat | Provides chat features for users, including real-time chat, group chat, and 1:1 chat. |
Auth Settings
| Feature | Description |
|---|---|
| Membership | Provides 'Login with Hive' IdP. |
| Google Sign-In | Provides 'Login with Google' IdP. |
| Google Play Games | Provides 'Login with Google Play' IdP. (Android) |
| Provides 'Login with Facebook' IdP. | |
| Apple Game Center | Provides 'Login with Game Center' IdP. (iOS) |
| Apple SignIn | Provides 'Login with Apple' IdP. |
| LINE | Provides 'Login with LINE' IdP. |
| VK | Provides 'Login with VK' IdP. |
| Provides 'Login with QQ' IdP. | |
| Provides 'Login with WeChat' IdP. | |
| Weverse | Provides 'Login with Weverse' IdP. |
| Steam | Provides 'Login with Steam' IdP. |
| X | Provides 'Login with X' IdP. |
| Telegram | Provides 'Login with Telegram' IdP. |
| Huawei | Provides 'Login with Huawei' IdP. (Android) |
Push Settings
| Feature | Description |
|---|---|
| Google FCM | Provides Firebase Cloud Messaging Notification functionality. (Android) |
| Apple APNs | Provides Apple Push Notification Service functionality. (iOS) |
| Amazon ADM | Provides Amazon Device Messaging Notification functionality. (Android) |
Market Settings
| Feature | Description |
|---|---|
| Google Play Store | Provides Google Play Store Billing functionality. (Android) |
| Apple App Store | Provides Apple App Store Billing functionality. (iOS) |
| OneStore | Provides OneStore Billing functionality. (Android) |
| Amazon Appstore | Provides Amazon Appstore Billing functionality. (Android) |
| Lebi | Provides Lebi Billing functionality (China). (Android) |
| Hive Store | Provides PG Billing functionality. (Android) |
| Samsung Galaxy Store | Provides Samsung Galaxy Store Billing functionality. (Android) |
| Huawei AppGallery | Provides Huawei AppGallery Billing functionality. (Android) |
Analytics Settings
| Feature | Description |
|---|---|
| Adjust | Provides Marketing Attribution functionality through Adjust. |
| Airbridge | Provides Marketing Attribution functionality through Airbridge. |
| AppsFlyer | Provides Marketing Attribution functionality through AppsFlyer. |
| Singular | Provides Marketing Attribution functionality through Singular. |
| Firebase | Provides Marketing Attribution functionality through Firebase. |
Windows
No additional settings are required after importing the Windows package.
Info
For detailed information on each Hive SDK feature (Authentication, Billing, Notification, ...), refer to each feature guide.
