PG payment
PG payment can be used on PC and mobile.
PG Payment Policy
| Category | Description |
| Language |
|
| Function |
|
| National Support |
|
| Payment Method |
|
| PG Payment Currency |
|
| Price Tier |
|
| Product Management |
|
| Refund User Repayment |
|
PG Payment Process
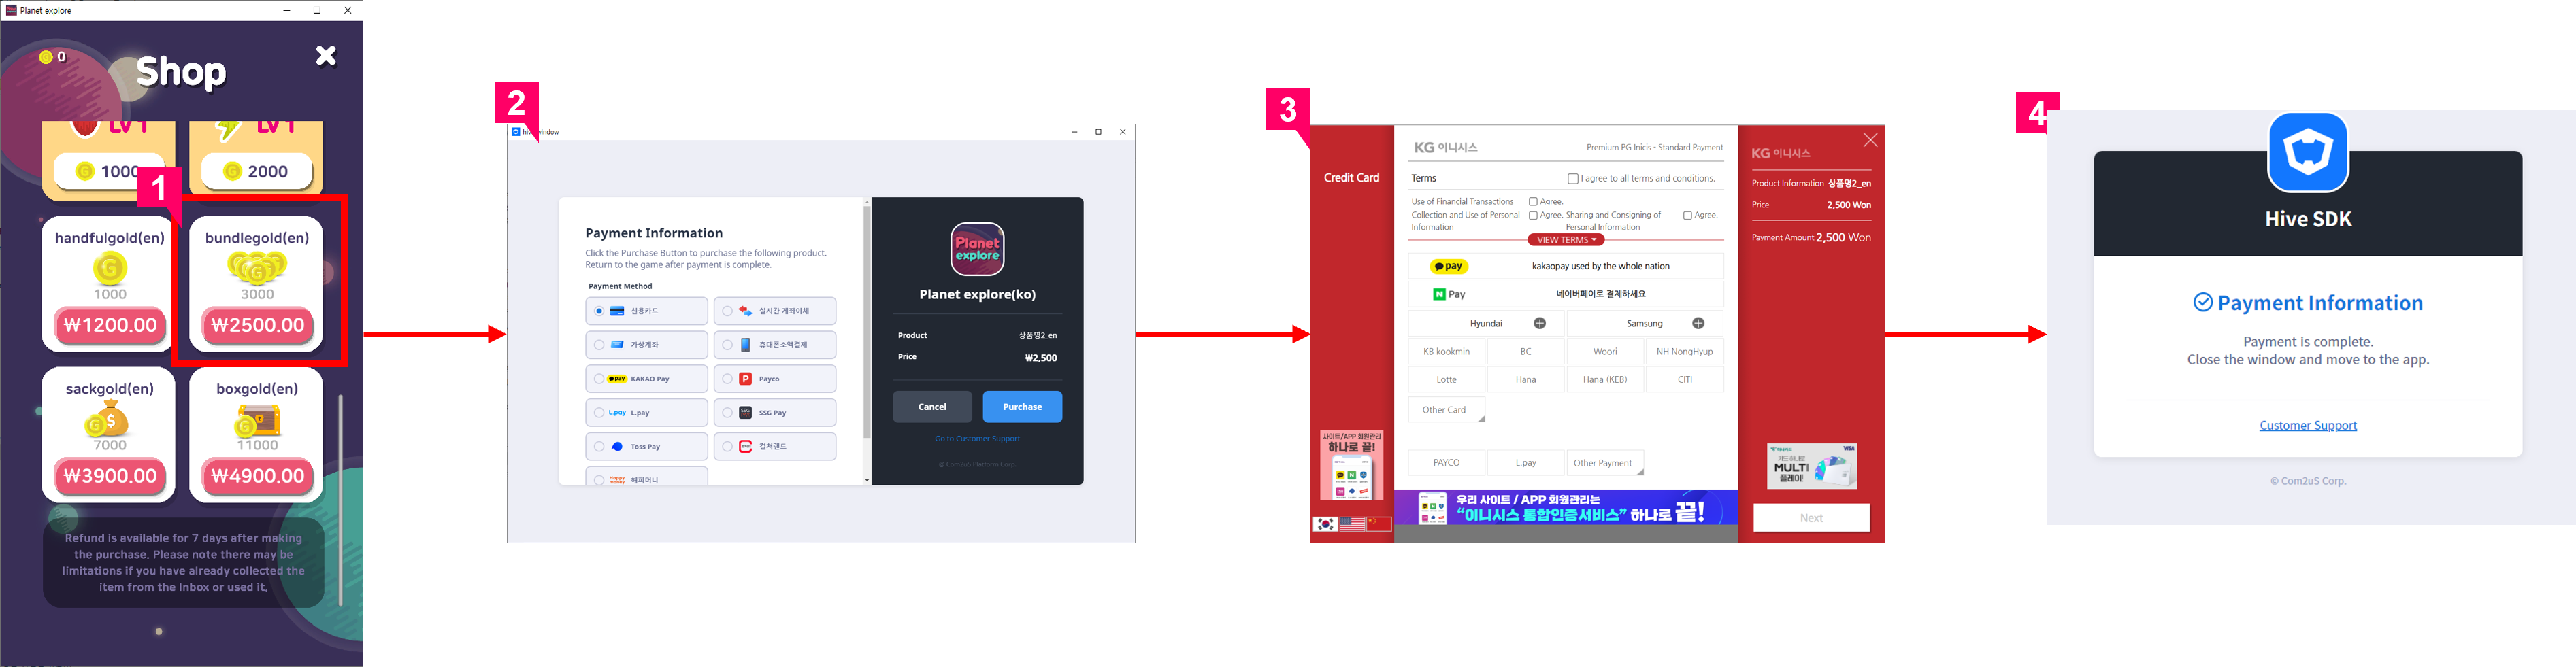 ① Select a product to purchase in the in-game store
② Expose the payment method selection screen in the web view outside the game screen
- Language: Game language
- Currency: hive_country to which the SDK delivers. If there is none, the country is checked by IP and exposed as the currency of the country
- The product name for payment is displayed in Console > Billing > IAP v4 > Market PID Management. If there is no product name in the language to be exposed, the content entered in the English product name will be displayed.
- The payment method settings can be made in Console > Billing > PG Payment Settings > PG Company Settings
③ Call the PG company's payment page for the country and expose it in the web browser
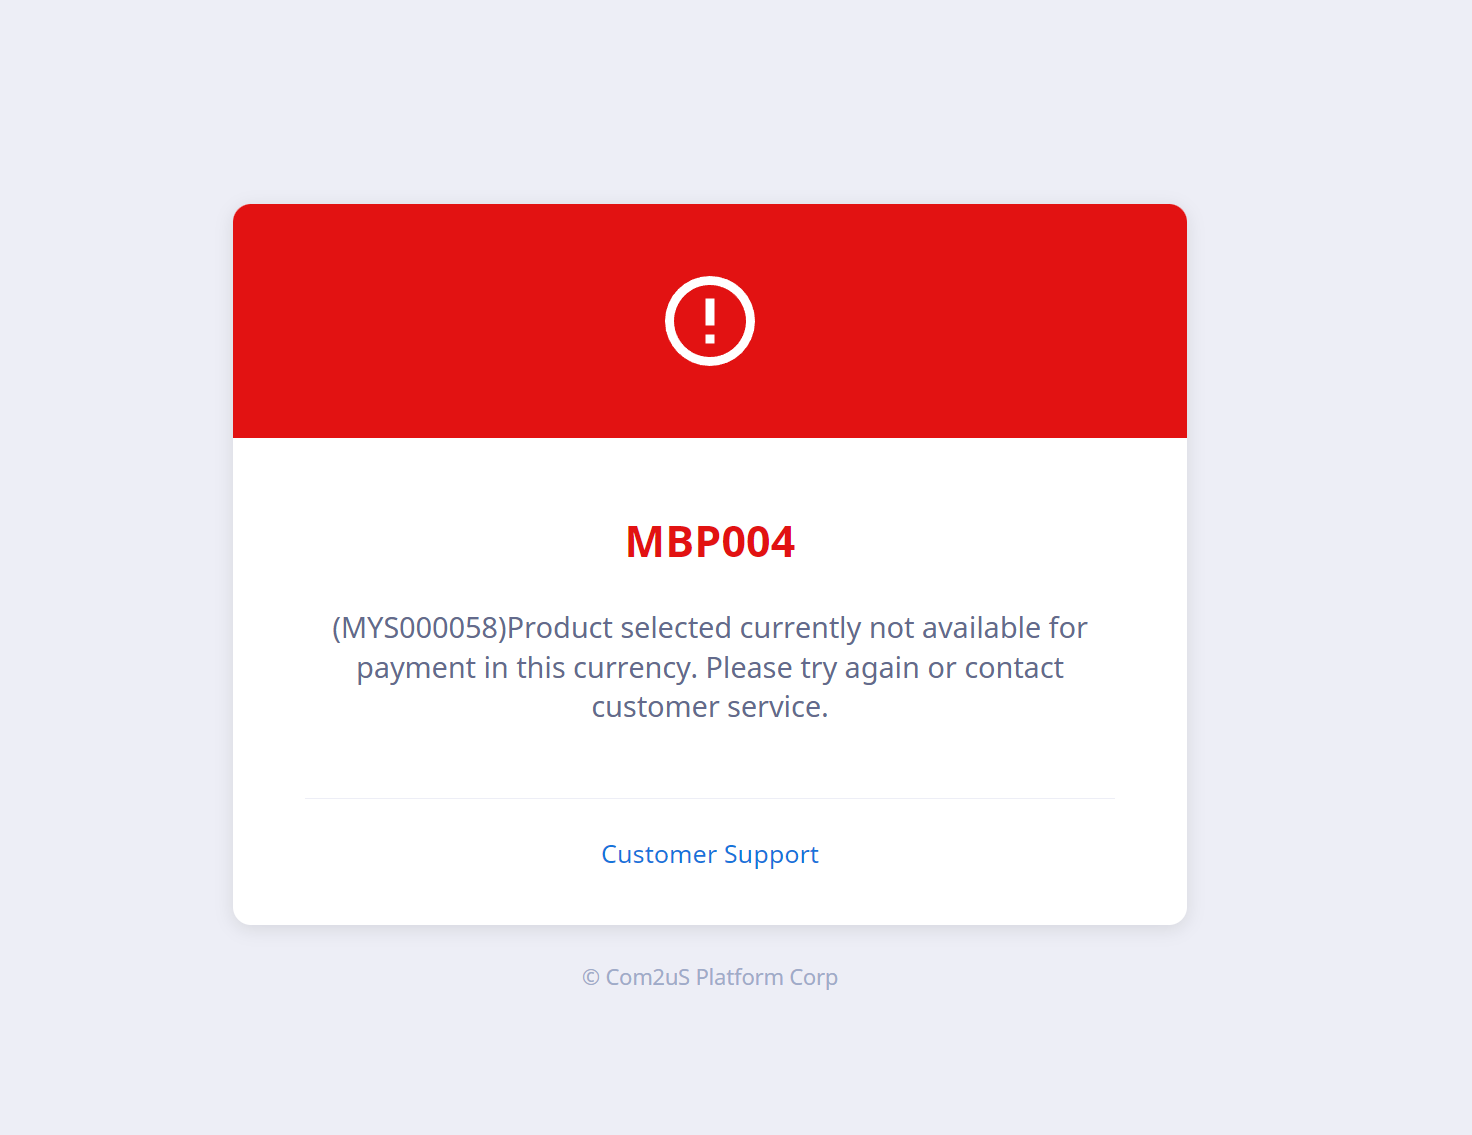
- Error page is displayed when it's not the payment target country
④ Go to the completion page when payment is completed. The completion page is displayed in the language of the browser.
Implementing PG payment in a web store
Please proceed as follows when building a website to sell products.
① Issue two AppIDs by going to Console > App Center.
- AppID for web login
- Select Web login AppID
- Select Usage as Website
- If you have an existing AppID issued for Website usage, you can also use the existing one.
- AppID for payment
- Select game AppID
- Select OS – Windows, Market – Direct distribution
② Set the details of the web login AppID.
- Enter all IdP key values in the login information
- Set login IdP usage
- Enter the site address to return to after login in the redirect URI in the web login action settings
③ Register PG company information by going to Console > Billing > Payment Environment Settings > PG Company Settings.
④ Register the market PID in the payment AppID created in step 1 by going to Console > Billing > In-app Payment > Register Market PID.
⑤ Develop the site with the web login API and web PG payment API.
Pre-work
1. PG Payment Platform Settings
- When using PortOne
- Register IAP server callback URL and set PG company in PortOne admin console
- Register common URL for sending webhook in PortOne admin console > system settings > webhook setting
- Webhook URL
- Commercial: https://store.withhive.com/payment/result_processing/import
- Sandbox: https://sandbox-store.withhive.com/payment/result_processing/import
- Please Note
- Since PortOne does not provide sandbox payment testing, we suggest the following method for testing.
- Create two PortOne accounts for commercial service and test. The admin account for the PortOne console can create an account regardless of the actual contract.
- Register the commercial URL on the PortOne commercial account, and register actual PG company information, etc. to the live console.
- Register the sandbox URL on the PortOne test account, and register test PG company information, etc. to the sandbox console.
- If only one actual PortOne account is being used for the purpose of commercial service, connect with sandbox upon initial application and change to commercial URL for the official service.
- Do not change to a sandbox address after changing to a commercial URL. Please be noted that actual user payment will be processed as test payment.
- If PortOne console sets the PG company to test, the transaction history is automatically canceled on the following day. Games in commercial service must not be set to test.
- Register IAP server callback URL and set PG company in PortOne admin console
- When using Xsolla
- Request to create a sub-project to the platform business office and issue a Project id and Secret Key
- When using MyCard through a direct contract
- Select MyCard as the service country by going to Console > PG Company Settings and generate a hash key.
- Enter the hash key issued by the console and the IP, URL, and customer company registration information for payment in the Registration Form provided by MyCard and submit it to MyCard. Download the IP and URL information from the attached file below.Download IP & URL Information
- After that, receive the FaServiceID from MyCard and enter it in the PG Company Settings of the Console.
- Please Note
- The minimum and maximum payment amounts are specified according to the currency of each payment method, so please be cautious when setting product prices.
- An error message will be displayed when requesting payment for products outside the applicable price range.
2. Console Settings
- Price Tier Settings
- Menu Location: Console > Billing > Store Price Management > Price Tier
- Price Tier Settings Guide Shortcuts
- Register Market PID
- Menu Location: Console > Billing > In-App Purchase > Market PID Registration
- Market PID Registration Guide Shortcuts
- PG Payment Settings
- Menu Location: Console > Billing > Payment Environment Settings > PG Company Settings
- PG Company Settings Guide Shortcuts
PG Settings Guide
PG Settings Method
You can configure PG information based on App IDs, with the following options:
Individual Settings

- Configure PG information for a single App ID.
- Click the Edit icon for the App ID, or select the App ID and click the Edit button to go to the PG settings page.
Batch Settings

- Apply the same PG information to all selected App IDs at once.
- To apply the same PG information to all selected App IDs, select the desired App IDs and click the Edit button.
- For batch configuration, existing settings may differ between App IDs, so previous information cannot be automatically retrieved.
- If needed, click the Load Existing Settings button to import PG information from a specific App ID and proceed with configuration.
- Once saved, the current PG information will be applied to all selected App IDs.
Load Existing Settings
Use the Load Existing Settings feature if you want to reference or apply PG information from another App ID.


- After clicking the button and selecting the desired App ID, its PG configuration will be imported.

- After loading, make sure to enter each PG platform settings pop-up and save the changes.
Service Country Selection
You can select the countries where each PG platform will be available. Payments will only be processed in the selected countries.

Note
- Only one PG platform can be serviced per country, and multiple PG platforms cannot be used simultaneously in the same country.
- Example: If PortOne service country is set to "South Korea (KR)," then Mycard or Xsolla cannot also be set to "South Korea (KR)."
PG Company Settings
PortOne Settings

- Basic Information
- Enter the same information registered in the System Settings of the PortOne Admin Console.
- If sub-shops exist, the Tier Code must be entered.
- For direct integration with Naver Pay, the Chain ID value must be entered.

- Payment Method Information
- The list of PG companies set in the PortOne Admin Console is automatically imported.
- When selecting payment methods, for KCP you must check the PG ID and enable it to match the PortOne Admin Console.
- If payment methods enabled by PG ID differ from those in the PortOne Admin Console, they may not display correctly.
- If a test payment page is required for PG company contracts, you can copy the Preview page URL and provide it to the PG company.
MyCard Settings

- Basic Information
- Enter the FacServiceID provided by MyCard.
- Click the Auto Generate button to create an Authentication Number (Hash Key).
- Copy the generated Authentication Number (Hash Key), enter it in the MyCard registration request form, and submit it to MyCard.
- If you want to use an already registered Authentication Number (Hash Key), enter it directly.
- Payment Method Information
- Only Mycard is supported as a payment method.
Xsolla Settings

- Basic Information
- Enter the Project ID and Secret Key from Xsolla Console > Project Settings > General Settings.
- Payment Method Information
- Select the payment methods to use.
- Select a country to view the supported payment methods by country.
- Use Preview to check in advance which payment methods will be displayed for each country.
- If you select a country, only the activated payment methods supported in that country will appear in the preview.
- If you do not select a country, the preview will show payment methods based on the first selected service country.
PG Payment Notification Settings
As soon as a payment succeeds or is canceled, the payment information is sent to the entered URL. The game can then use this result to verify the receipt and deliver the purchased item to the user. If no configured server exists, this field can be left blank. In that case, the game must directly query unpaid transactions and run the receipt verification process.

- Payment Completion Info: Immediately sends success or cancellation info to the entered URL.
- All Payment Info: Immediately sends all payment details (success, cancellation, refund, re-payment by user) to the entered URL.
Note
If the applied Hive SDK version is earlier than 25.1.0, you can use the payment information to verify receipts in the game and then grant items to the user. For versions 25.1.0 and later, the SDK automatically sends the payment information, so no additional setup is required. If you want to receive and use payment information for operational needs, you can register a server URL.
PC Payment Inquiry and Cancellation
Check all payment details of PortOne or Xsolla on one page and cancel directly if necessary. Terminal 3 of the Paymentwall sends a payment cancellation request instead of an immediate payment cancellation, and whether the cancellation has been completed must be confirmed in the terminal 3 console.
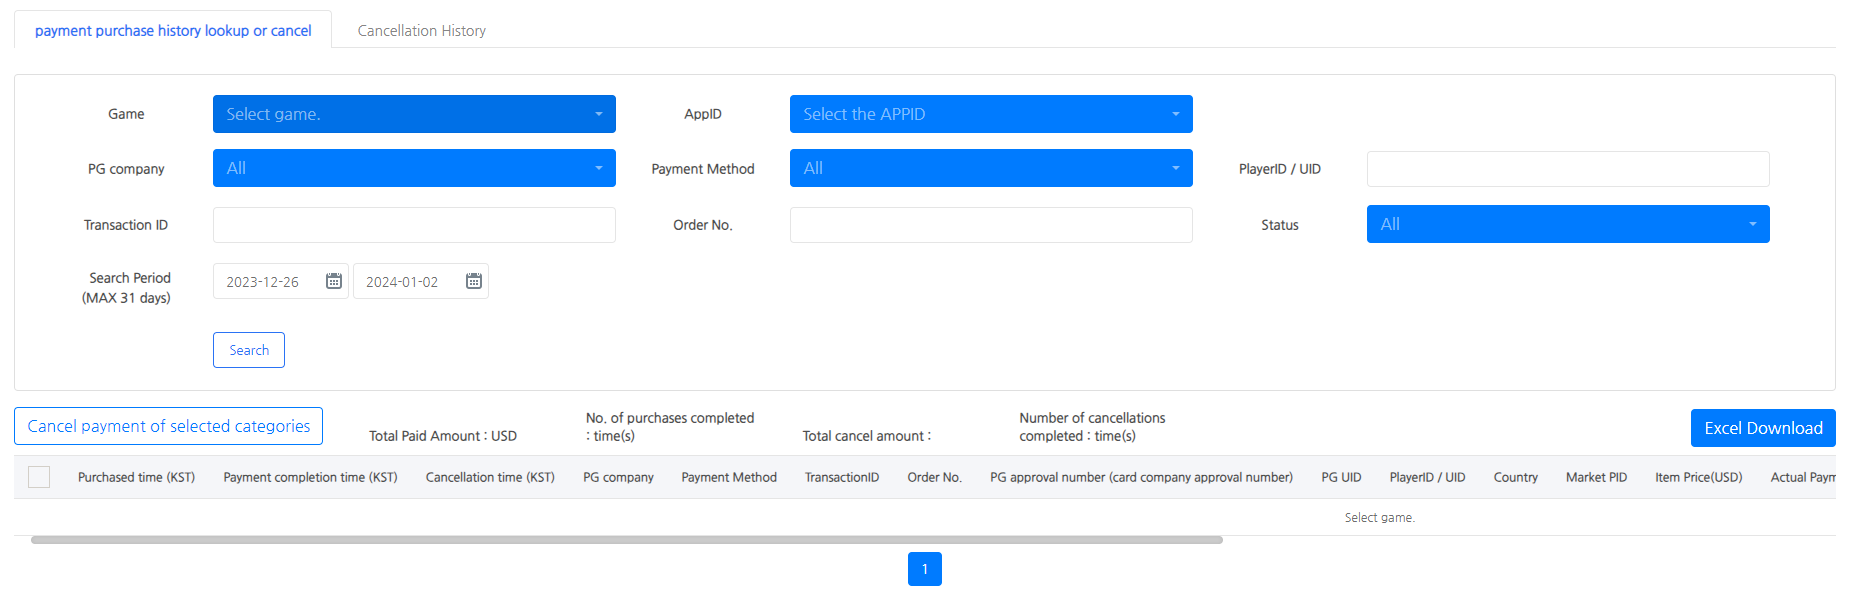
- PG Company and Payment Method
- A list of all PGs provided by the company is provided as an optional selection, regardless of whether the payment method is activated in the PG company settings or not.
- Status
- PG
- Payment Complete - Payment has been successfully completed
- Payment Failed - Payment failed due to errors during payment, etc.
- Payment Pending - Payment is not made immediately due to account transfer, etc.
- Cancellation Request – Request to cancel payment
- Cancellation Complete – Payment is canceled properly. Terminal 3 payment cannot be confirmed whether cancellation has been completed or not
- Cancellation Failed – Cancellation request failed
- Incomplete – Payment is not completed because a user closed the payment window or clicked Cancel Payment before payment
- Steam
- Receive Order
- Accept Payment (User)
- Cancel Payment
- Refund Payment
- Partial Refund Payment
- Illegal Payment
- Order Fraud
- Chargeback Fraud
- Payment Cancellation Failed
- PG
- Total Payment Amount: Total Payment Amount: Sum of all search conditions excluding non-progress
- Number of Purchases Completed: Purchase Completed Counts: Number of completed payments excluding cancellations
- Total Cancellation Amount/Cancellations: Total Cancellation Amount/Cancellation Counts: Total amount and number of canceled cases
- Product price: Product price in the display currency set in Price Tier
- Game_Payload_info: The value received from the game server to be used as an additional indicator in Analytics through the item payment result transmission API
- IAP_Payload: Purchase metadata self-defined by the app developer
- Cautions
- The payment history on the console with the setting value from before the change cannot be canceled if you modify the option value in the PG company configuration.
- Example 1: The existing Xsolla payment data cannot be canceled in Console if you switch from using Xsolla to PortOnein the PG company settings.
- Example 2: Payment history from the time a tier code was used cannot be canceled in the Console if the tier code was used and then erased in the PG company settings.
- If you directly cancel the payment details in the I'mport console, depending on the PG company, the cancellation details may not be delivered to the console so please try to cancel through the panel instead.
- The payment history on the console with the setting value from before the change cannot be canceled if you modify the option value in the PG company configuration.
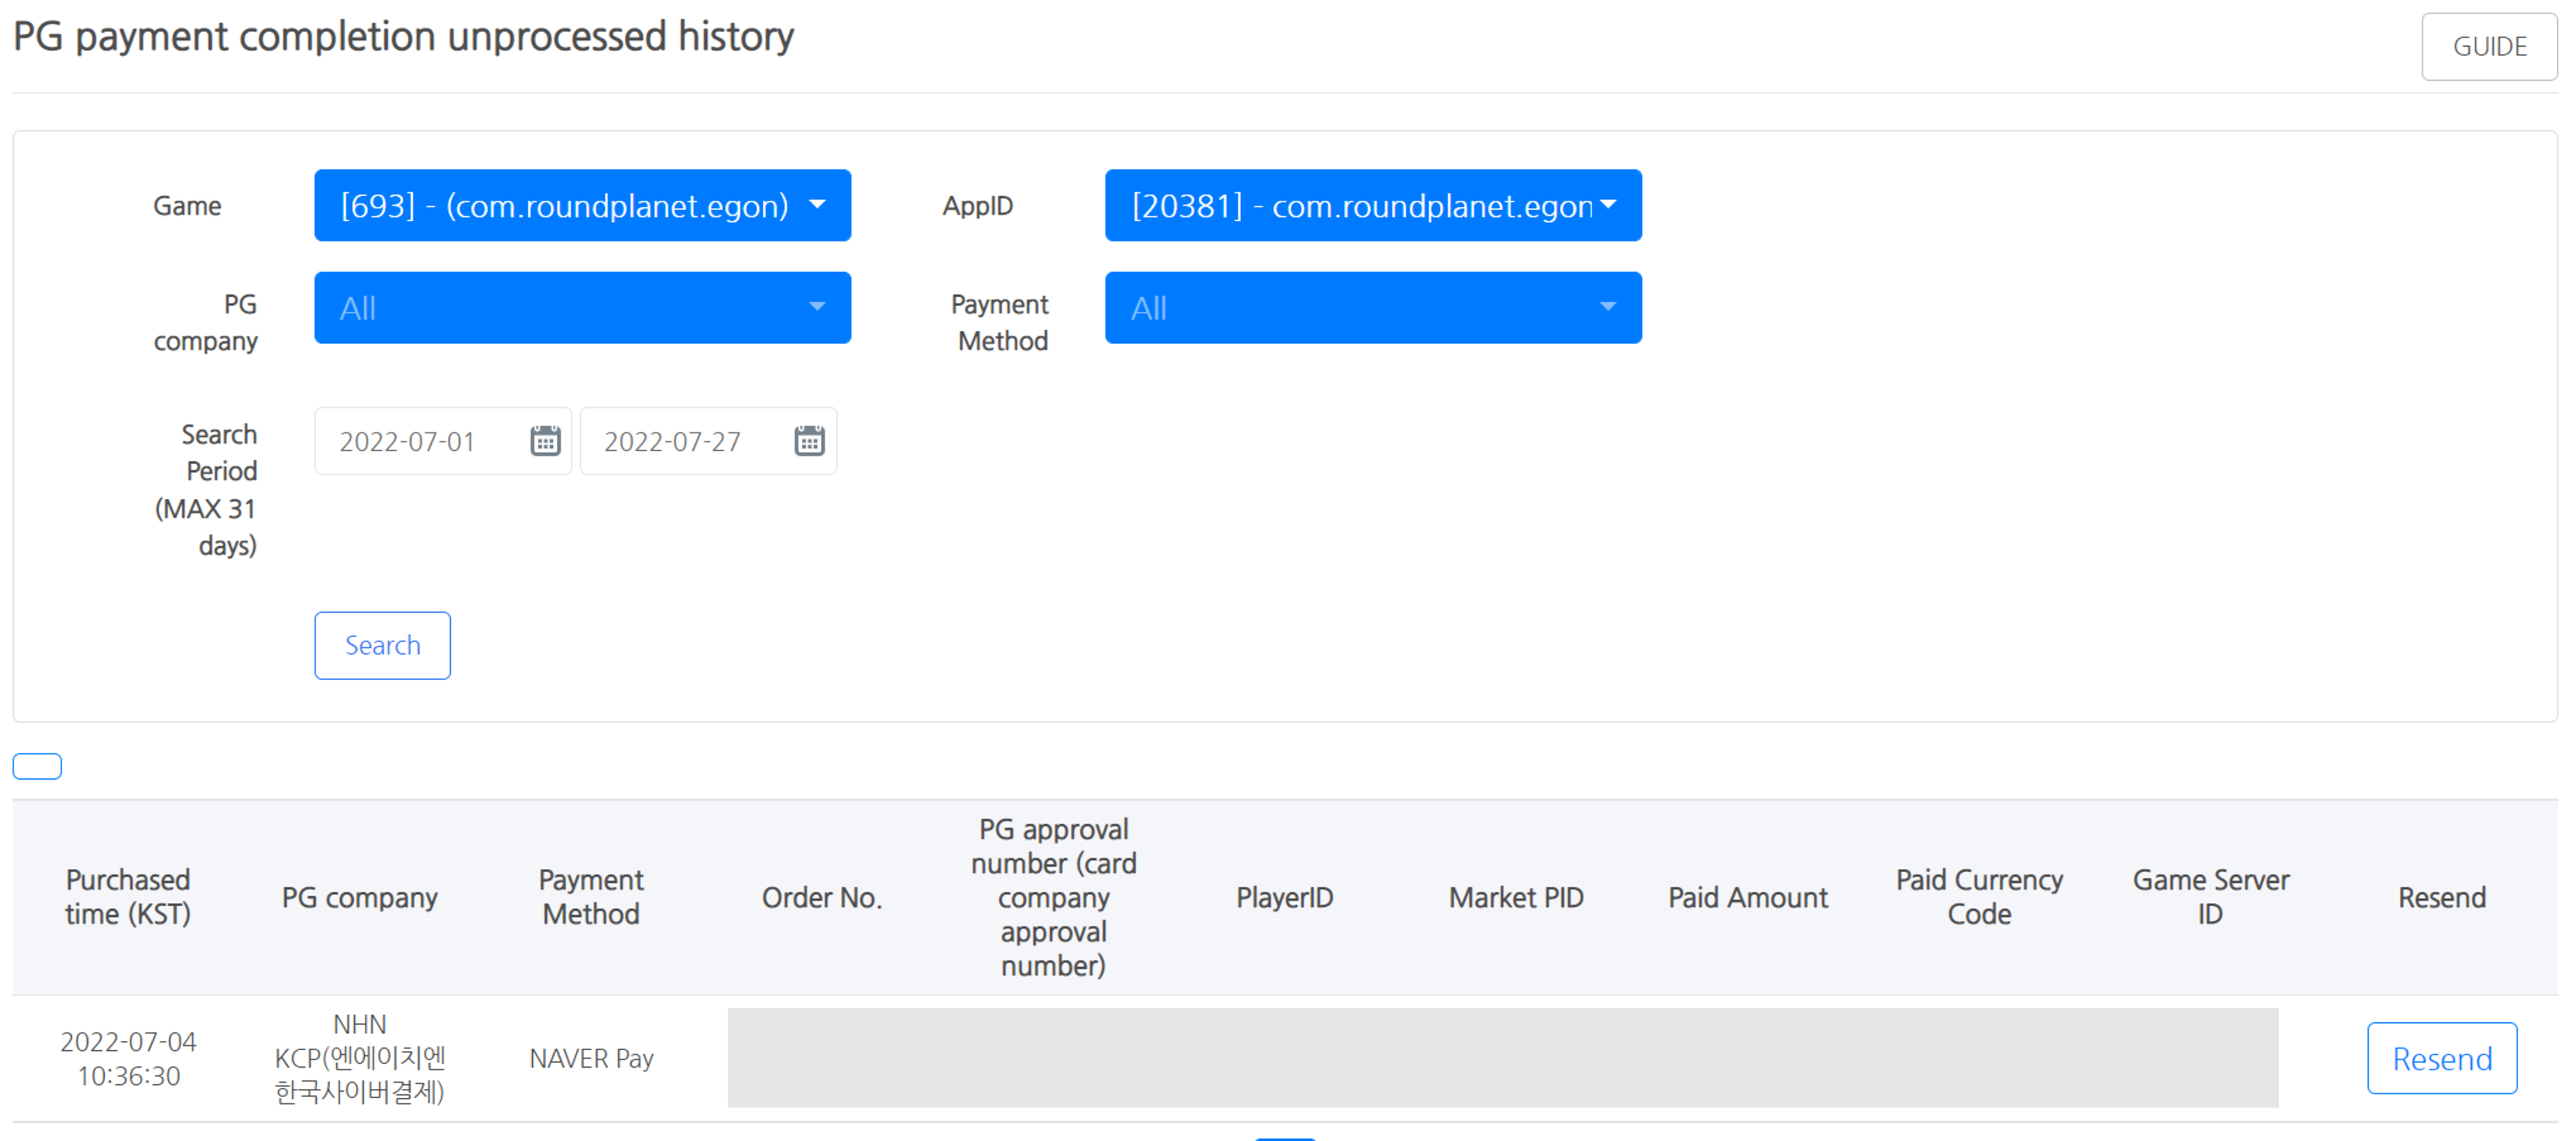
PC Payment Item Re-processing
In this menu, you can check the details of the PG payments that are not completed normally. Click Resend to complete the payment process and pay the purchased product. If the retransmission is successful, it will disappear from the search results.
- Menu Location: Console > Billing > IAP v4 > PG payment completion unprocessed history
Compliance with the California Digital Media Consumer Protection Act (AB 2426)

- Due to the enforcement of California’s “Digital Media Consumer Protection Act (AB 2426),” it is mandatory to inform consumers that they do not actually own digital content purchases. A notice reflecting this policy is displayed in the PG payment UI. This message appears only when the country is set to the United States and the language is set to English (en).
- Clicking Learn more opens the Terms of Service link set in Console > Provisioning > Terms.