Inquiry list
Review and process inquiries submitted through in-game 1:1 inquiries or email. Features include checking inquiry status, changing the assigned service rep, and registering replies.
My Inquiries & Language Tab
The My Inquiries tab shows inquiries assigned to you, and the Language tab shows inquiries received in your assigned language. The range of visible inquiries may vary depending on the Service Rep level settings.
My Inquiry Status : Check the number of inquiries by status based on the current tab.

Search Criteria
Search inquiries by setting conditions such as game, route, period, and status.
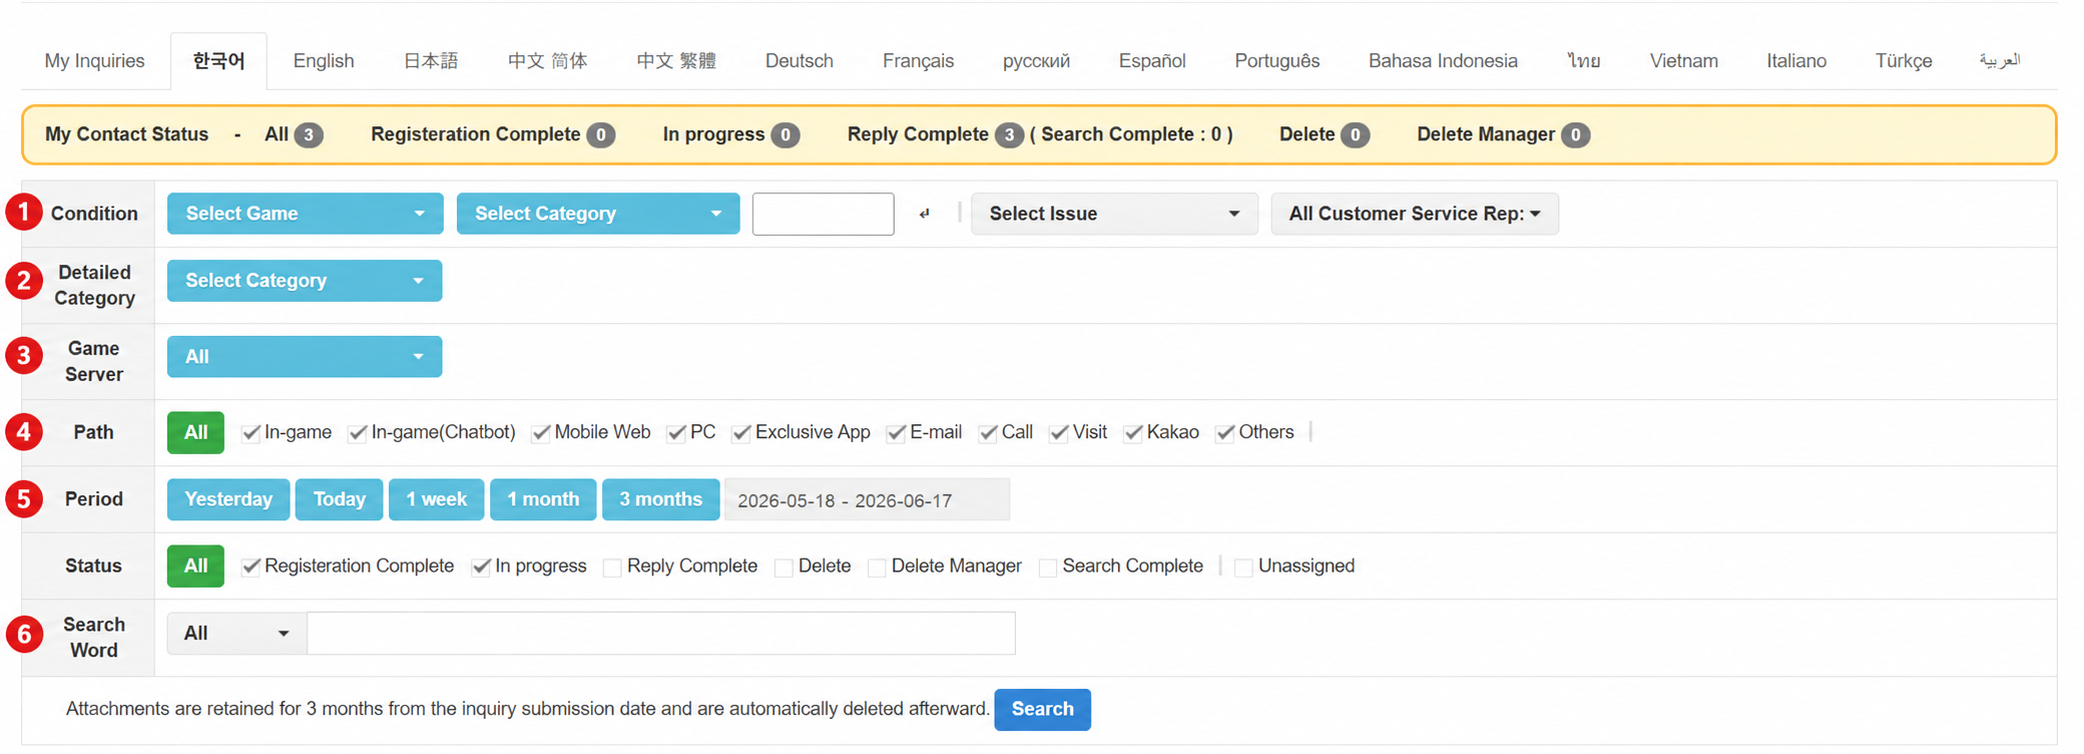
- Condition : Set conditions for game, category, issue, and service rep. Entering a category code allows you to select game and category together.
- Sub-category : Set a sub-category under the selected category.
- Game Server : Search inquiries by game server.
- Route : Search by the route through which the inquiry was received. Options include In-game, In-game (Chatbot), Mobile Web, PC, Dedicated App, Email, Phone, Visit, Kakao, and Other.
- Period : Set the search period. Use the Yesterday, Today, 1 Week, 1 Month, or 3 Months buttons, or select dates manually. The search range can be set up to 3 months at a time.
- Status : Search by inquiry processing status. Options include Received, In Progress, Reply Complete, Deleted, Admin Deleted, Viewed, and Unassigned.
- Search Word : Enter a search category and keyword to search inquiries. Searchable fields include account identifiers, email, title, content, and inquiry number.
Inquiry Related Features
Select an inquiry to change information such as the assigned service rep, category, or issue, or to perform bulk actions.
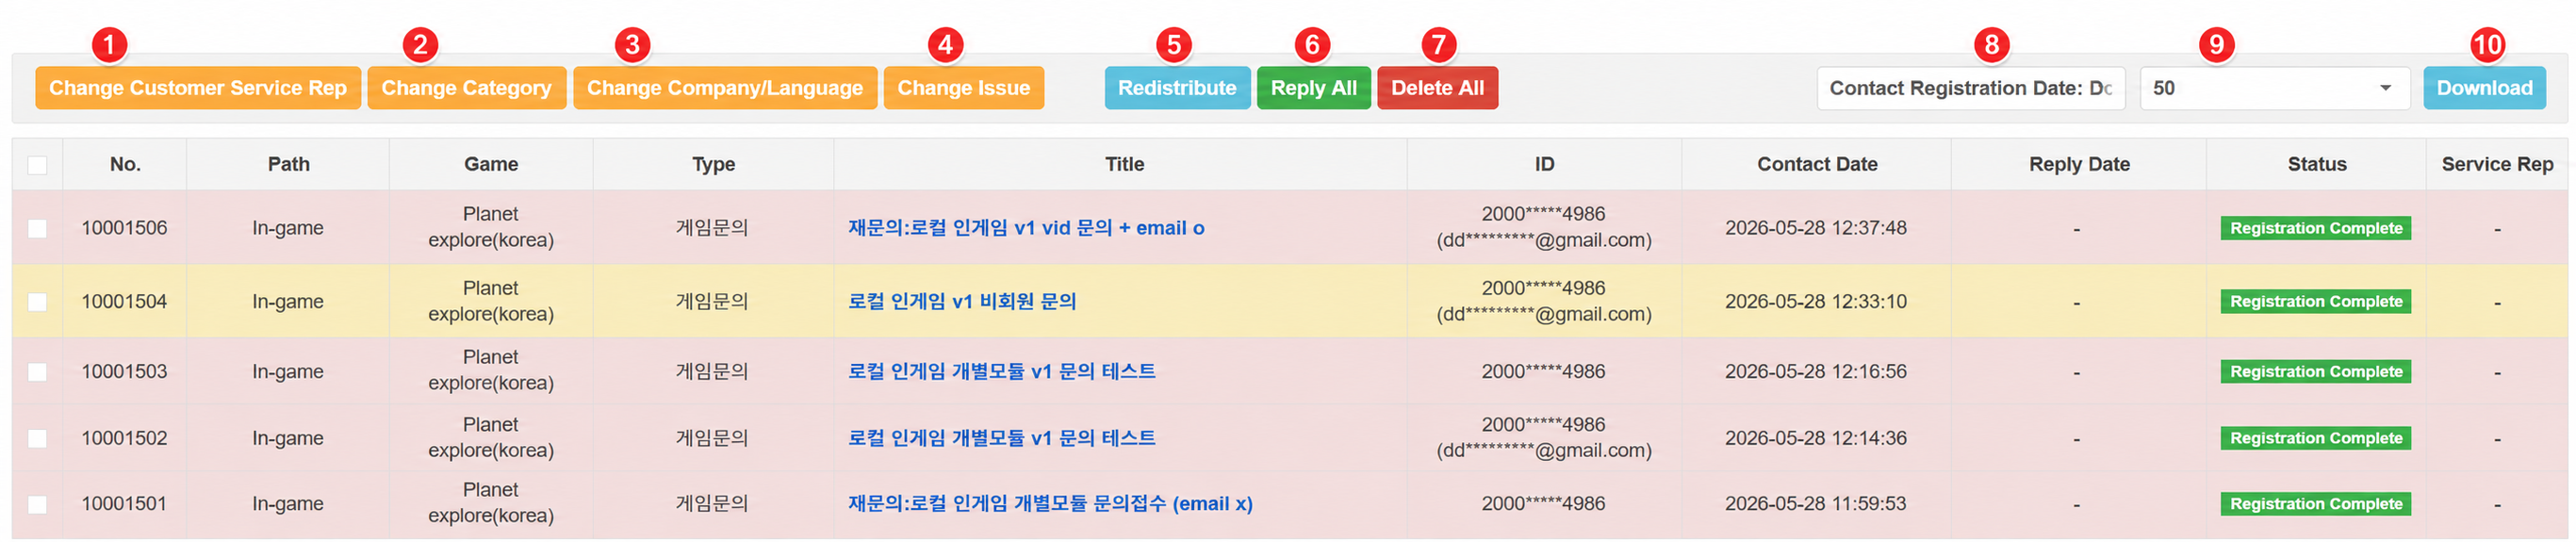
- Change Service Rep : Change the service rep assigned to the selected inquiry.
- Change Category : Change the category of the selected inquiry. You can search by category code or select from the category list.
- Change Company/Language : Move the selected inquiry to another company or language tab. The inquiry will be delivered with no assigned service rep.
- Change Issue : Change the issue of the selected inquiry.
- Redistribute : Reassign the selected inquiry according to the inquiry distribution rules.
- Reply All (Admin only) : Register the same reply for multiple inquiries at once.
- Delete All (Admin only) : Delete the selected inquiries all at once.
- Sort : Sort the inquiry list by received date, reply completion date, or inquiry volume (UID/Email).
- Items per Page : Set the number of inquiries displayed per page.
- Download : Download the current inquiry list as a file.
Inquiry List
The inquiry list displays key information about inquiries available in the current tab.
| Field | Description |
|---|---|
| Inquiry No. | A unique number assigned when the inquiry is received. |
| Route | The route through which the inquiry was received. |
| Game | The game for which the inquiry was received. |
| Category | The category under which the inquiry was received. |
| Title | The inquiry title. Click to go to the inquiry detail page. Hover to preview part of the inquiry content. |
| ID | Account identification information of the person who submitted the inquiry. |
| Received Date | The date and time the inquiry was received. |
| Reply Date | The date and time the reply was completed. |
| Status | The processing status of the inquiry. |
| Service Rep | The service rep assigned to the inquiry. |
Key status values are displayed based on the following criteria.
| Status | Description |
|---|---|
| Received | The inquiry has been received. |
| In Progress | The assigned service rep has viewed the inquiry. |
| Reply Complete | The service rep has registered a reply. |
| Deleted | The service rep or the user has deleted the inquiry. |
Row colors in the list vary based on the time elapsed since the inquiry was received or the type of inquiry.
| List Color | Criteria |
|---|---|
| White | Within 24 hours of inquiry receipt |
| Blue | More than 24 hours and up to 48 hours after receipt |
| Red | More than 48 hours after receipt |
| Orange | Non-logged-in inquiries (web, email, etc.) |
Inquiry Detail
On the inquiry detail page, you can review inquiry information and content. Depending on the inquiry status, you can write or review a reply, and check the processing history, service rep memo, and related inquiries.
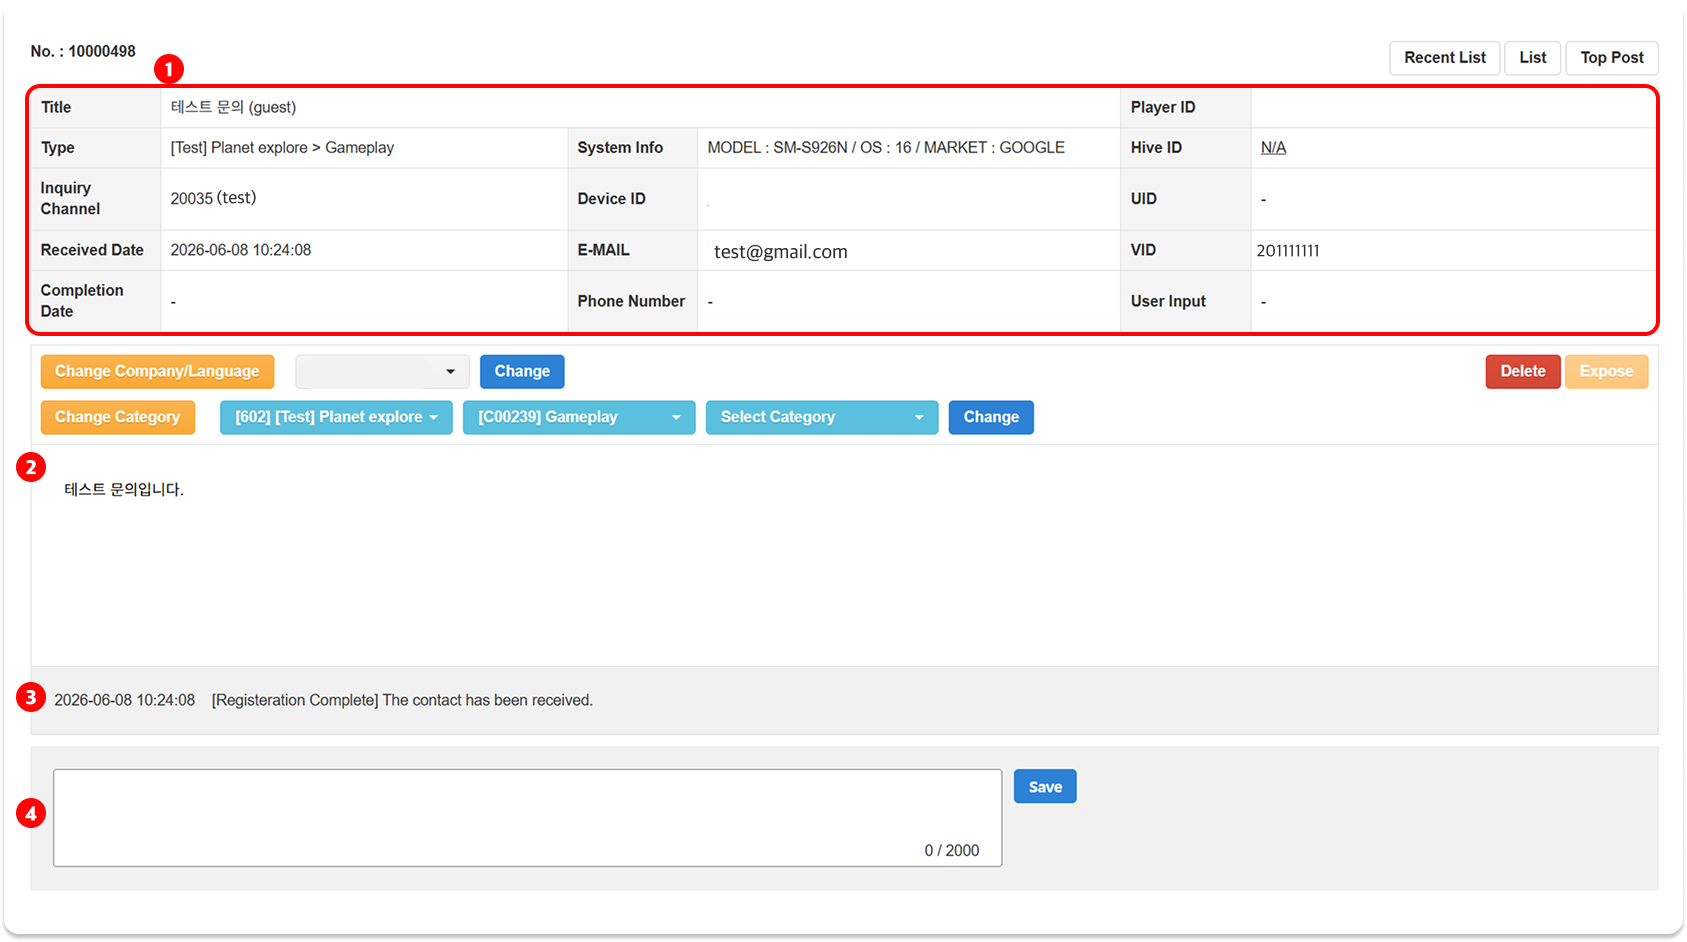
- Inquiry Information : Check the inquiry title, category, route, received date, completion date, user identification info, and device info.
- Inquiry Content : Check the content and attachments submitted by the user.
- Consultation History : Check the inquiry processing history including receipt, auto-distribution, and service rep changes. Service rep memos are also recorded here.
- Service Rep Memo : Enter internal memos needed for processing the inquiry.
Note
- Images and files attached by the user are automatically deleted after 3 months from the inquiry receipt date.
- It is recommended to enter only information necessary for processing in the service rep memo, and to avoid including personal information.
Inquiry Information Detail
The following are the key fields available in the inquiry information section.
| Field | Description |
|---|---|
| Inquiry Route | The route through which the inquiry was received. In-game inquiries are displayed in App Index (Game Name) format, and web routes such as Email, Mobile Web, and with HIVE are displayed in Route Identifier (Route Name) format. |
| System Info | Environment information at the time of inquiry. Displays MODEL, OS, and MARKET. |
| Device ID | The identifier of the device from which the inquiry was submitted. |
| The email address of the person who submitted the inquiry. | |
| Player ID | The Player ID of the person who submitted the inquiry. |
| Hive ID | The Hive ID of the person who submitted the inquiry. |
| UID / VID | Account information used to identify the user. |
| User Input Info | Account identification information entered directly by the user when submitting the inquiry. |
Fields with no value are displayed as - or N/A. Fields marked N/A can be clicked to enter or update the information.
Writing and Reviewing a Reply
For unanswered inquiries, write and register a reply. For completed inquiries, review the registered reply.
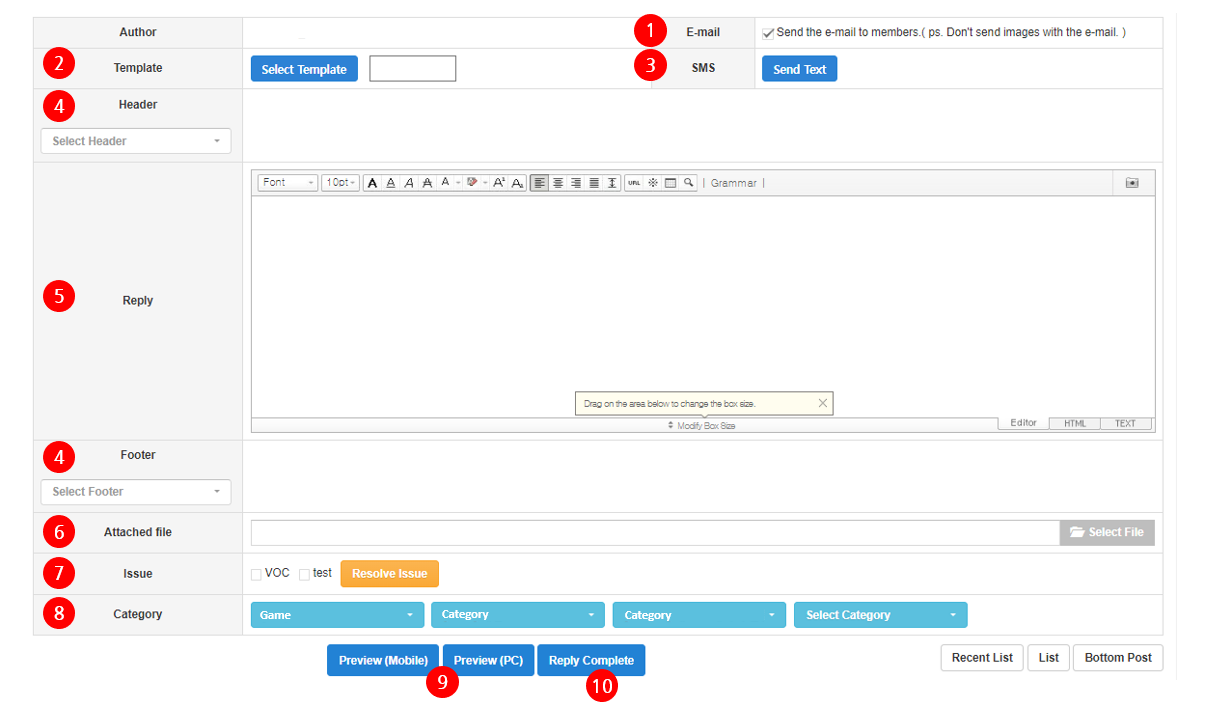
- Email : Displayed when the user's email address is available, and selected by default. When selected, a reply email is sent to the user's email address upon registration.
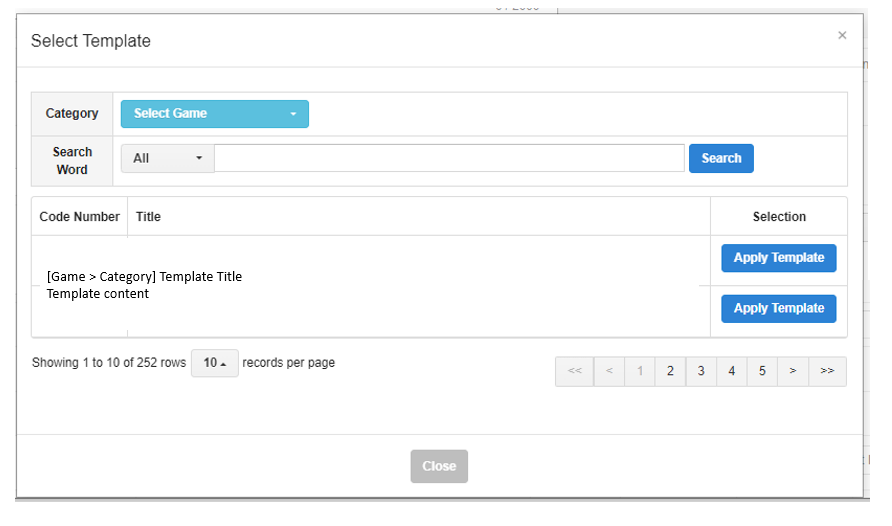
- Template : Click Select Template to browse registered reply templates and apply one to the reply.
- Send SMS : The SMS sending page appears as a pop-up.
- Header/Footer : Select the header and footer to apply to the reply.
- Reply : Enter the reply content to register for the inquiry.
- Attachment : Attach a file to the reply. Only 1 attachment is allowed per reply.
- Issue : Displays the issue registered in admin settings. Click the Edit Issue button to change to a different issue.
- Category : Displays the category selected when the inquiry was received. Click the Edit Category button to change it.
- Preview : Preview the inquiry content and reply in mobile or PC view.
- Reply Complete : Click the Reply Complete button to register the reply.
Reply templates and headers/footers are managed in Response Templates.
Related Inquiries
Below the reply section, a list of related inquiries from the same user is displayed. Related inquiries are retrieved based on VID/Player ID, UID, and email. Click a title to go to that inquiry's detail page.
The ID field in related inquiries displays the user's identification information, shown in priority order: VID/Player ID, UID, then email.