Admin settings
Configure agent permissions, inquiry distribution methods, and inquiry categories required for customer support center operations.
➡️ Console path: Customer Support > Inquiry > Admin Settings
User Info
New Service Rep. Registration
Register administrators or agents who will handle customer inquiries.
Location
Admin Settings > Contact Management Settings (tab) > Language (tab) > User Info (tab)
Before New Registration
- To register a new administrator or agent, the account must have company console permissions and project permissions. If the account cannot be found, check whether these permissions have been granted.
- The customer support center includes 5 administrator and agent accounts. Accounts currently in use are counted without duplicates across languages. Deactivated agents are not included.
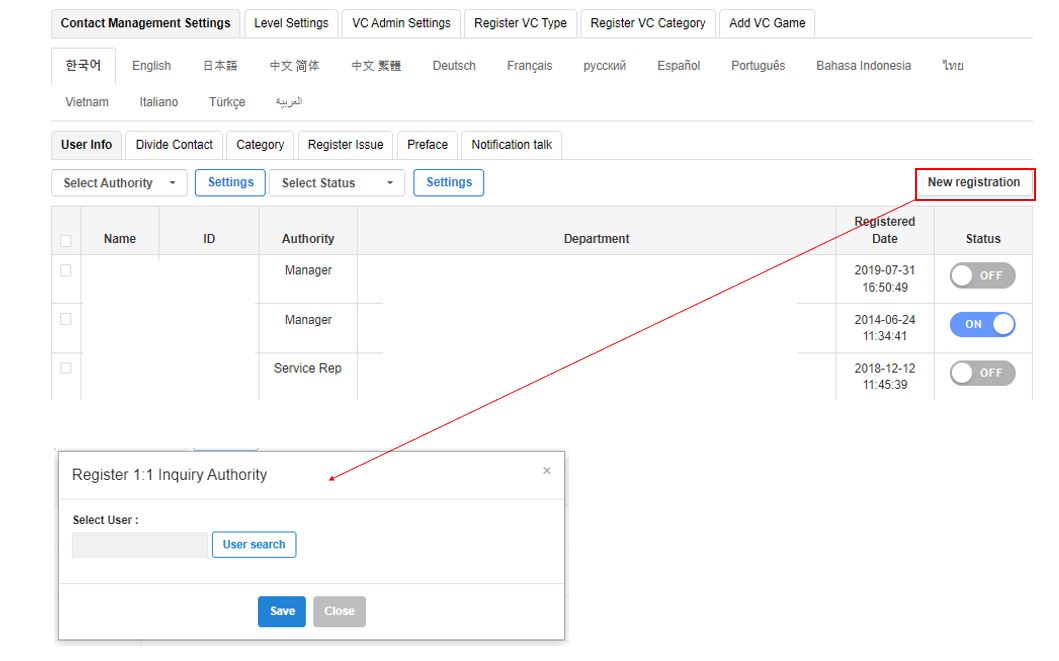
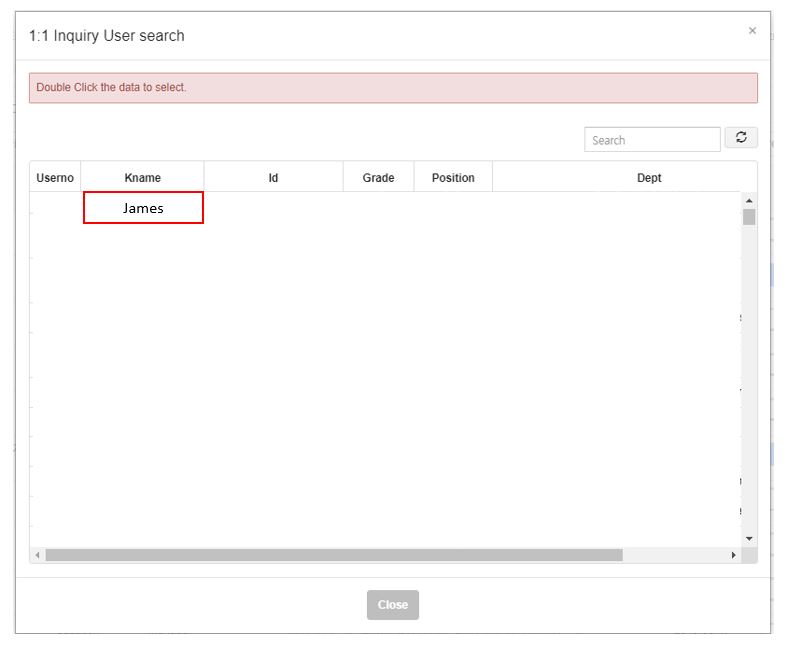
- Click New registration , then search for a user in the 1:1 Inquiry Permission Registration pop-up.
- Double-click the user's name in the search results to select the user, then save.
- Newly registered users are added to the Canceled Customer Service Rep. list.
- Select a user from the Canceled Customer Service Rep. list and grant administrator or agent permissions. The user will move to the active user list in the ** User Info** tab.
Account Usage
The User Info screen shows the number of included accounts, accounts currently in use, and additional accounts in use.
- Included accounts : The number of administrator and agent accounts included by default.
- Accounts currently in use : The number of accounts with administrator or agent permissions. An account registered in multiple languages is counted only once.
- Additional accounts in use : The number of accounts currently in use that exceed the included account count.
Service Rep. Permission Settings and Revocation
Grant or revoke permissions for users registered in the User Info tab.
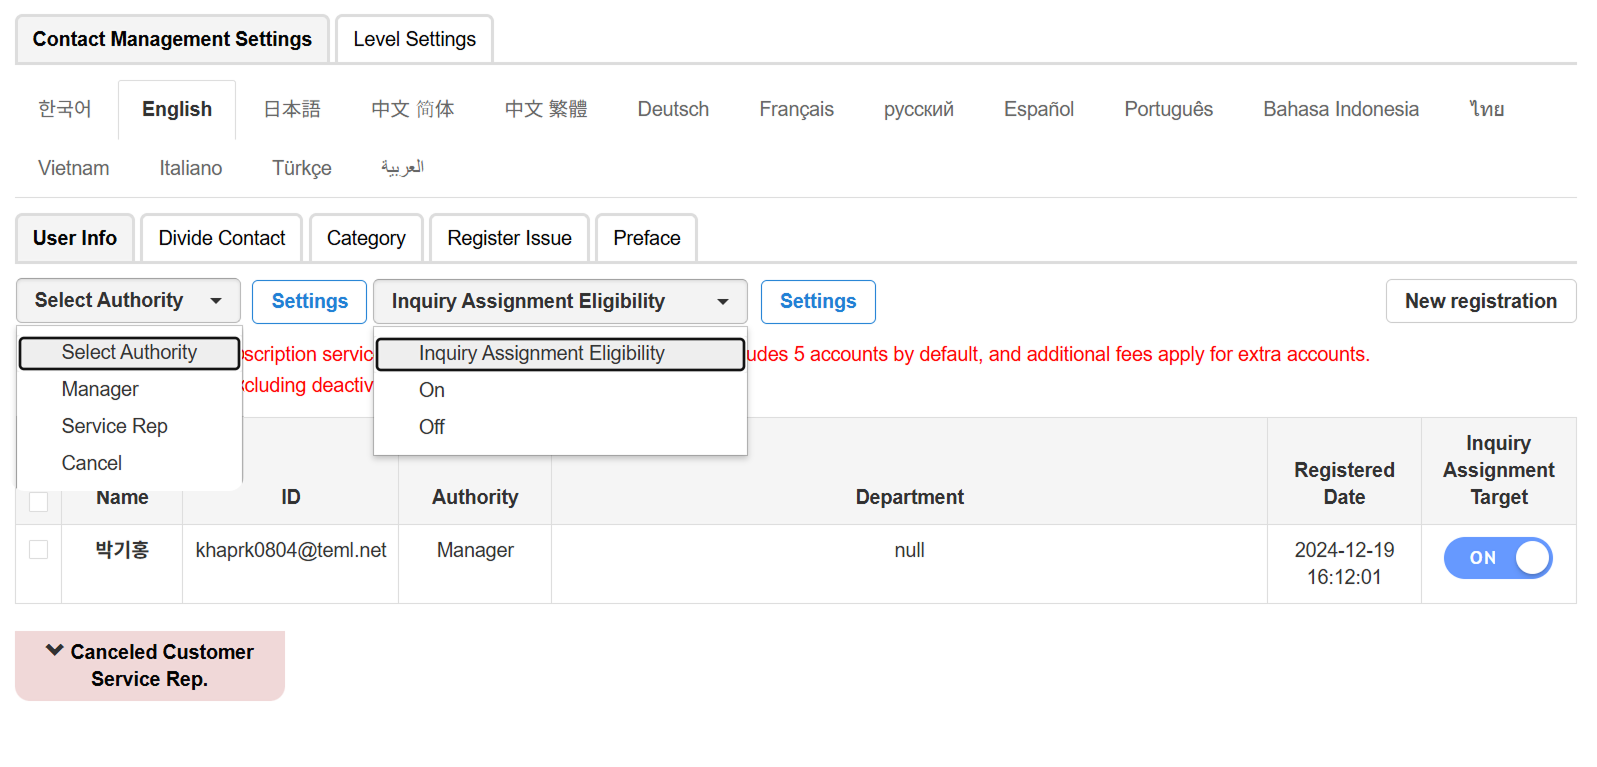
Select Authority
- Manager : Can manage agent permissions for the selected language tab and distribute inquiries.
- Service Rep : Can view assigned inquiries and submit replies.
- Cancel : Revokes administrator or agent permissions. Users whose permissions have been revoked can be found in the Canceled Customer Service Rep. list.
Before Revoking Permissions
Users whose Inquiry Assignment Target is set to ON cannot have their permissions revoked. Set it to OFF before revoking permissions.
Inquiry Assignment Target
- Set whether an agent is included as an inquiry assignment target.
- Agents set to ON are included as inquiry assignment targets.
- Agents set to OFF are excluded from inquiry assignment targets.
- However, when using Distribute by Game , inquiries are also assigned to agents set to OFF.
Service Rep. Deletion
Delete unused agents to organize the user list. Closing or deleting a console account does not automatically remove the agent from the customer support center's agent list. An administrator must delete the agent manually.
Agents are managed by language. Deletion applies only to the currently selected language and does not affect registration or permissions in other languages.
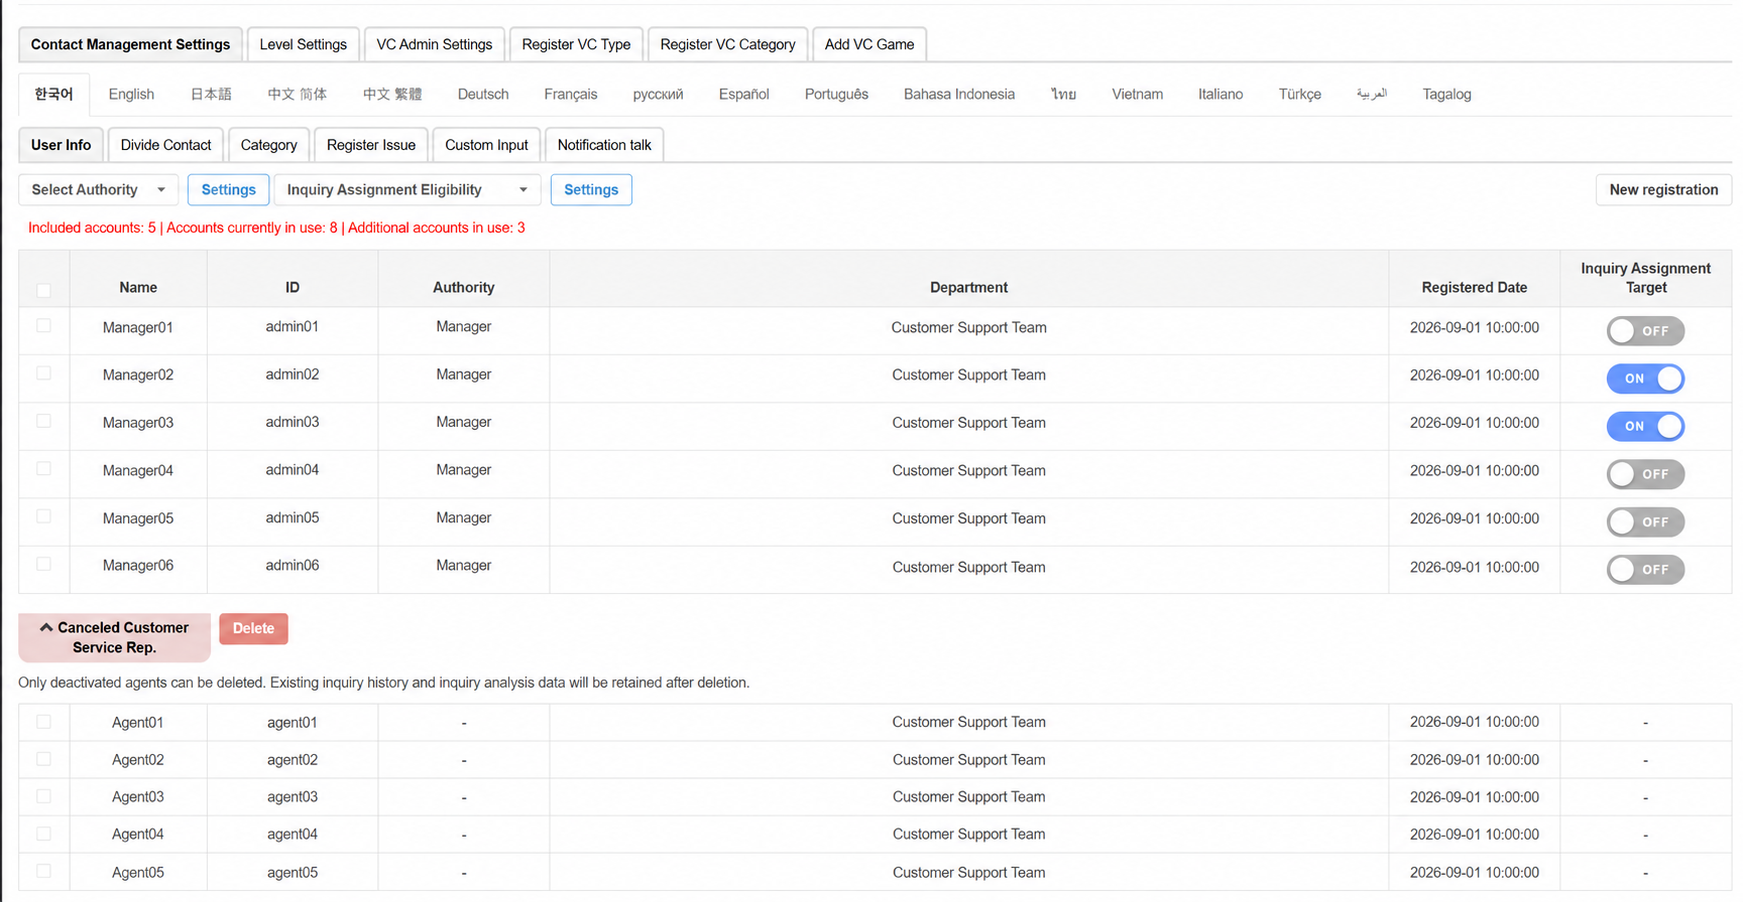
How to Delete Agents
- In the User Info tab, check the ** Canceled Customer Service Rep.** list.
- Select the agents to delete using the checkboxes.
- Click Delete .
- Check the target language and the information about retained history in the confirmation pop-up, then confirm deletion.
Before Deleting Agents
- Only deactivated agents can be deleted.
- For an active agent, first set Inquiry Assignment Target to OFF, revoke permissions, and then delete the agent from the ** Canceled Customer Service Rep.** list.
- The Delete button becomes available when at least one deactivated agent is selected.
- The checkboxes in the Canceled Customer Service Rep. list are used for both reassigning permissions and deletion. After selecting agents, use the permission settings or the ** Delete** button for the intended action.
- Existing inquiry handling history and consultation analytics data are retained after deletion.
Lists and History After Deletion
- Deleted agents are removed from the agent management list for the current language and are no longer displayed on the management screen.
- Agents whose permissions have been revoked remain in the Canceled Customer Service Rep. list until they are deleted.
- Deleted agents are displayed as
Name[X]in existing records, such as inquiry lists and consultation analytics. - The
[X]marker applies only to the language in which the agent was deleted. It does not appear in records for other languages where the agent remains registered, or on screens that do not distinguish records by language.
Reregistering Agents
- If the deleted agent still has a console account, use New registration in the same language to register the agent again. There is no separate restore function.
- Reregistering an account with the same console member number links it to the existing information, clears its deleted status, and removes
[X]from existing inquiry handling history and consultation analytics data for that language. - After reregistration, grant administrator or agent permissions again from the Canceled Customer Service Rep. list.
- If the console member number has changed, such as after closing an account and signing up again, the account may not be linked to the existing history.
- If the console account has been closed or deleted and cannot be found in the search, the agent cannot be registered again.
- Reregistration does not affect registration or deletion status in other languages.
Service Rep. Level Settings
Configure each agent's inquiry access scope by language.
Location
Admin Settings > Level Settings (tab)
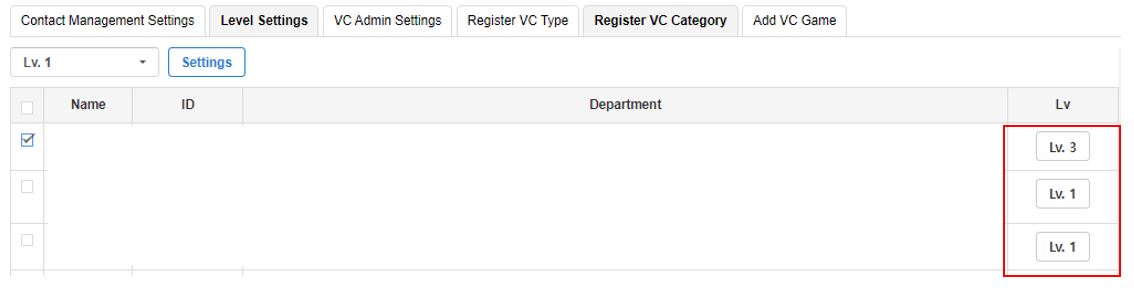
| Level | Access Scope |
|---|---|
| Level 1 | Can view and reply to inquiries in all language tabs. Primarily assigned to administrators. |
| Level 2 | Can view and reply to inquiries in language tabs where the user is registered as an agent. |
| Level 3 | Can access inquiries in all language tabs, but cannot view inquiry replies. |
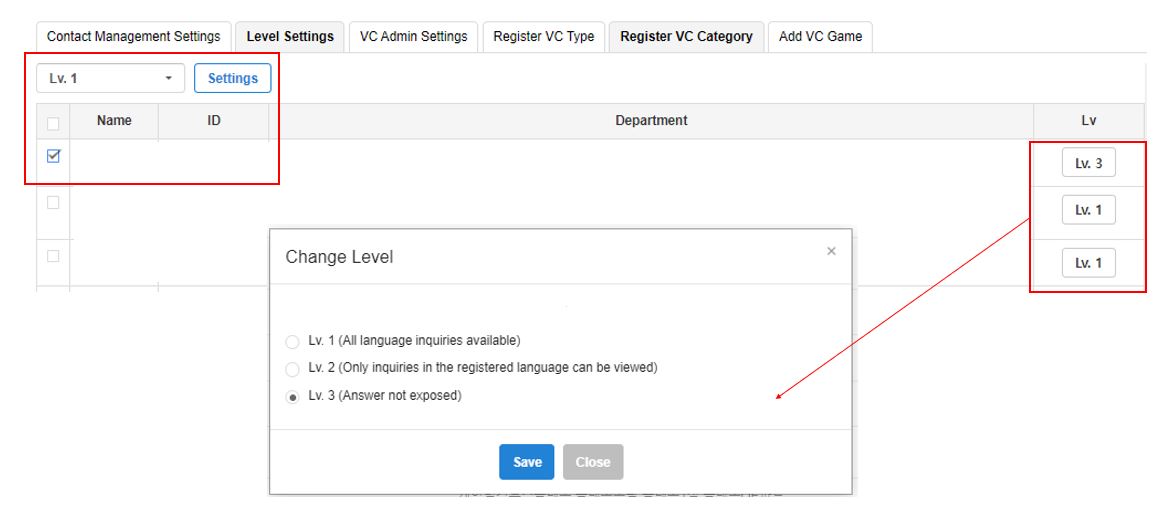
How to Change Levels
Agent levels can be changed in either of the following ways.
- Bulk change : Select agents using the checkboxes in the list, then select a level from the level selection box.
- Individual change : Click Level in the agent's information, then select a level in the pop-up.
Inquiry Distribution
Configure how 1:1 inquiries and email inquiries are distributed to agents.
Location
Admin Settings > Contact Management Settings (tab) > Language (tab) > Divide Contact (tab)
1:1 Inquiry Distribution
Configure the distribution method for 1:1 inquiries. Except for Distribute by Game , distribution methods apply to agents whose Inquiry Assignment Target is set to ON.
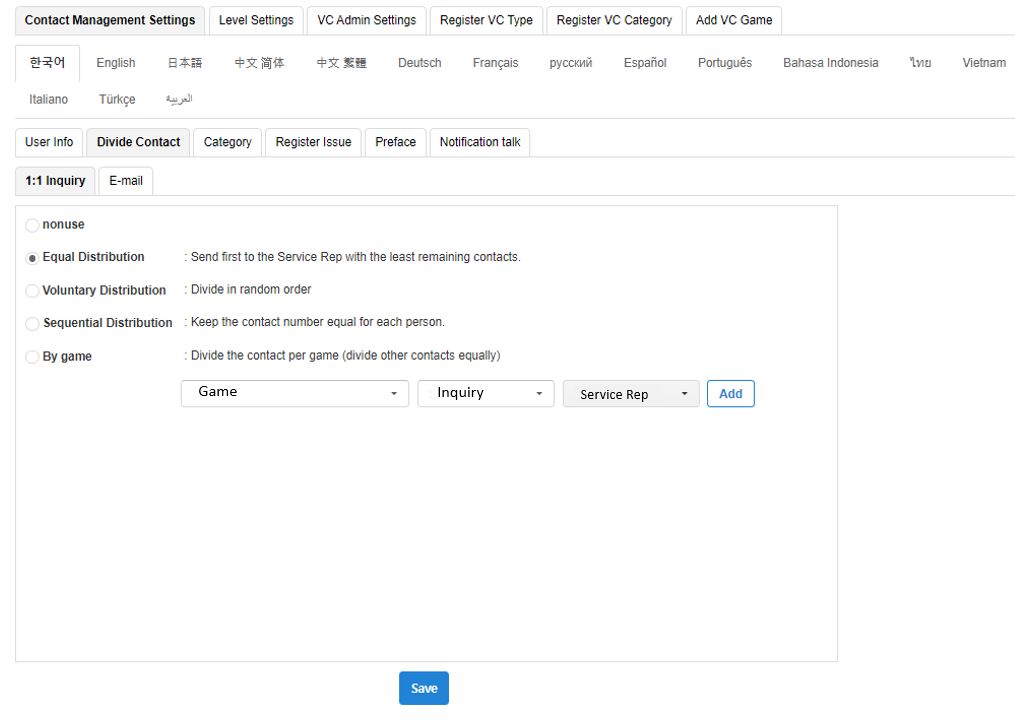
| Distribution Method | Description |
|---|---|
| Disabled | Administrators manually distribute inquiries without automatic distribution. |
| Equal Distribution | Inquiries are assigned first to the agent with the fewest inquiries in progress. |
| Random Distribution | Inquiries are randomly assigned to eligible agents. |
| Sequential Distribution | Inquiries are distributed to agents in sequence so that the number of assigned inquiries is balanced across agents. |
| Distribute by Game | Inquiries are distributed to agents designated for each game. Inquiries received under Other are distributed using Equal Distribution. |
Email Inquiry Distribution
Distribute email inquiries to agents based on language or receiving email address. Assign agents by operating language or email account to manage responsibility for email inquiries.
Category
Configure the inquiry types displayed for each game on the customer support inquiry page.
Location
Admin Settings > Contact Management Settings (tab) > Language (tab) > Category (tab)
When setting up the customer support center for the first time, proceed in the following order.
- In Add Game , add the games to display on the inquiry page.
- In Add Category , configure categories, input fields, attachments, and visibility settings for game inquiries.
- In Category Settings , configure the categories to display for each game.
Add Game
Add games to display on the customer support inquiry page.
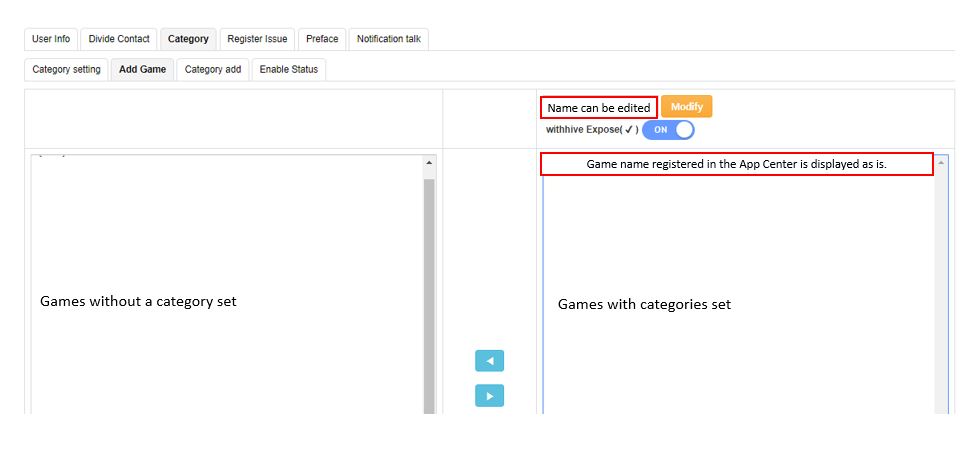

- Select a game from the All Games List on the left.
- Move the selected game to the Selected Games List on the right.
- If necessary, select a game from the Selected Games List and click ** Edit** to change the game name displayed on the customer support website.
- Click Save .
Add Category
Add categories to use for game inquiries.
Before Adding Categories
Once a category is added, it cannot be edited or deleted. Check the category name before registering it.
Categories added with Default selected are included in the default configuration when configuring categories for each game.
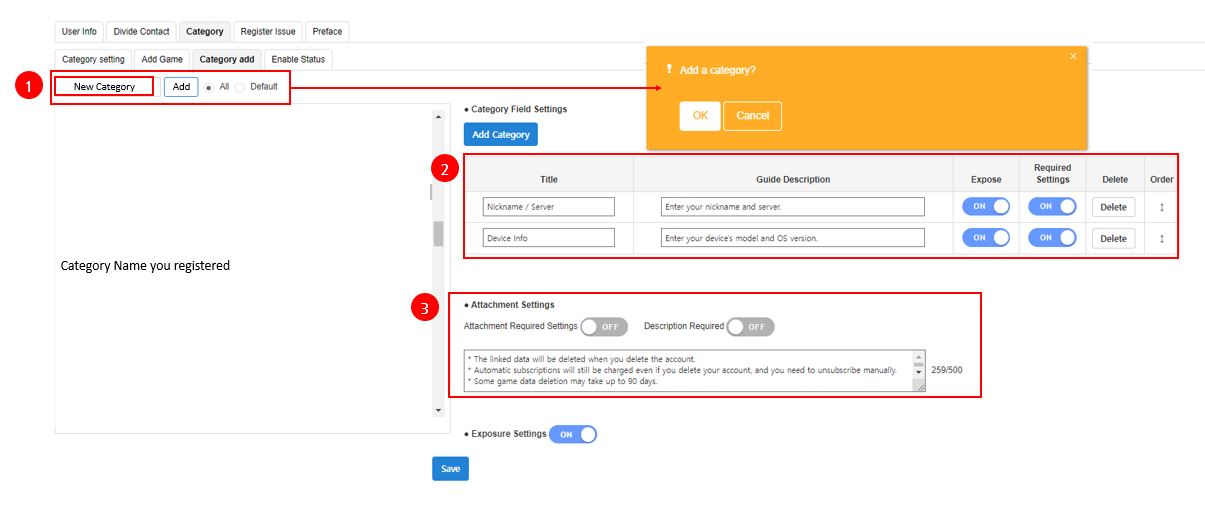
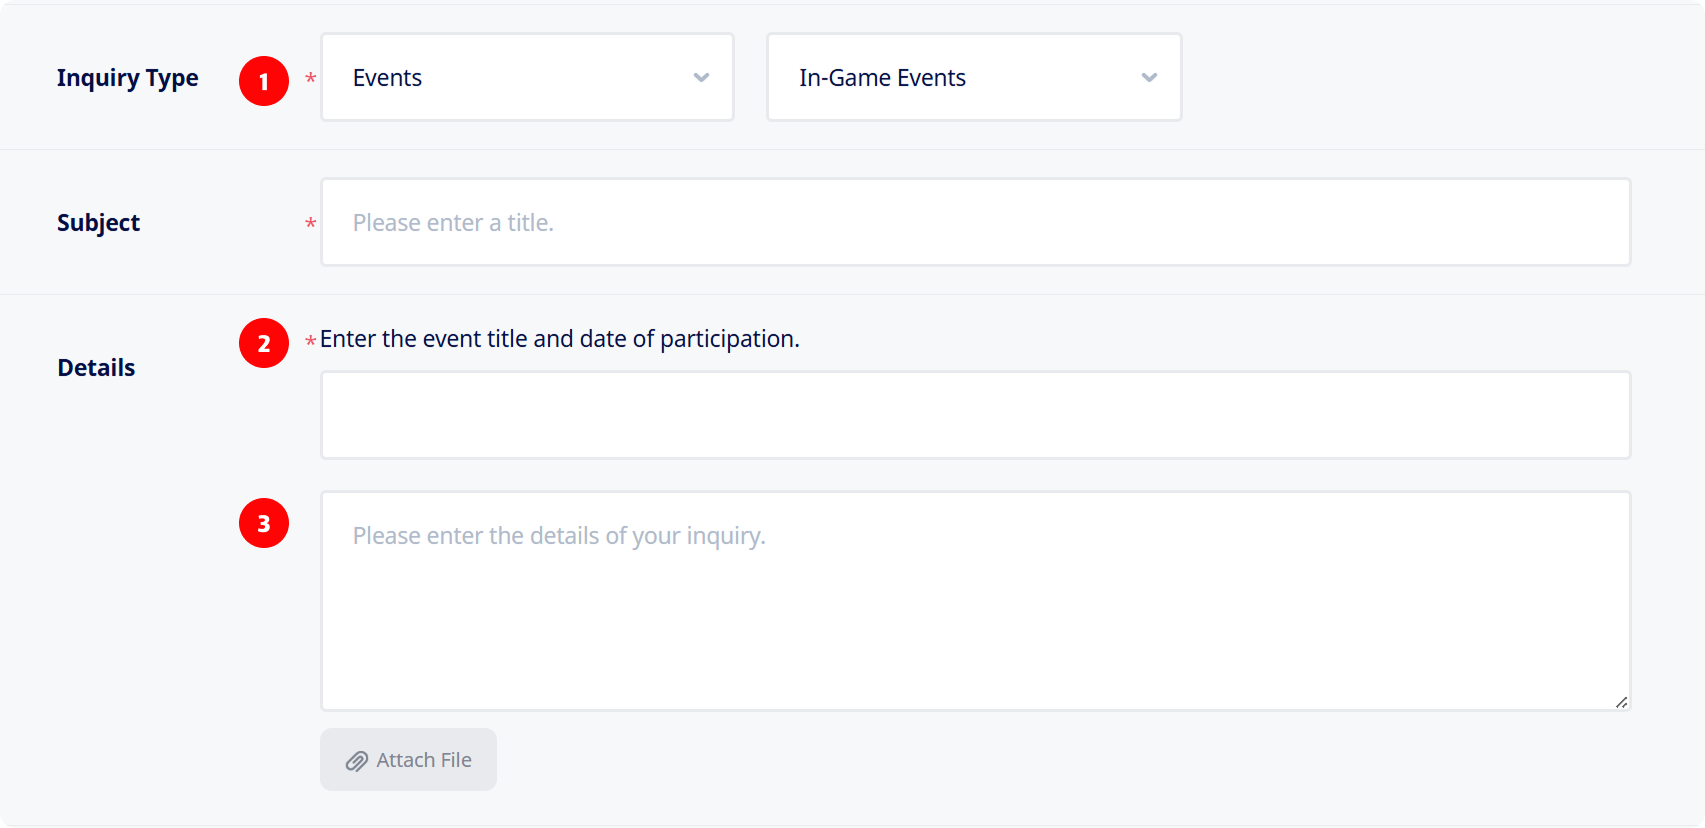
1. Category Settings
- Configure categories to display as inquiry types on the customer support inquiry page.
- To add a category, enter a category name in the Category Settings area and click ** Add** .
2. Input Field Settings
- Configure input fields to display in the content area of the customer support inquiry page.
- Up to 10 input fields can be configured per category.
- Each input field can have a title and guide text. Guide text is displayed above the input field.
- Set Required to ON for fields that users must complete. Required fields are marked on the inquiry page, and a prompt is displayed if a user leaves them empty.
- If two or more input fields are configured, their display order can be changed.
3. Attachment File Settings
- Set attachment file settings to ON if users need to attach files when submitting inquiries, then enter guide text.
- Attachments can also be set as required.
4. Public Settings
- Configure whether the category appears in the category selection list when setting up categories for each game.
- When visibility is set to OFF, the category cannot be selected for subsequent game category configuration.
- Categories already added to a game remain in place even if visibility is set to OFF.
Google Account Deletion Requirements
According to Google's account deletion requirements, if users can create an account within an app, they must also be able to request deletion of their app account and related data.
Both an in-app path and a web link must be provided. If using the customer support center as the web link, configure the following:
- Add a web link to the customer support center where users can submit account and data deletion requests.
- Create a category for membership withdrawal or account deletion requests.
- Add guide text explaining how to request account and data deletion in that category.
Write the guide text in accordance with your company's account deletion and personal data handling policies. If needed, refer to the example below.
Category Settings
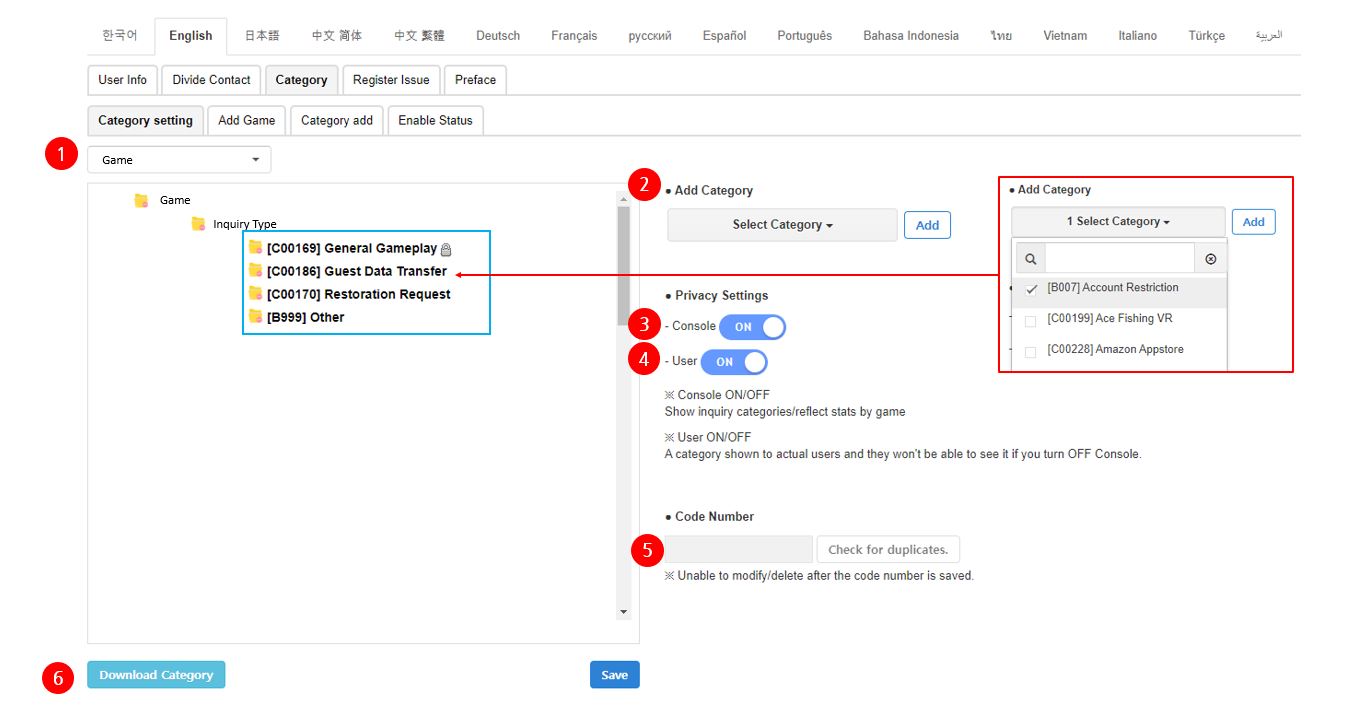
1. Select Games
- Select the game whose categories you want to configure. Games enabled in Add Game appear in the list.
- When configuring categories for a game for the first time, the Set classification pop-up appears.
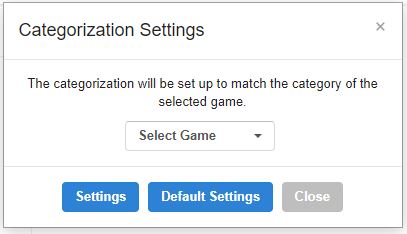
- To use the same category configuration as an existing game, select that game.
- To use the default category configuration, click Default Settings without selecting a game.
2. Add Category
- Add categories registered in Add Category to the game's category structure.
- Categories can be organized in a tree structure with up to three levels.
3. Open to Console
- Configure whether the category is available as a game category in the console.
- Set unused categories to OFF.
4. Open to Users
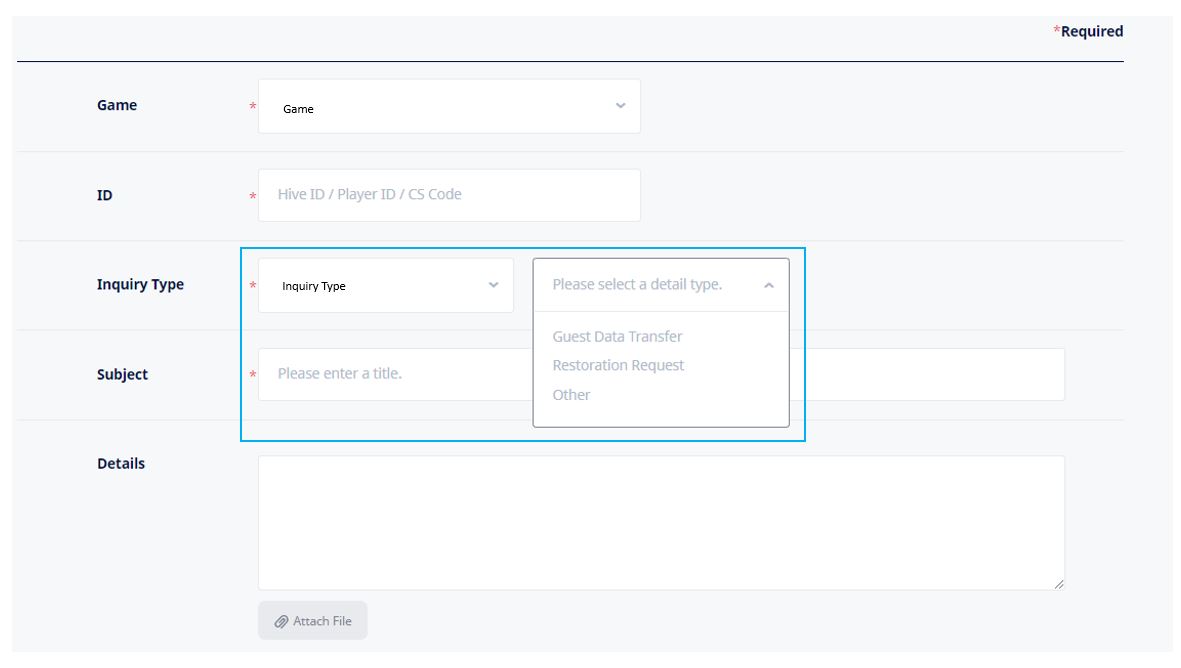
- Configure whether the category is displayed to users on the customer support 1:1 inquiry page.
- When set to OFF, the category is removed from the inquiry type list.
Inquiry Submission Restriction
If Open to Users is set to OFF for a first-level game category, all subcategories of that game are hidden. Users will not be able to submit inquiries for that game.
5. Identifier Code
- Assign a code to frequently used categories to make them easier to find in category searches.
- Codes can contain only letters and digits, with a maximum of 5 characters. Codes are not case-sensitive.
- Once entered, a code cannot be changed.
6. Download Category
- Download the selected game's category configuration as an Excel file.
Register Issue
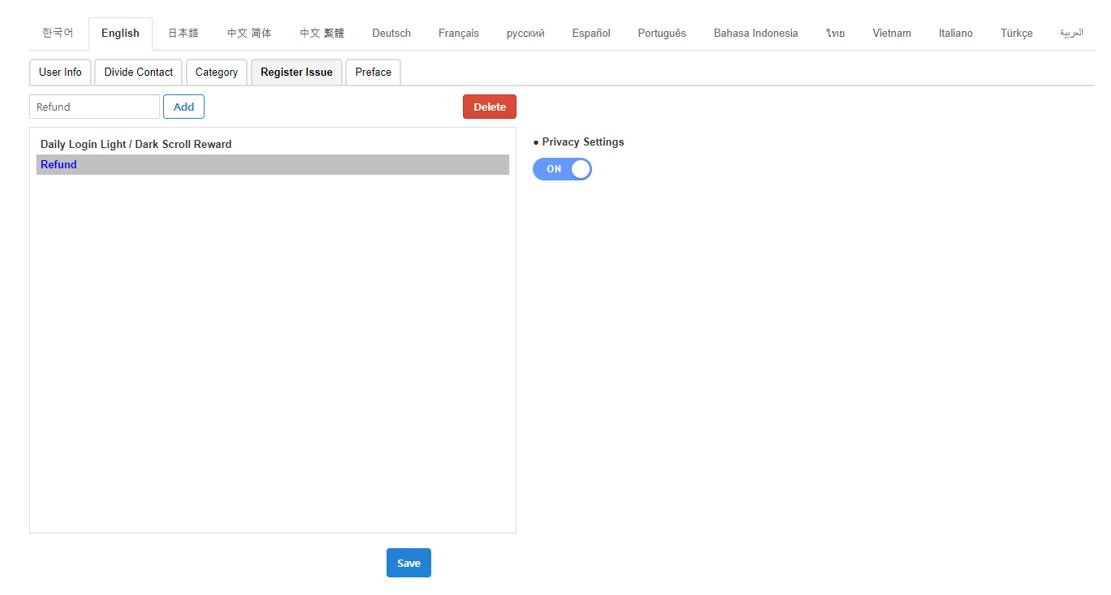
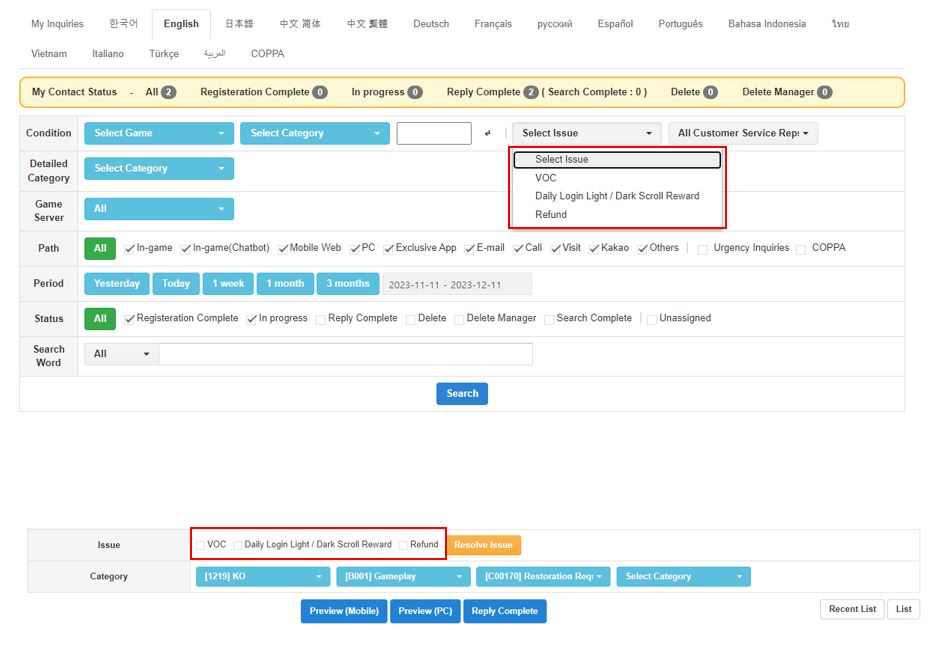
Register issue items that agents can select when replying to inquiries. Registered issues can be used as search filters in Inquiry > Inquiry List .
Location
Admin Settings > Contact Management Settings (tab) > Language (tab) > Register Issue (tab)