Game
Social's Hive Games menu provides features such as game introduction, announcements, Hive Games management (main banner, game list) and more. Game asset management allows you to manage assets by language (Social supports 8 languages) and enter market / community links. In addition, you can register the announcements that are essential to the game.
Main features
- Provides game introduction, promotional videos, screenshots, market and community links.
- You can upload notices for each game.
- You can manage Hive Games main banners and the order of the games exposed.
- The game must be registered in the App Center to use this menu.
Game asset
- Game Asset implies the information of games and content to be exposed on Hive.
- Game assets consist of game titles, introduction, screenshots, descriptions, and videos for each language.
- You can set up the details in the Console > Social > Hive Games > Game Asset menu.
Manage game list
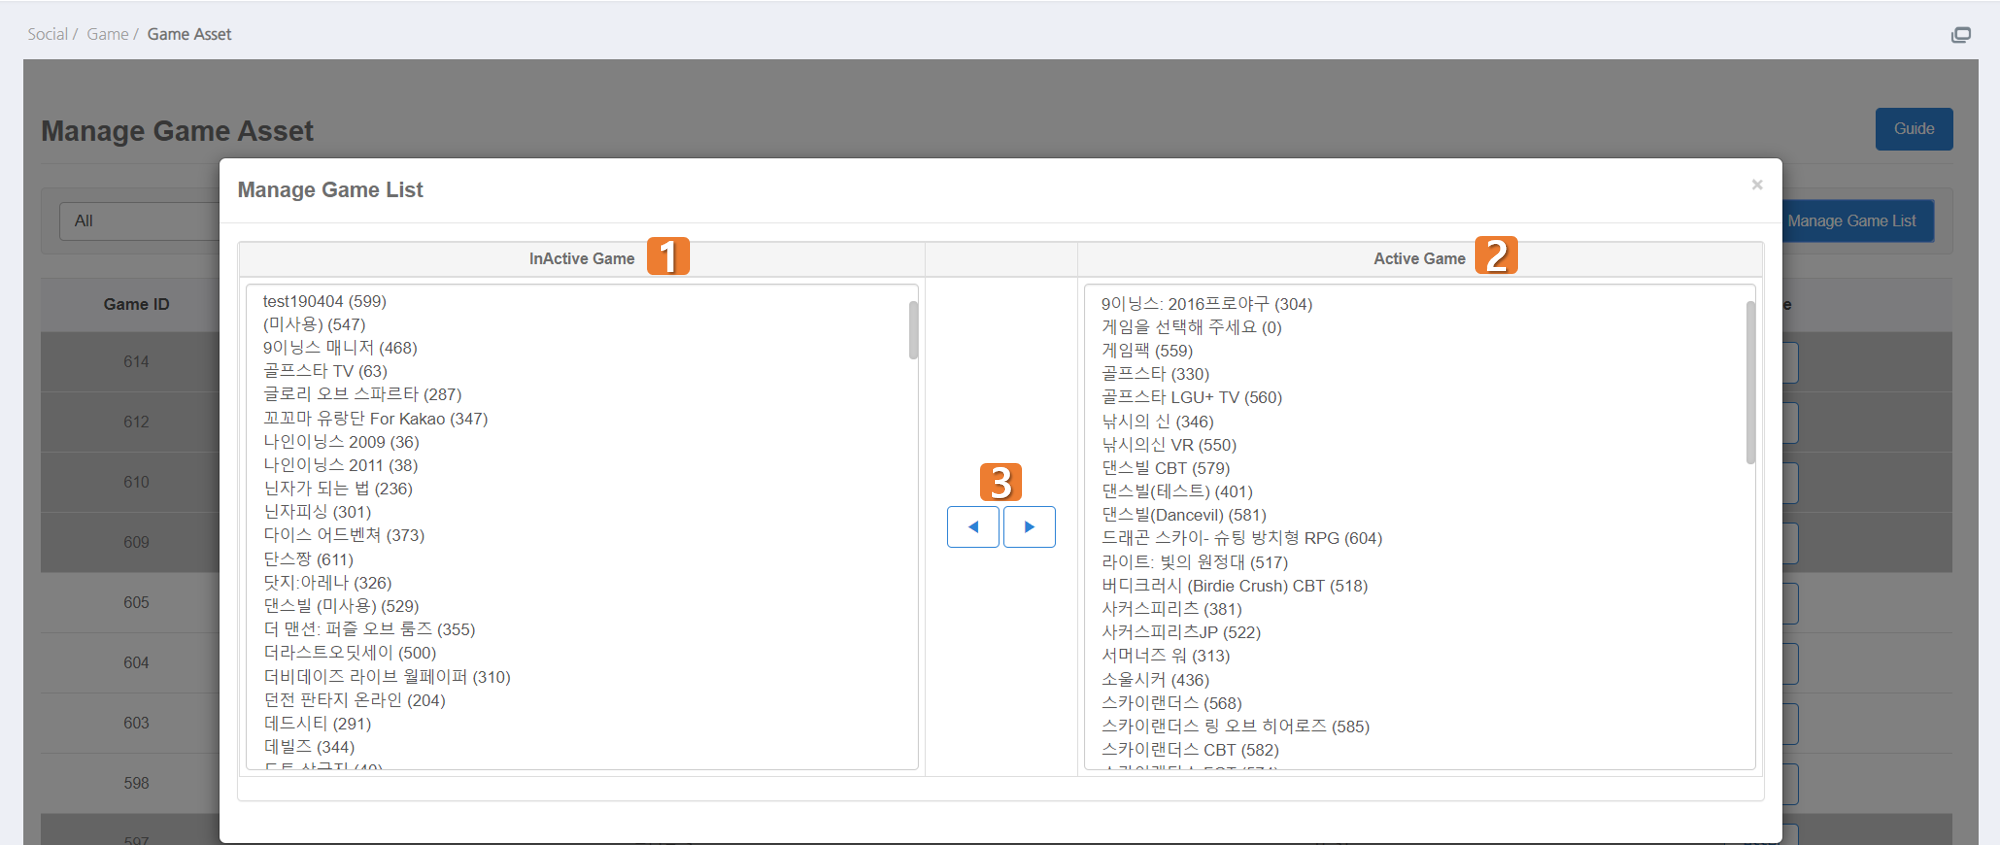
- The game list management is located in the game asset management menu. It's a page that allows you to expose only the games in live service in the game asset management and the full game list settings in the Hive Games.
- You can set up the details by going to Console> Social> Manage Game Asset menu and tap Manage Game List.
- This is a list of inactive games, which are not exposed in the game asset management or the full game list settings.
- The list of active games, which are exposed in the game asset management or the full game list settings. When a game is registered for the first time, it will be automatically set as the active game.
- After selecting a game, click the arrow to set it as active / inactive.
Game asset management list
- You can filter games by genre.
- If a game is not exposed on the game asset management list, tap the game list management button on the top-right and set it up as an active game.
- Grey-colored cells imply that the game hasn’t been registered to the Game Asset List.
- You can move to register the game’s asset or to a page where you can match when you click the Asset Button.
Game/asset info
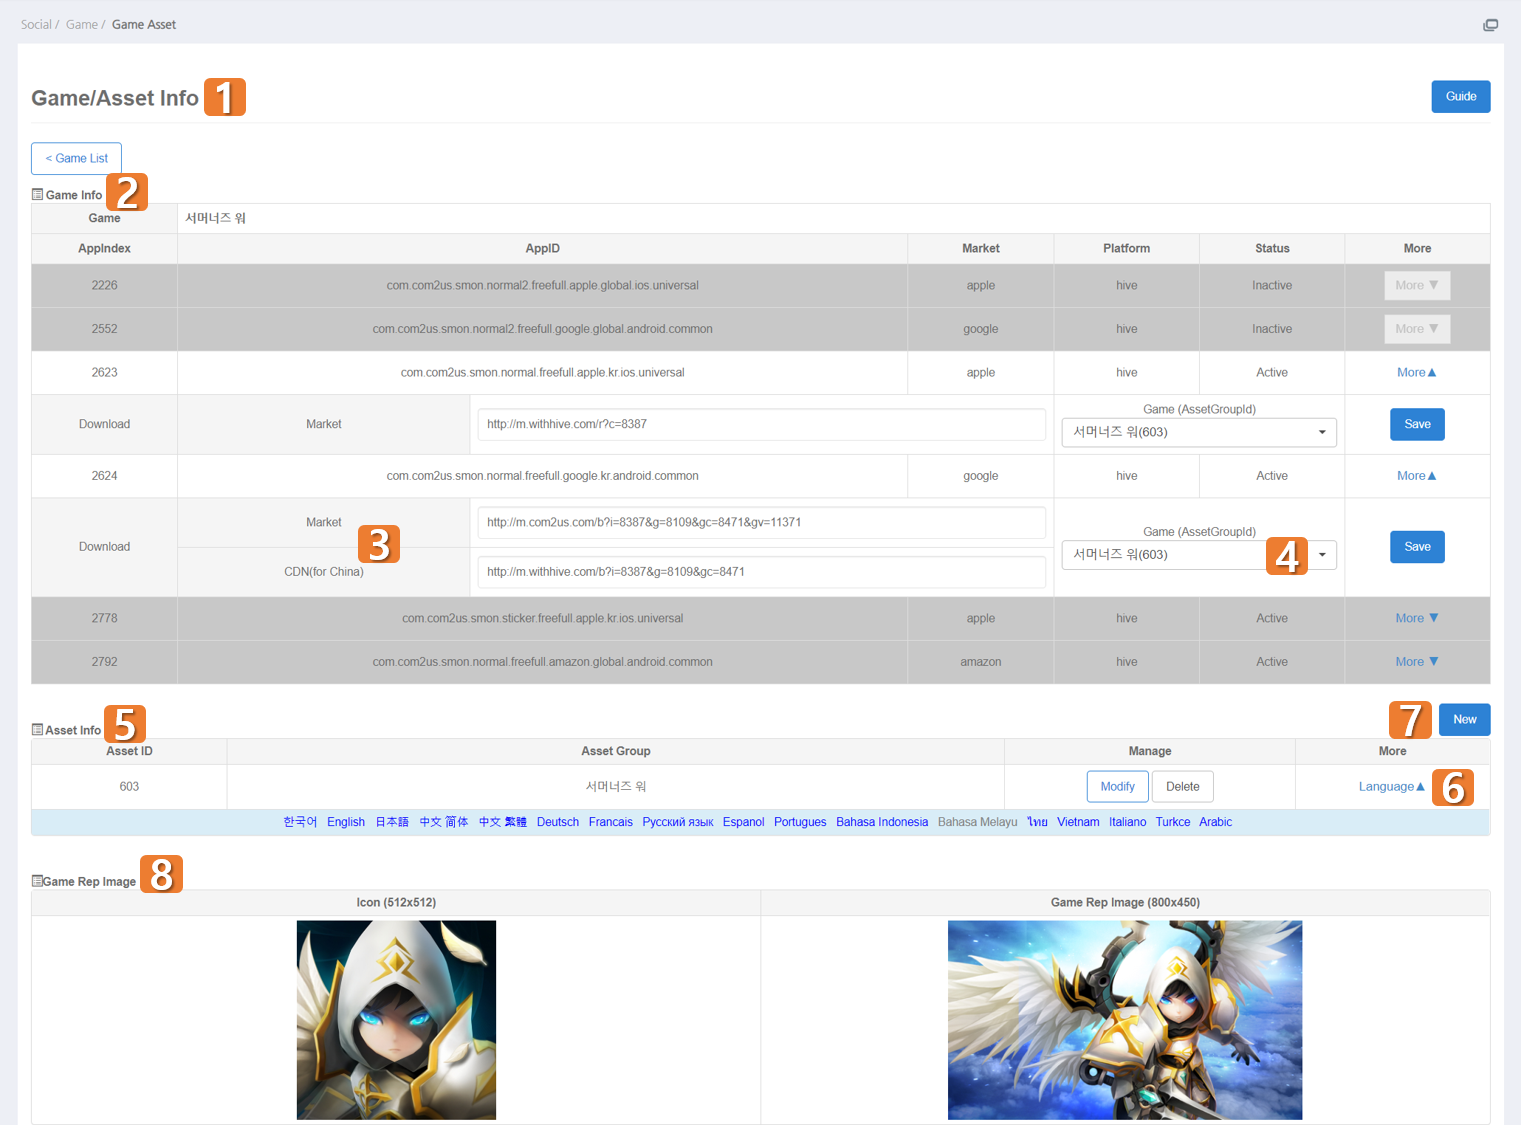
- The game / asset information screen is divided into game information (top), asset information (center), and game representative image (bottom) with the corresponding game ID.
- The game information area is an area that shows the market and platform information and active status for each App ID linked to the corresponding game ID.
- 1 AppID can have 1 Download URL. Enter the URL of the market in Download URL. China does not have access to Google Play, so you can enter an additional download URL to download via CDN.
- 1 AppID can be matched with 1 game asset. Select one of the registered assets and match.
- Asset Information Area shows the basic info of the registered asset and you can change the status by clicking the Modify/Delete Button.
- The button implies the registration status of each language. Blue means registered and grey means languages that aren’t registered.
- Click the New Button to register a new asset. You can use the Modify Button (refer to #5 above) if you’re registering languages additionally to the existing asset.
- The game representative image area is an area where you can check the game icon and game representative images associated with the game asset.
- To register or edit the game's representative image, please go to App Center> Manage Project> Project Details> Game asset tab.
Game asset
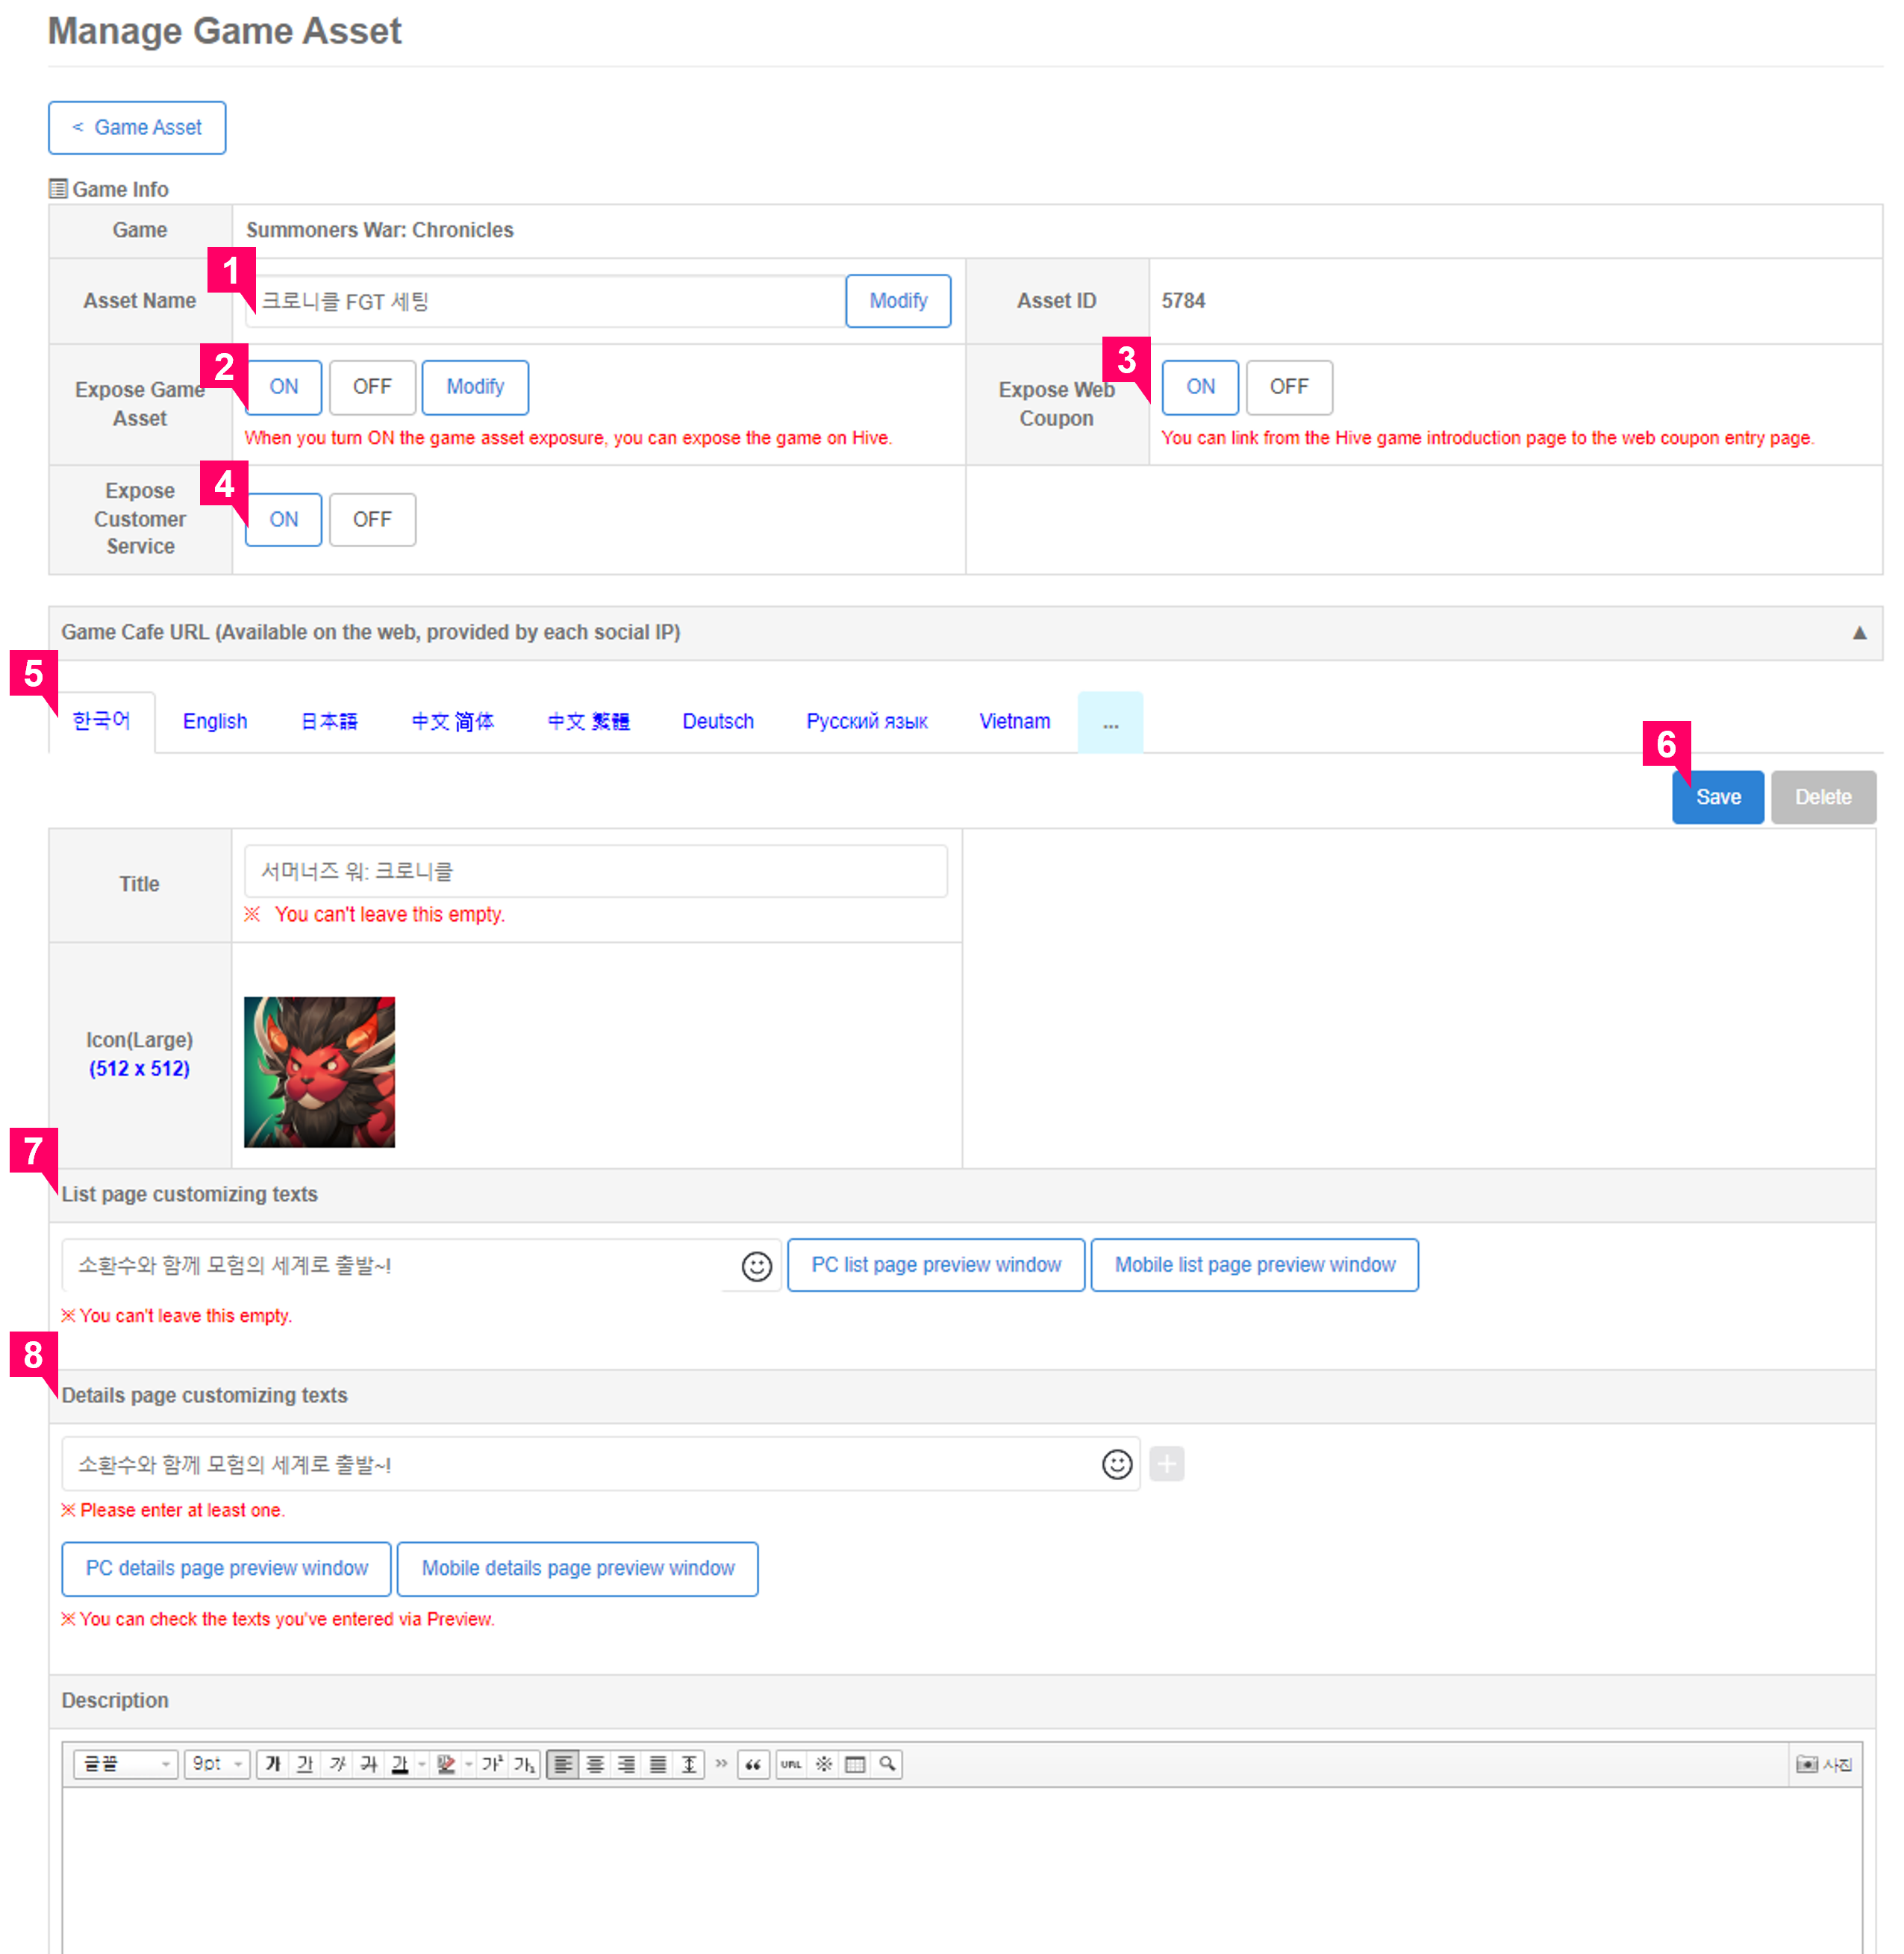
- You can designate an asset name. This is for convenience of operation and is not exposed to the actual service.
- Select whether or not to expose the game asset. Game assets will be exposed on Hive Games if you turn it ON. Use the Modify Button to change the status to either ON or OFF.
- Determines the exposure of a button for the web that leads to the coupon entry. A coupon entry page is automatically generated for each game, you do not need to enter a separate URL.
- Choose whether or not to expose a button that directs to the Customer Support.
-
You can register info per language using the Language Tab. Social provides 8 languages. If the language is supported by the game, it is recommended to support the corresponding asset of the language as well. If it is difficult to do so, enter it in English.
Note
Languages supported by Social: KR, EN, CNS, CNT, JP, RU, DE, VN
-
You must click the Save Button for each language.
- Writes a game introduction based on the game list page. You can use emoji to write the introduction. Before registering it, make sure that the description is being displayed properly via the PC/Mobile Page Preview window and click Save.
- Writes a game introduction based on the game details page. You can use emoji to write the introduction and you can add up to 3 fields. Before registering it, make sure that the description is being displayed properly via the PC/Mobile Page Preview window and click Save.
- You can use the same screenshots used as the actual market assets. You can register as many screenshots as you want; however, it is recommended to register at least 5 screenshots. Use the Order Button to adjust the order of screenshots.
- You can use the same video thumbnails (in-game videos required) used as the actual market assets. Only 1 thumbnail can be registered. When registering a video, you must enter a link to the video. (YouTube or Youku links recommended.)
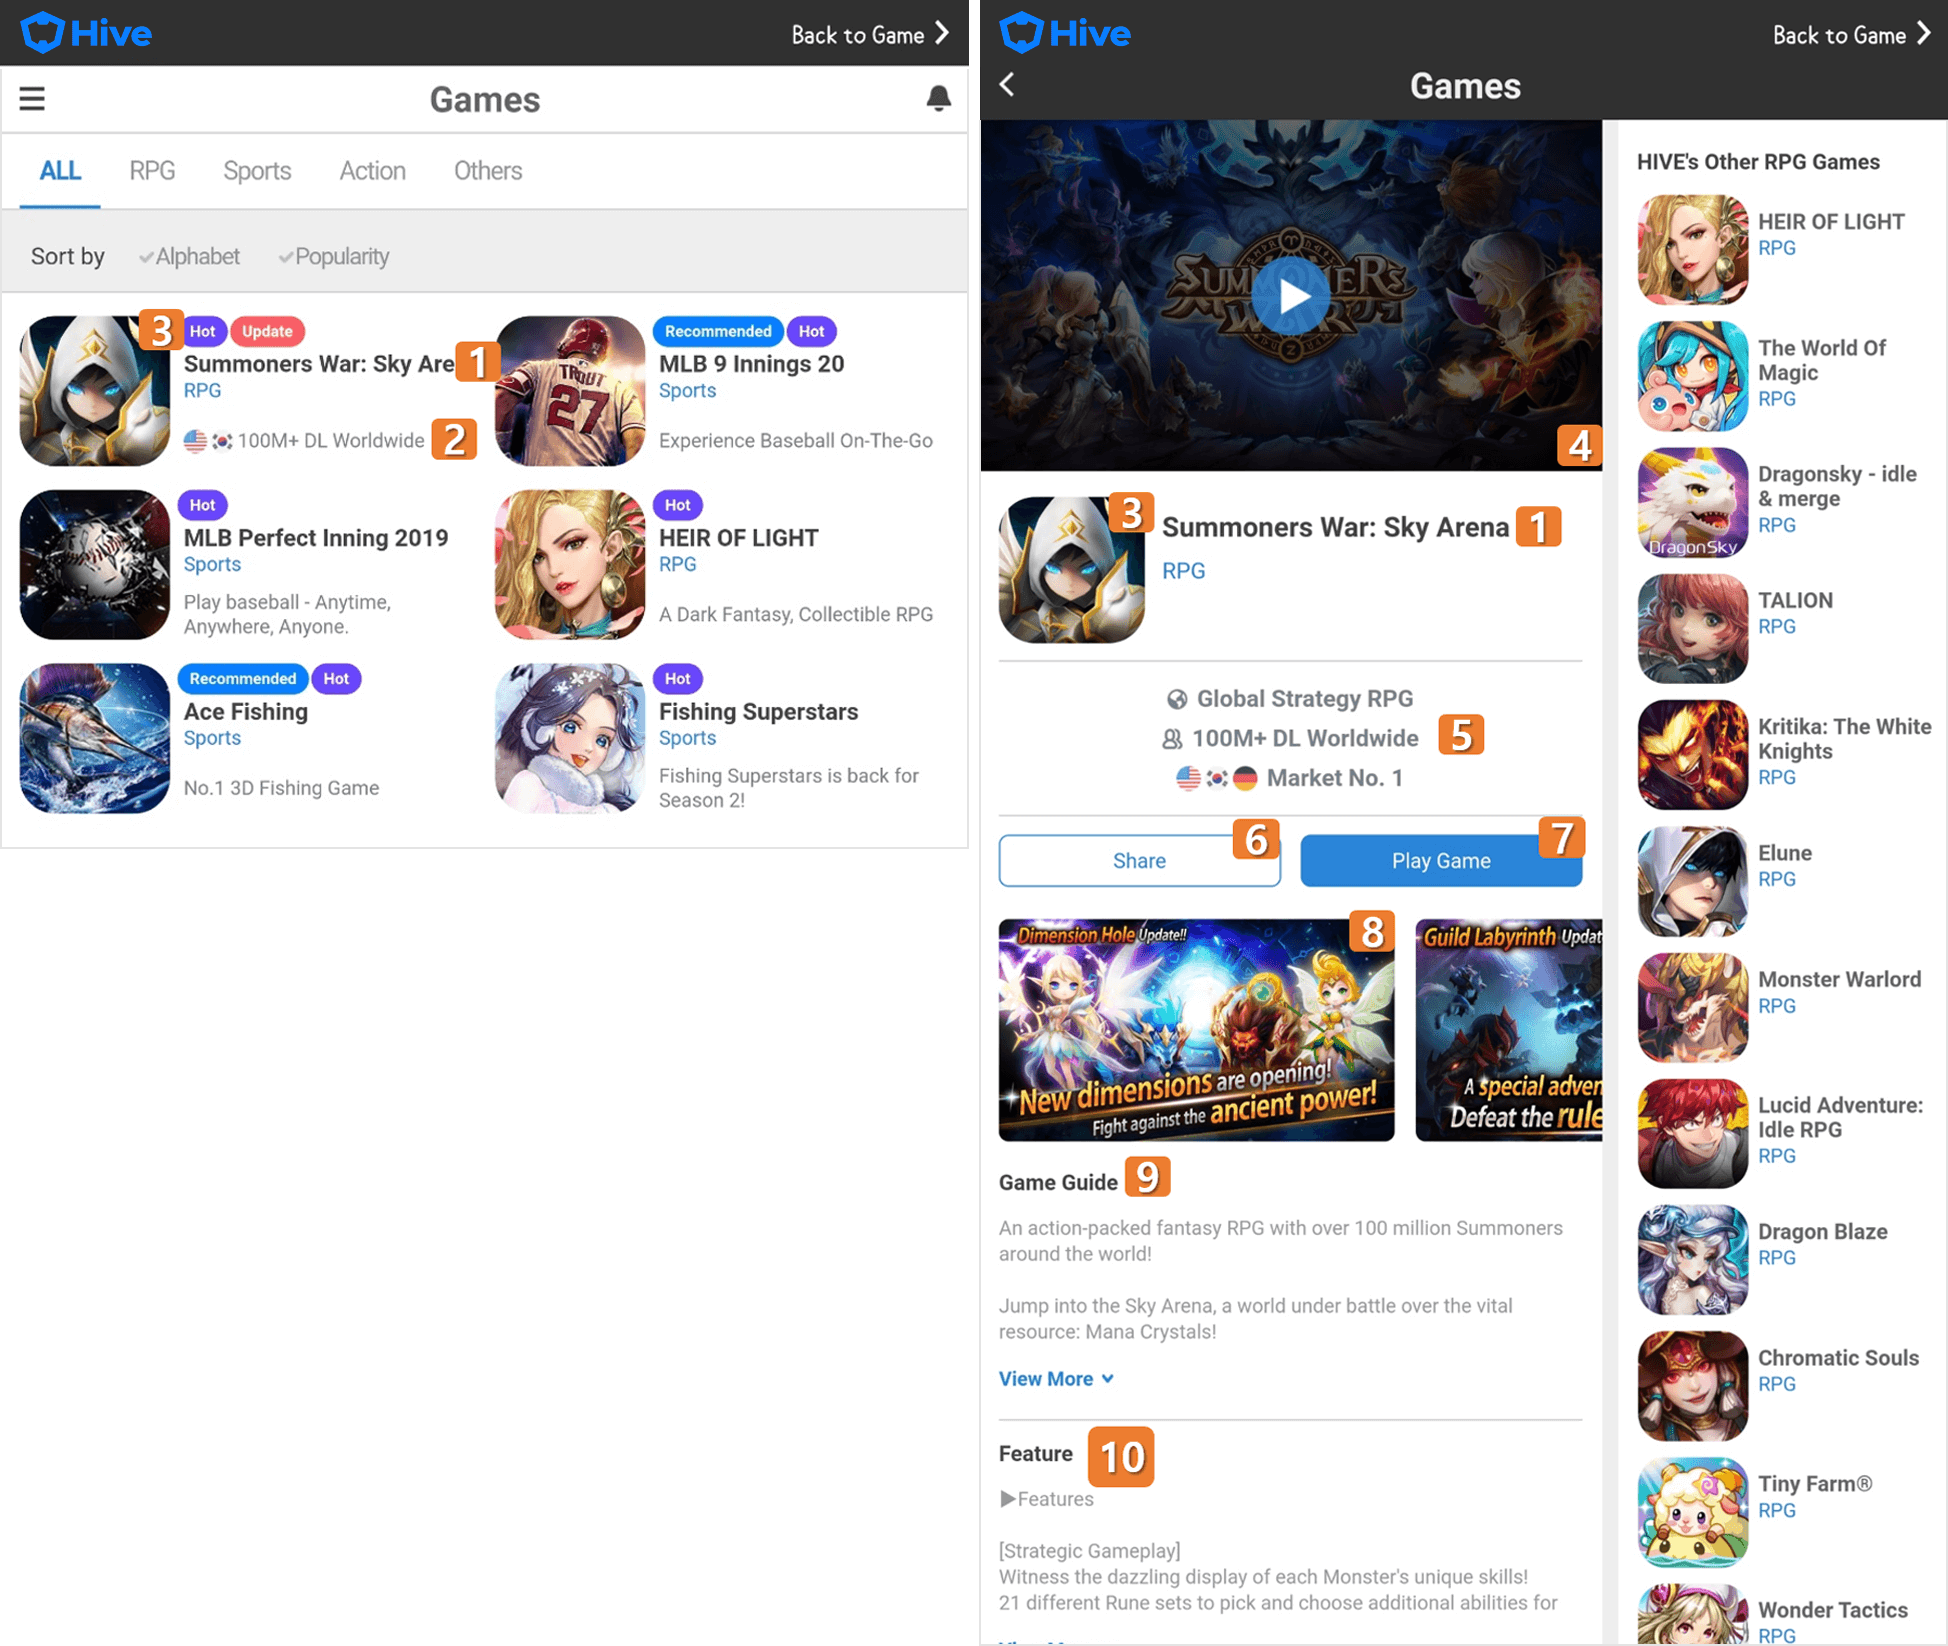
Live service example (In-game)
- Title
- List page game introduction
- Icon Small/Large
- Video
- Details page game introduction
- Share details page URL
- Connect to App Market
- Screenshot
- Game Details
- How to play
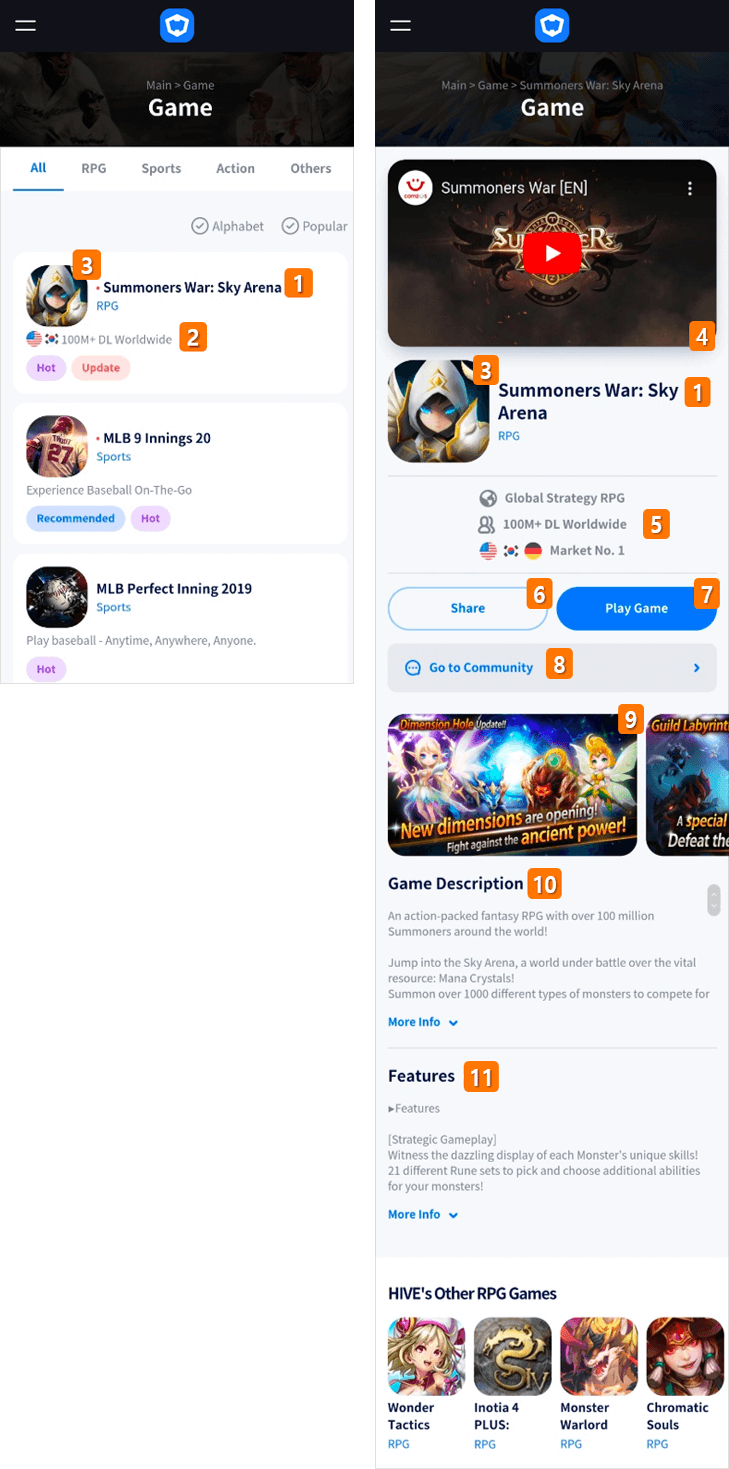
Live service example (Mobile web)
- Title
- List page game introduction
- Icon Small/Large
- Video
- Details page game introduction
- Share details page URL
- Connect to App Market
- Game Community
- Screenshot
- Game Details
- How to play
Main banner
- You can register banners to be displayed in the center of the very top of the Hive Games.
- You can set up the details in the Console > Social > Main Banner menu.
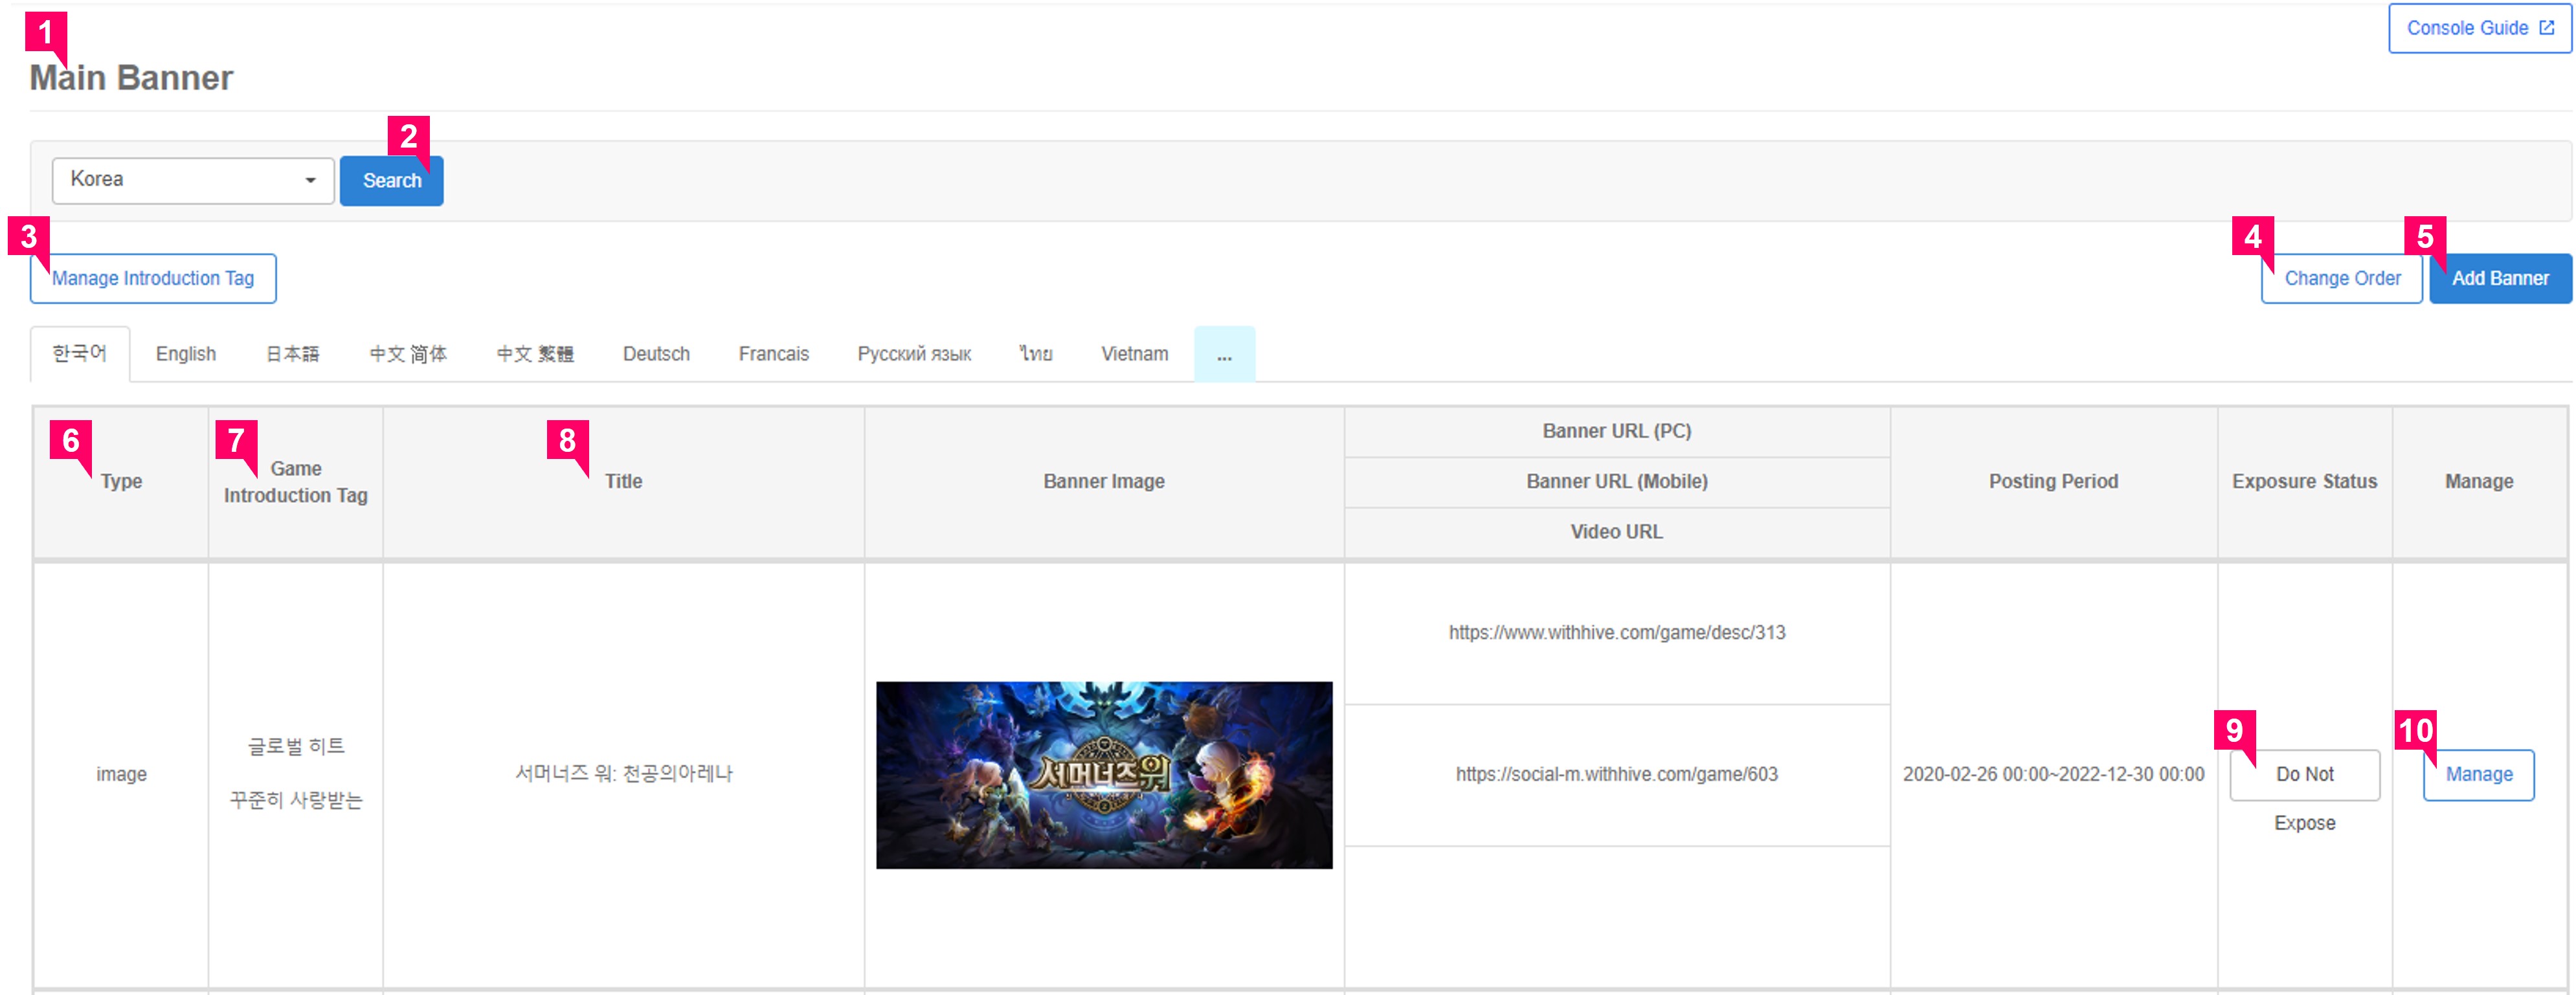
Main banner list
- One image must be registered for the banner. You can register the banner link separately for PC and mobile if you want. If you use the same link, just enter the URL in the PC URL field.
- You can register and manage the main banner for each social support IP.
- When clicked, the game introduction tag management window is activated.
- Click the change order exposure button and drag to adjust the order between banners.
- You can click the Add Banner Button to check the Available Banner List page.
- The types of banners are divided into video type and image type. Video type banners refer to banners with a link to the video.
- It's a game introduction tag that will be displayed at the top of the main banner. (Up to 2 available)
- You need to set the title for each banner.
- By clicking the Do Not Expose Button, you can exclude the banner from the List of Banners Currently Exposed and add it to the Available Banner List.
- When you click the Manage Button, you can check and edit banners.
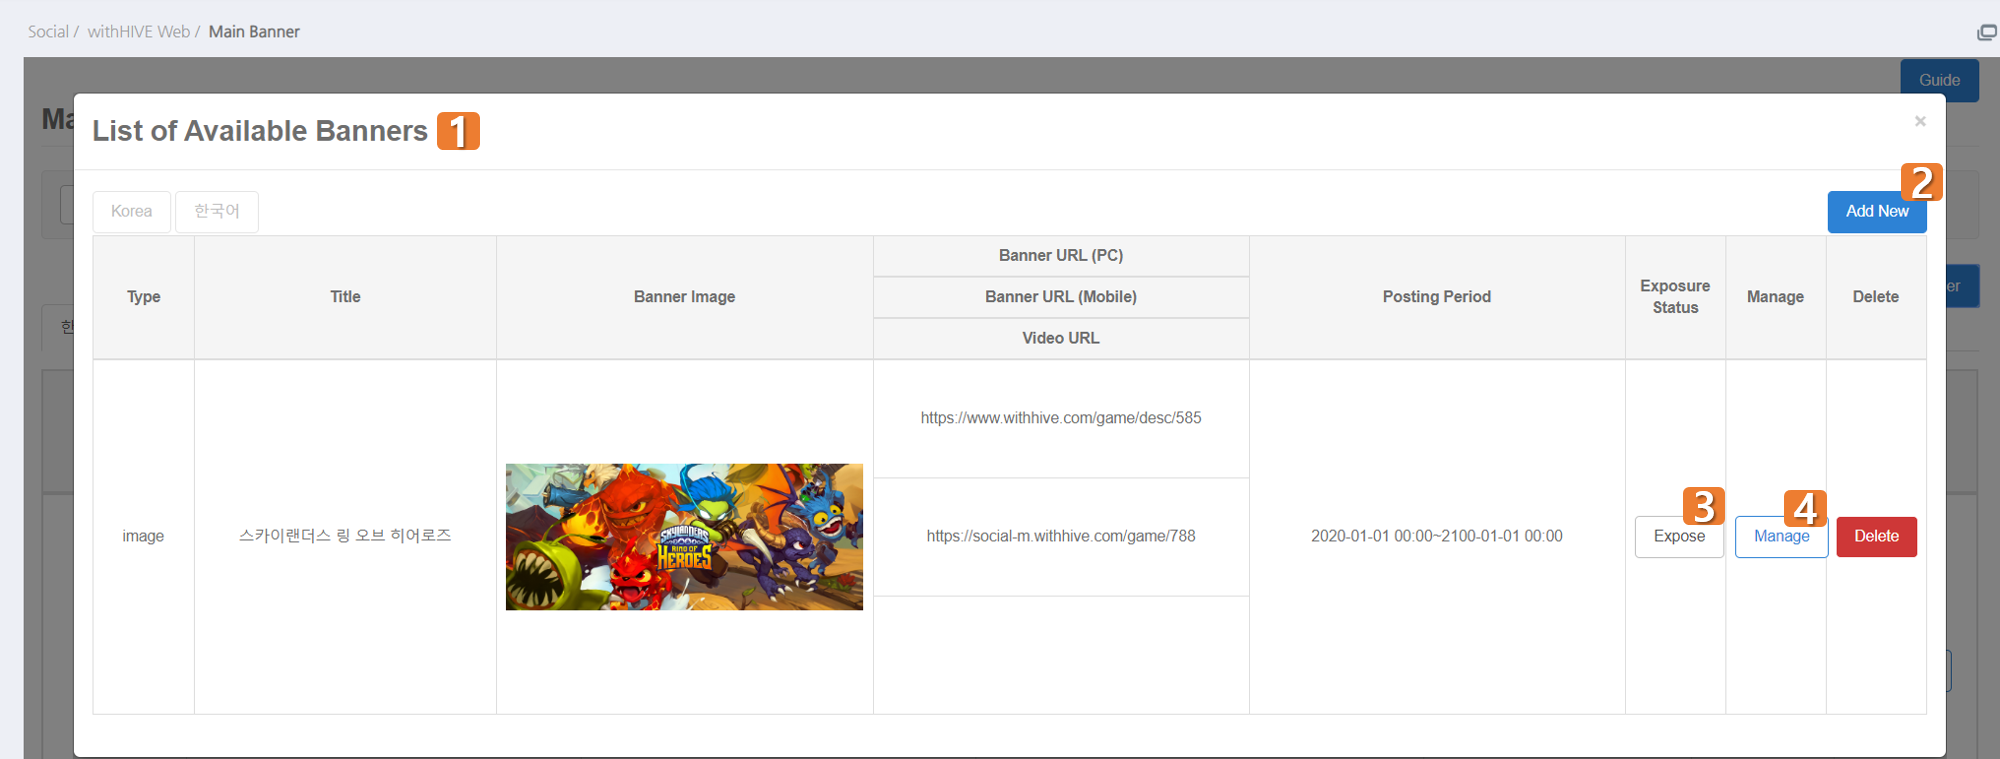
Available banner list
- It's the list of pending banners page where banners are successfully saved but not being exposed at the moment.
- When you click the Add New Button, you can register a new banner that doesn't already exist in the Available Banner List.
- When you click the Expose Button, you can move a banner from Available Banner List to List of Banners Currently Exposed.
- When you click the Manage Button, you can check and edit banners.
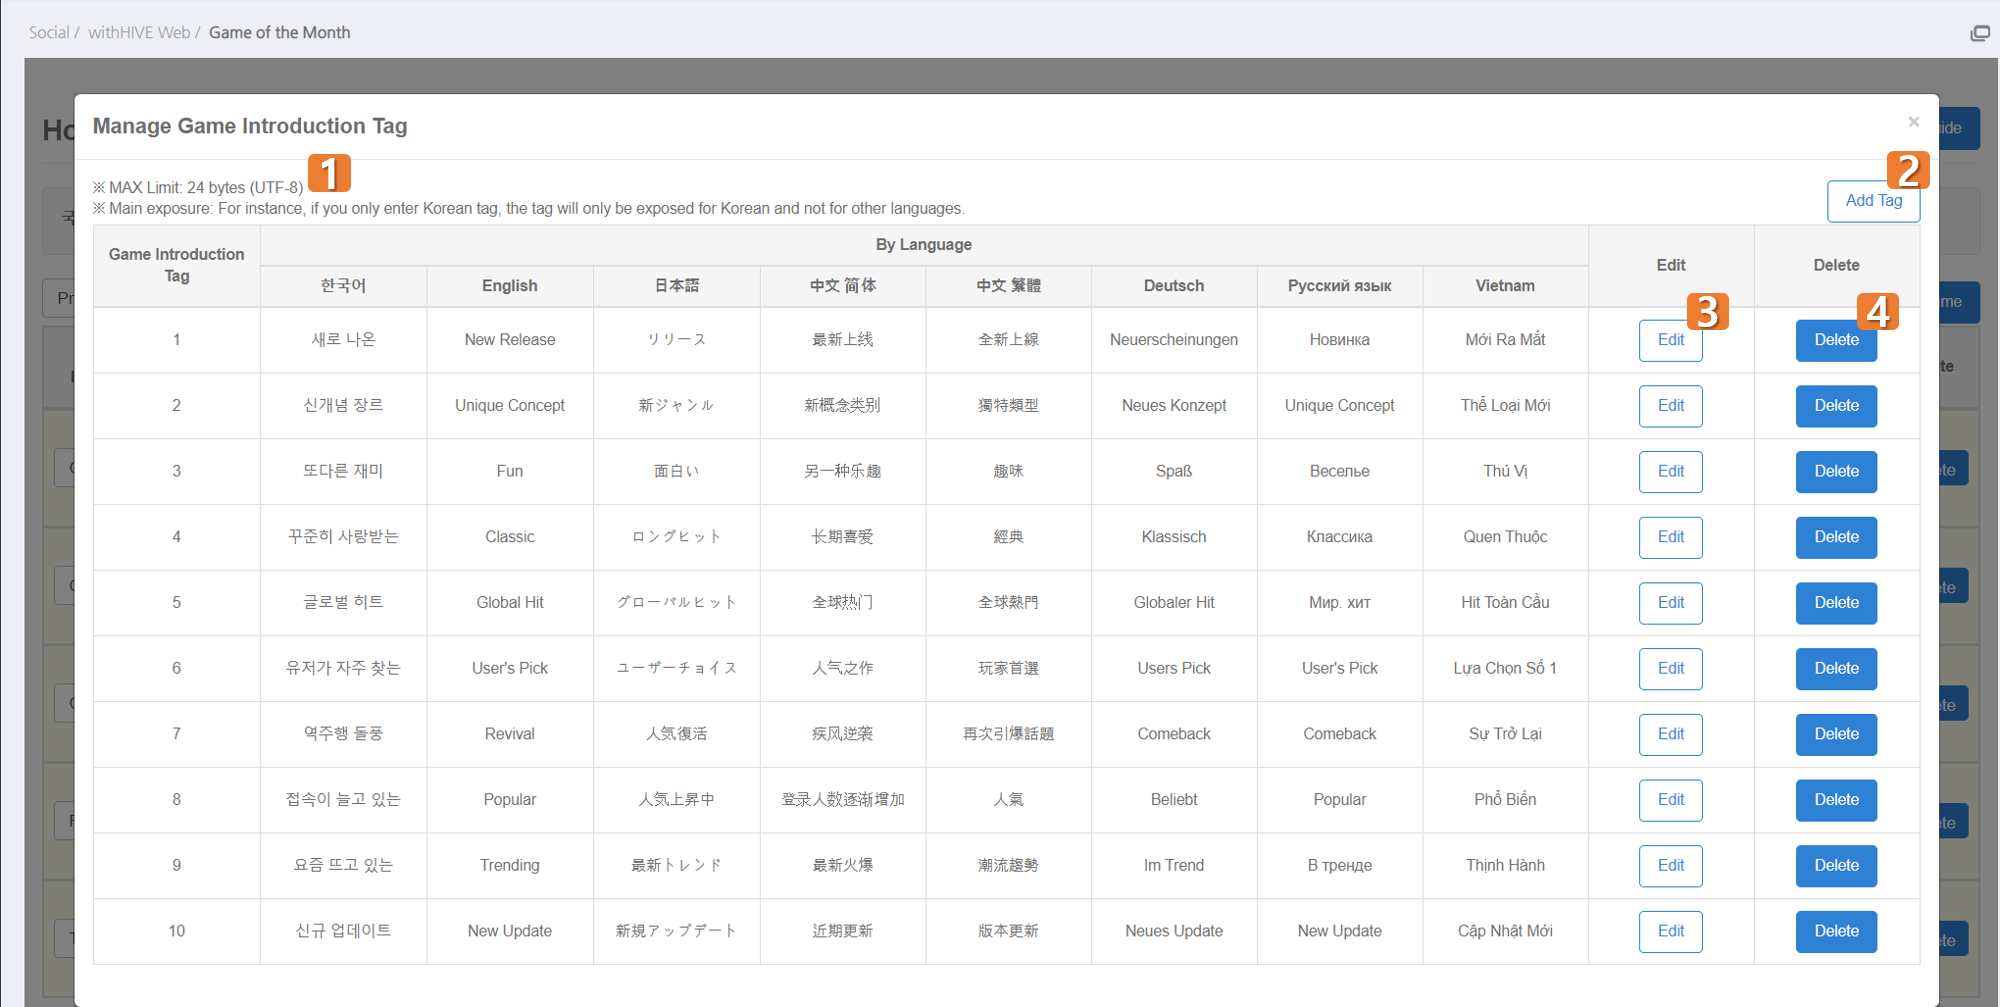
Manage game intro tag
- There is a limit of characters for tag, and you can enter up to 24 bytes based on UTF-8.
- When you click the Add Tag Button, you can add a tag. Korean tags must be entered.
- If you click the Edit Button, you can edit the tag.
- When the you click the Delete Button, the tag is deleted. Tags in use will be automatically released.
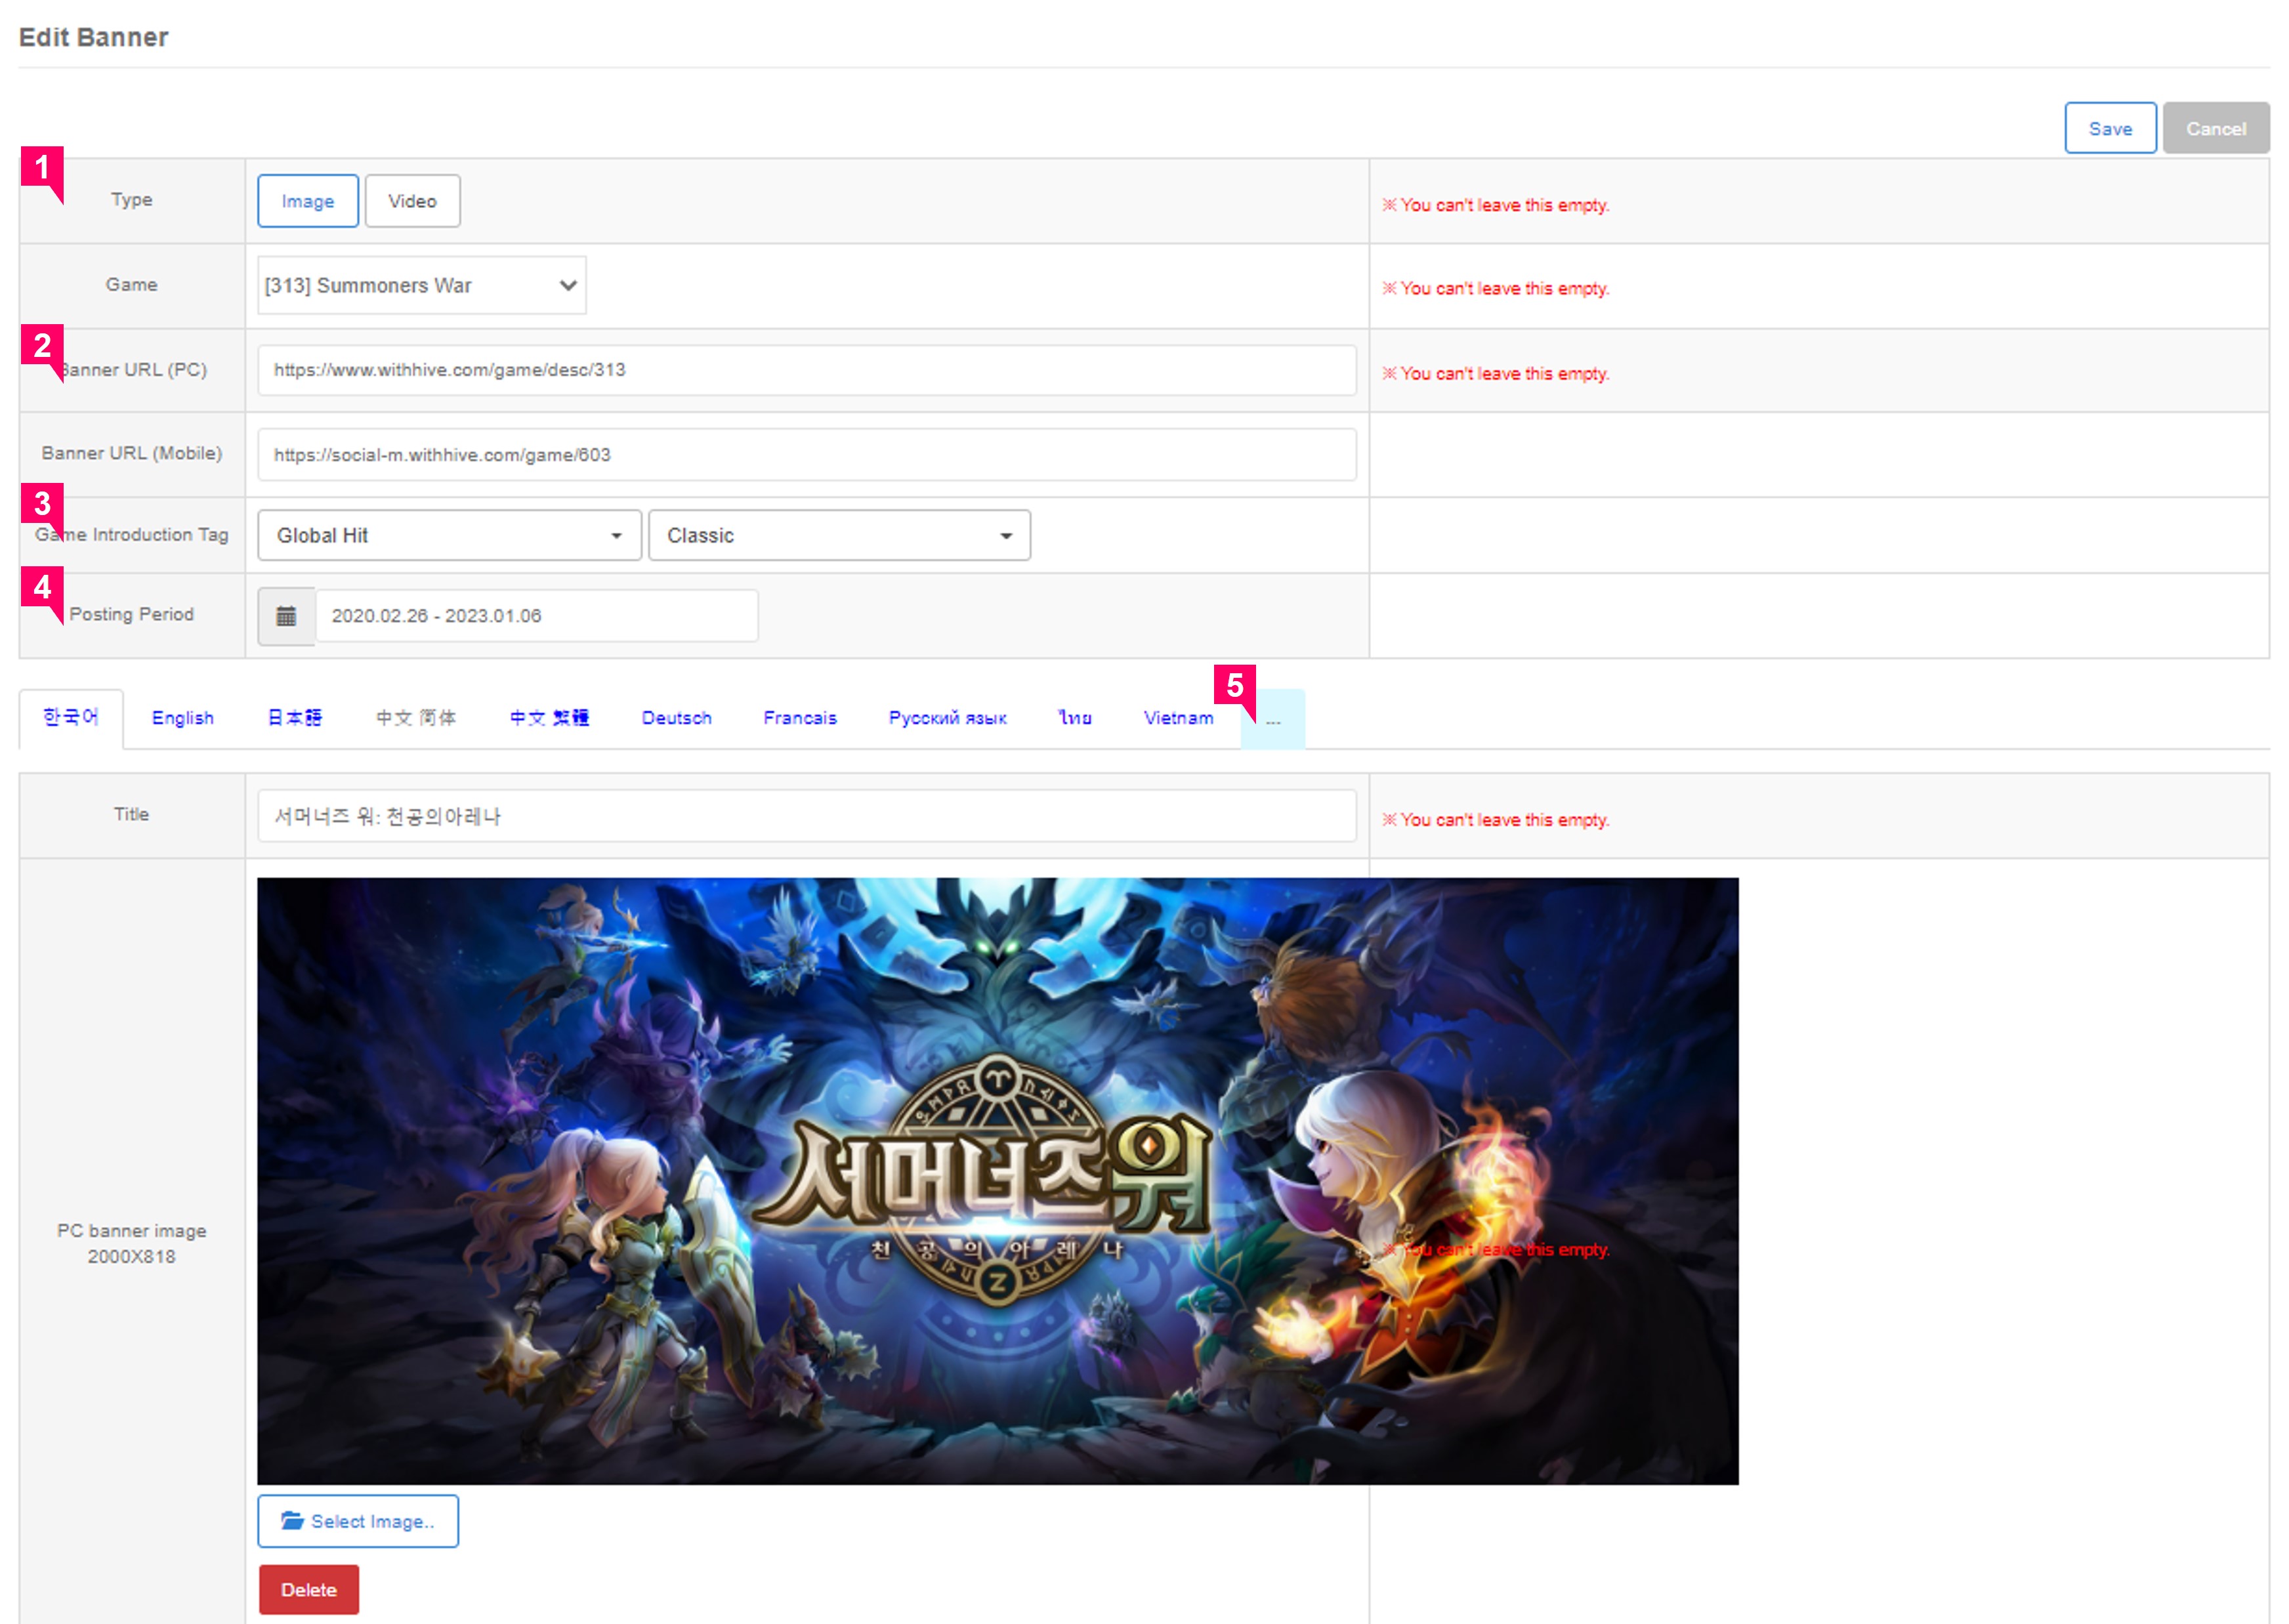
Add / edit banner
- You can choose the banner type. If you select the video banner, you must enter the video URL.
- You can register the banner connection link separately for PC and mobile if you want. If you use the same link, just enter the URL in the PC URL field. (If a link URL is entered, the image must be saved.)
- When clicked, the main game introduction tag can be set. (Up to 2 tags can be selected)
- You can set how long you'd like to expose the banner for.
- Select the banner image for each language tab, and click “Save” to finish registering the banner.
Manage game list
- Set in-games, games to be exposed on the web, and priorities according to the IP.
- It will be revealed in the reverse order of the game index if the game priority of other companies is the same.
- You can set up the details in the Console> Social> Full game list menu.
Game list
- Click and drag to change the order in the game list.
- Click to activate a game list add window.
- You can check the list of games corresponding to each IP-specific language (Ex: Korean IP x Korean) via the preview window by using the View List by Language. However, if the language is not registered in the game asset, it will not be exposed on the game list page.
- When clicked, you can set the game features. (Up to two can be selected)
- Click Preview on the right side to preview the PC/Mobile game details page.
- Click to no longer expose the game on the game list of the corresponding IP.
Add to game list
- Click the Add Button at the top of the game list page to check the list of games that can be added to the list (registered assets, games not added to the game list of the corresponding IP).
- Click Expose to expose it to the game list.
"Play on PC" test IP
- When accessing the Hive Games with the registered test IP, the "Play on PC" button on the game page will be activated.
- The market of AppID must be MacAppStore, MicrosoftStore, and HiveStore.
- The test IP allows you to download crossplay games from the AppID of your choice, regardless of the live status of the game.
Test IP list
- Only games with AppIDs that are Windows or macOS are listed.
- Only AppIDs with Windows or macOS operating systems are exposed in the selected games. If you choose AppID, you can add test IP.
- A test IP registration pop-up will be exposed when you click on the new registration button.
- If you add a test IP, the registered details are displayed in the list.
