About community monitoring system
Community monitoring system introduction
- Community Monitoring System provides the Keyword Monitoring System, which monitors focusing on the keywords of texts registered to the community, and Post Monitoring System, which monitors focusing on the post title and comments. These monitoring systems enhance the efficiency of community monitoring tasks.
What to prepare in advance
- Verify that you have access to the Keyword Monitoring System and Post Monitoring System from Hive Console and if not, please gain access to the menu by referring to the Hive Console Permission Management Guide from the Permission Administration Guide
- Check the App Center registration status of the monitoring target project (or game).
Keyword monitoring system
- Provides functions to monitor keywords including the title of the post based on the default keyword provided by the system and the keywords that the community operator registered.
- When a title containing both Keyword 1 and Keyword 2 appears, a function to get this information by messenger is available. Currently, you can get notifications via Dooray, Slack, Alertnow, JANDI, Teams, Telegram, and Google Chat.
- Other than Hive Community, Naver Lounge, Naver Cafe, DC Inside, and Steam Community are supported.
- Location of the Menu: Hive Console > AI Service > Community Monitoring > Keyword Monitoring System
- Function Composition: Statistics, View, Community Settings, Keyword Settings, Notification Settings, Personal Settings, Backoffice Log
- For more details on Community Settings, Keyword Settings, and Notification Settings, please refer to the Keyword Monitoring System Guide.

Community settings
-
If the community you want to monitor using Keyword Monitoring System is not Hive Community, you have to register the community information first.
- You can check the registered community information on the registered community list when using Hive Community.
- You can enter and register community information through Keyword Monitoring System.
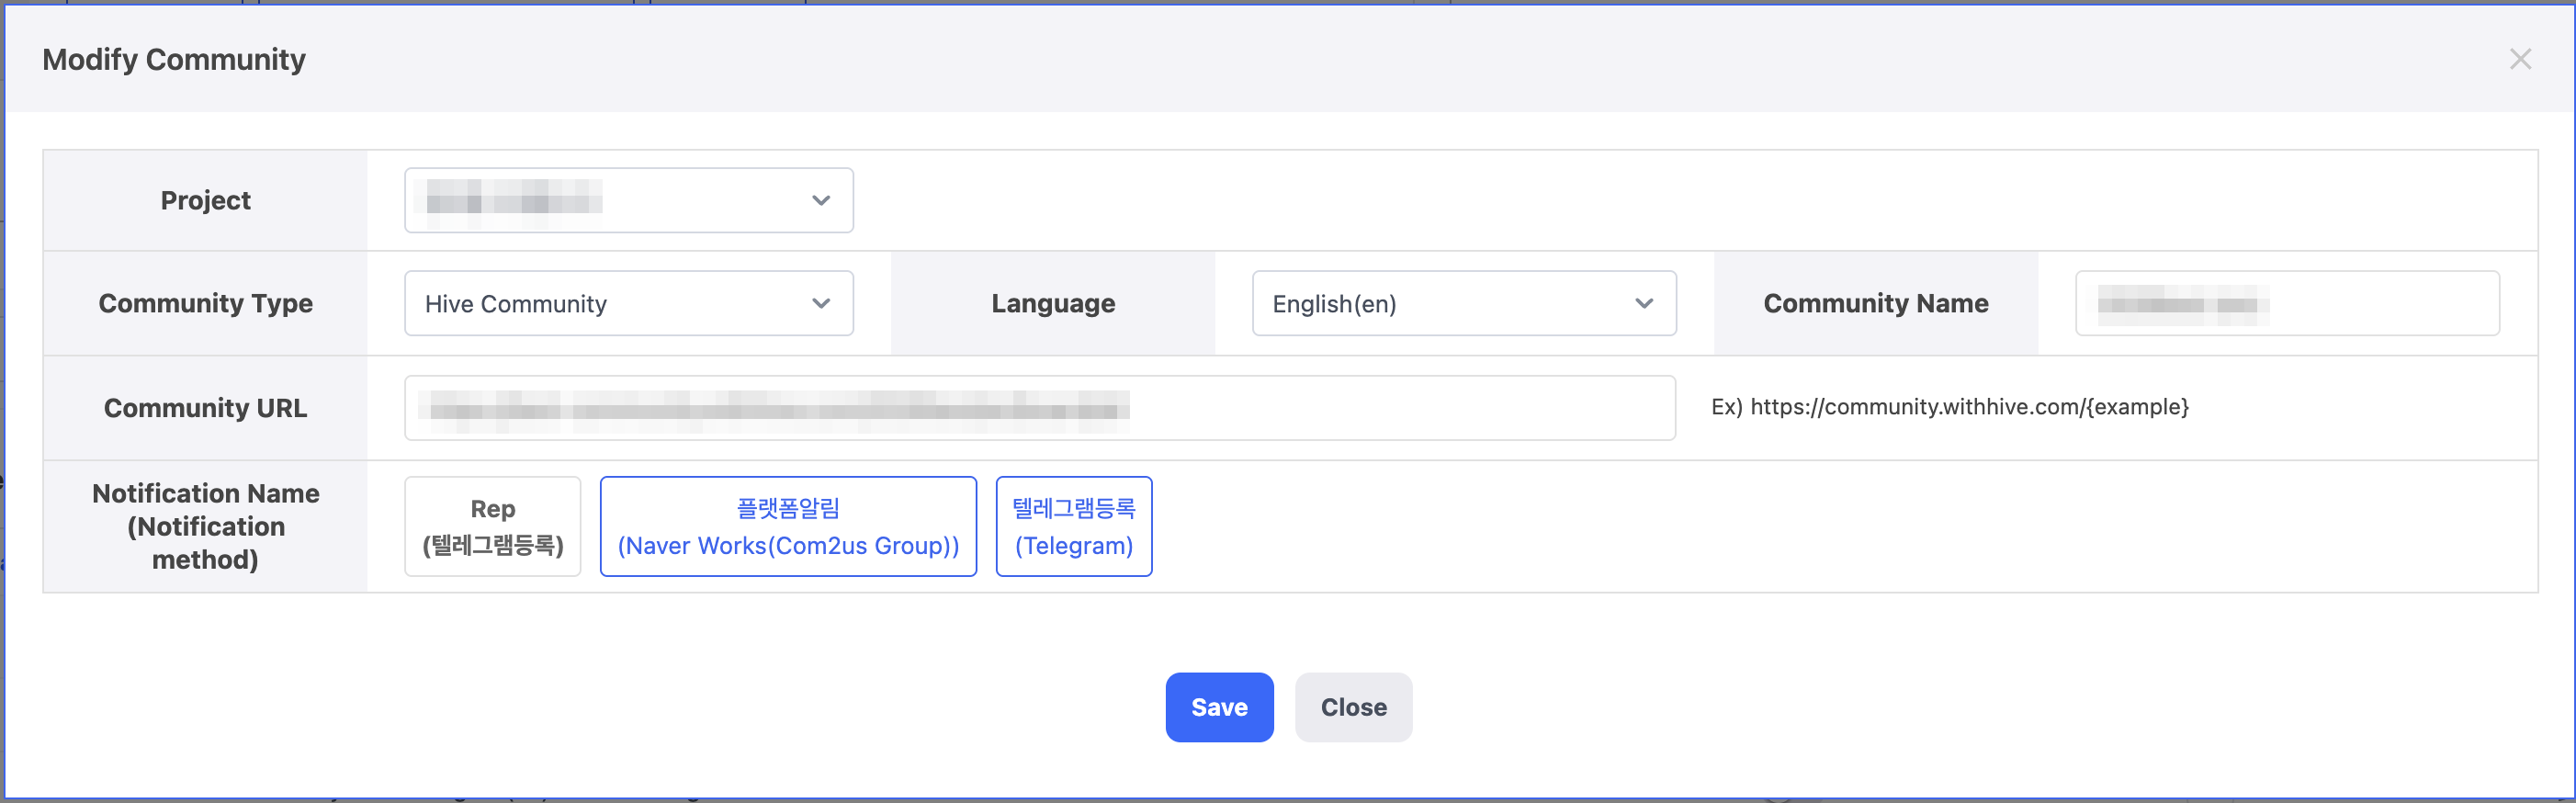
- The community name is automatically completed based on the selected language, project, and community type.
- You can check for the example URL for each community type.
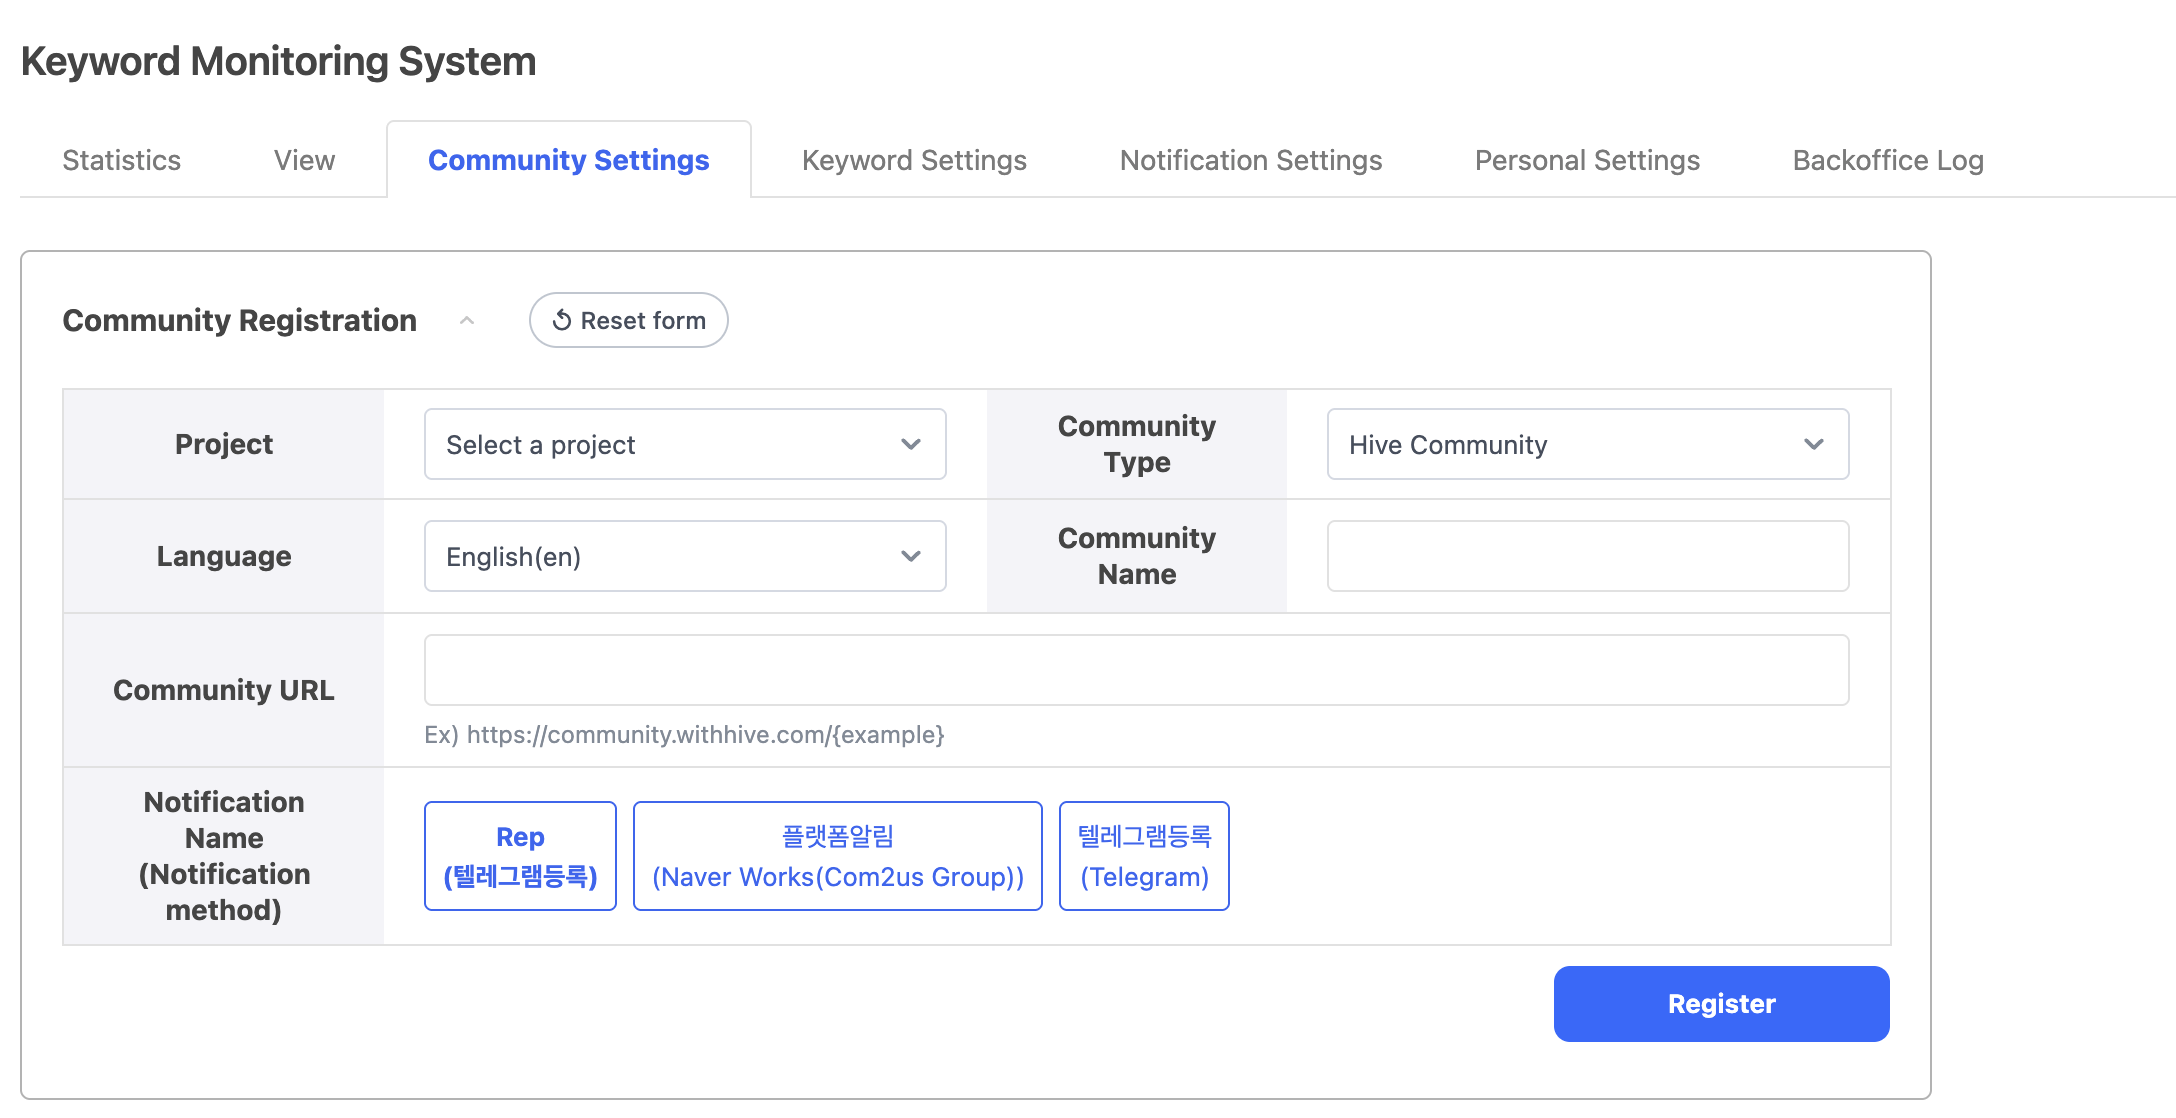
- Project: A list of projects (or games) registered in the App Center is displayed. Select the project (or game) of the community to register.
- Community Type: Supports Hive Community, Naver Lounge, Naver Cafe, DC Inside, Steam Community.
- In the case of Naver Lounge, users who are not logged in must be able to view all of the posts on the bulletin board.
- Language: You can distinguish and register the main language used in the community. Only the languages supported by the selected community type are listed (the language cannot be changed for types that support only one language), and the console language is selected by default if supported. The languages are distinguished by Hive language code according to the Hive Identifier Policy
- Community URL: Registers community URL to monitor by community type using Keyword Monitoring System.
- Community Name: Specifies the name to distinguish communities. After selecting the community type, language and game, {Project name} ({Language code}) will automatically be suggested as the default community name, which can also be changed. A name you edit yourself is kept even if you change the project or language.
- Registered Community List
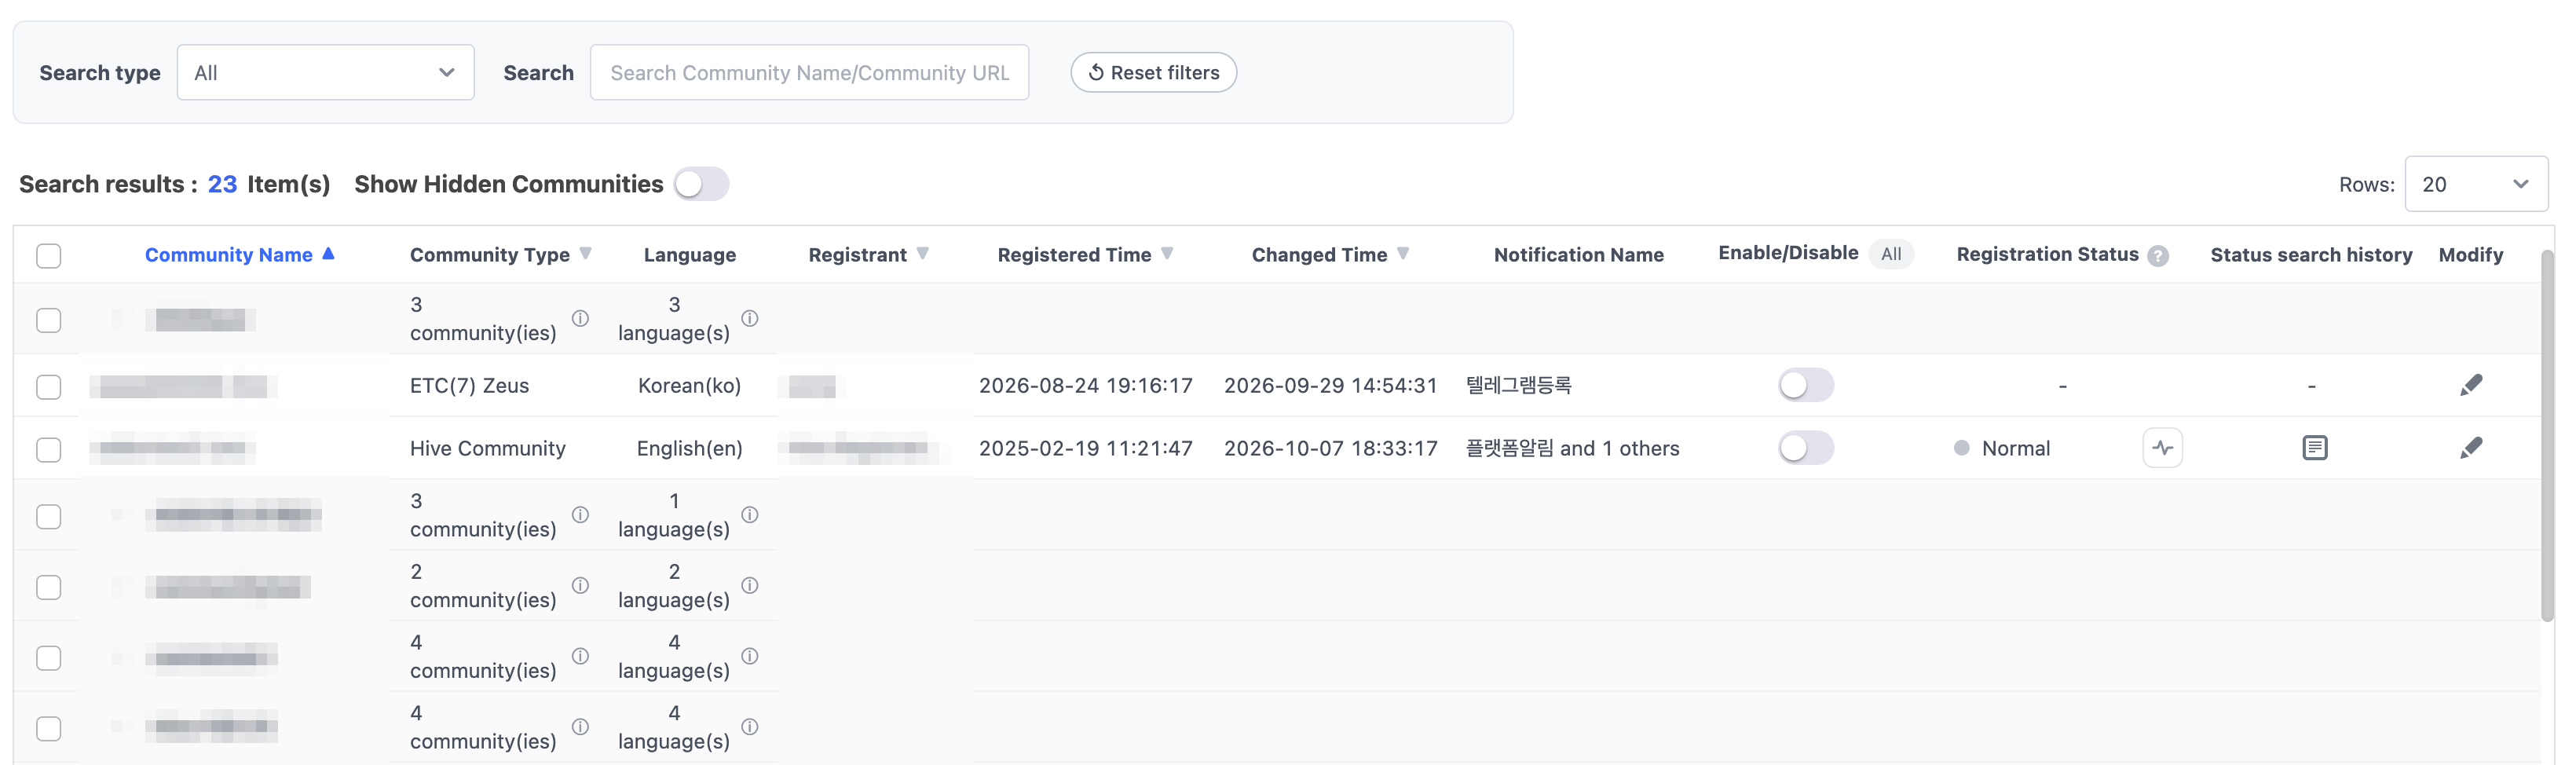
- Search: Select a search type (All, Community Name, Community URL) and enter a search word to filter the list immediately.
- Grouping: If multiple communities are registered under the same project, they are displayed as one group. For details, see the Keyword Monitoring System Guide.
- Check Box: You can select multiple communities and click the Delete button that appears above the list to delete.
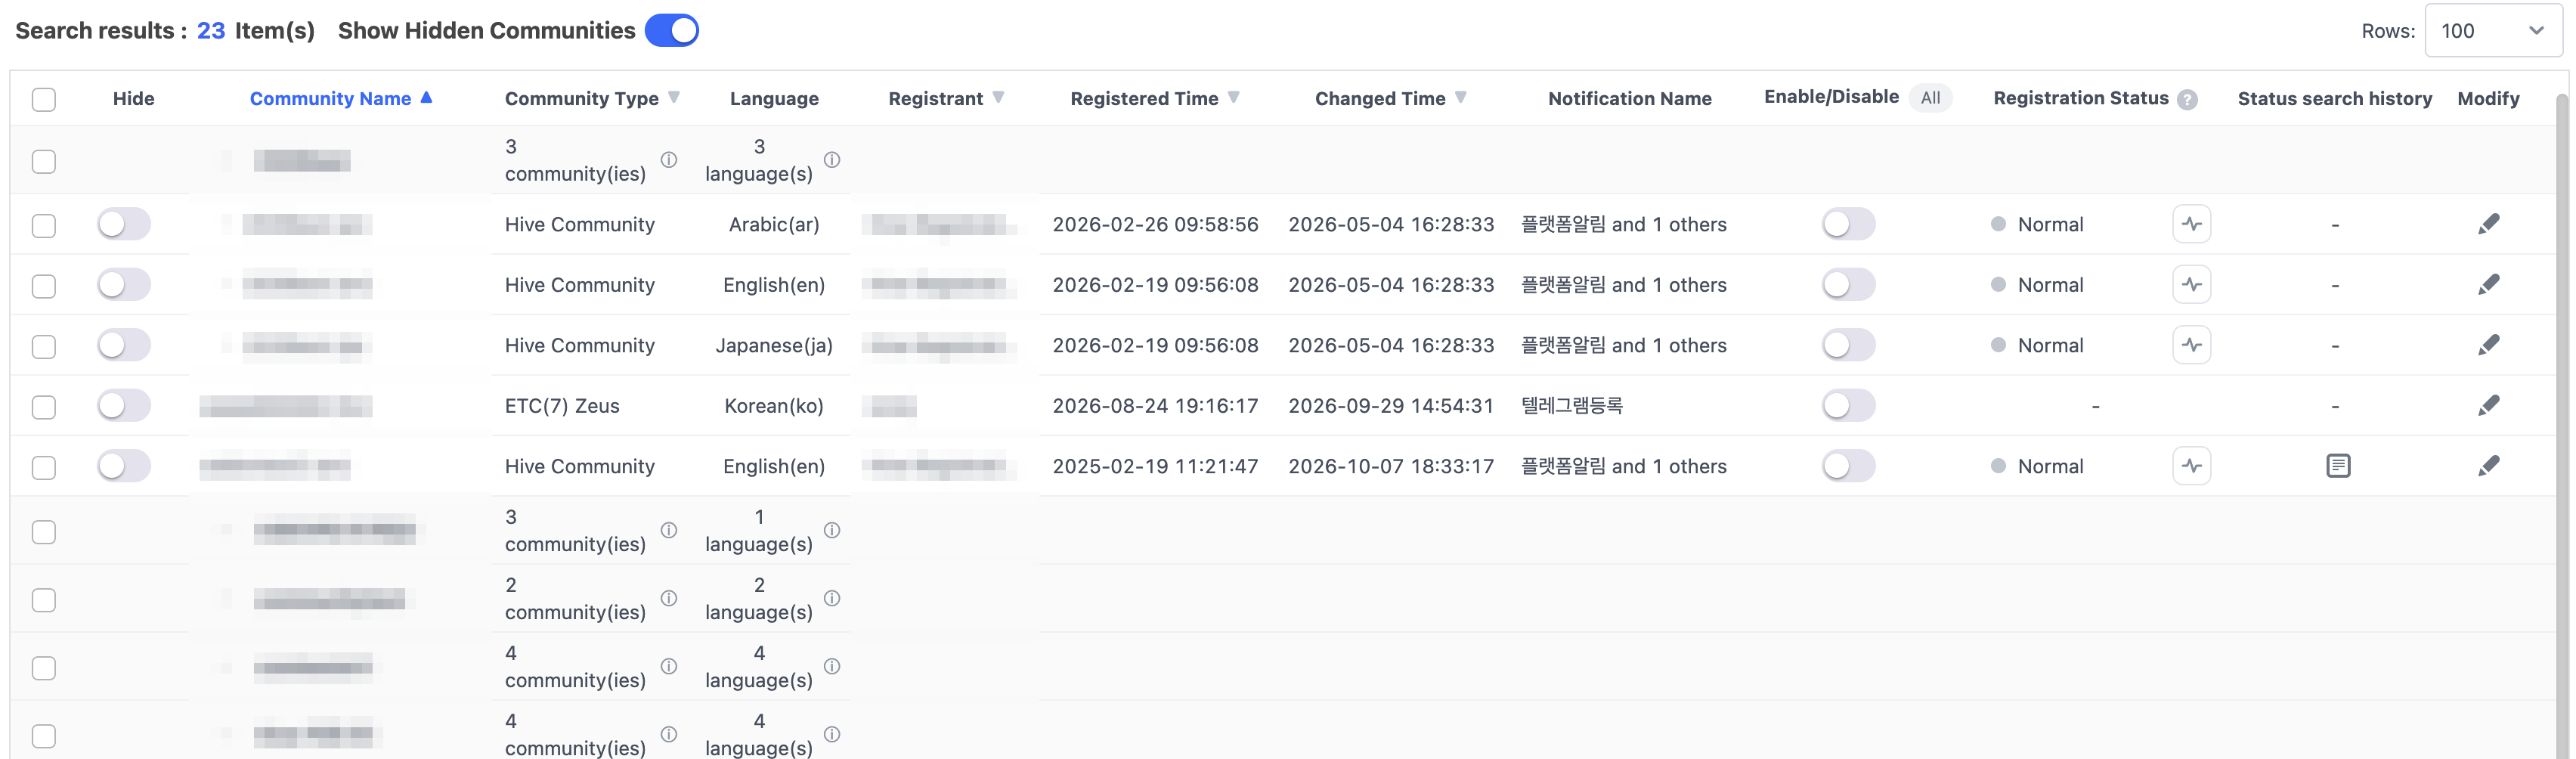
- Hide: Hidden communities will be displayed when "Show Hidden Communities" is enabled, and you can hide specific communities from the list.
- Hide settings apply on an individual basis.
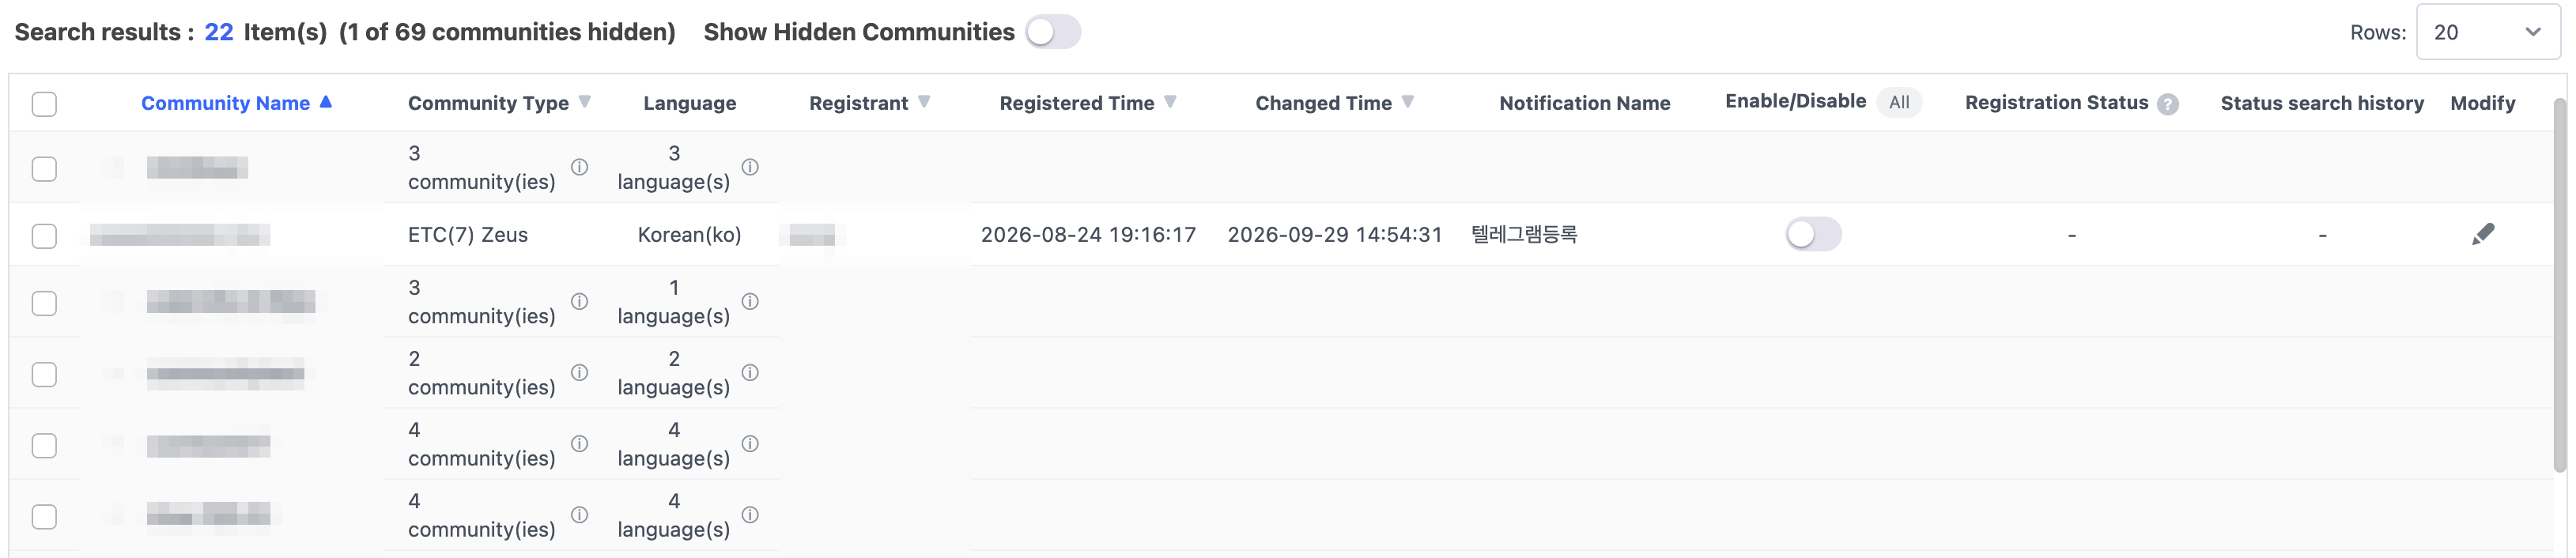
- If there are hidden communities, you can check how many of all the communities are hidden.
- After configuring hidden settings, disabling "Show Hidden Communities" will display only the remaining communities in the list, excluding the hidden ones.
- Notification Name: You can check the notification name that's being used when monitoring the community. If there are several notifications, "first notification name and N others" is shown, and you can hover over it to see the full list.
- Enable/Disable: Activates/deactivates monitoring. Each click on the column name filters the list in the order All → Enabled only → Disabled only. For a community temporarily deactivated due to a community or system error, the toggle is locked and a ? icon explains why.
- Registration Status and Status Check: You can check if the community is able to be monitored. The dot in front of the status shows the latest collection result (green: last collection succeeded, red: last collection failed (including communities automatically deactivated after consecutive failures), grey: inactive or no collection history). Hover over the dot to see the number of consecutive failures and the last collected time.
- Connection Error: It means that the community URL isn't registered correctly or community is unavailable.
- Normal: Connection available
- Registering: Status before the community is activated where Hive Community is set to activate in the App Center's settings by product
- Information Error: Status where supported languages and URL information aren't synchronized with Hive Community
- Connection Error (Project): Status where the community cannot be connected based on the project
- Status search history: Shows the history of status checks (connection URL, result, message, processing status, requested by, request time).
- Modify: You can edit the community info from the edit pop-up shown below when clicking on the icon.
Keyword settings
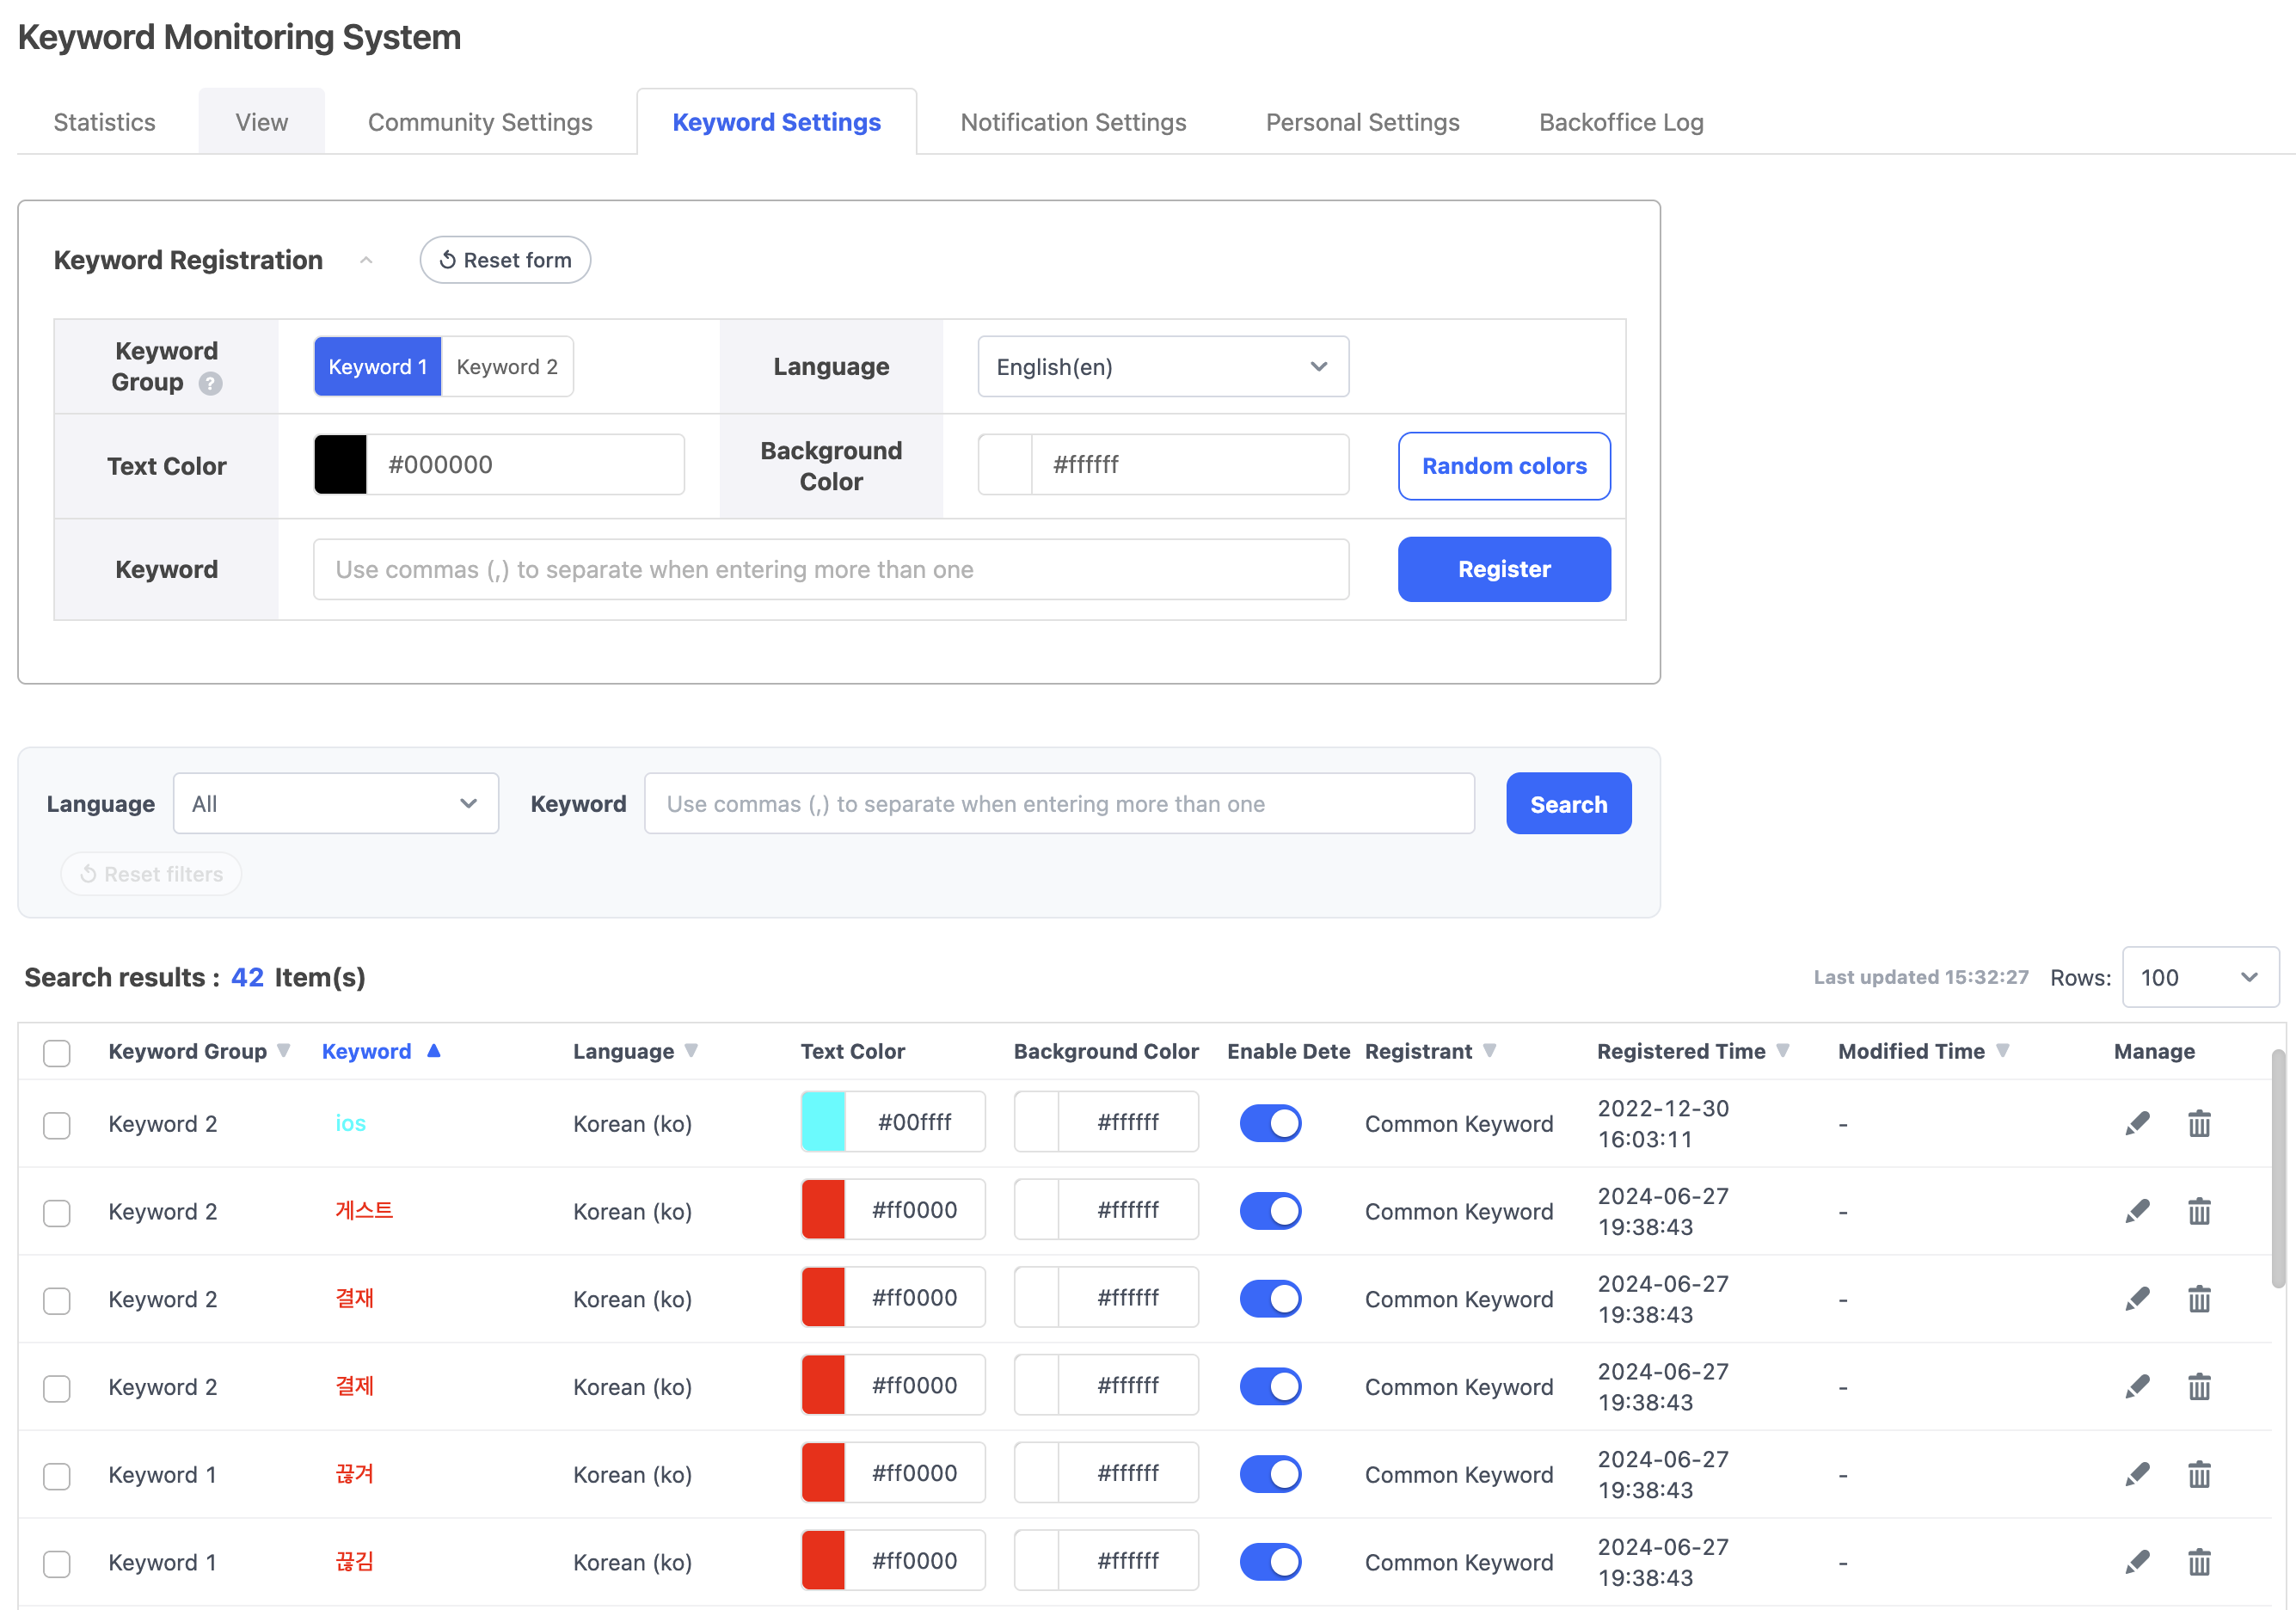
- Registering Keywords
- Keyword Group: Classifies the keyword as Keyword 1 or Keyword 2.
- Keyword Group classifies the features of the keywords. For example, Keyword 1 represents problems such as errors and disconnections, whereas Keyword 2 represents problems related to servers, connections, and purchases.
- A notification is sent when the post title contains both Keyword 1 and Keyword 2.
- Language: Sets languages for distinguishing keywords. The language used for Keyword Monitoring System will be displayed, and the console language is selected by default if it is among the options (otherwise the first language).
- Text Color: Sets the text color to mark the keywords in Keyword Monitoring System.
- Background Color: Sets the background color to mark the keywords in Keyword Monitoring System.
- Random colors: Automatically picks an easy-to-read combination of text and background colors.
- Keyword: You can enter the keywords to register. When entering more than one keyword, you can use commas to distinguish each of them or paste the keywords distinguished with commas. Typing a comma turns the keyword into a chip, and each keyword can be up to 45 characters. Keywords that are already registered are excluded when registering.
- Keyword Group: Classifies the keyword as Keyword 1 or Keyword 2.
- Search Registered Keywords
- Languages: Searches based on the language set upon keyword registration.
- Keyword: Searches for the registered keywords. When entering more than one keyword, you can use commas to distinguish each of them. You can see the list of the keywords when entering partial letters from the keywords.
- Registered Keyword List
- You can view the keyword list registered using languages and keyword filters. "Common Keyword" in the Registrant column means the default common keywords provided by the Keyword Monitoring System.
- Edit: Click the pencil icon in the Manage column to change the keyword group, keyword, language, text color, and background color in the row and save them.
- Enable Detection: You can activate/deactivate keyword detection.
- Delete: You can delete a keyword with the trash icon in the Manage column, or select check boxes to delete multiple keywords at the same time. When multiple keywords are selected, you can also enable or disable detection at once.
View
- Provides the history of keyword notifications of the community according to the set search conditions.
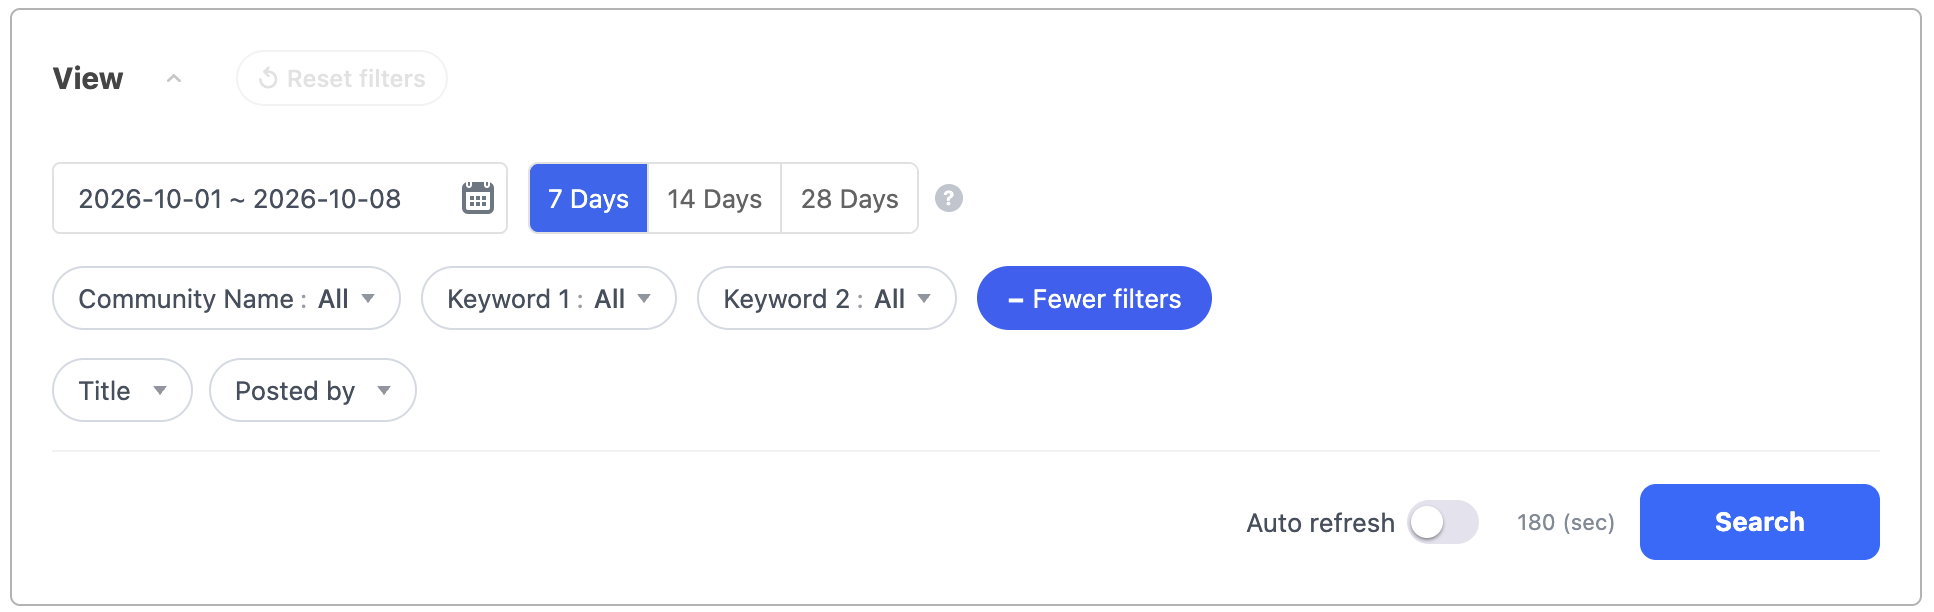
- Search Conditions
- Search Period: You can set a specific period as search range. If no search period is specified in the personal settings, the default range is from 7 days ago to today. You can set up to 60 days.
- Title: Entered under More filters. You can view the posts including the words of the post title.
- Author: Entered under More filters. You can view the posts based on the authors.
- Community Name: You can view the post under the community name registered in the Keyword Monitoring System. If a search community is set in Personal Settings, it will be applied, and the community you searched last is selected first if there is one.
- Keyword 1: You can view a list corresponding to Keyword 1 upon selection and view posts that contain the keyword in the title.
- Keyword 2: You can view a list corresponding to Keyword 2 upon selection and view posts that contain the keyword in the title.
- Auto Refresh: Automatically refreshes at the interval set in the Refresh Interval field of Personal Settings. You can toggle it on or off with the button, and the remaining time in seconds is displayed.
- Search Results: You can view the details of the post searched under the set search conditions. If no items per page are set in Personal Settings, the default is 20. You can sort by registered time, newest or oldest first.
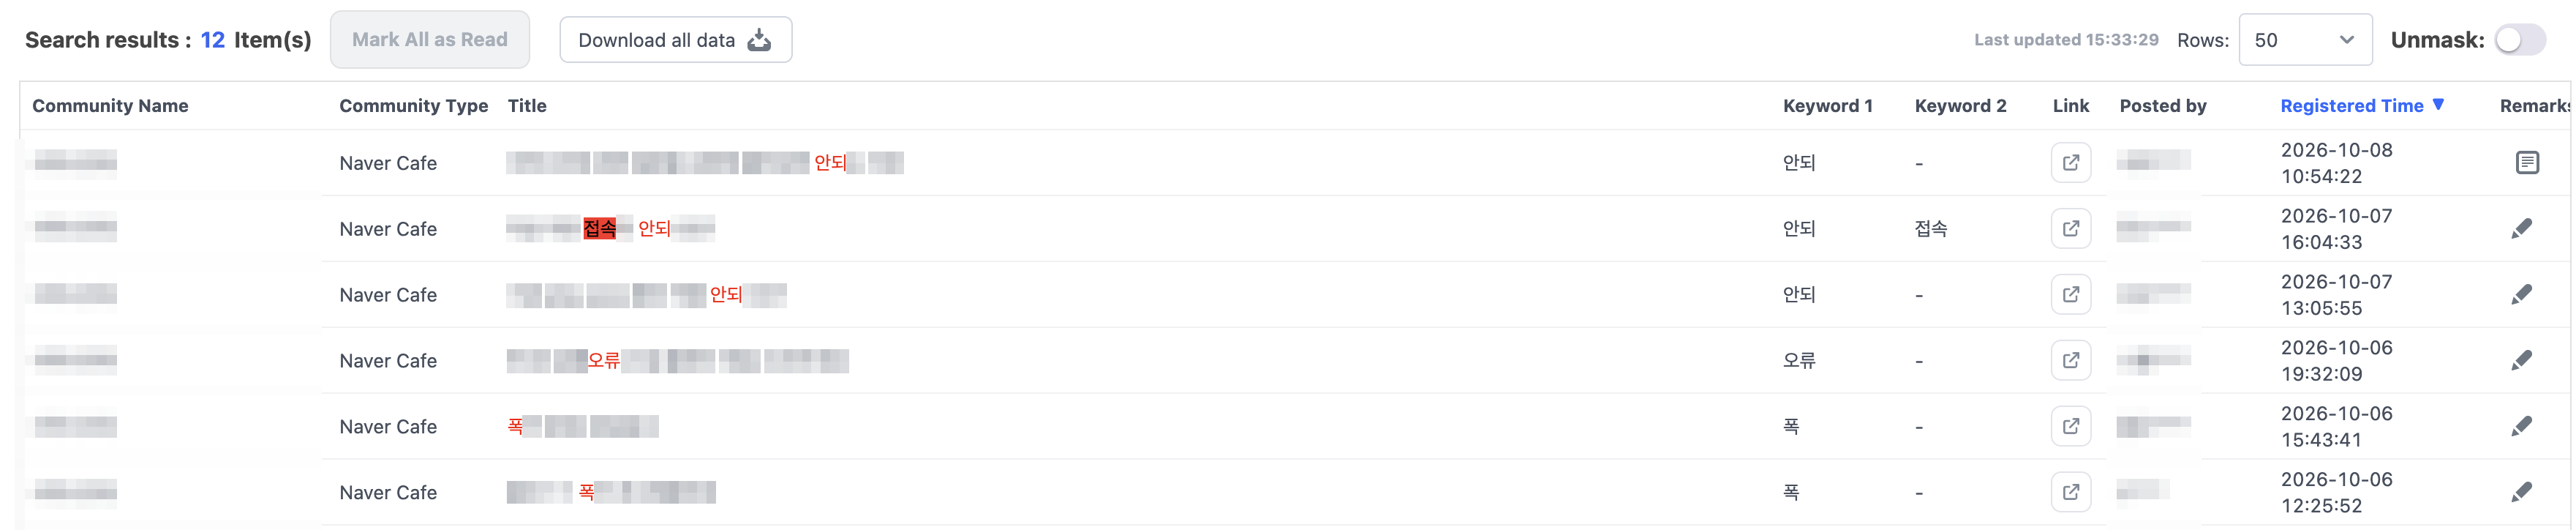
- Mark All as Read: Clears indicators for newly added posts.
- Unmask: Shows the masked authors as they are. Unmasking is recorded in the backoffice log.
- Download all data: You can download the search results of the set conditions as an Excel file. Authors' information is not included in the download. You must enter a reason for the download (5 to 50 characters), and downloads are available only in permitted network environments.
Notification Settings
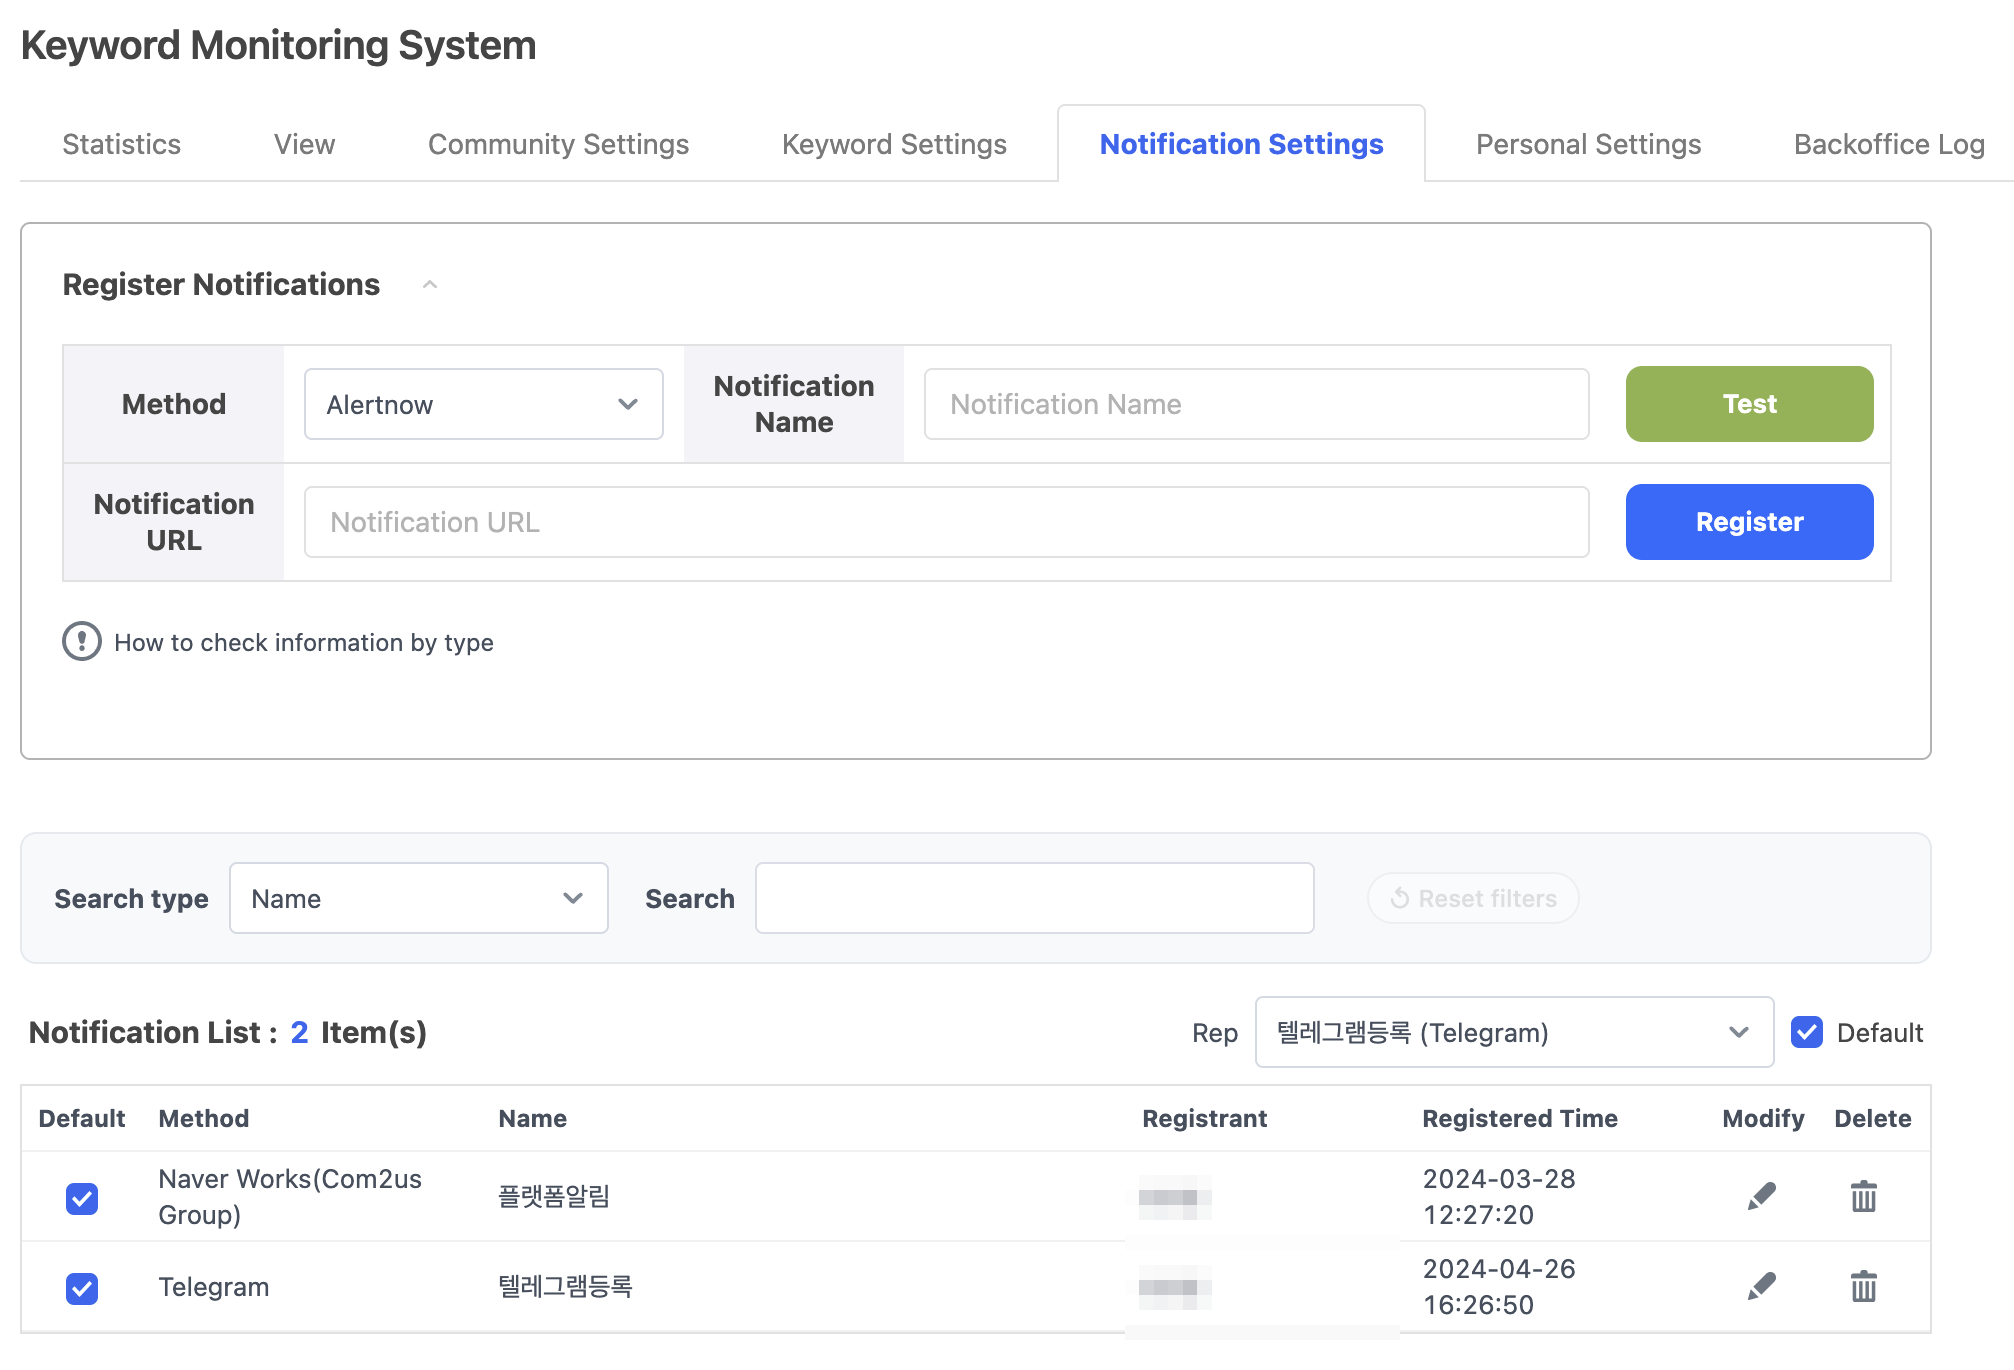
- Settings to receive notifications when both Keyword 1 and Keyword 2 are detected.
- You can view the notification method to receive the message when there's been a keyword notification.
- The notification information you must input changes based on the notification mode, which you can view in full by selecting the How to check information by type.
- Select a notification method, enter the required information, and register.
- Dooray: Check Dooray webhook URL information
- Slack: Check Slack webhook URL information
- Alertnow
- JANDI: Check JANDI incoming webhook URL information
- Teams: Check Teams webhook URL information
- Google Chat: Check Google Chat webhook URL information
- Telegram: Check Telegram bot token and chat ID information
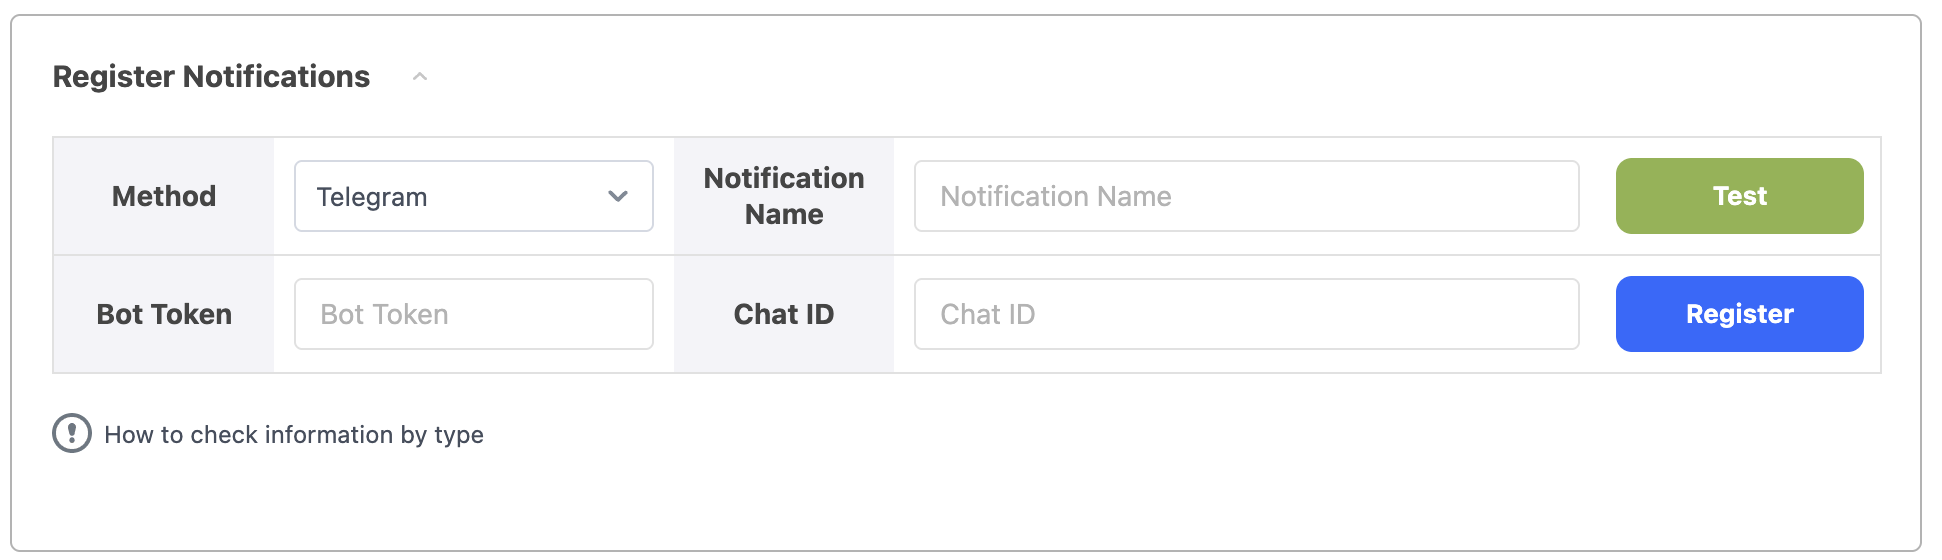
- For Telegram, you can receive messages via bot.
- How to Check (Official API Document)
- After searching for Botfather on Telegram, use the Telegram Botfather document to create a bot and acquire a bot token.
- Once you have obtained the bot token, prepare to communicate with the bot as follows.
- To begin a bot discussion, search for the bot name you created as a chat partner, create a chat room, enter, then type "/start" to start the conversation.
- If you only want to receive messages via 1:1 conversation, preserve the chat room you created.
- To receive messages in a chat room with many individuals, add the created bot to the group or channel as an administrator and enter "/start" to start the conversation.
- Check the bot API using Telegram's Making Requests document.
- To verify the bot's chat ID in the preceding API, enter the URL input box of the web browser and change <token> to the issued bot token and METHOD_NAME to getUpdates.
- When connected, the API answer value appears on the web browser screen.
- For 1:1 chat, “chat :” {“id”: xxxxxx's xxxxxx (positive number) among the displayed response values is the chat ID.
- For group chat, “chat :” {“id”: xxxxxx's xxxxxx (negative number) among the displayed response values is the chat ID.
- If the chat ID is not found, enter random text instead of "/start" in the chat room with the bot. Afterward, input the same content in the URL input bar of your web browser and check.
- Use the issued bot token and confirmed chat ID.
- Through testing, you can check whether notifications are being sent out properly with the notification information you entered.
- Select a notification method, enter the required information, and register.
- Registered Notification List

- Default: When selected, the notification is selected by default when registering a community.
- Method: Method for sending keyword notifications.
- Representative: Notification used as a representative. You can change the representative notification in the Rep dropdown above the list, and the representative notification cannot be deleted.
- Modify: Click the icon to open the View/Modify pop-up.
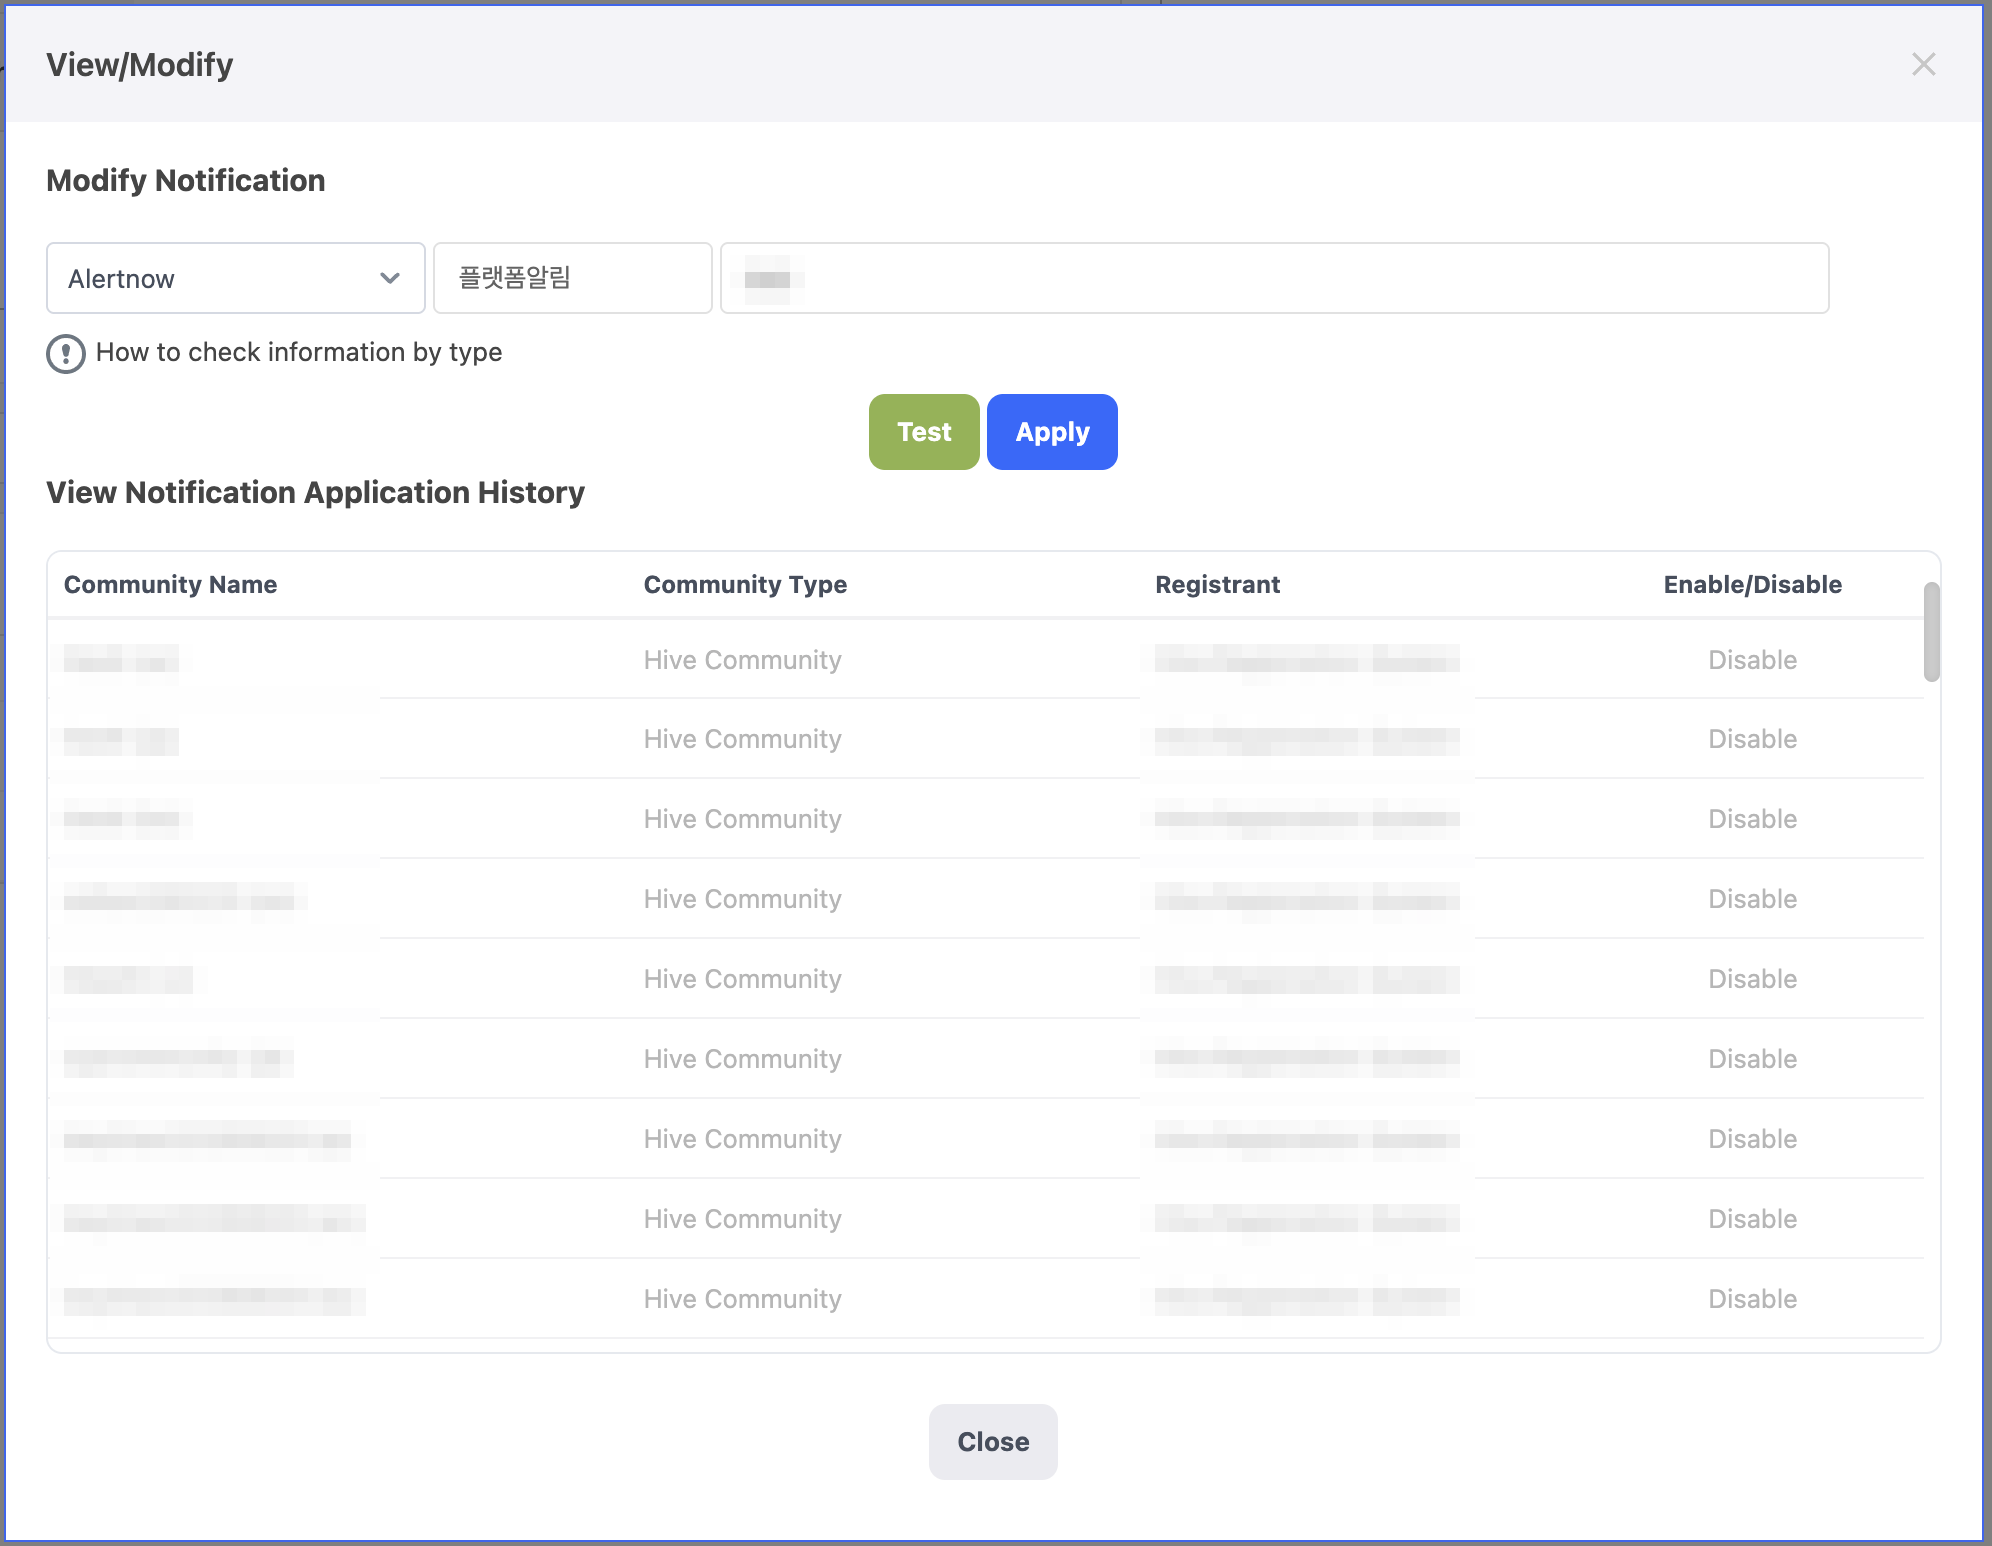
- Modify Notification: You can edit and test the information of registered notifications. Click Apply to save.
- View Notification Application History: You can view communities that are using the notification.
- Delete Notification: Click the icon in the Delete column to see the communities using the notification, and either change them to the representative notification and delete it, or delete it right away.
Statistics
- Provides keyword notification statistics by community according to the set search conditions.
- You can download the graph data as an Excel file by using the Download all data button.
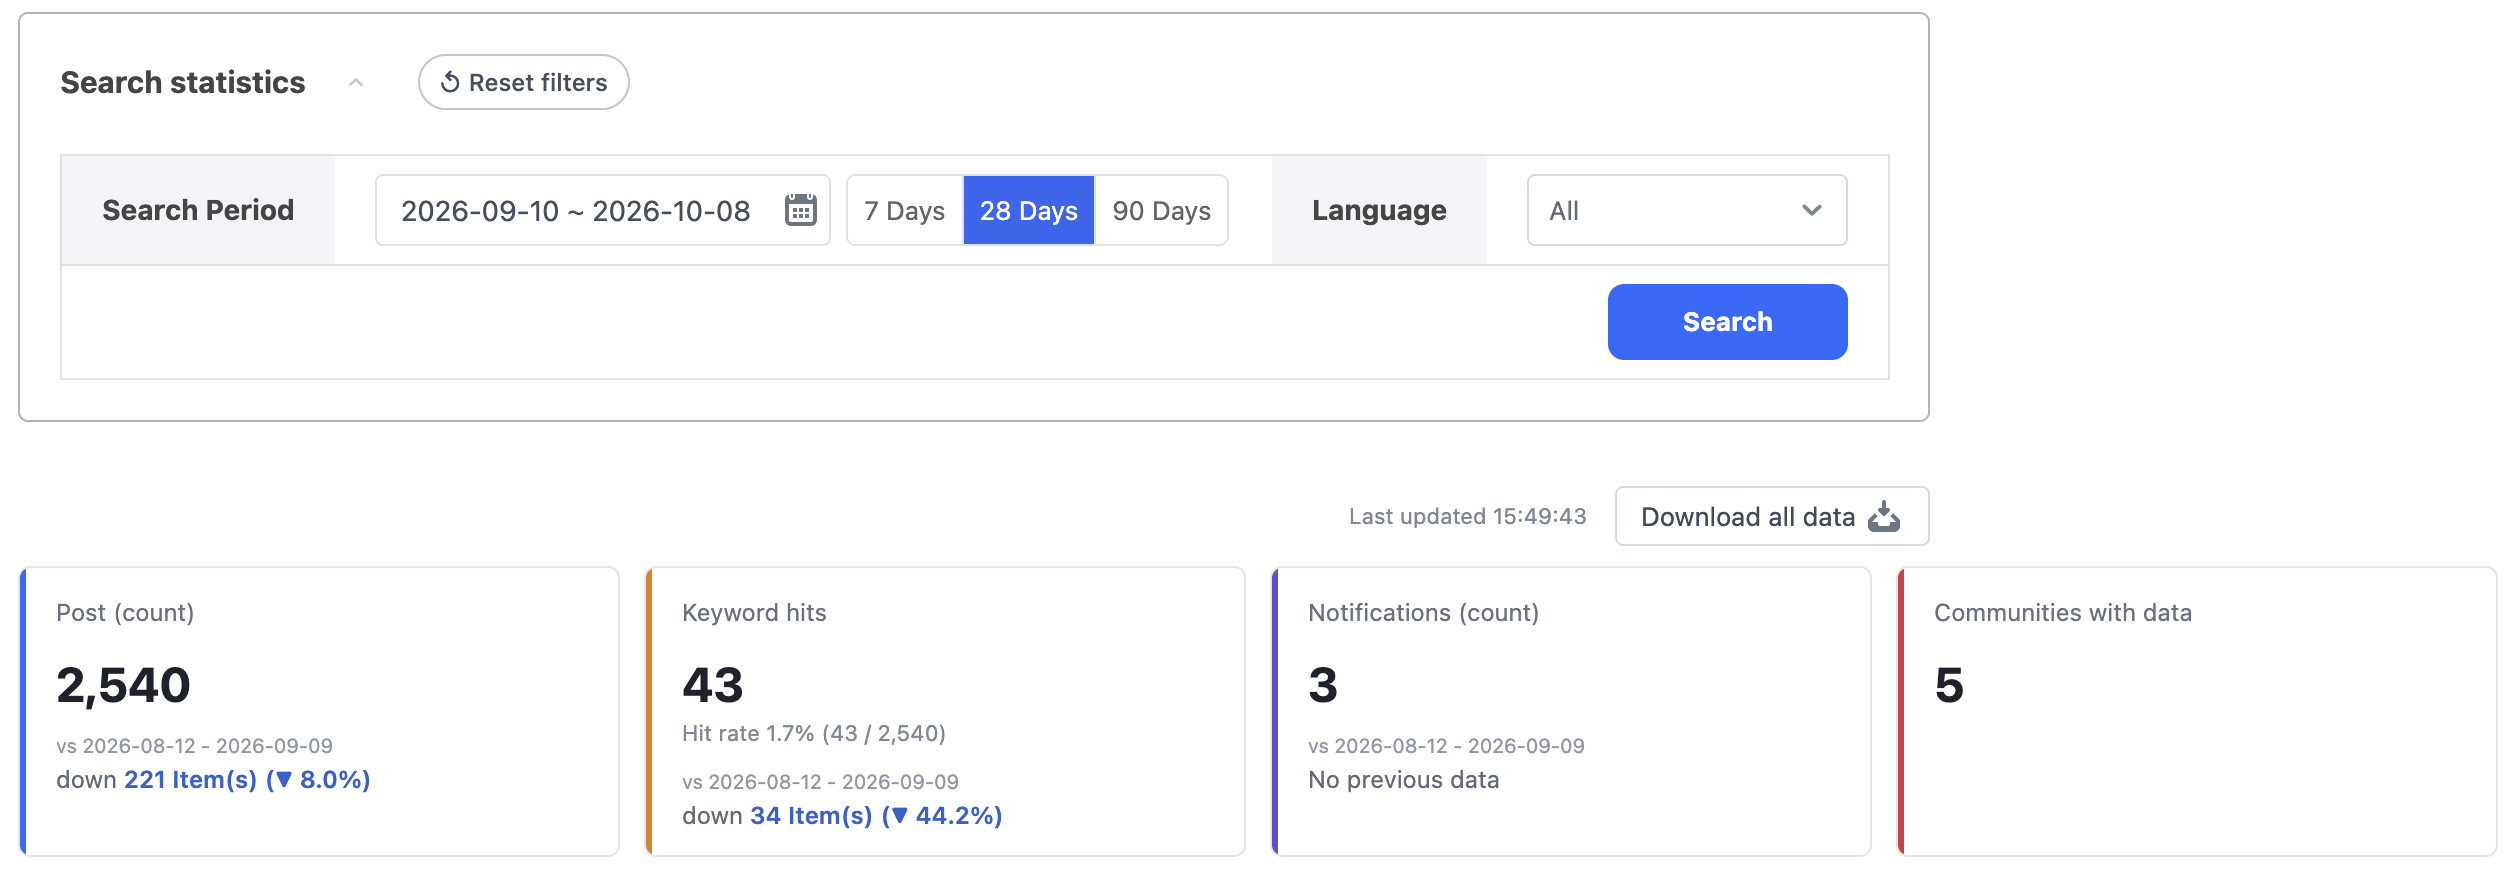
- Search Conditions
- Search Period: You can set the search range using 7 Days, 28 Days, 90 Days buttons. The selected number of previous days will be set up from the end date. You can also pick dates in the calendar that opens when you click the period field, or use its Today and Recent 7, 30, 60, and 90 Days buttons, up to 90 days back. If no search period is specified in the personal settings, the default range is from 7 days ago to today.
- Languages: You can view based on the language set when registering the community for Keyword Monitoring System. The Search Language setting in Personal Settings is applied.
- Download all data
- You can download the data under the search conditions, as an Excel file. You must enter a reason for the download (5 to 50 characters).
- Contents included in the data are No. of Posts (Daily), Daily Notification Statistics, No. of Keyword Appearance, Keyword 1 Count (Daily), Keyword 2 Count (Daily)
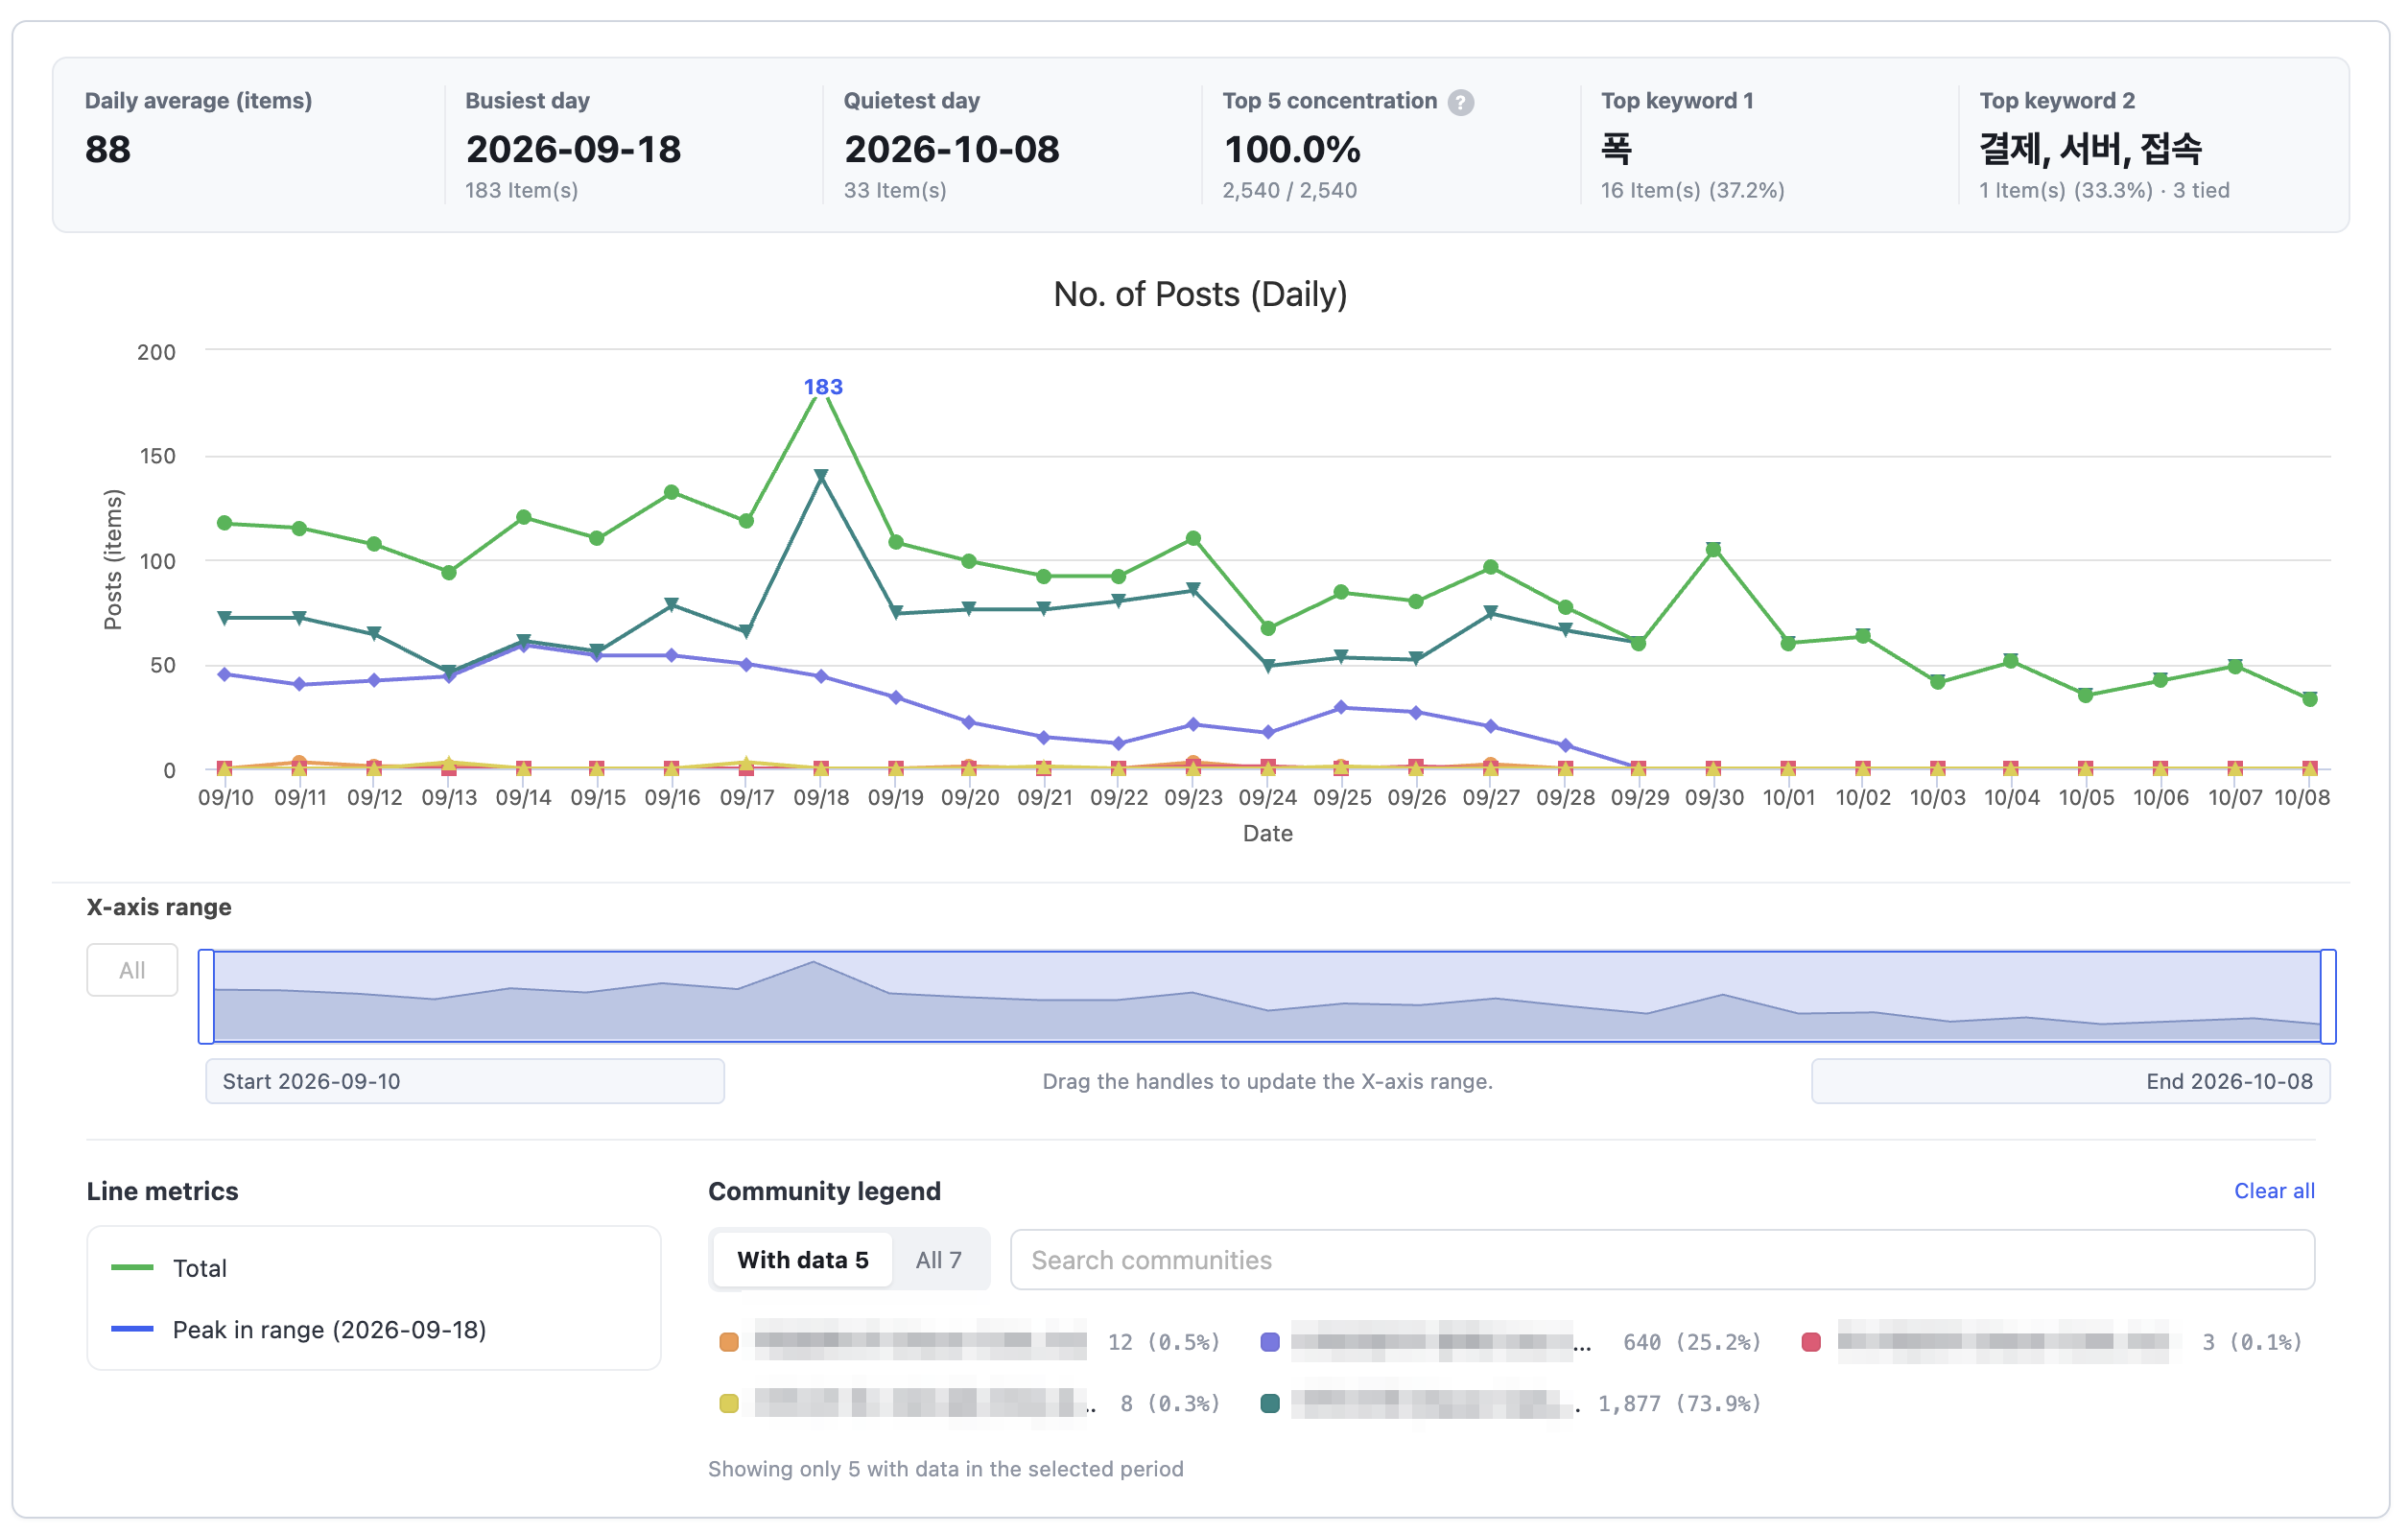
- Summary cards: Show posts, keyword hits, notifications, and communities with data, together with the change compared with the previous period of the same length.
- Surge badge: Shown when the day with the most notifications is at least twice the usual level (the median daily count over the previous 28 days) and at least 20 higher.
- No. of Posts (Daily): You can view the daily number of collected posts by community. Select the communities to show in the community legend, and narrow the period with the X-axis range below the chart.
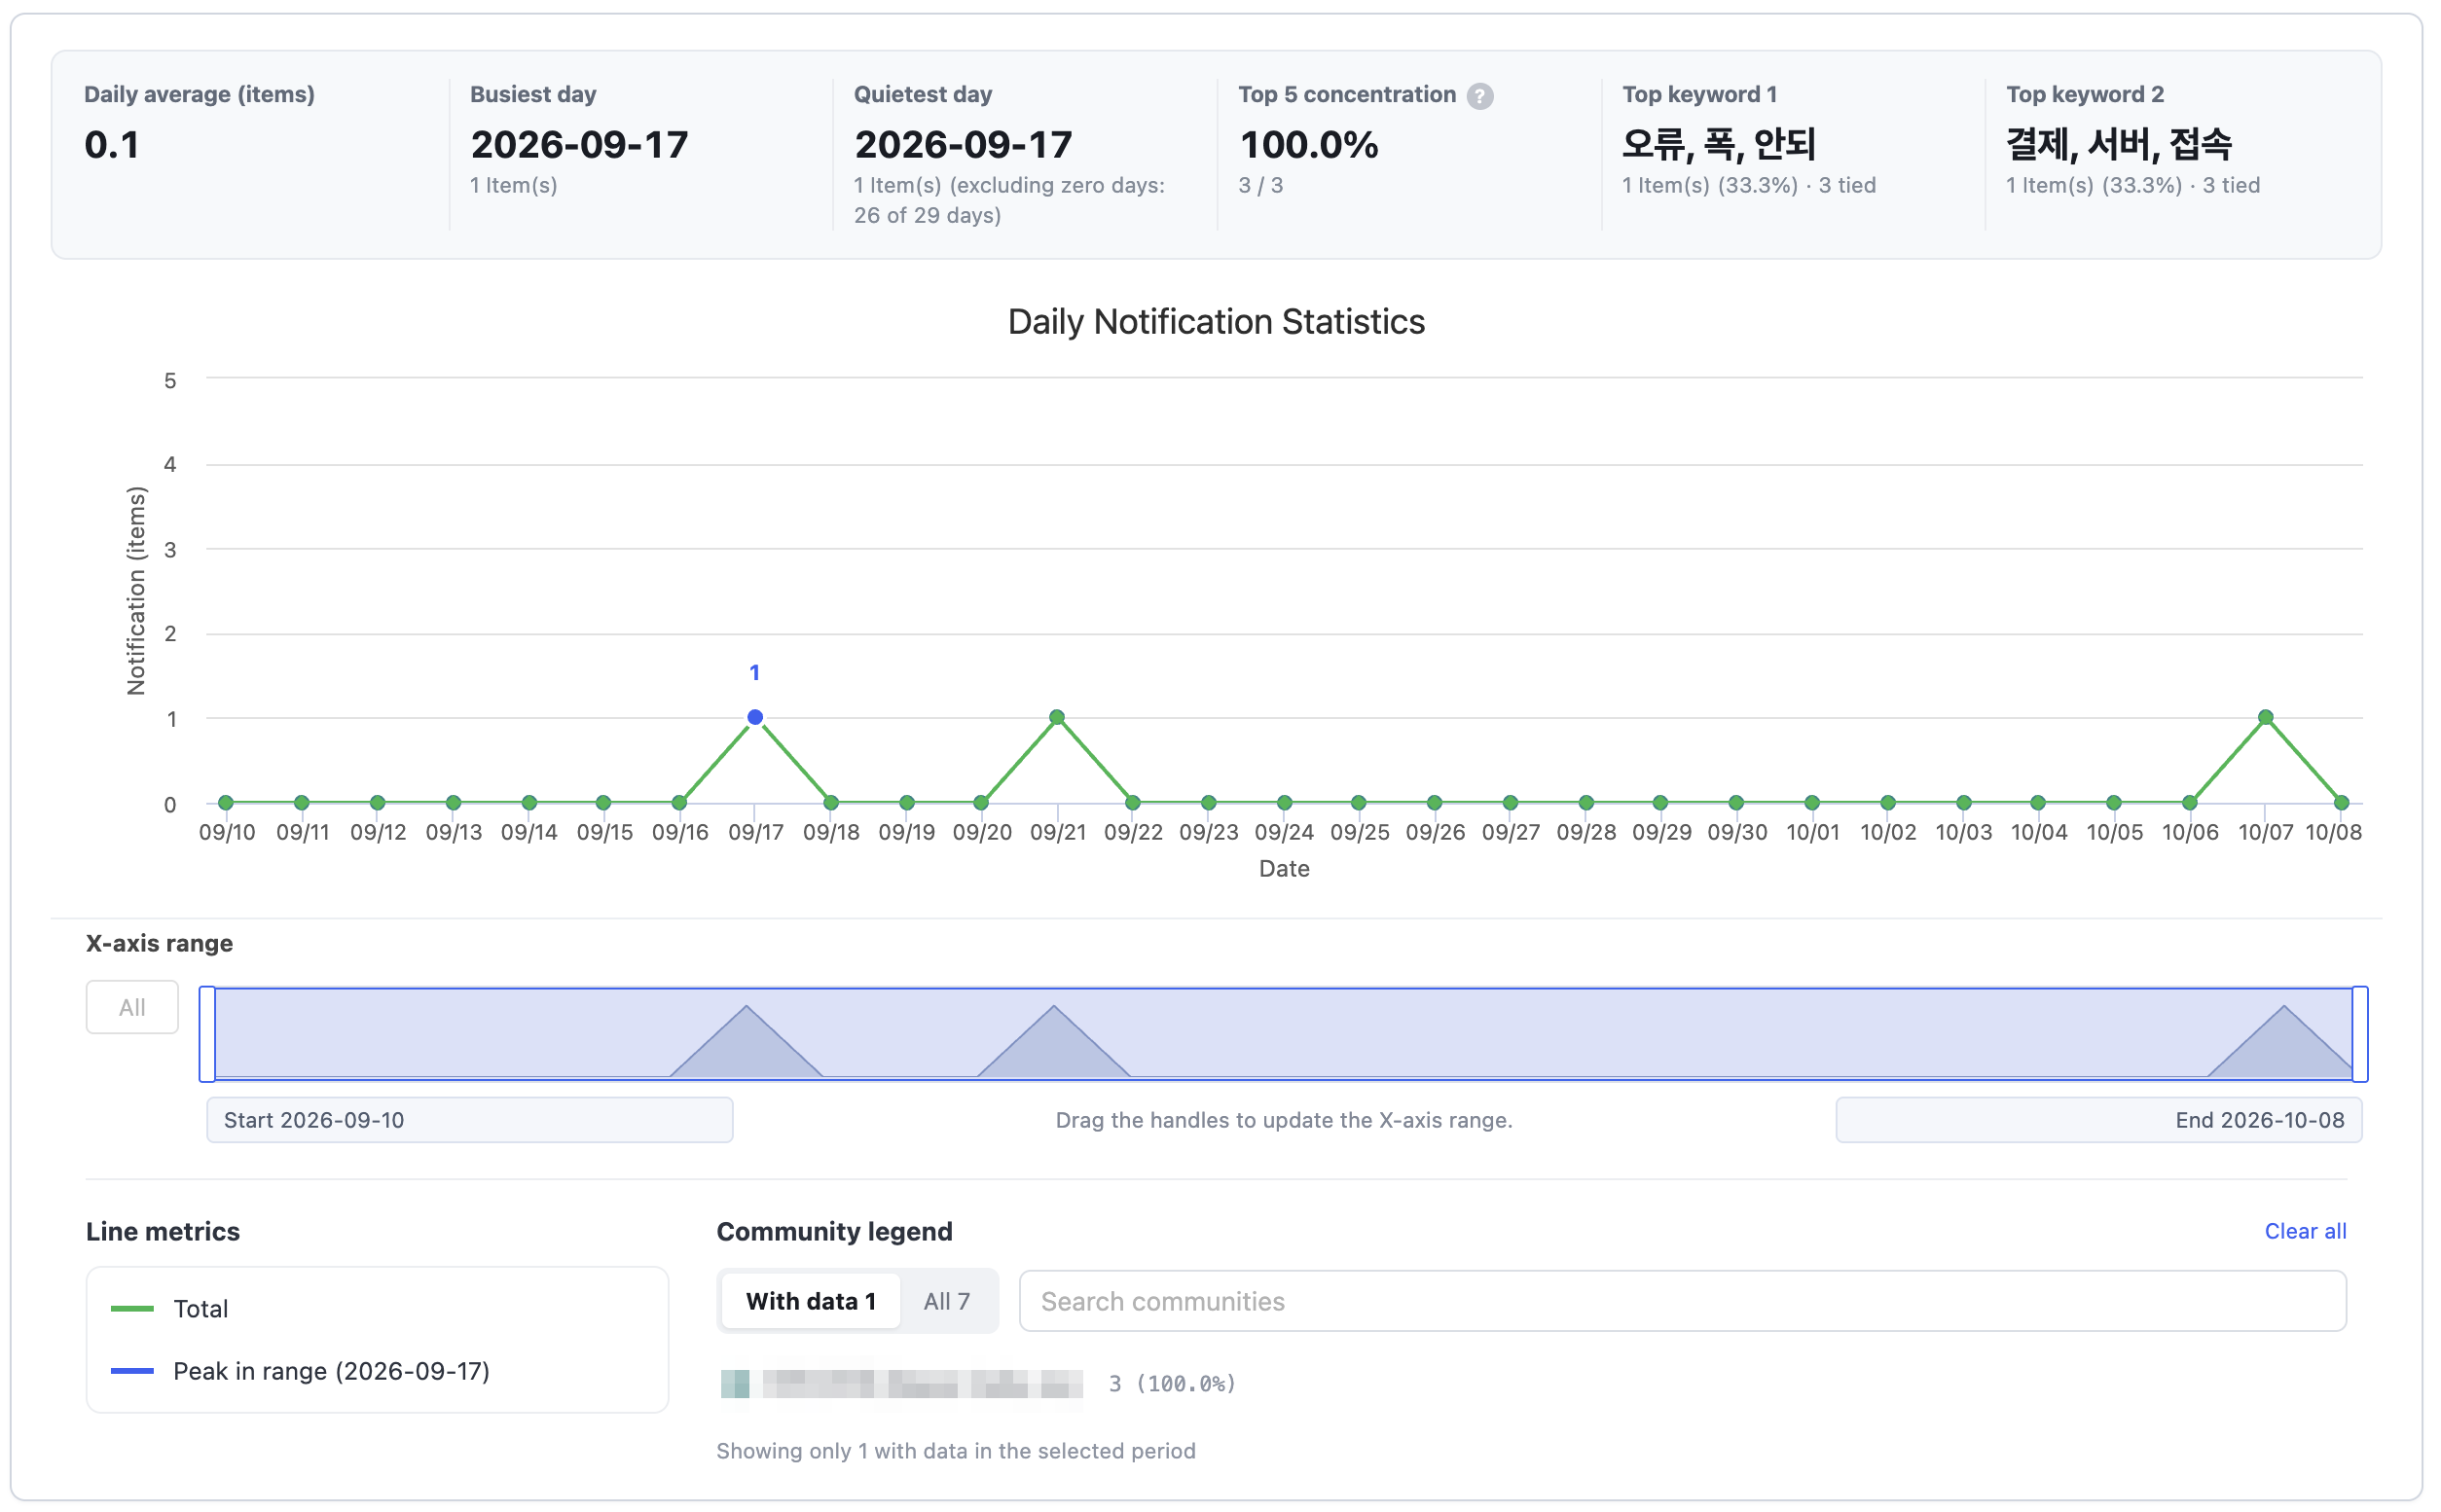
- Daily Notification Statistics: You can view the daily number of notifications during the selected period. The notifications will only be sent when both Keyword 1 and Keyword 2 are in the post title.
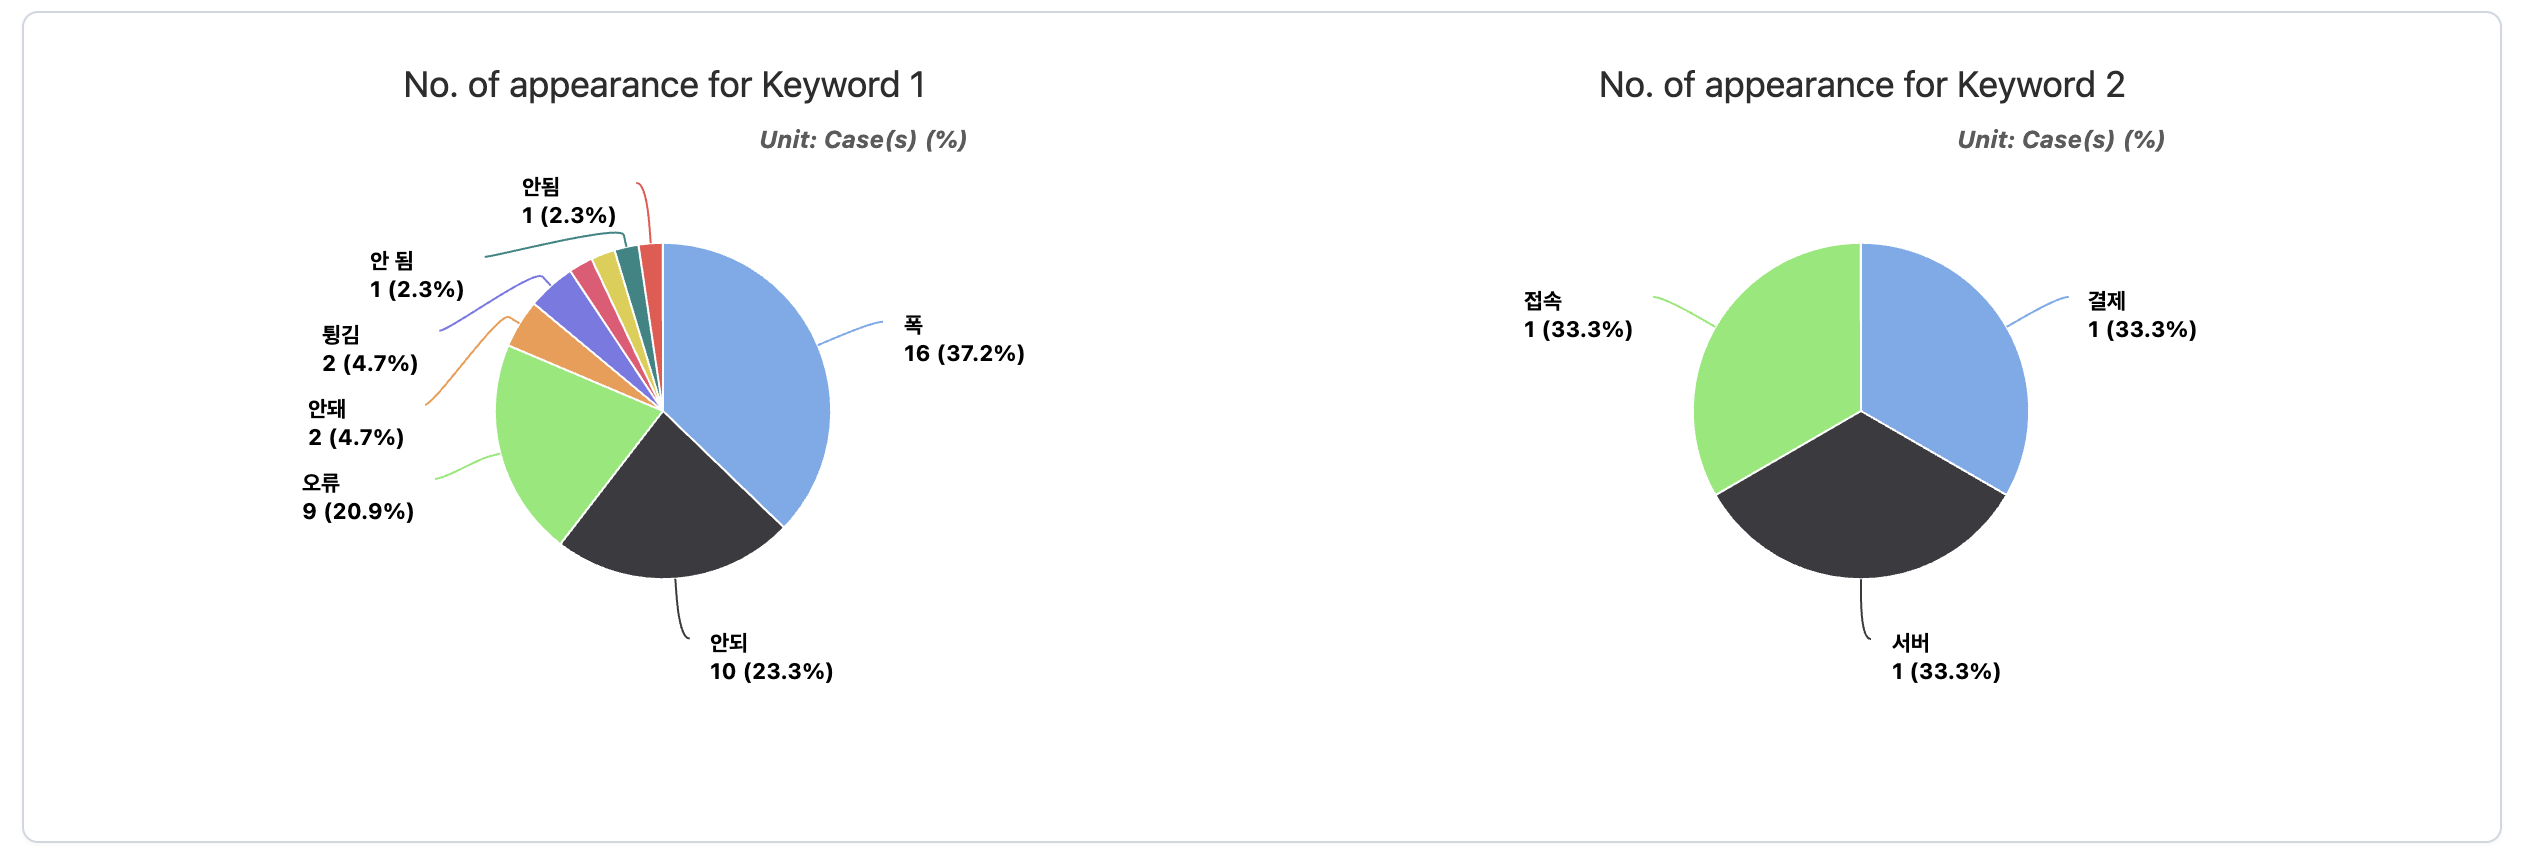
- No. of appearance for Keyword 1, Keyword 2: You can view how many times the keyword appeared in the title during the selected period.
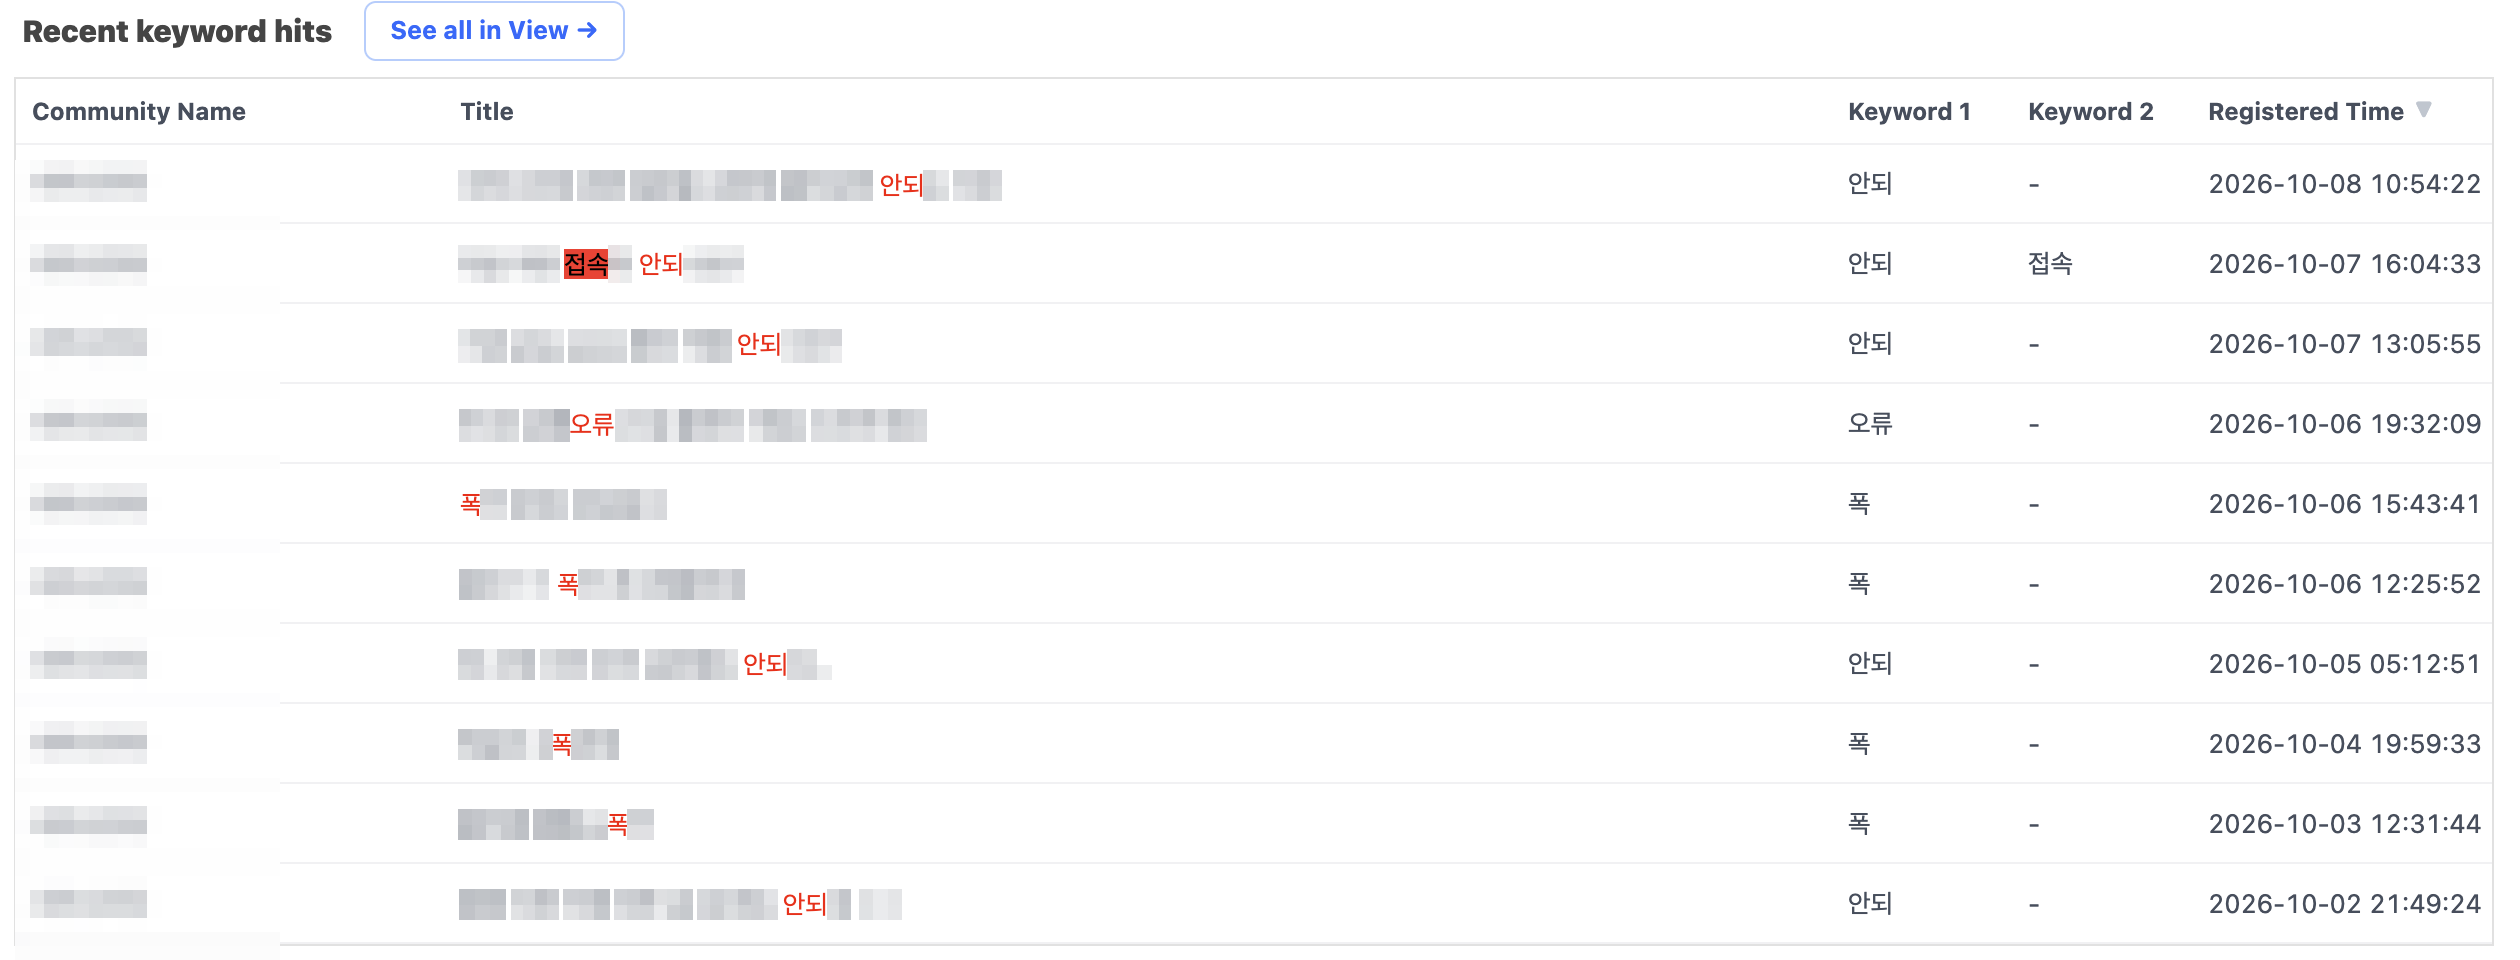
- Recent keyword hits: You can view the 10 most recent posts with keyword hits during the selected period, including the community name, title, keywords, and registered time. Click See all in View to go to the "View" tab.
Personal Settings
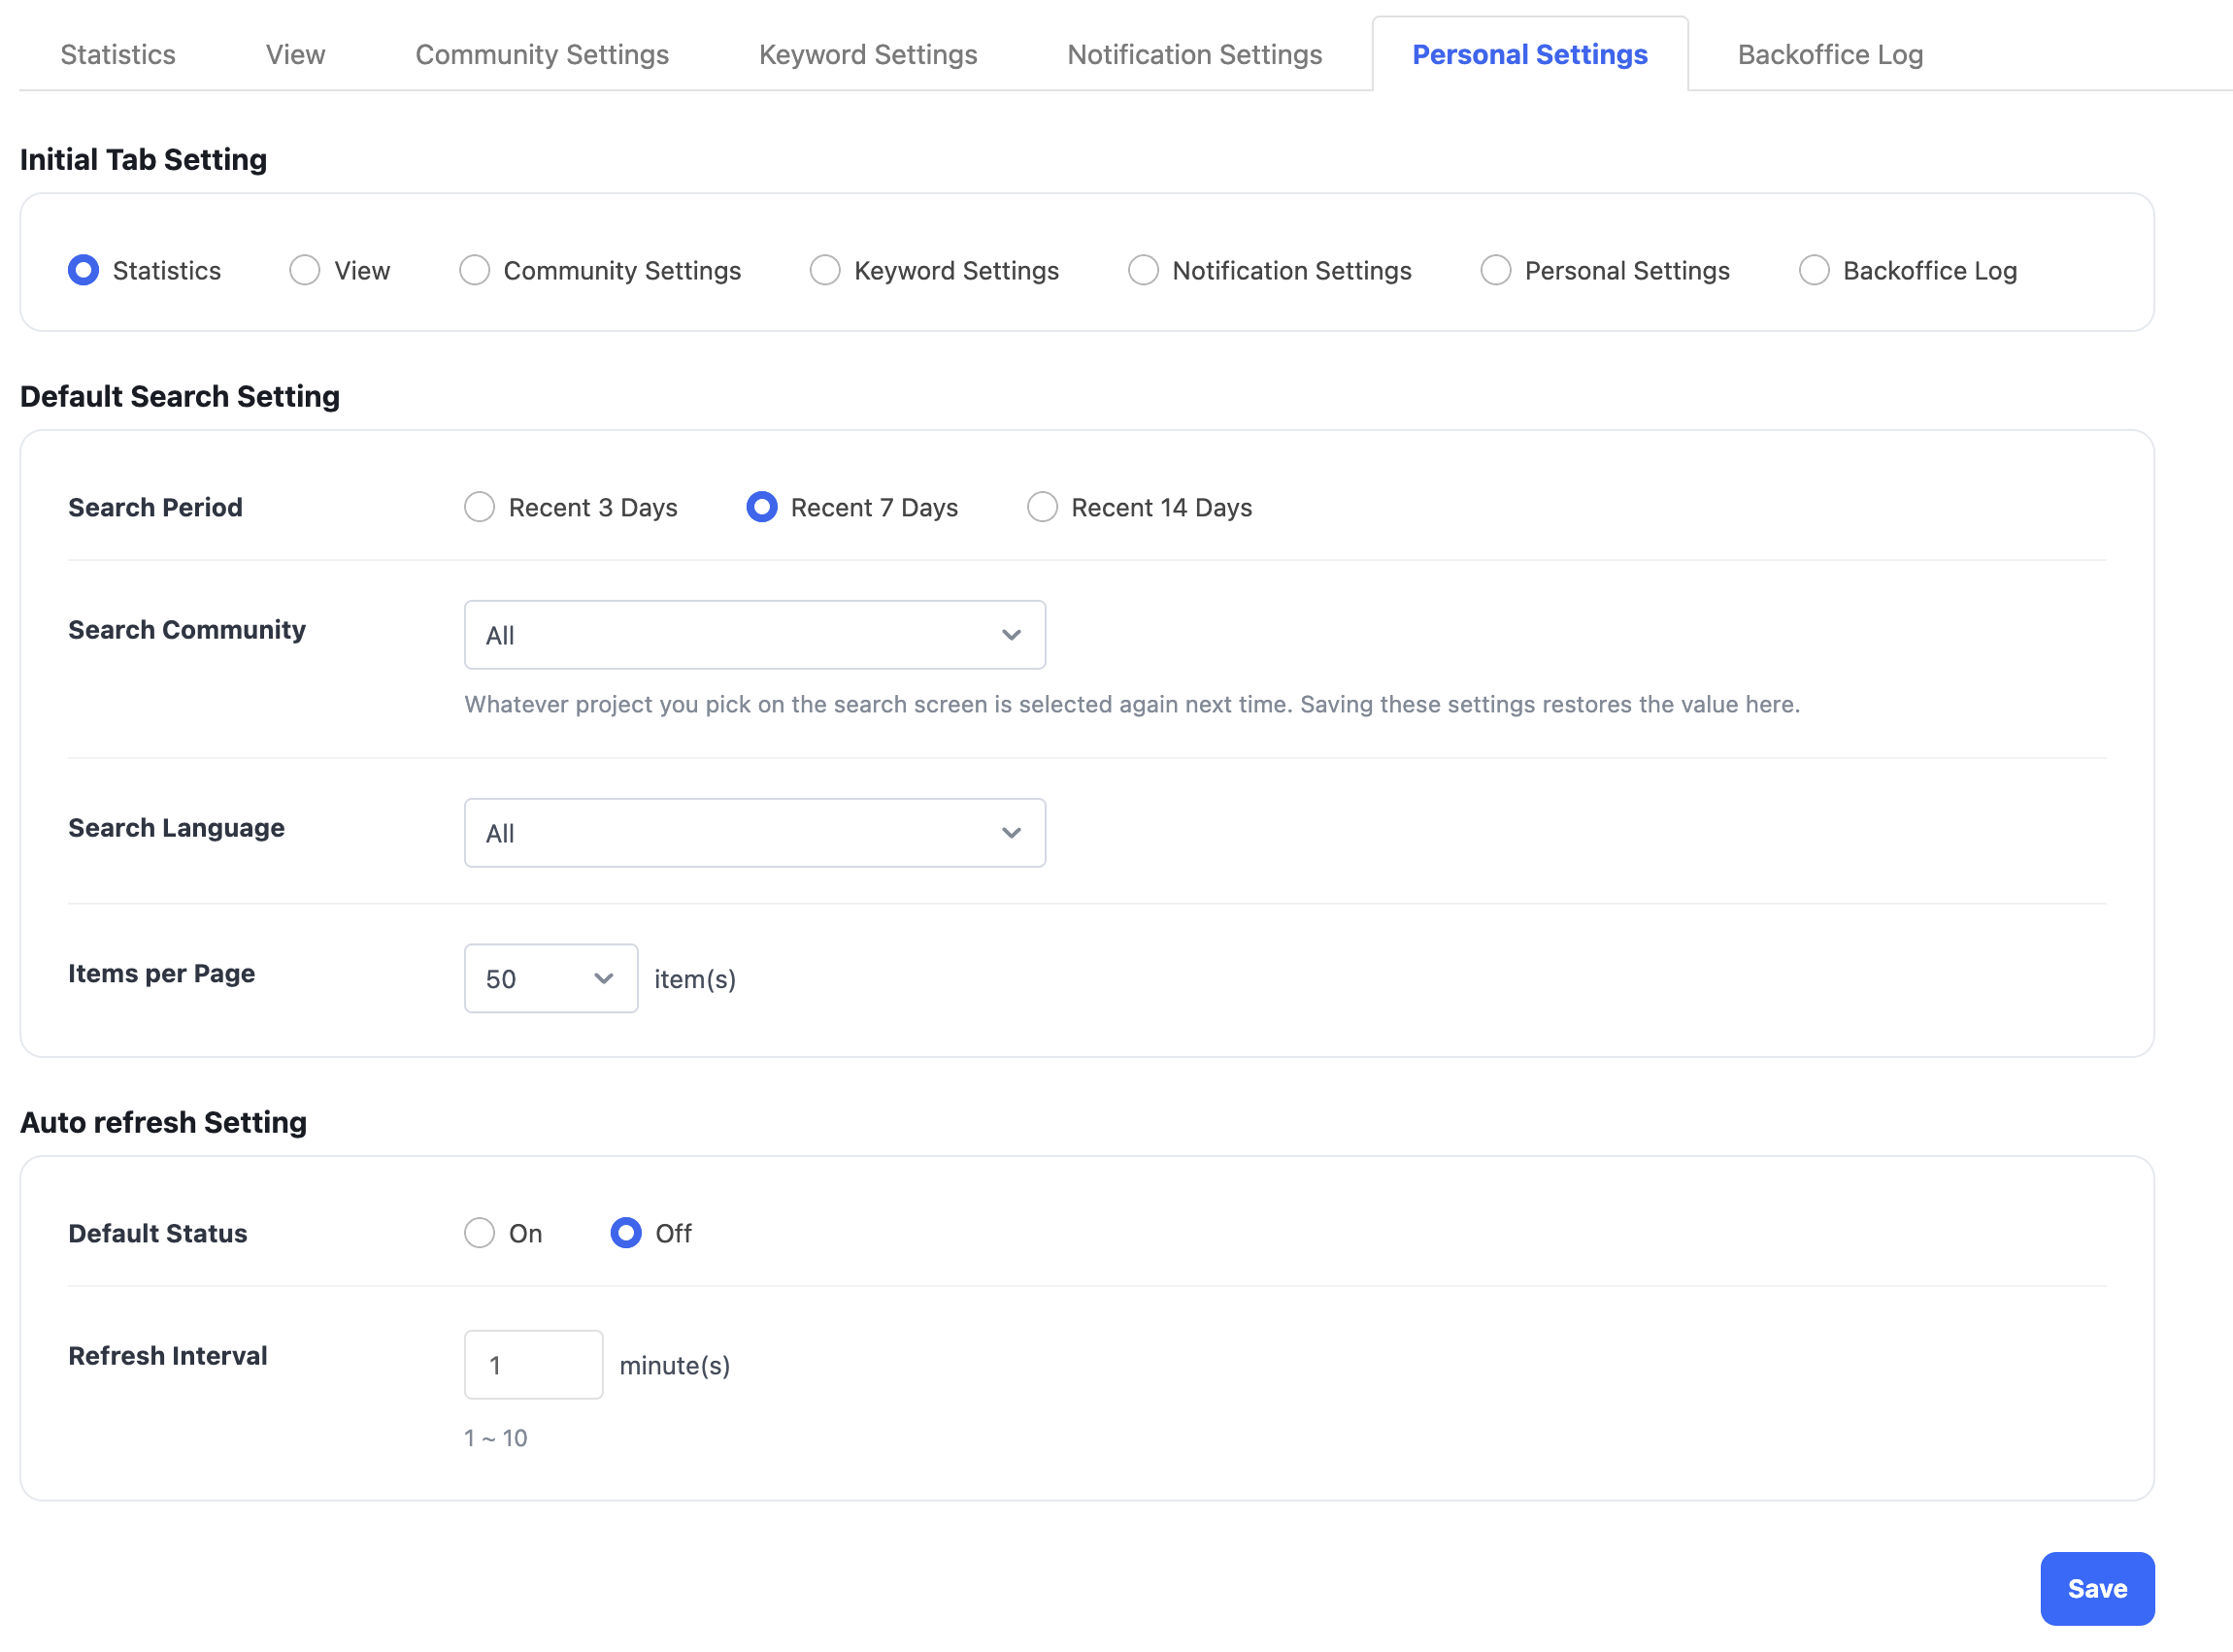
- Personal settings are saved for each menu.
- Initial Tab Setting: Set the start page when entering via Console.
- Default Search Setting: Set default filter values used in the Statistics and View tabs.
- Auto refresh Setting: Set default values for auto refresh in the View tab.
Backoffice log
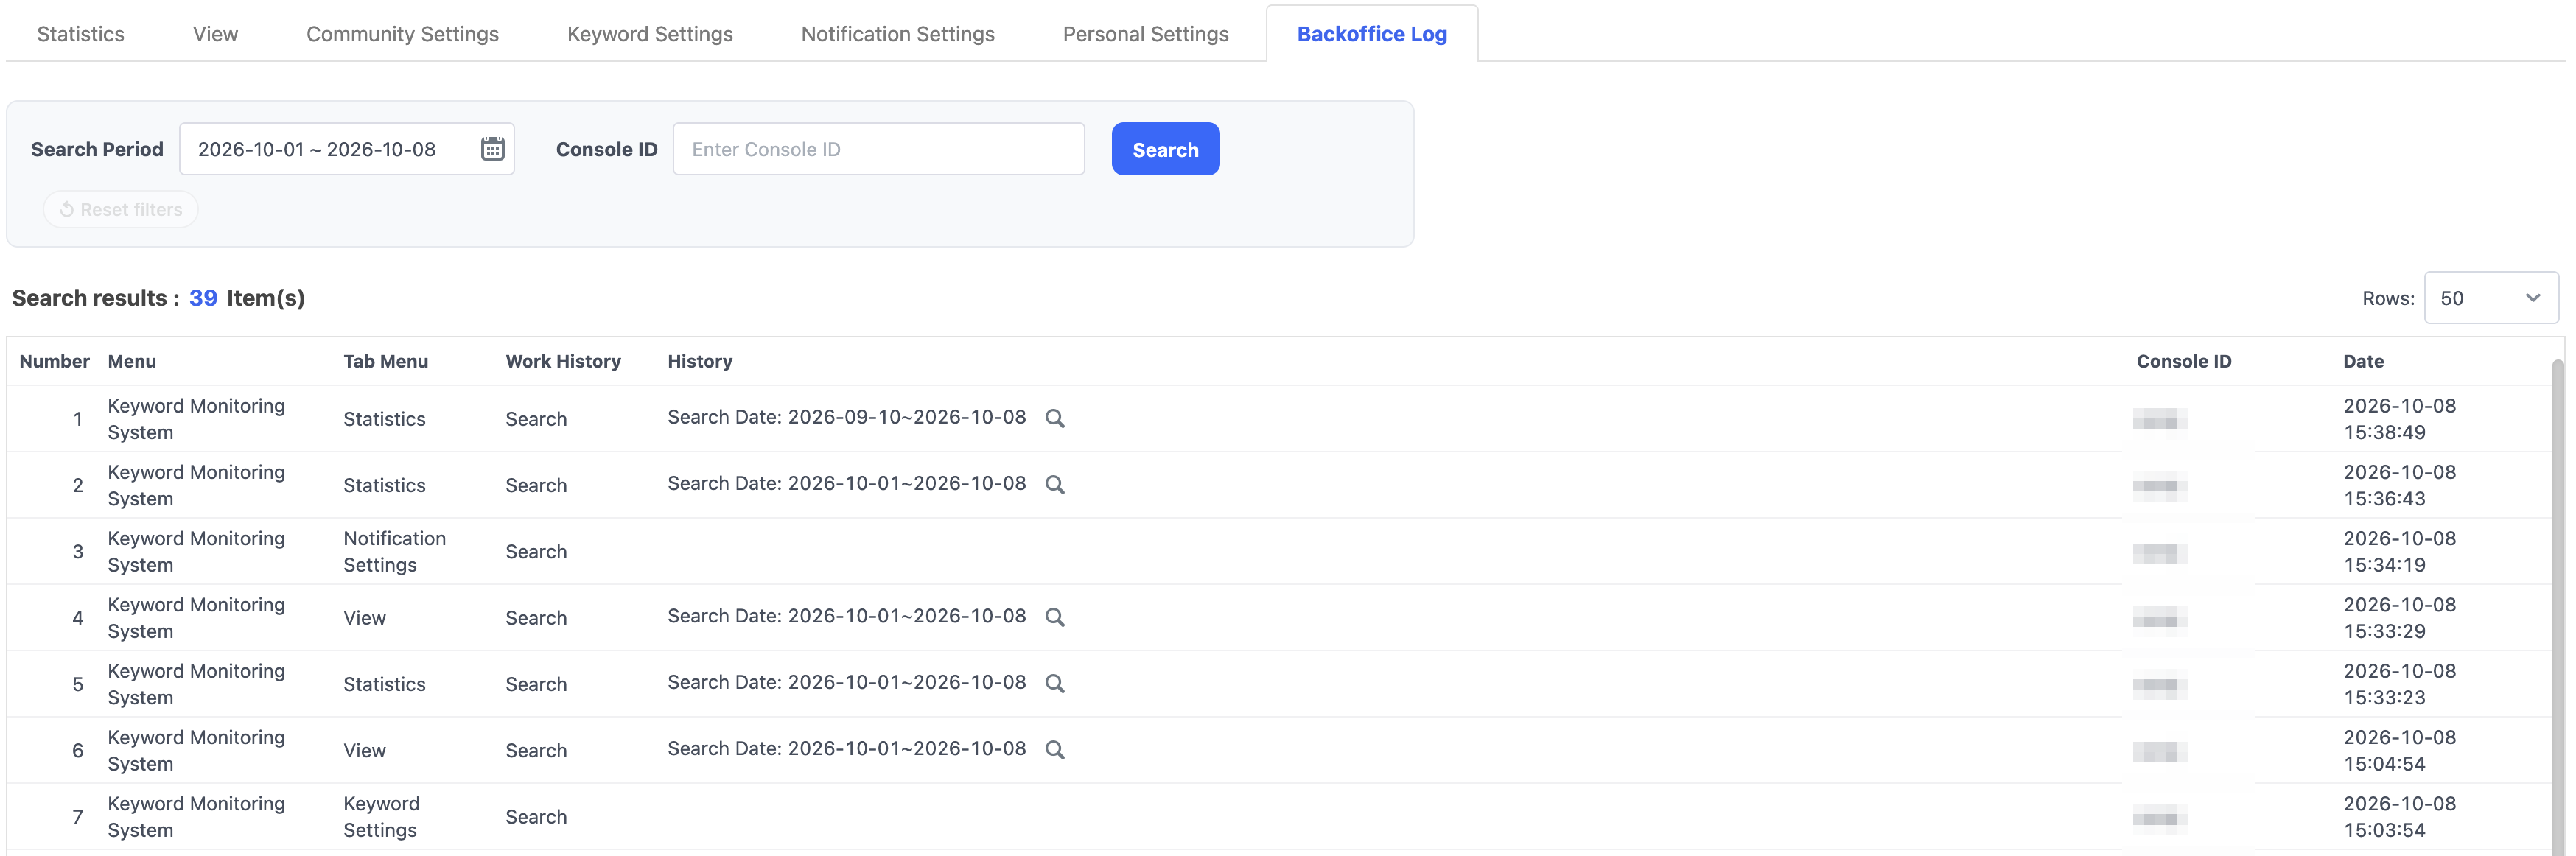
- You can check the use logs of views, registration, edit, delete, etc. during the search period.
- Search Period: You can set a specific period as search range. Default setting of the date is from 7 days ago until today, and you can quickly set it with the Today and Recent 7, 30, 60, and 90 Days buttons in the calendar that opens when you click the period field.
- Console ID: You can enter the Console ID to search.
Post monitoring system
- Provides functions to monitor the posts/comments registered on the community using Hive Community and to detect abusive language and spam.
- When a project is registered in the Hive Console > Community, it is automatically registered. You can use it after activating the project by going to Community Settings Tab.
- For a project that does not use Hive Community or Hive Community and does not provide automatic post/comment collection, you can register the project manually under Community Registration at the top of the Community Settings tab. After issuing an API Key, integrate the project by sending post, comment, and board information directly through the API. For details, see the Register Post, Comment, and Board Information API guide.
- Menu Location: Hive Console > AI Service > Community Monitoring > Post Monitoring System
- Function Composition: Statistics, Monitoring, Community Settings, Personal Settings, Backoffice Log

Community settings
- You can view the monitoring information (language, activation, status search history) of the post for the game community using Hive community.
- You can sort by project, Registered Time, or Changed Time. Registered Time in descending order is set to default.
- You can filter the list immediately by enable/disable status and a search word (project, project description).
Community registration (for API integration)
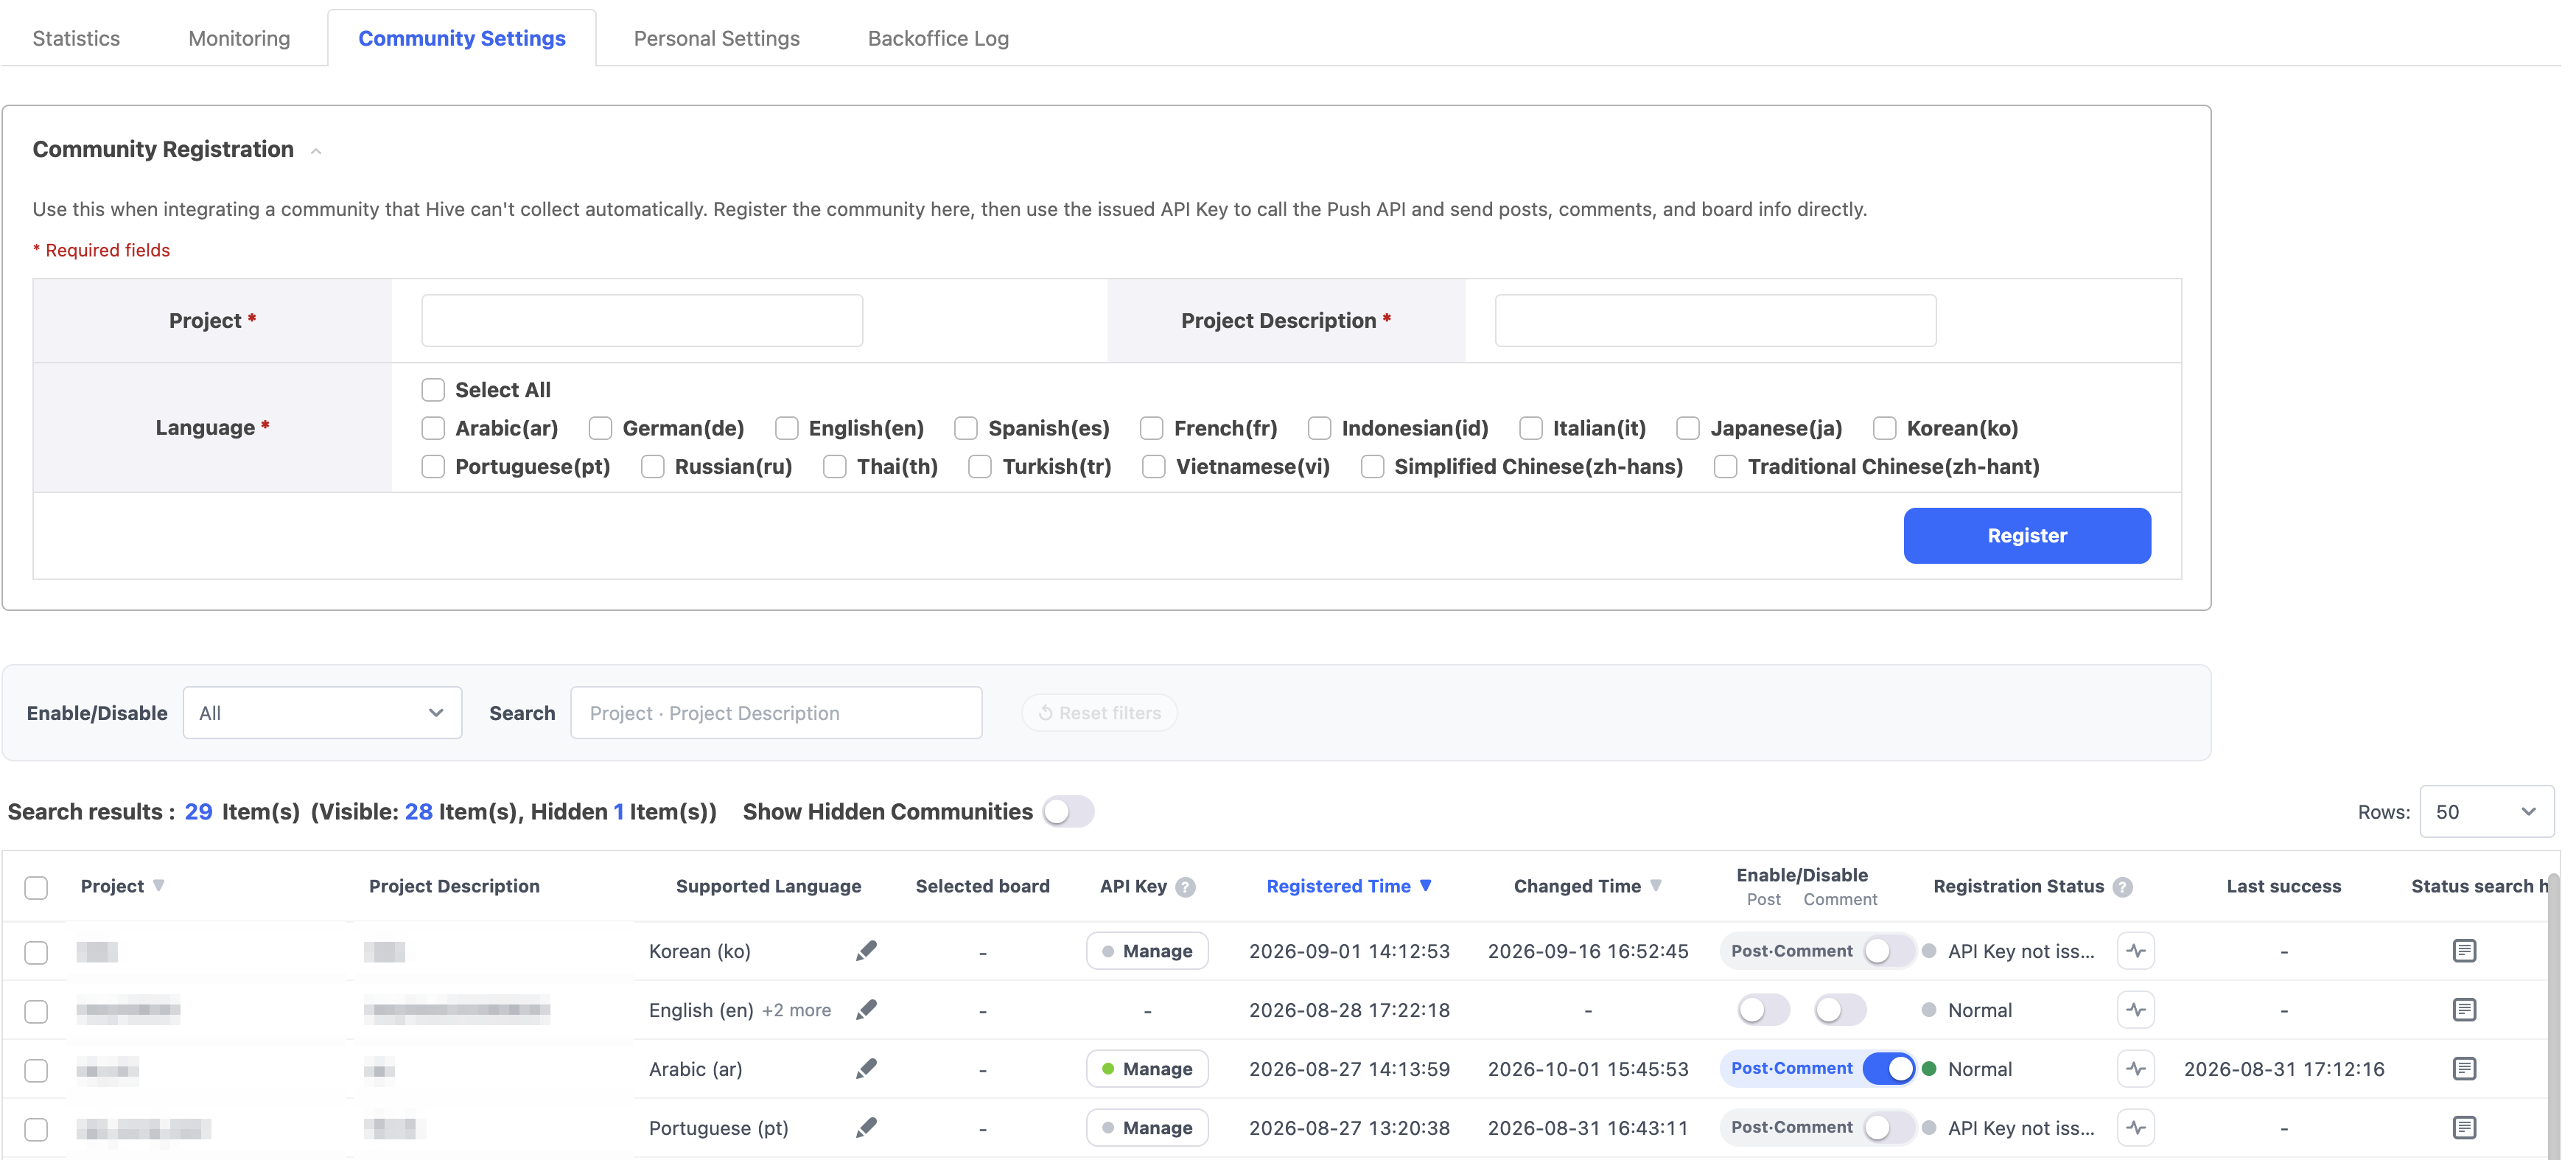
- Use this option to register a project that does not provide automatic collection of posts, comments, and board information. Projects registered this way can receive data only through the Register Post, Comment, and Board Information API.
- Expand Community Registration at the top of the list, enter the Project, Project Description, and Language (multiple selections allowed), and then click Register. All three fields are required.
- After registration, you must issue an API Key before the project can receive data.
- Check Box: You can select multiple boxes at once to enable or disable them. While "Show Hidden Communities" is enabled, you can also hide or unhide them at once.
- Hide: Hidden communities will be displayed when "Show Hidden Communities" is enabled, and you can hide specific communities from the list.
- Hide settings apply on an individual basis.
- If there are hidden communities, you can check the count of both visible and hidden communities.
- After configuring hidden settings, disabling "Show Hidden Communities" will display only the remaining communities in the list, excluding the hidden ones.
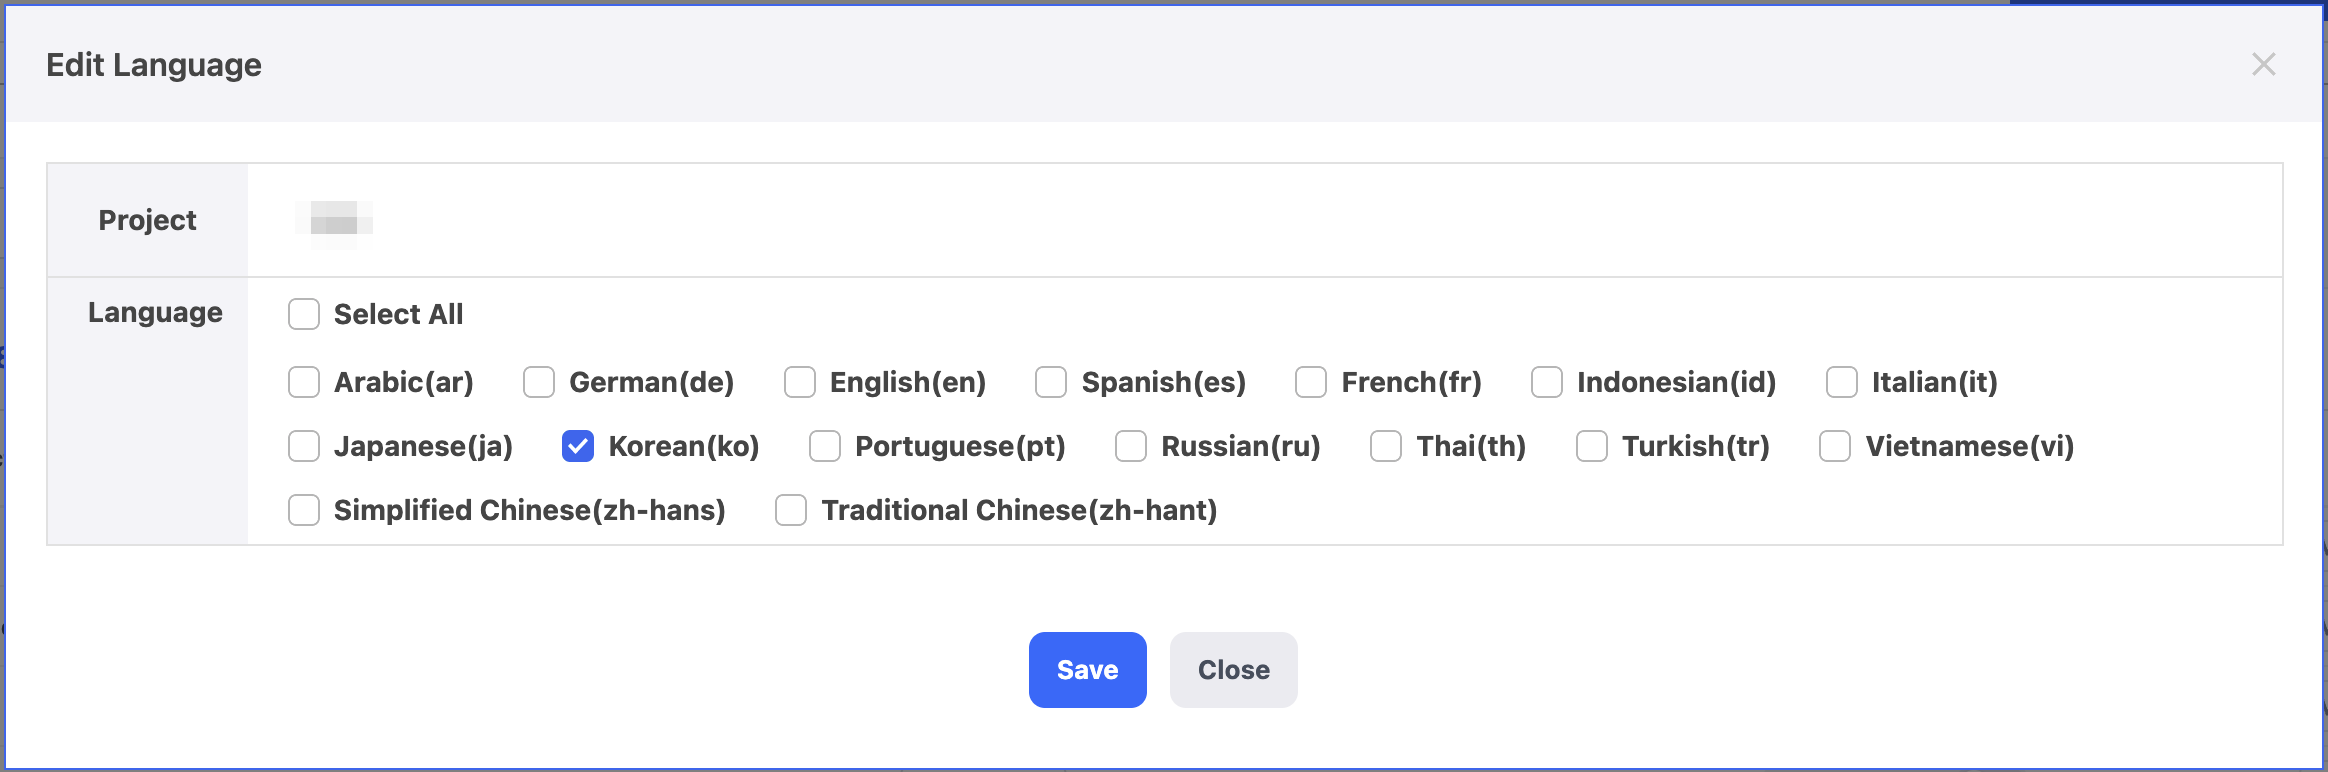
- Supported Languages: Shows the languages supported by the project. Click the pencil icon to edit the supported languages using checkboxes in the dialog shown below.
- Selected Board: Click the gear icon to select boards as monitoring targets or deselect them.
- The numbers displayed in the corresponding column represent "number of selected boards / total number of boards".
- If no selection has been made, the list will be displayed with all boards selected.
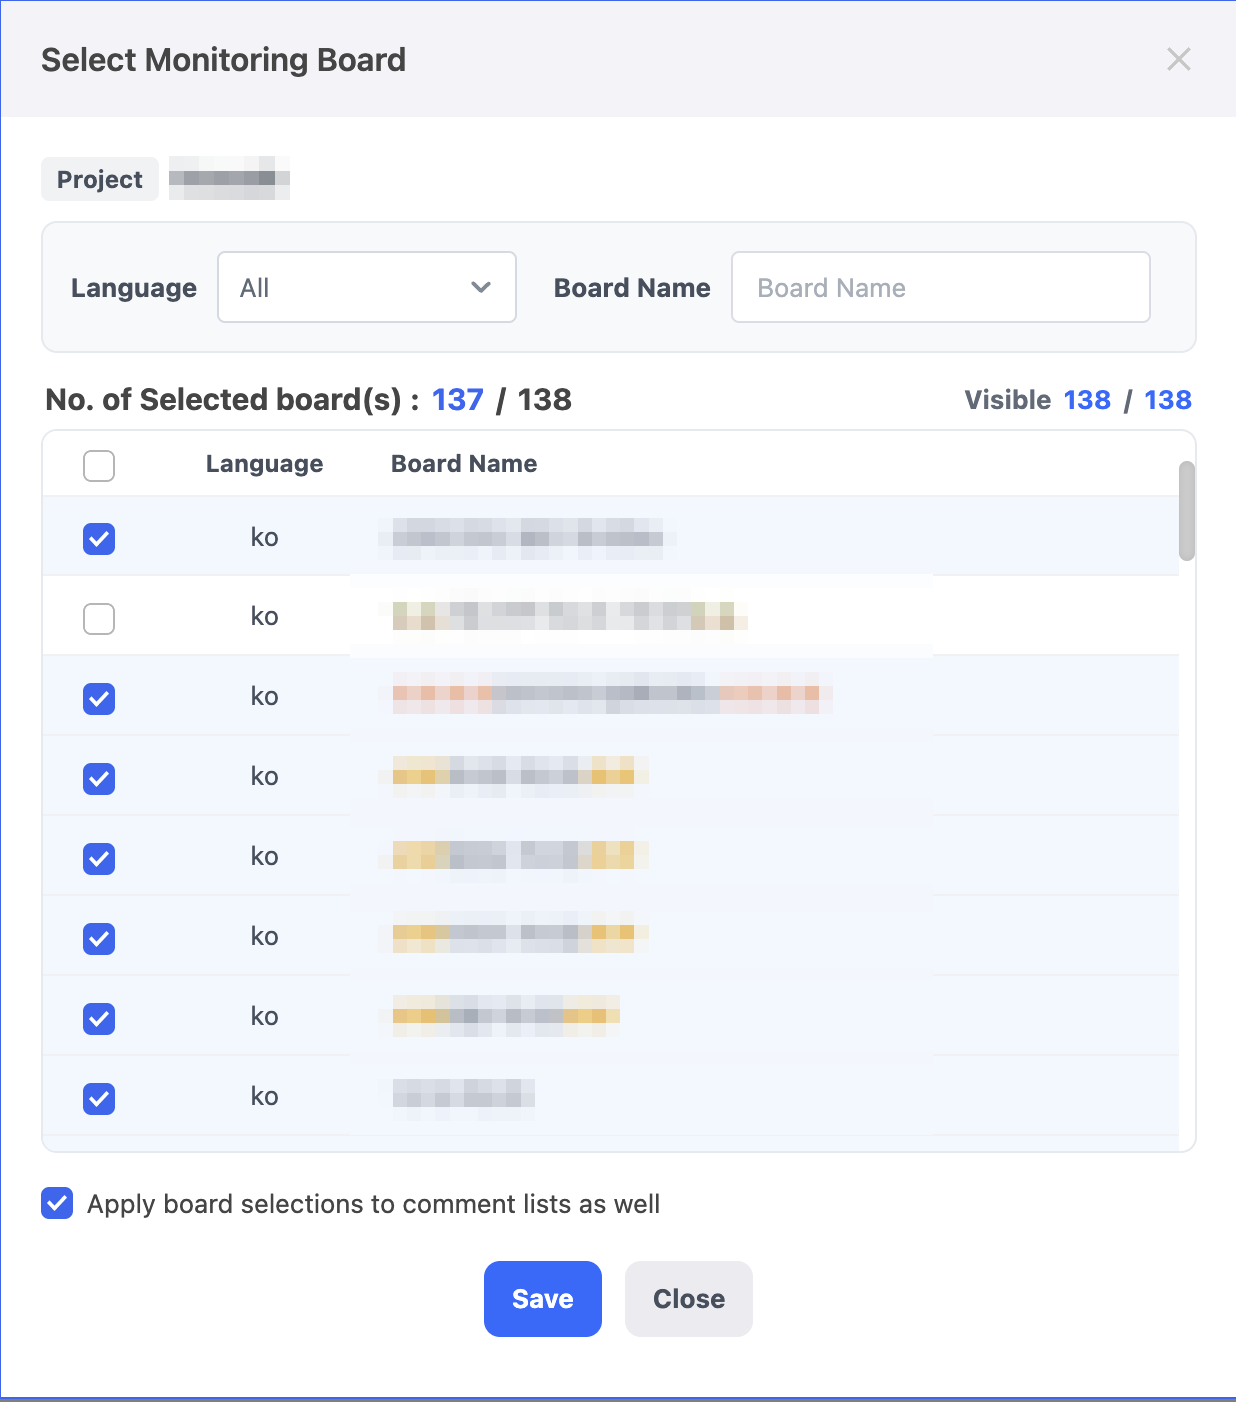
- In the list of boards, select or deselect board names to set the monitoring target boards for post view.
- Click the "Apply Board Selections to Comment lists as well" checkbox at the bottom to apply the selected monitoring boards to comment view as well.
- "Apply Board Selections to Comment lists as well" is selected by default in the comment list.
- API Key: Available only for API-integrated projects added through Community Registration. A hyphen (-) appears for all other projects. Click Manage to open the API Key management dialog shown below.
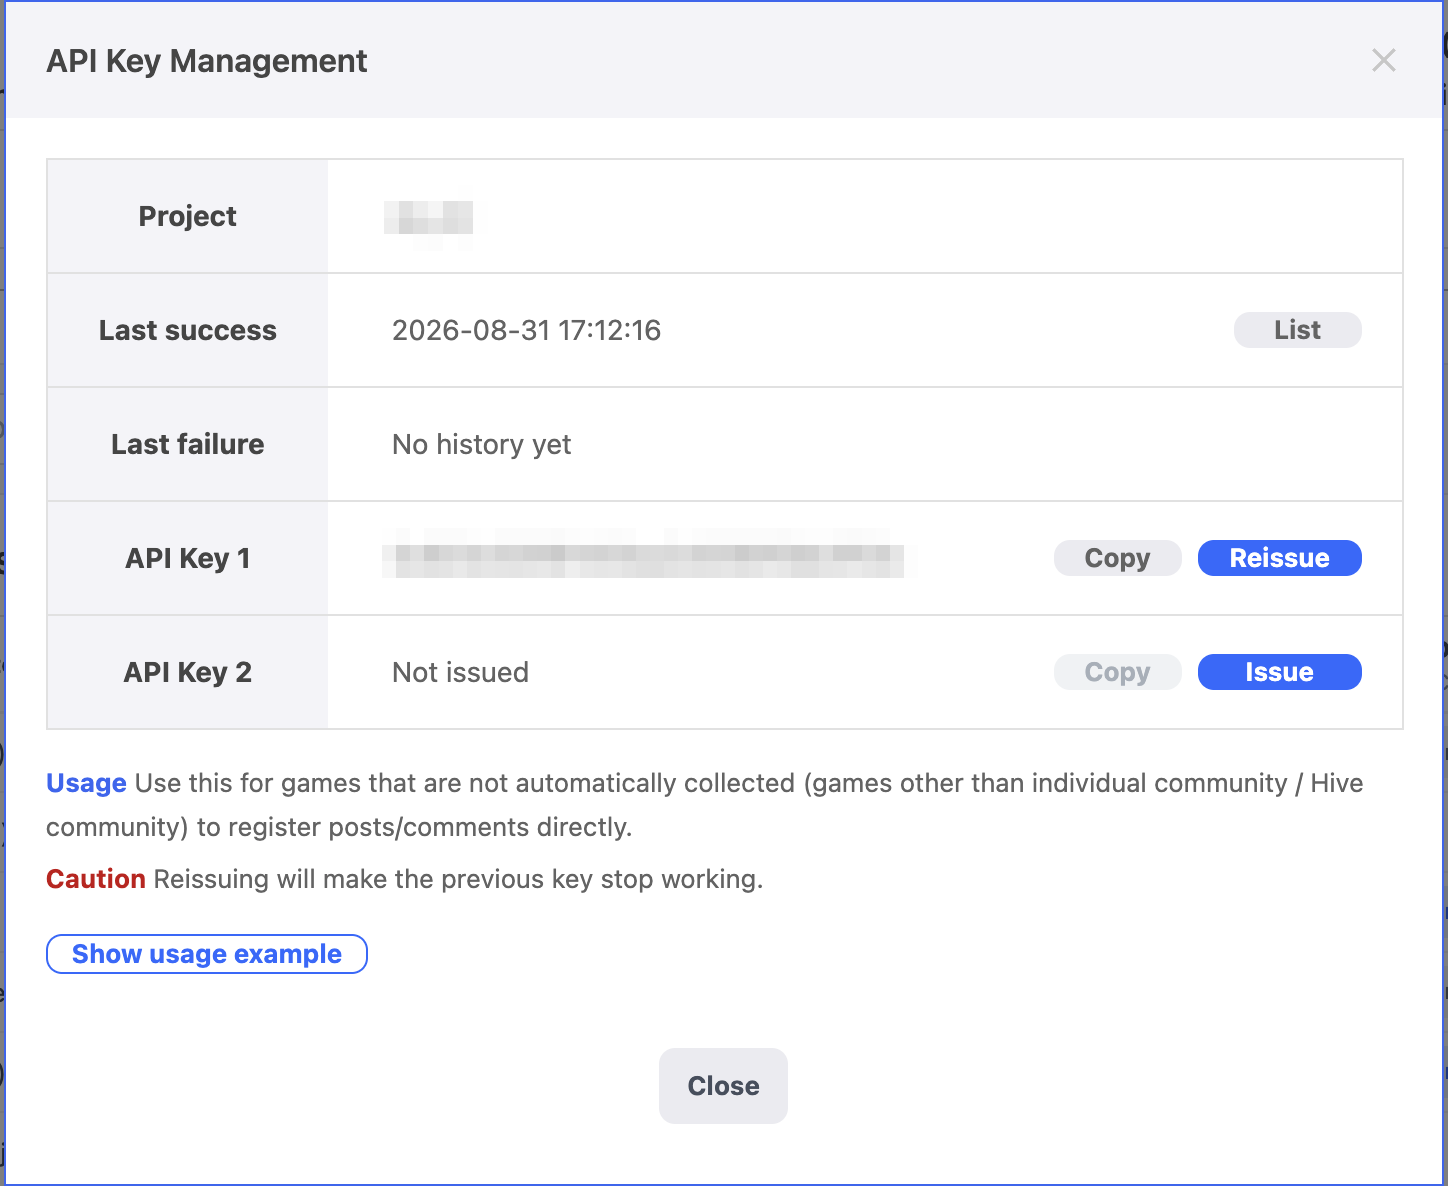
- API Key 1 / API Key 2: You can issue up to two keys. Use Issue/Reissue to create a key and Copy to copy its value. Reissuing a key invalidates the previous key immediately.
- Last success / Last failure: Shows when data was most recently received through this API and when it last failed. Click List to expand the API data receipt history on the right side of the dialog, including the Number, Result, Message, and Request time.
- Show usage example: Provides curl examples for posts, comments, and board information that you can call directly with an issued API Key. Exercise caution when testing: after you edit an example and click Run, the data is actually registered in this project.
- Enable/Disable: Enables or disables monitoring for posts and comments. An API-integrated project added through Community Registration displays a single toggle rather than separate post and comment toggles. If this toggle is disabled, data received through the API is not saved, although the request itself is processed successfully.
- Registration Status and Status Check: Use the Check status icon button to check if the community is available for monitoring. The dot in front of the status shows the latest collection result (red: failed within 24 hours, yellow: failed within 7 days, green: no recent failure, grey: inactive or no collection history).
- Normal: Connection available
- Connection Error: It means that the community URL was not registered properly, or community is unavailable
- Connection Error (Project): Status where posts/comments of the registered project cannot be viewed through the API
- Registering: Status before the community is activated where Hive Community is set to activate in the App Center's settings by product
- Information Error: Status where Hive Community is set to activate in the App Center's settings by product but supported languages and URL information aren't synchronized
- API-integrated projects added through Community Registration display one of the following three statuses instead.
- API Key not issued yet: An API Key has not yet been issued.
- Inactive: An API Key exists, but the activation toggle is disabled, so data is not saved.
- Normal: An API Key has been issued and the toggle is enabled, so the project can receive data immediately.
- Last success: The last time posts and comments were collected successfully. For API-integrated projects, the last time data was received.
- Status search history: Shows only the history of running the Check status icon button. To view data received through the API, go to "Last success > List" in the API Key management dialog.
Monitoring
- Views posts and comments according to the search condition. Use the All / Posts / Comments buttons at the top of the screen to choose which list to show.
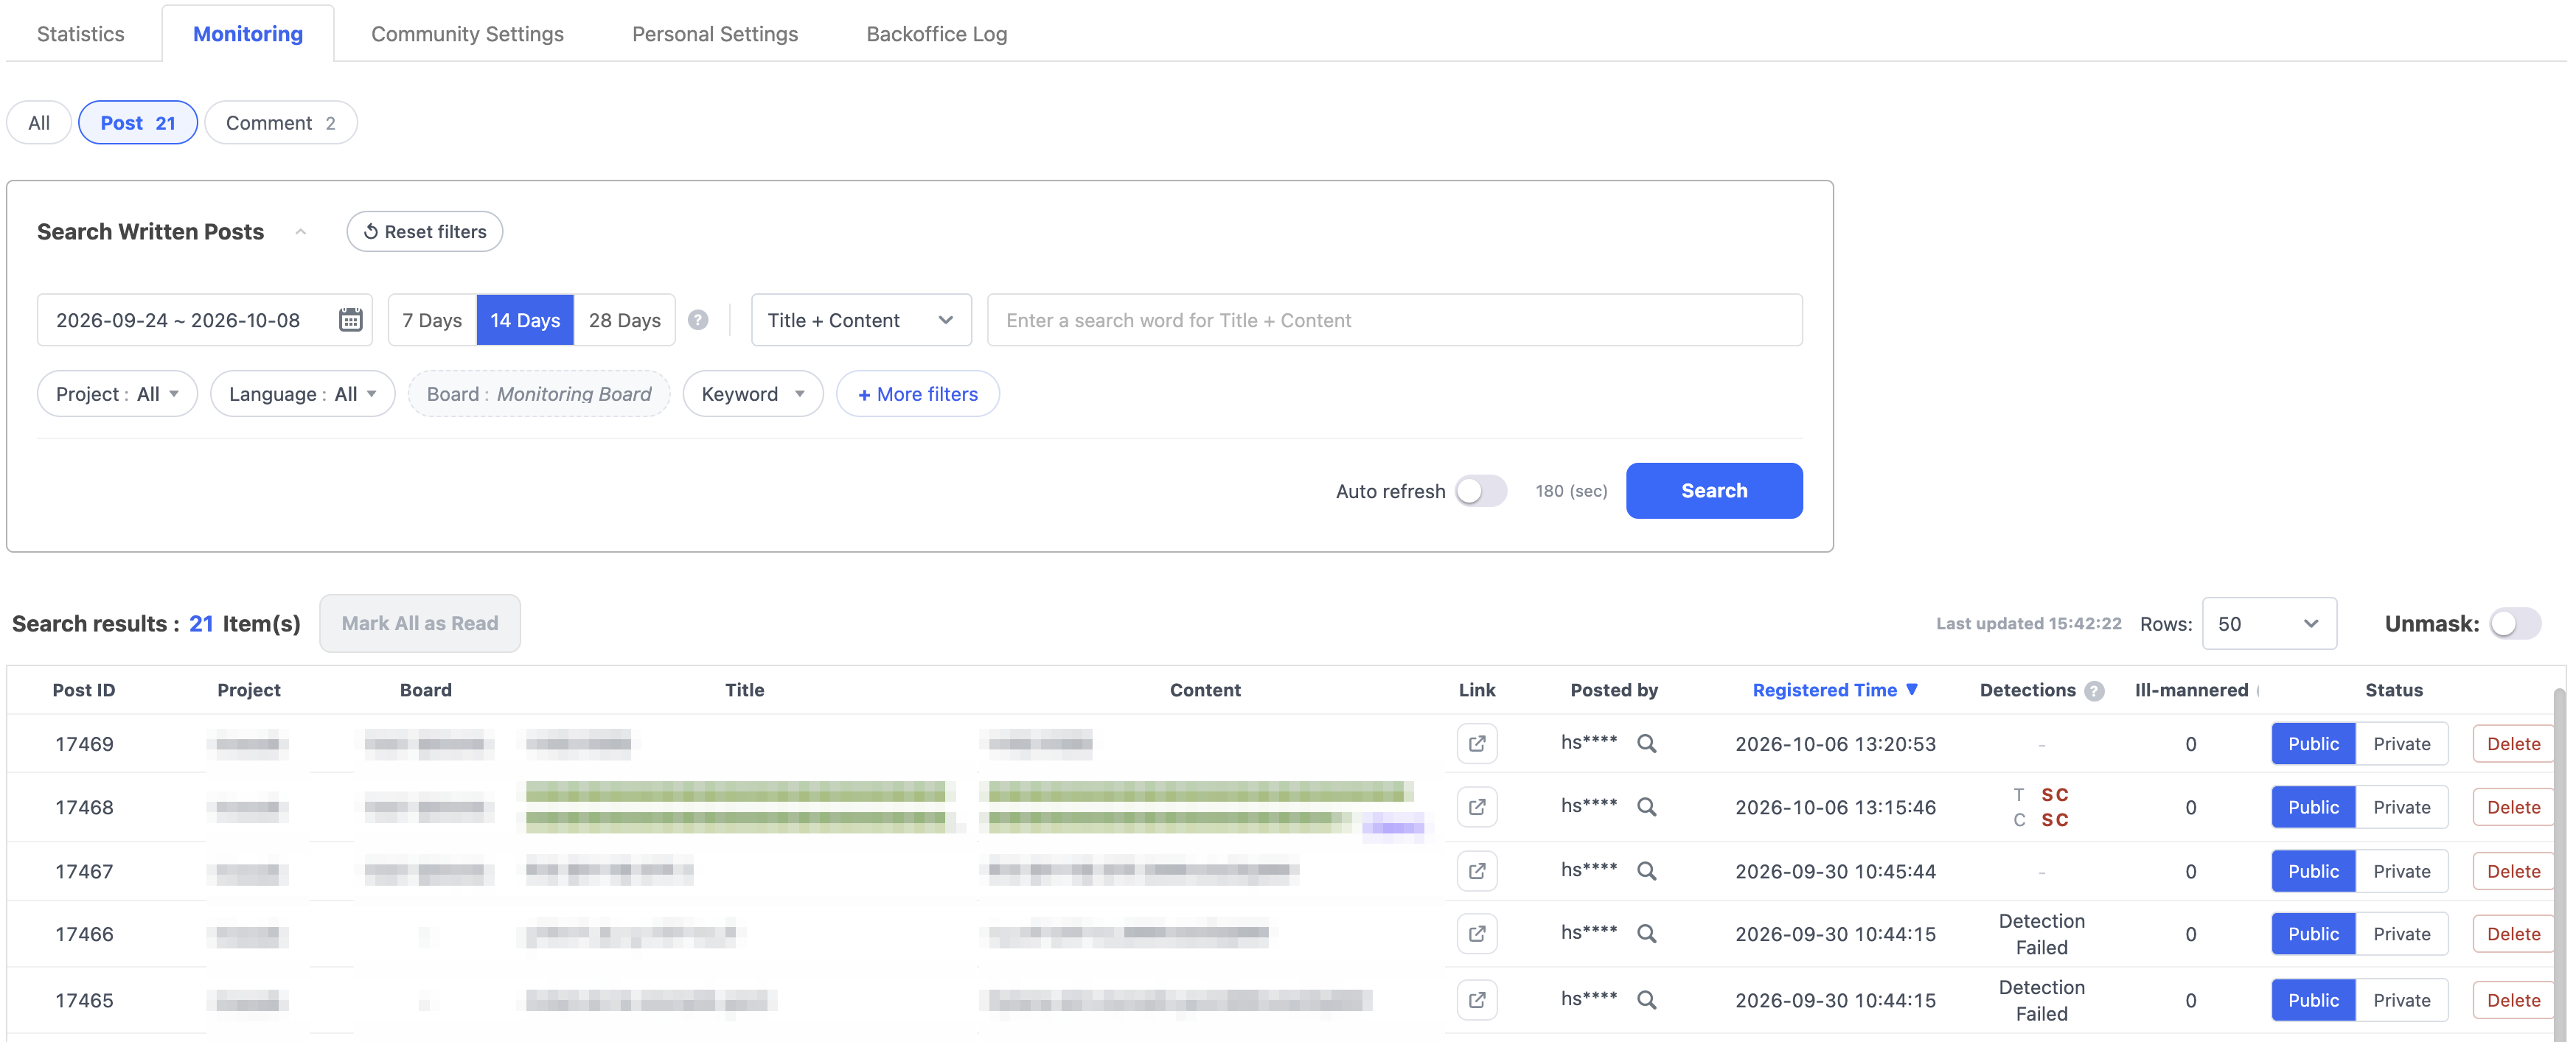
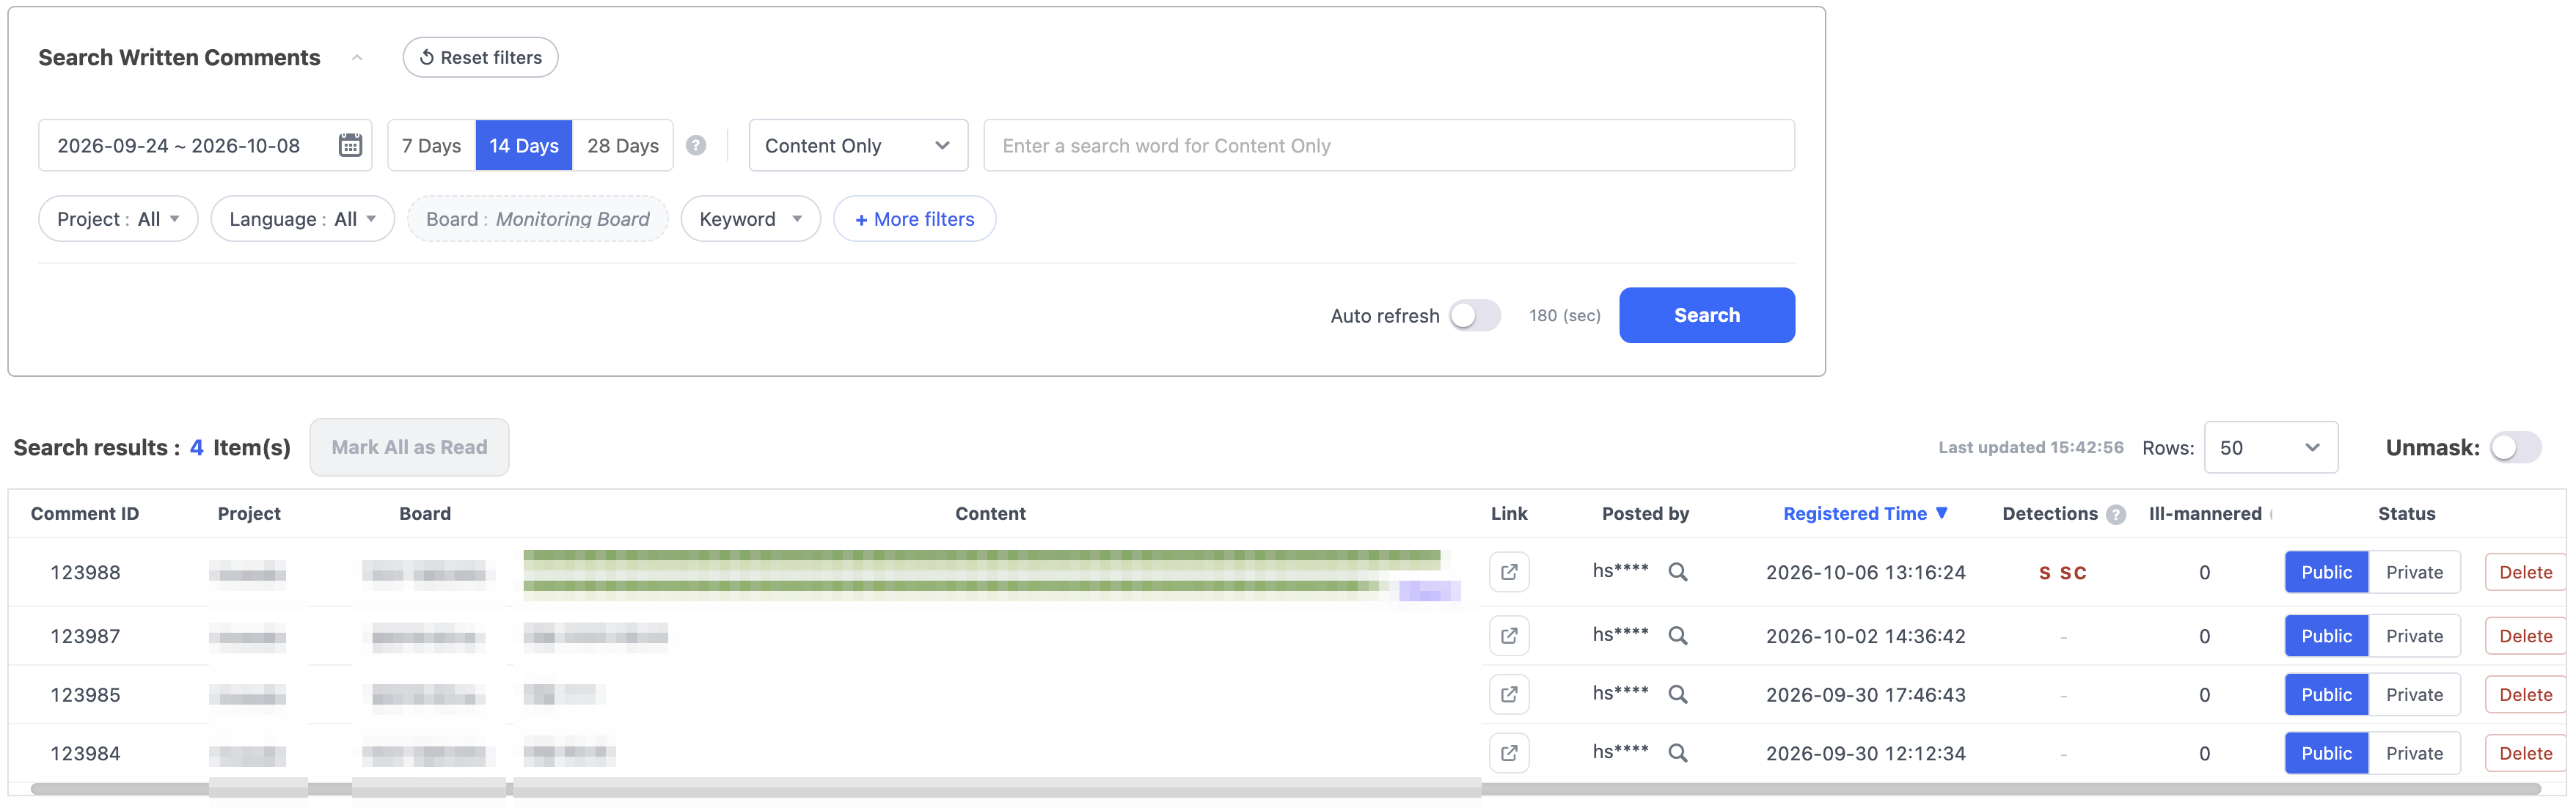
- Search Conditions for Posts and Comments
- Search Period: You can set a specific period as search range. If no search period is specified in the personal settings, the default range is from 7 days ago to today. You can set up to 60 days.
- Project: You can set the search range to specific game community. Default value is "All". If a search project is set in Personal Settings, it will be applied, and the project you searched last is selected first if there is one.
- Language: You can set the search range to specific language. Default value is "All". The Search Language setting in Personal Settings is applied.
- Board: It is activated if a project is selected, and you can set the search scope by selecting a board or any board set as a monitoring board in the community settings. The monitoring board is set to default.
- Keyword: Shows the list of keywords registered in the Keyword Monitoring System and you can search for posts including certain keywords.
- Spam: You can view the posts specified as Spam according to the engine detection result. Under More filters, choose All, Detected, or Not detected for the title and content (content only for comments). The default follows Personal Settings.
- Special Combinations: You can view the posts specified as Special Combinations according to the engine detection result. Under More filters, choose All, Detected, or Not detected for the title and content (content only for comments). The default follows Personal Settings.
- Ill-mannered Counts: You can view the posts specified as Ill-mannered Counts according to the engine detection result. Under More filters, choose All, Detected, or Not detected for the title and content (content only for comments). The default follows Personal Settings.
- Detection Status (Posts): Under More filters, you can select Before Detection, Detection Completed, Long Post Detection Excluded, Engine Processing, or Detection Failed to search.
- Search Word Range: Title + Content, Title Only (options above can only be used to search for posts), Content Only, Posted by (Nickname)
- Auto Refresh: Automatically refreshes at the interval set in the Refresh Interval field of Personal Settings. You can toggle it on or off with the button, and the remaining time in seconds is displayed.
- Search Result List
- Mark All as Read: Clears indicators for newly added posts.
- Unmask: Displays the masked "Posted by" information.
- Detections: Only the detected items are shown as abbreviations (T: Title, C: Content, S: Spam, SC: Special combination, IM: Ill-mannered).
- Status: You can delete the post/comment or change the status to public/private. A deleted post cannot be changed back to public/private. Posts in communities that do not support status changes are marked "Not Supported", and posts already deleted are marked "Deleted".
- Grouped comments: When several comments are grouped, click the {N} in group button to check each comment and change its status.
- Manage (Magnifying glass icon): You can view/restrict information, view posts, view comments, write/view memo of the post/comments writers. View/restrict information is available only for some projects.

Statistics
- Provides post and comment statistics by community according to the search condition.
- You can download the graph data as an Excel file by using the Download all data button.
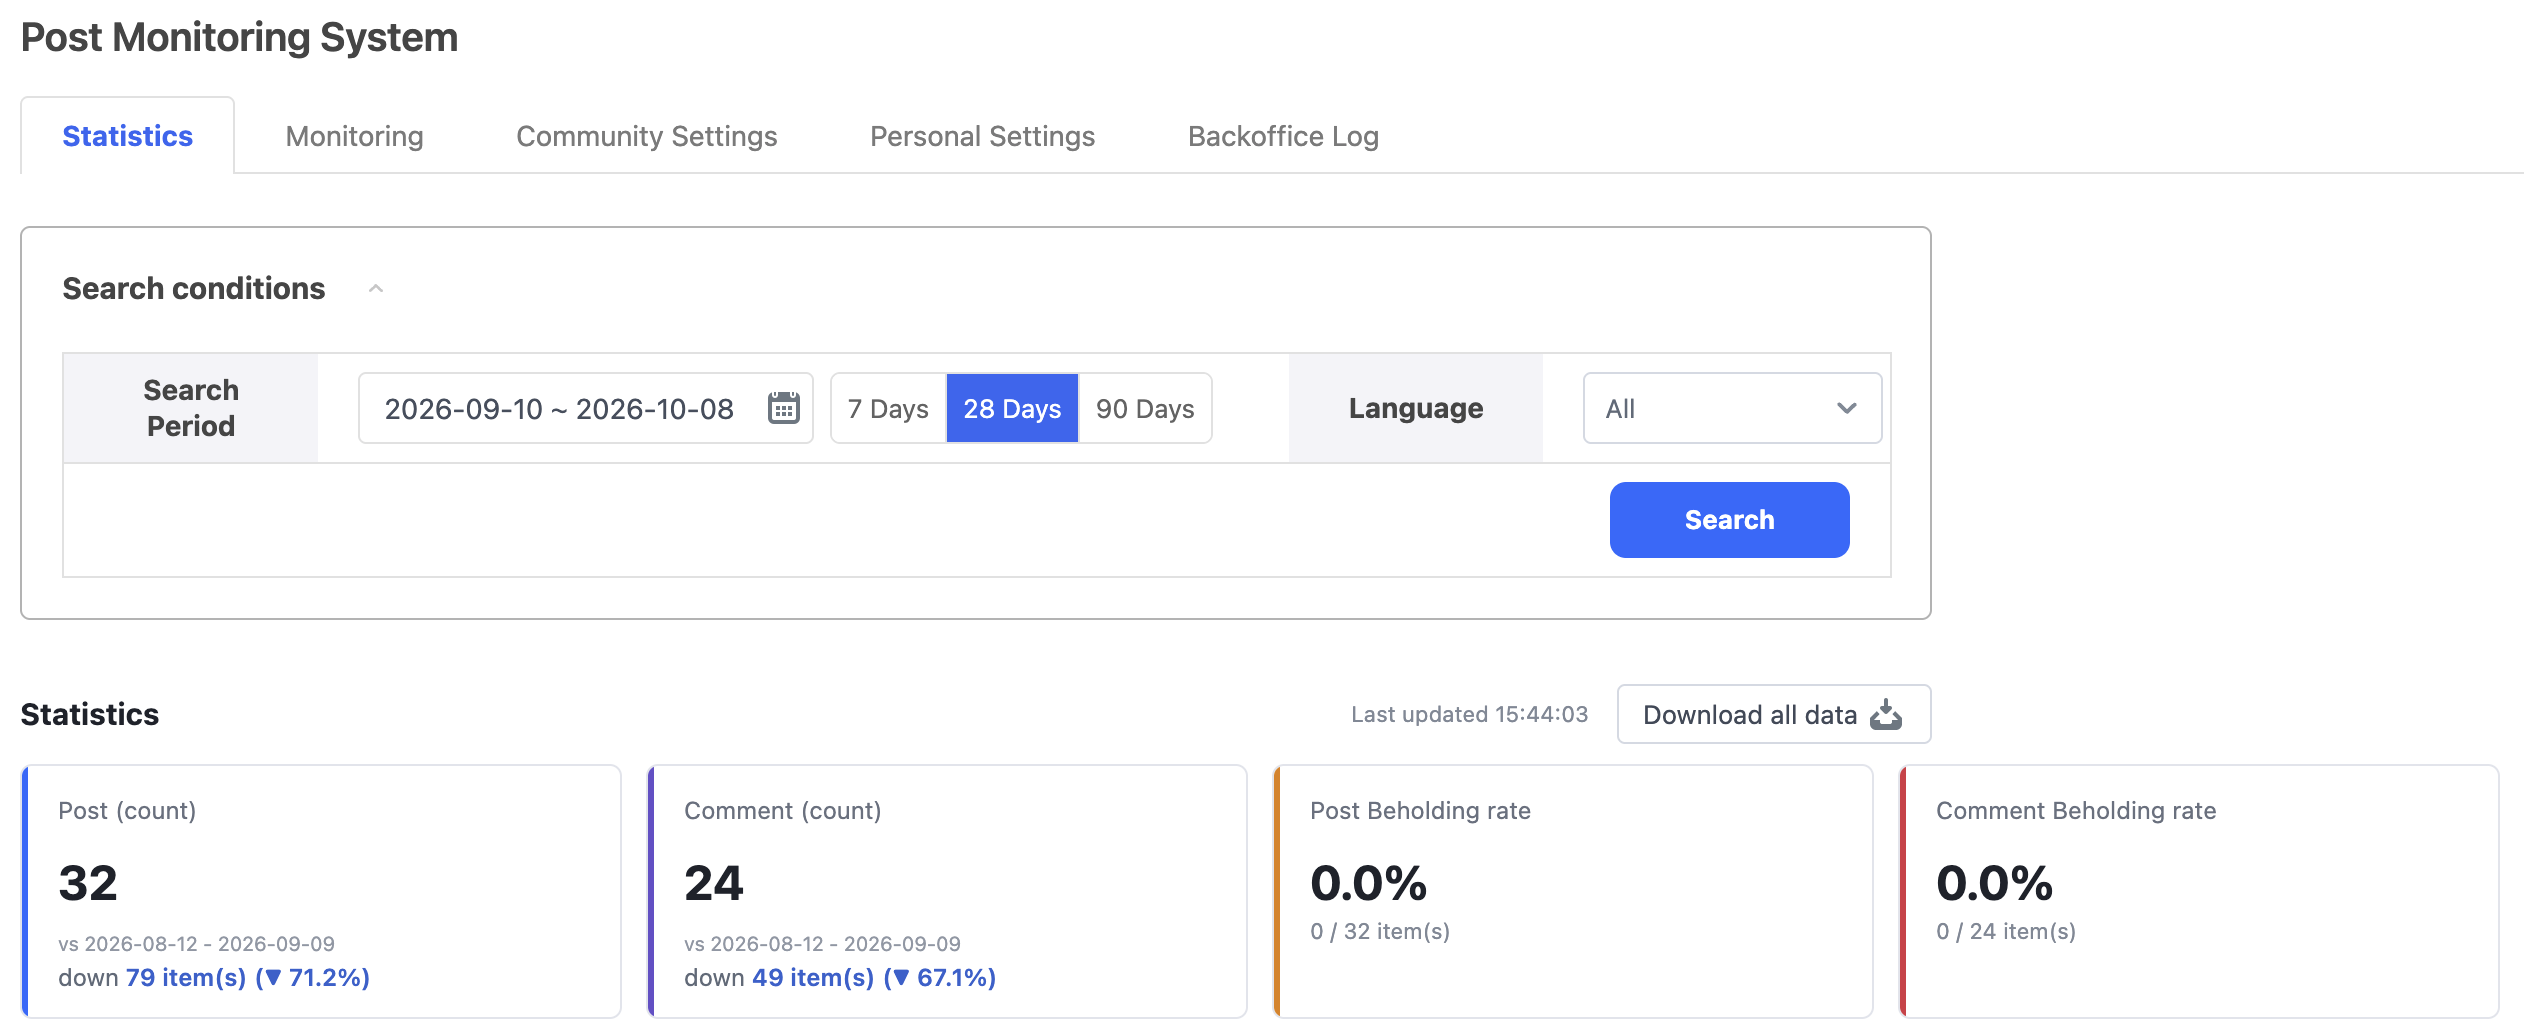
- Search Conditions
- Search Period: You can set the search range using 7 Days, 28 Days, 90 Days buttons. The selected number of previous days will be set up from the end date. You can also pick dates in the calendar that opens when you click the period field, or use its Today and Recent 7, 30, 60, and 90 Days buttons, up to 90 days back. If no search period is specified in the personal settings, the default range is from 7 days ago to today.
- Languages: You can view based on one of the languages of the registered communities. Default setting is "All". The Search Language setting in Personal Settings is applied.
- Download all data: You can download the data below under the set search conditions as an Excel file. You must enter a reason for the download (5 to 50 characters).
- Daily Posts Count
- Ratio of Posts
- Daily Post Beholdings¹ Count
- Ratio of Post Beholdings¹
- Daily Comments Count
- Ratio of Comments
- Daily Comment Beholdings¹ Count
- Ratio of Comment Beholdings¹
Beholdings¹: Result of a context being brought into attention according to whether it includes abusive language or masking symbols
- Summary cards: Show the number of posts and comments (with the change compared with the previous period of the same length) and the post and comment beholding rates. A surge badge appears when posts increase sharply compared with usual.
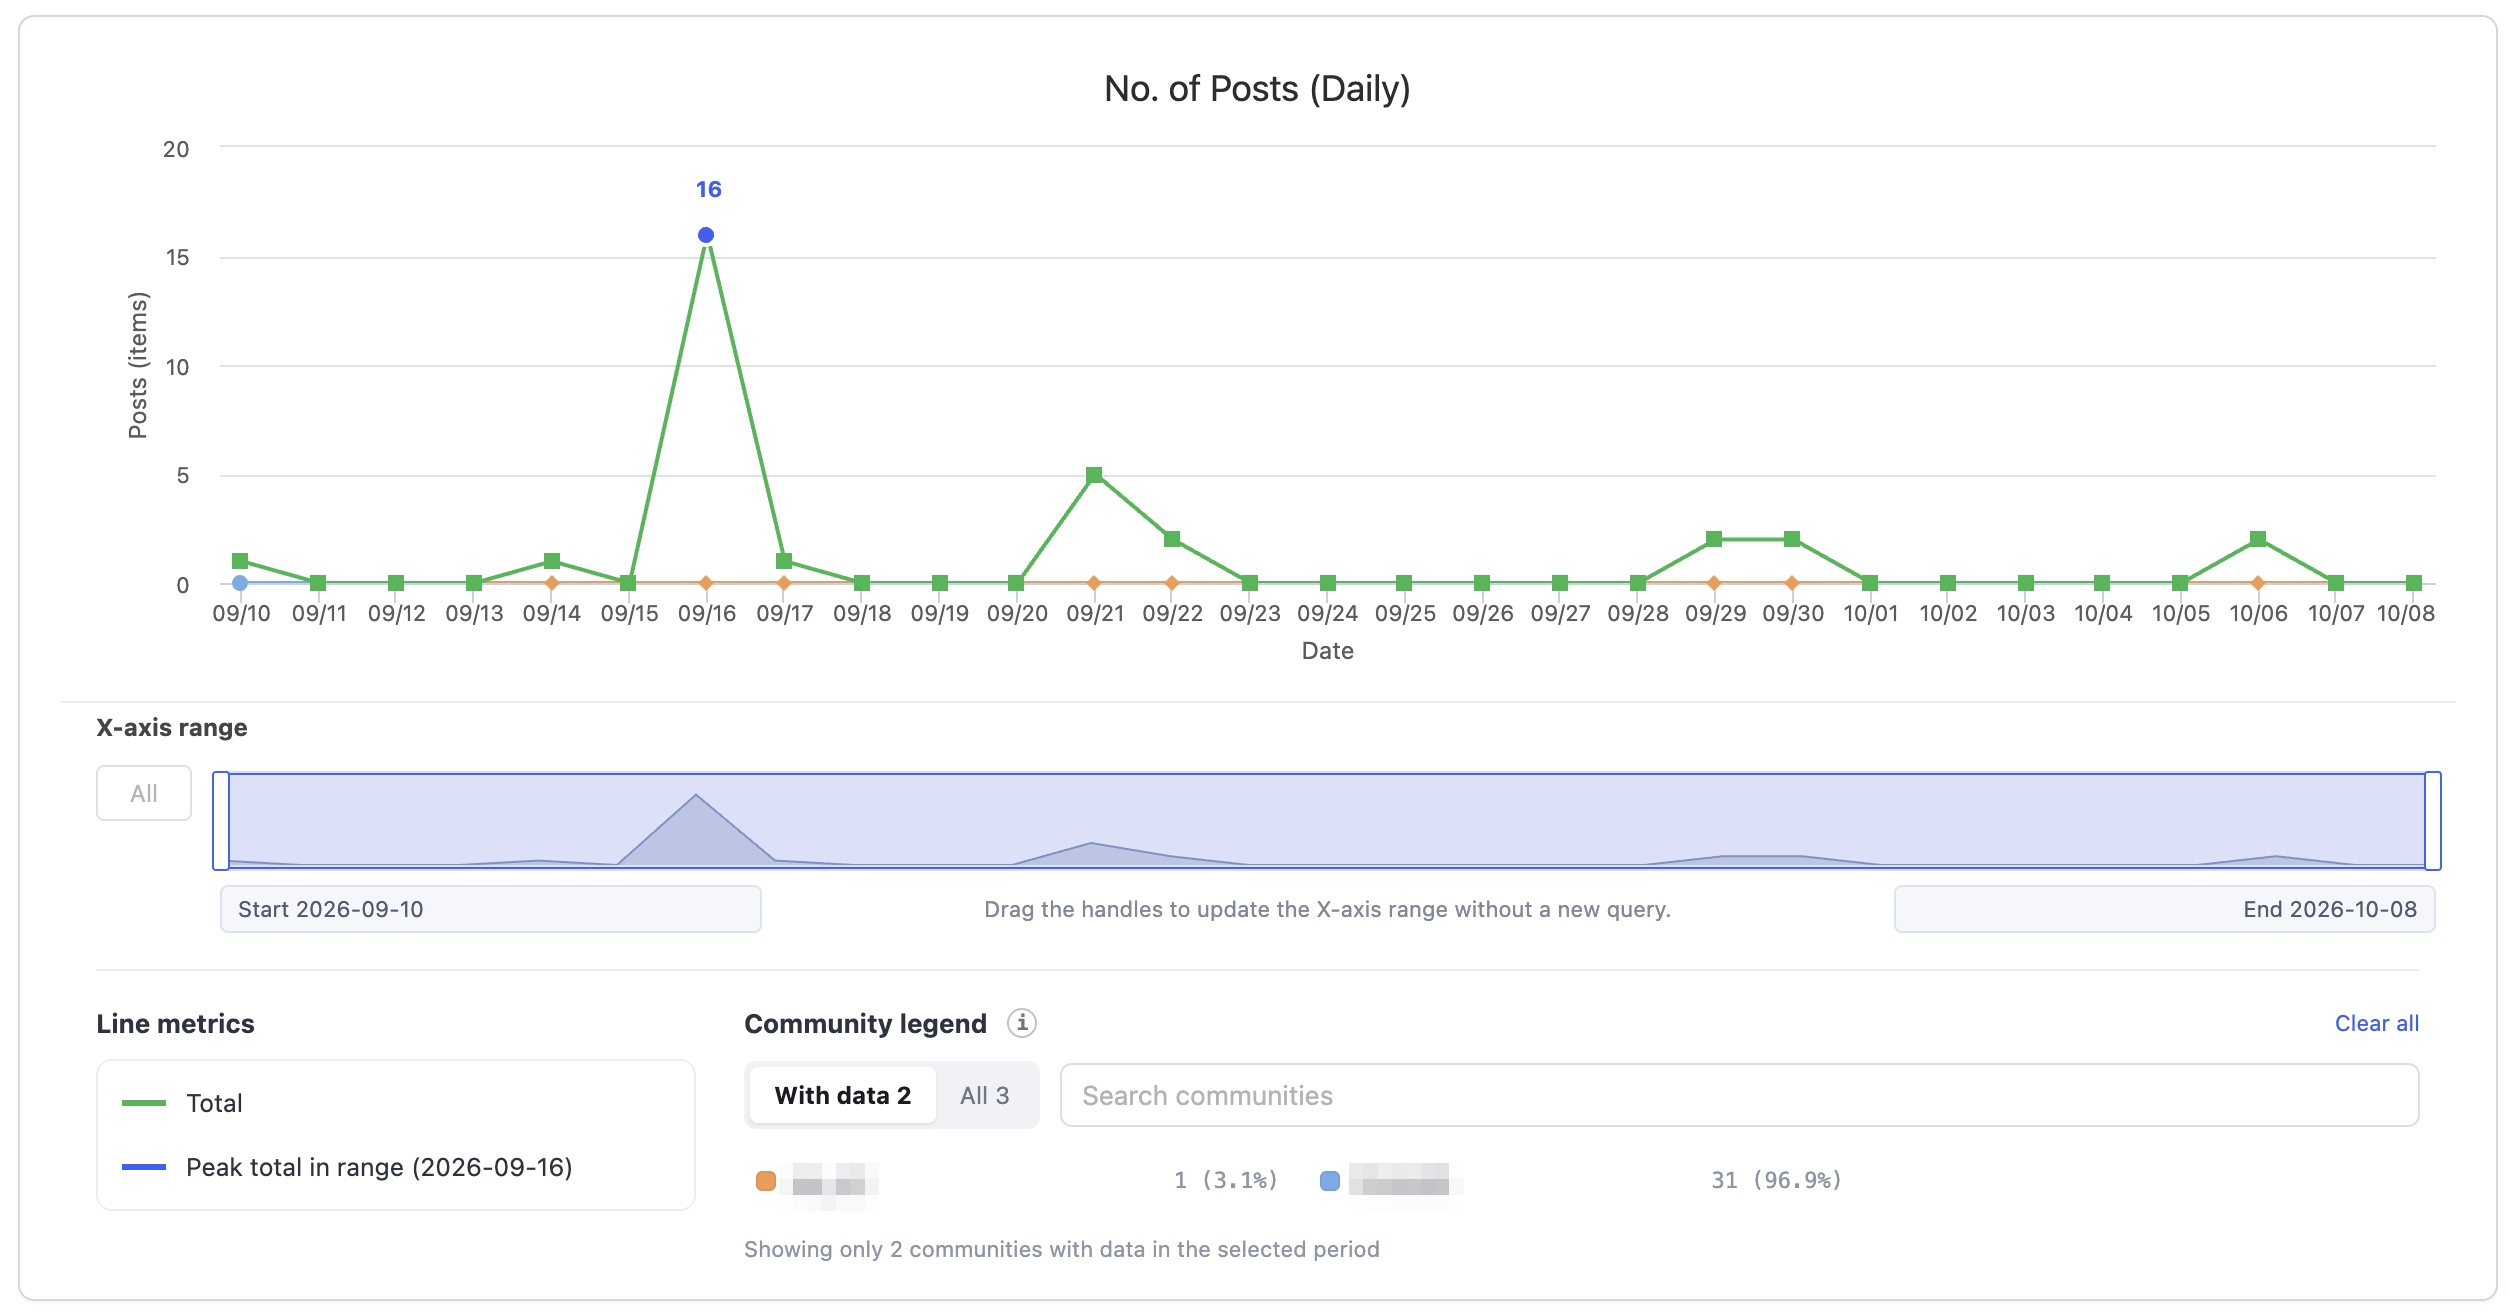
- No. of Posts (Daily): You can view the daily number of posts during the selected time period.
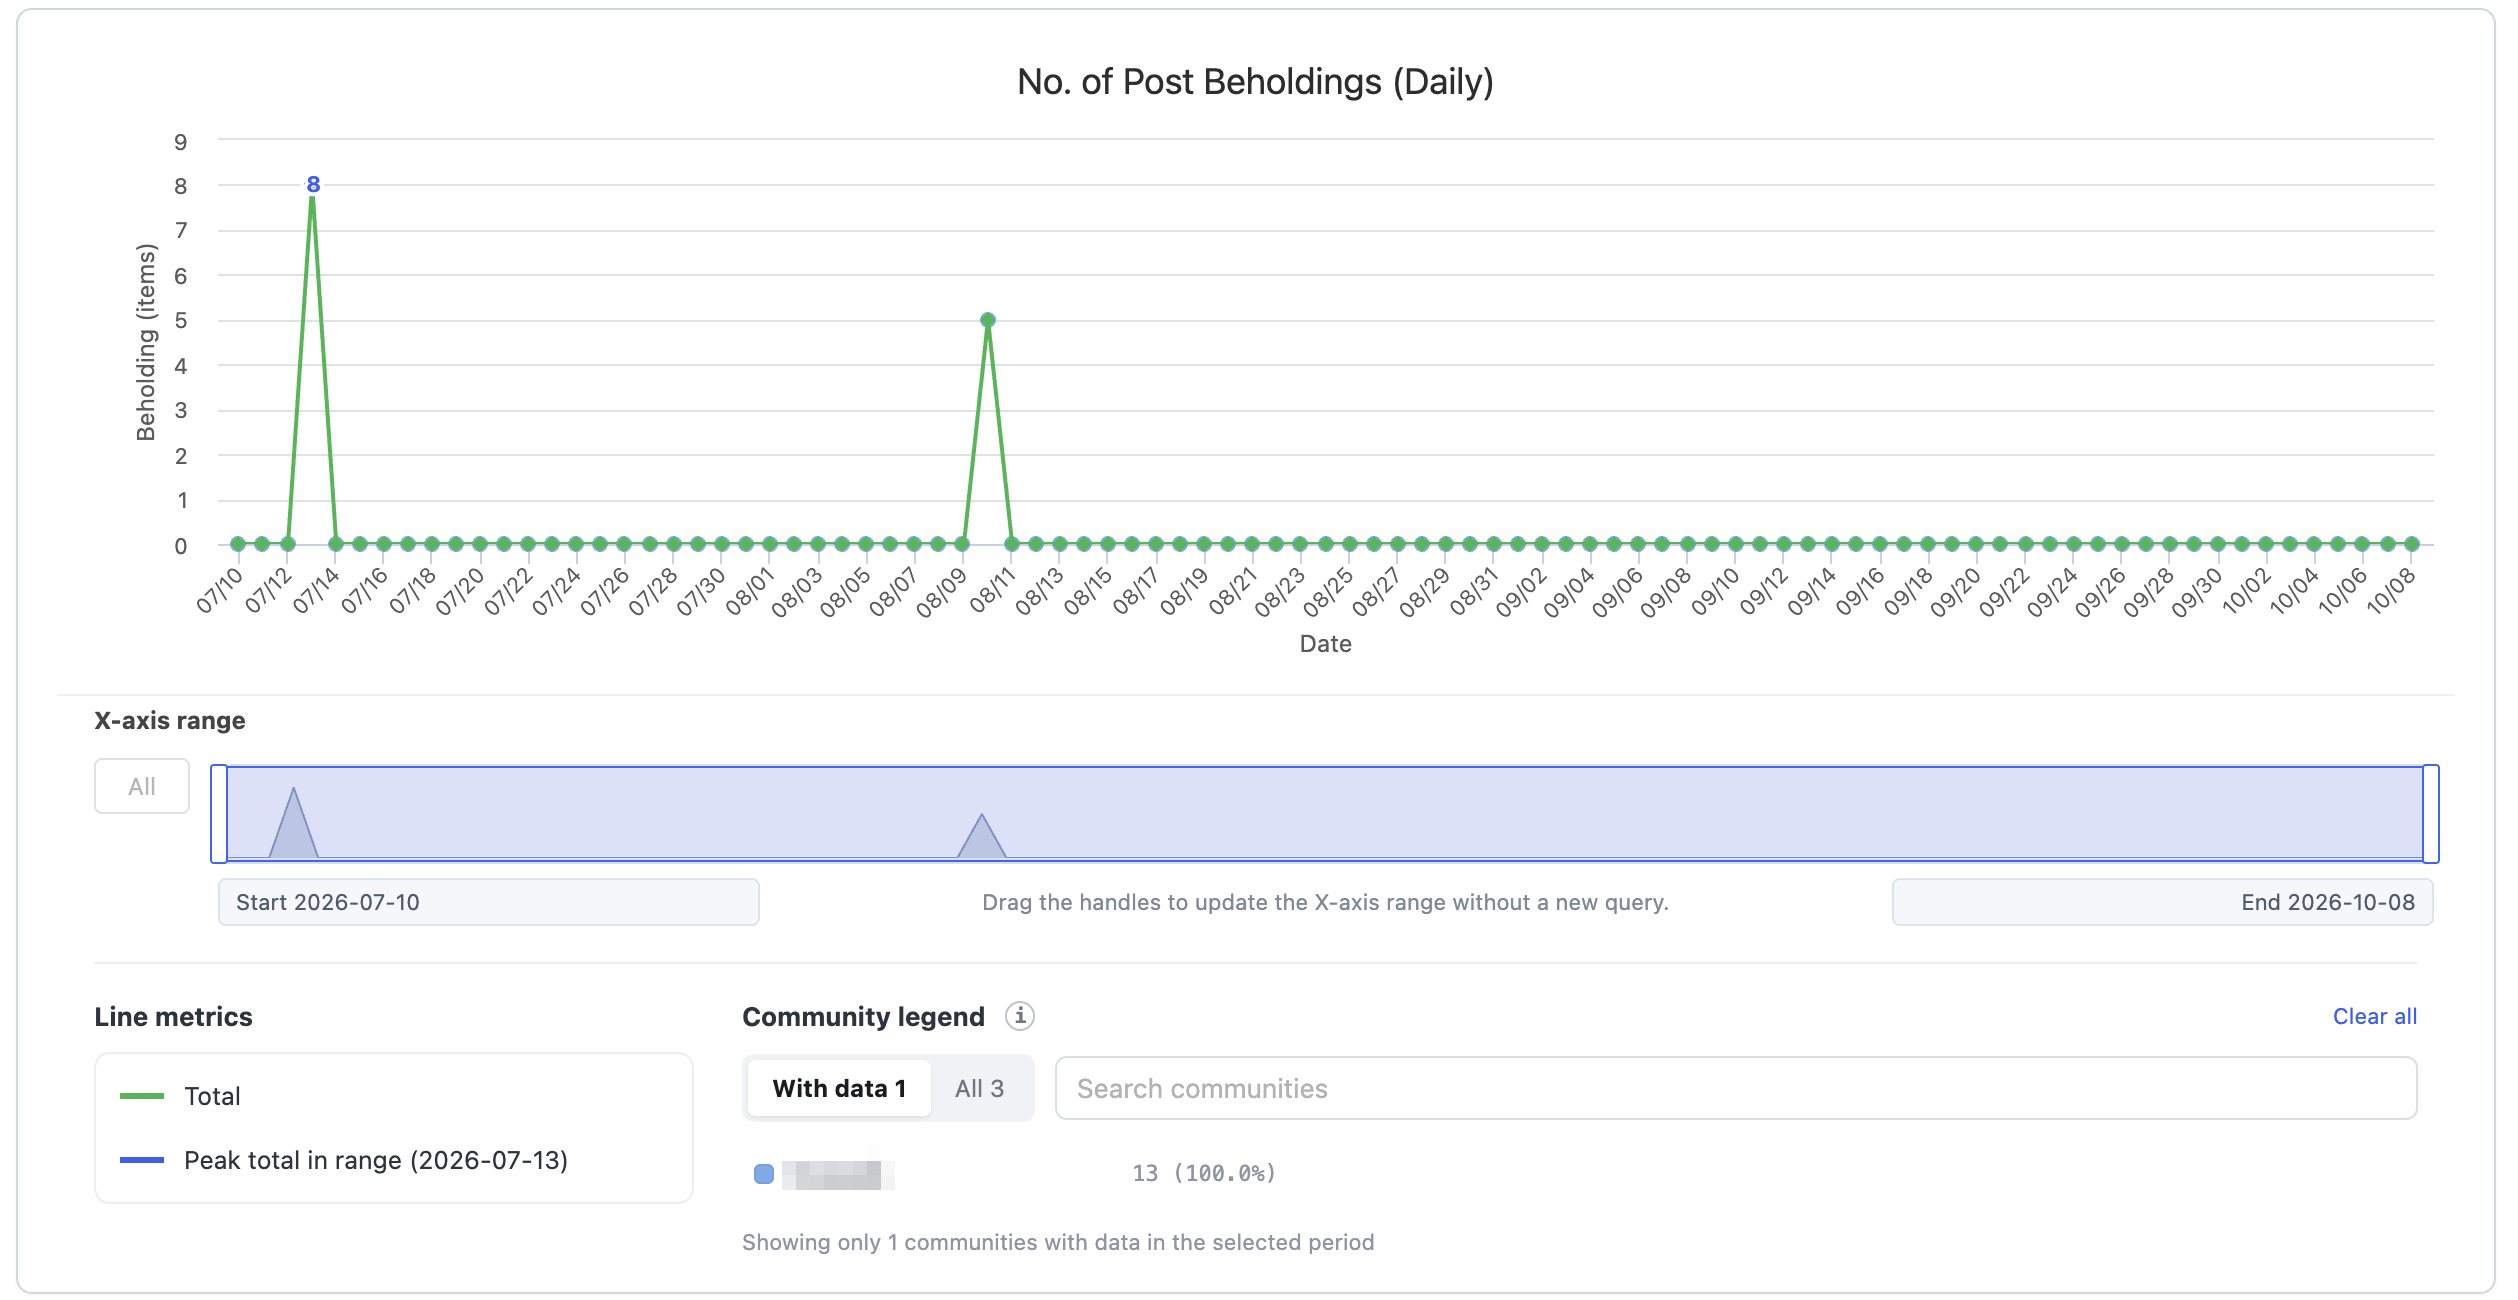
- No. of Post Beholdings (Daily): You can view the daily number of beholdings for the posts during the selected time period.
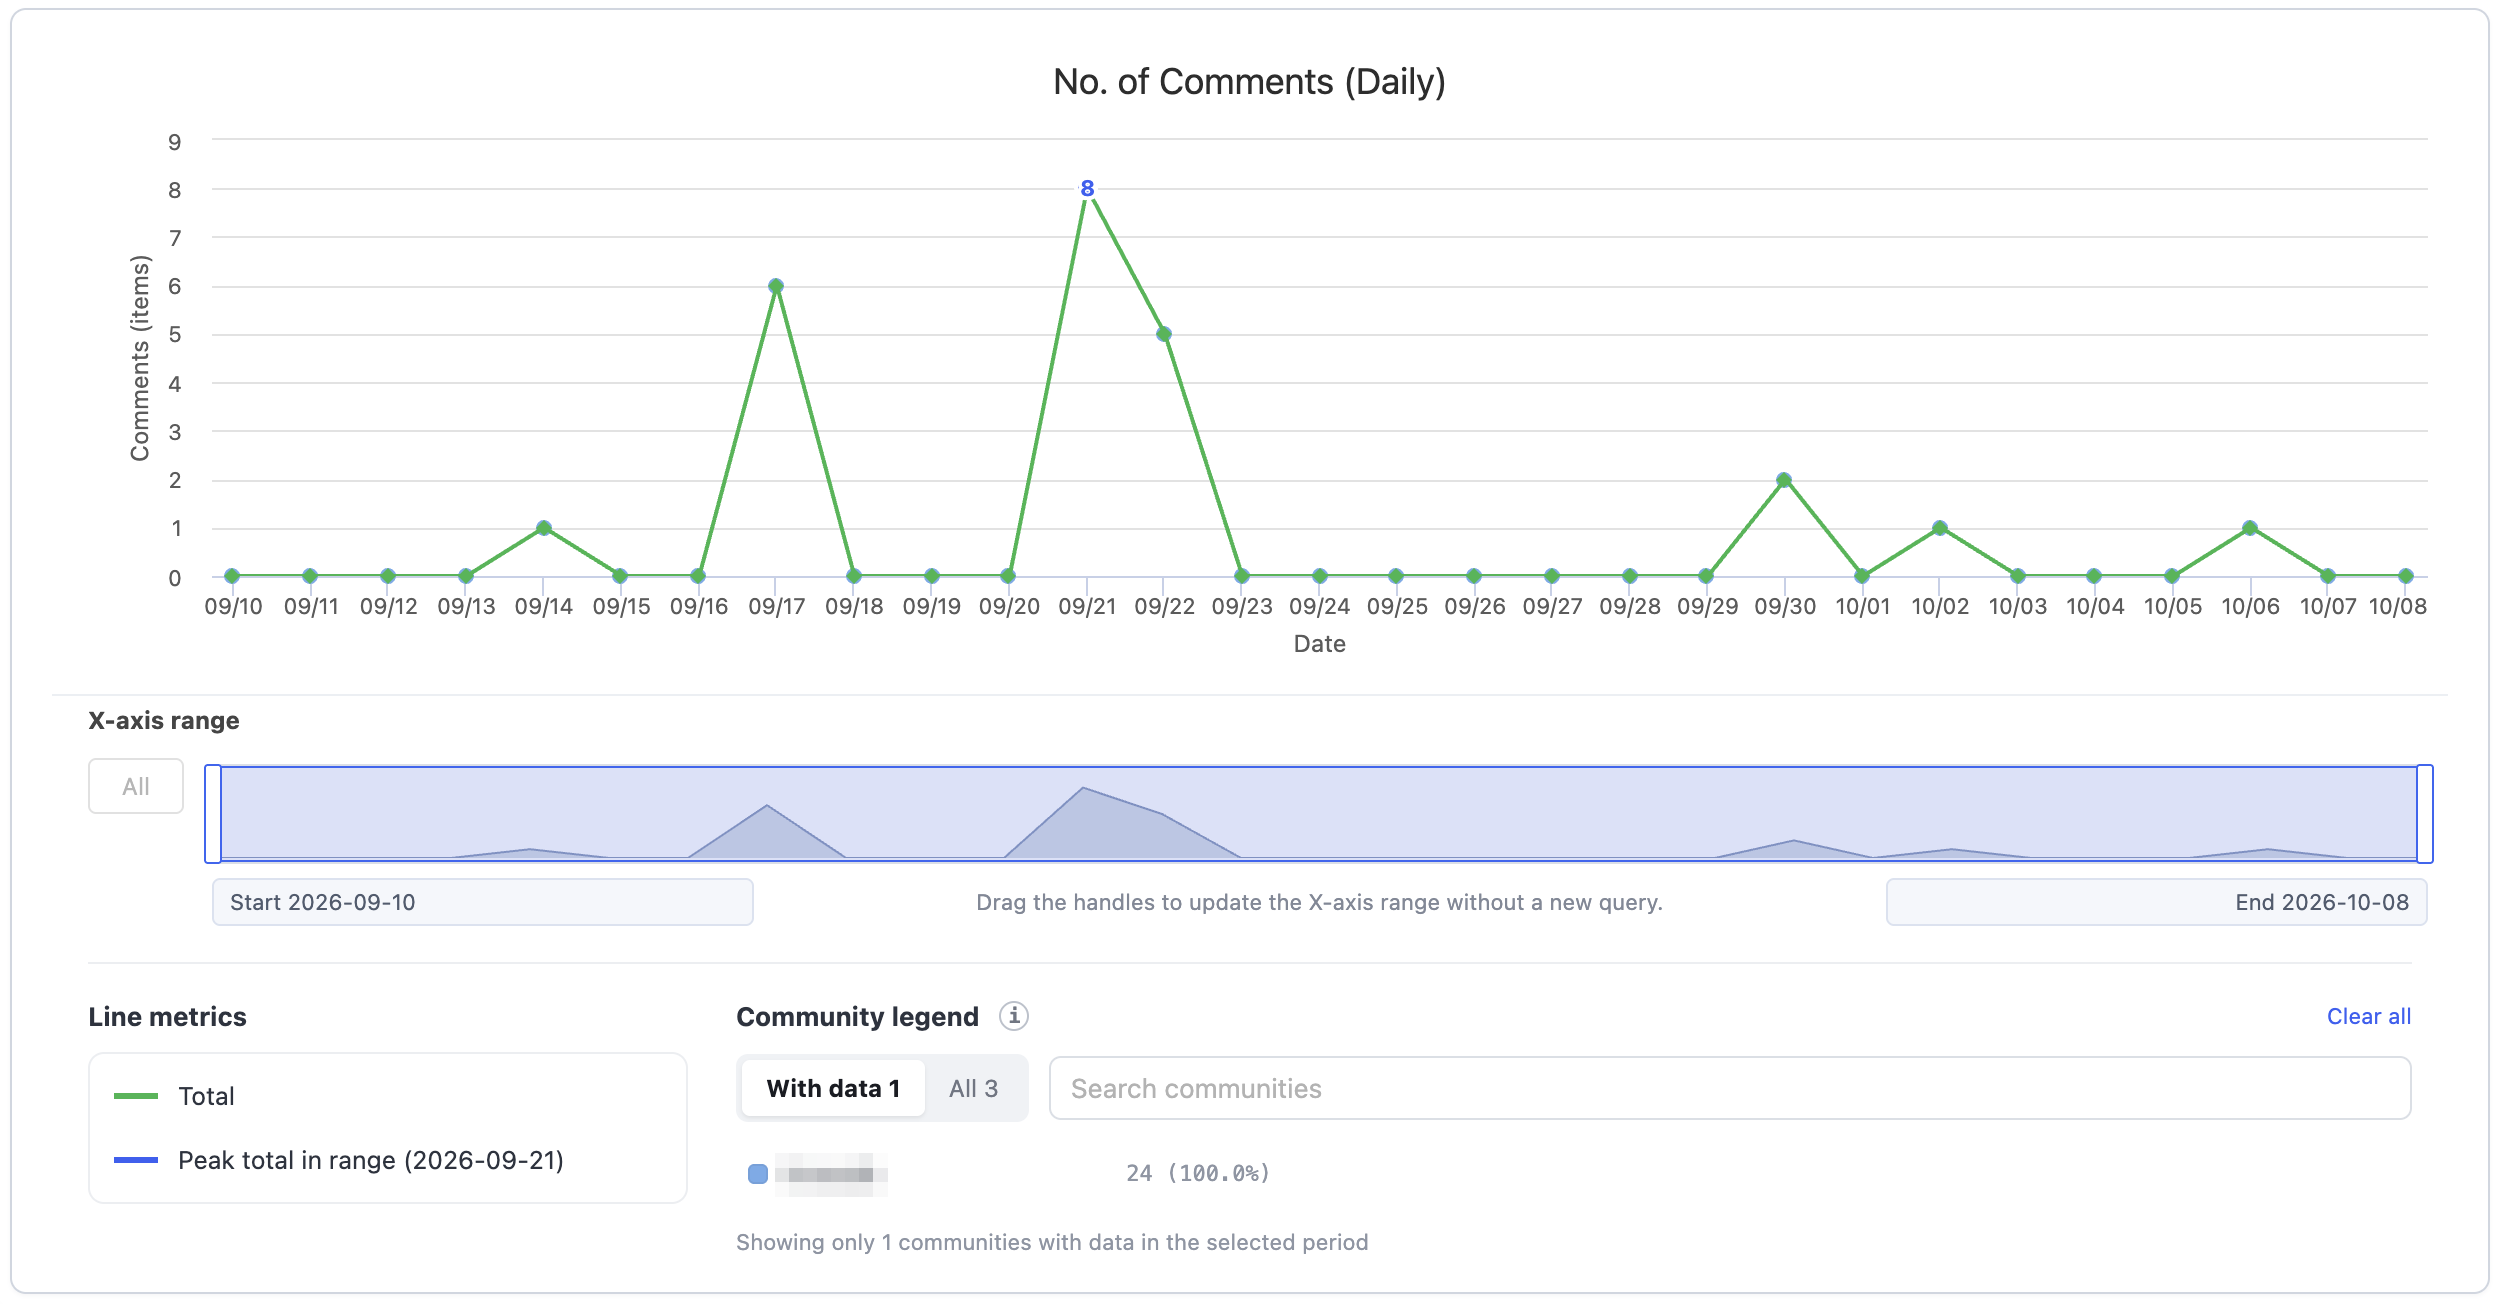
- No. of Comments (Daily): You can view the daily number of comments during the selected time period.
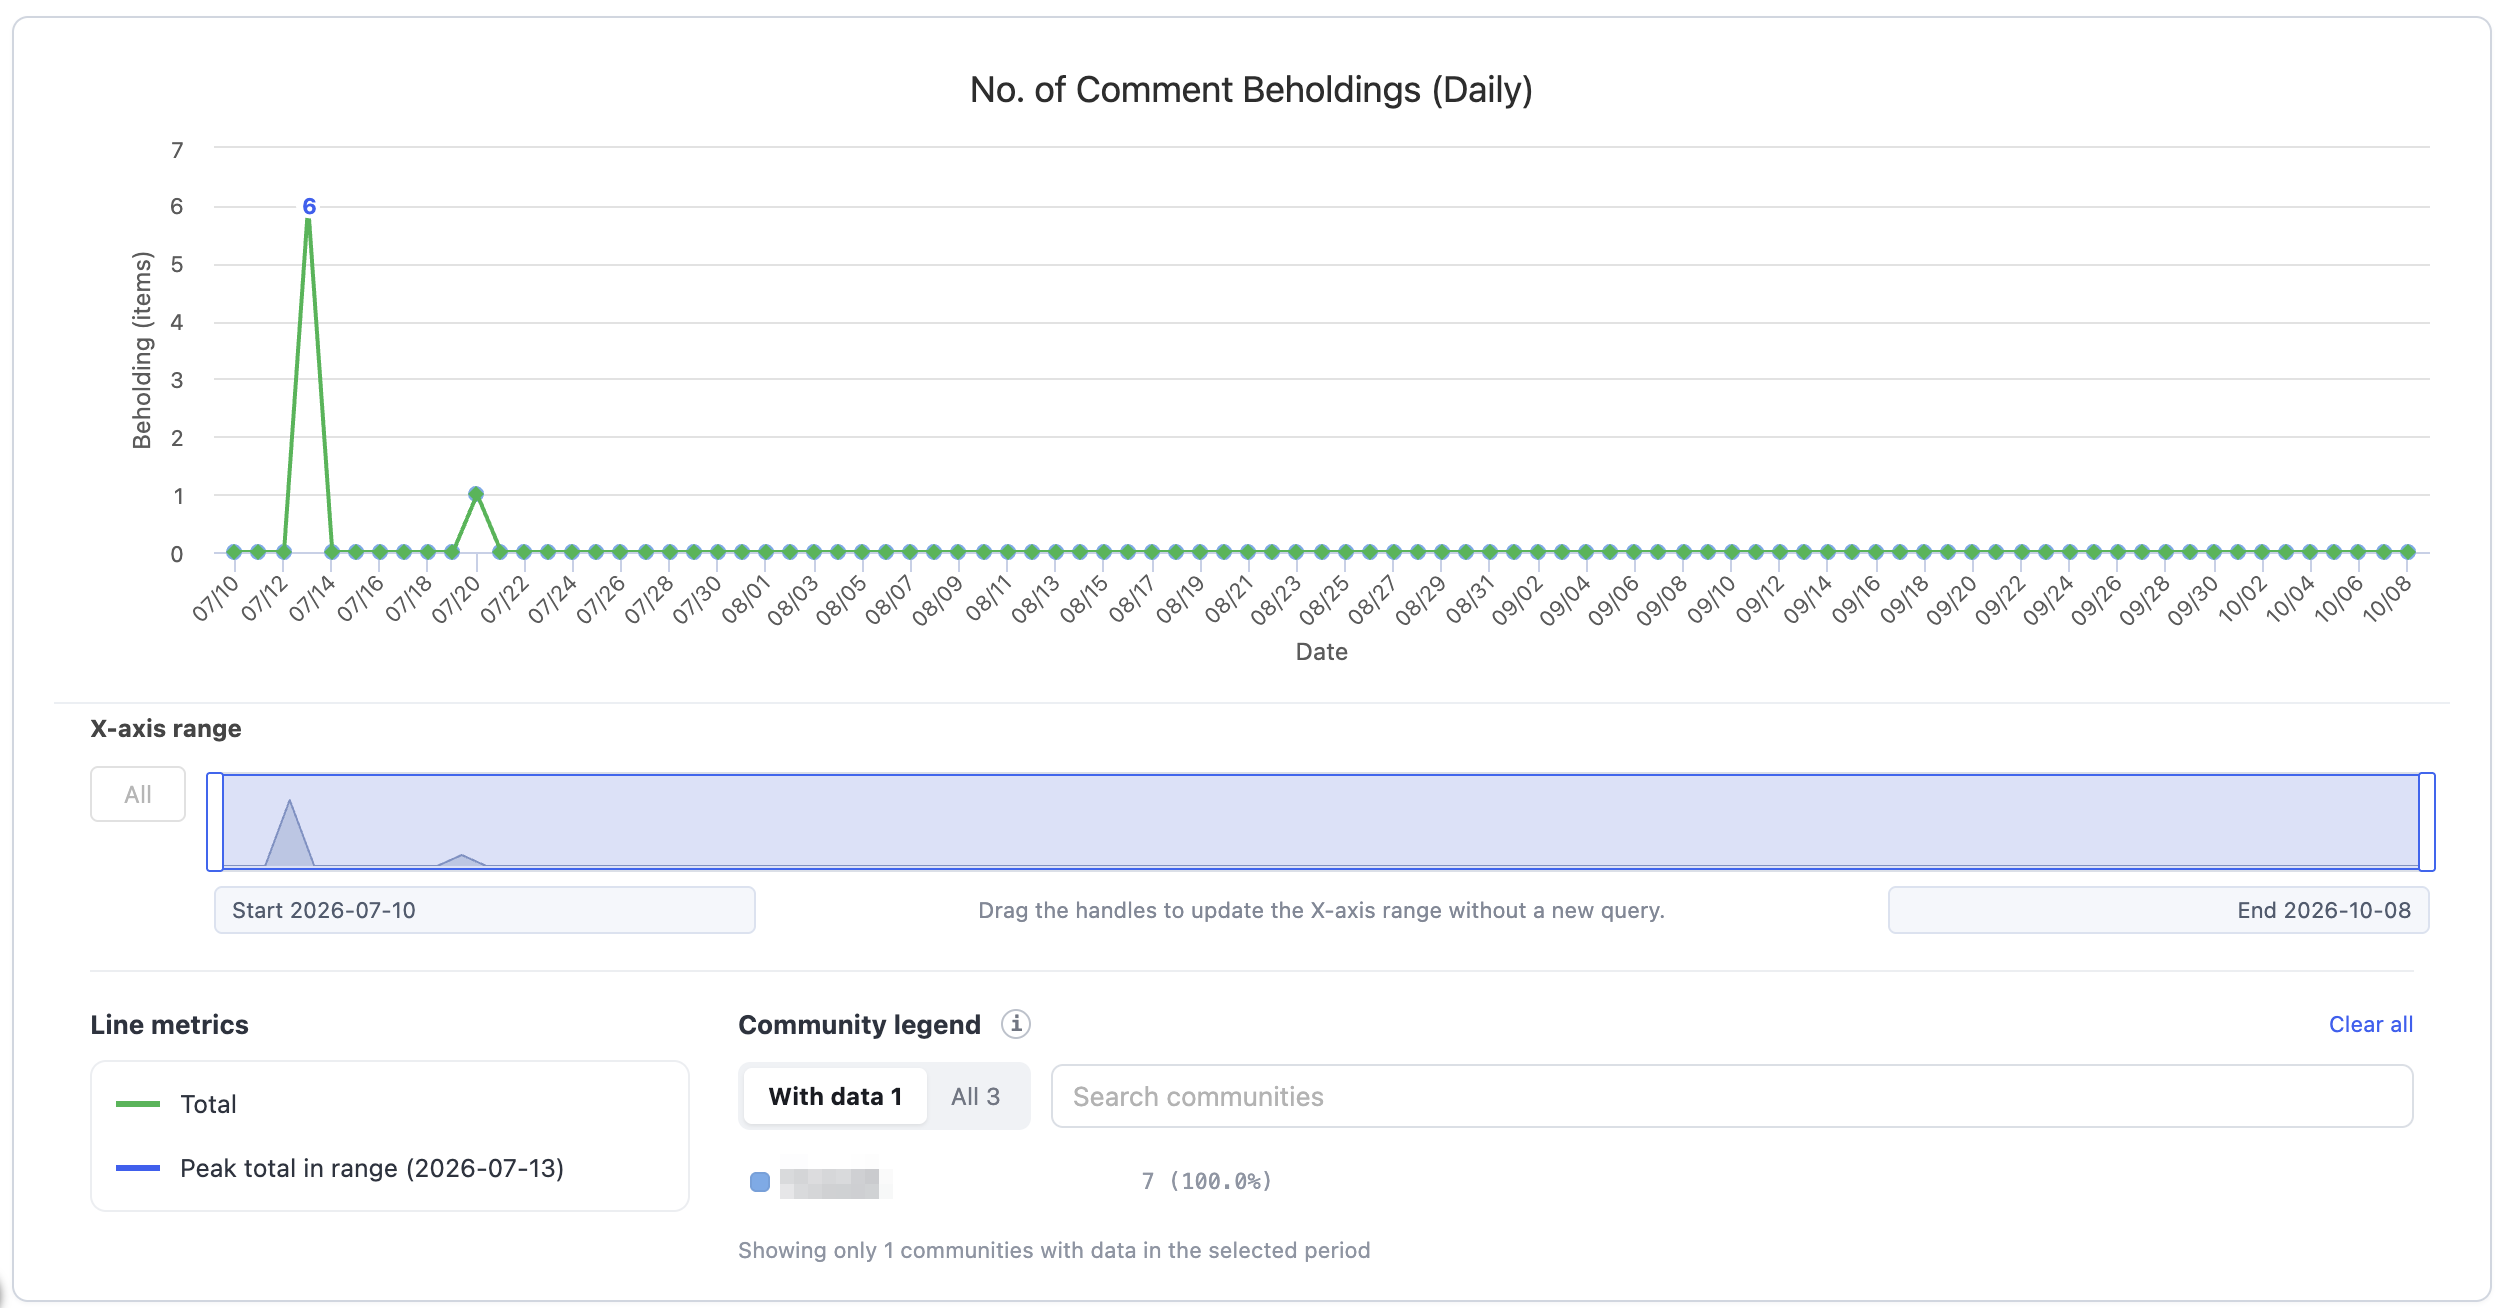
- No. of Comment Beholdings (Daily): You can view the daily number of beholdings for the comments during the selected time period.
- Ratio by Community: You can view the total and ratio by community in the community legend of each chart. Narrowing the X-axis range below the chart updates the legend values as well.
Personal Settings
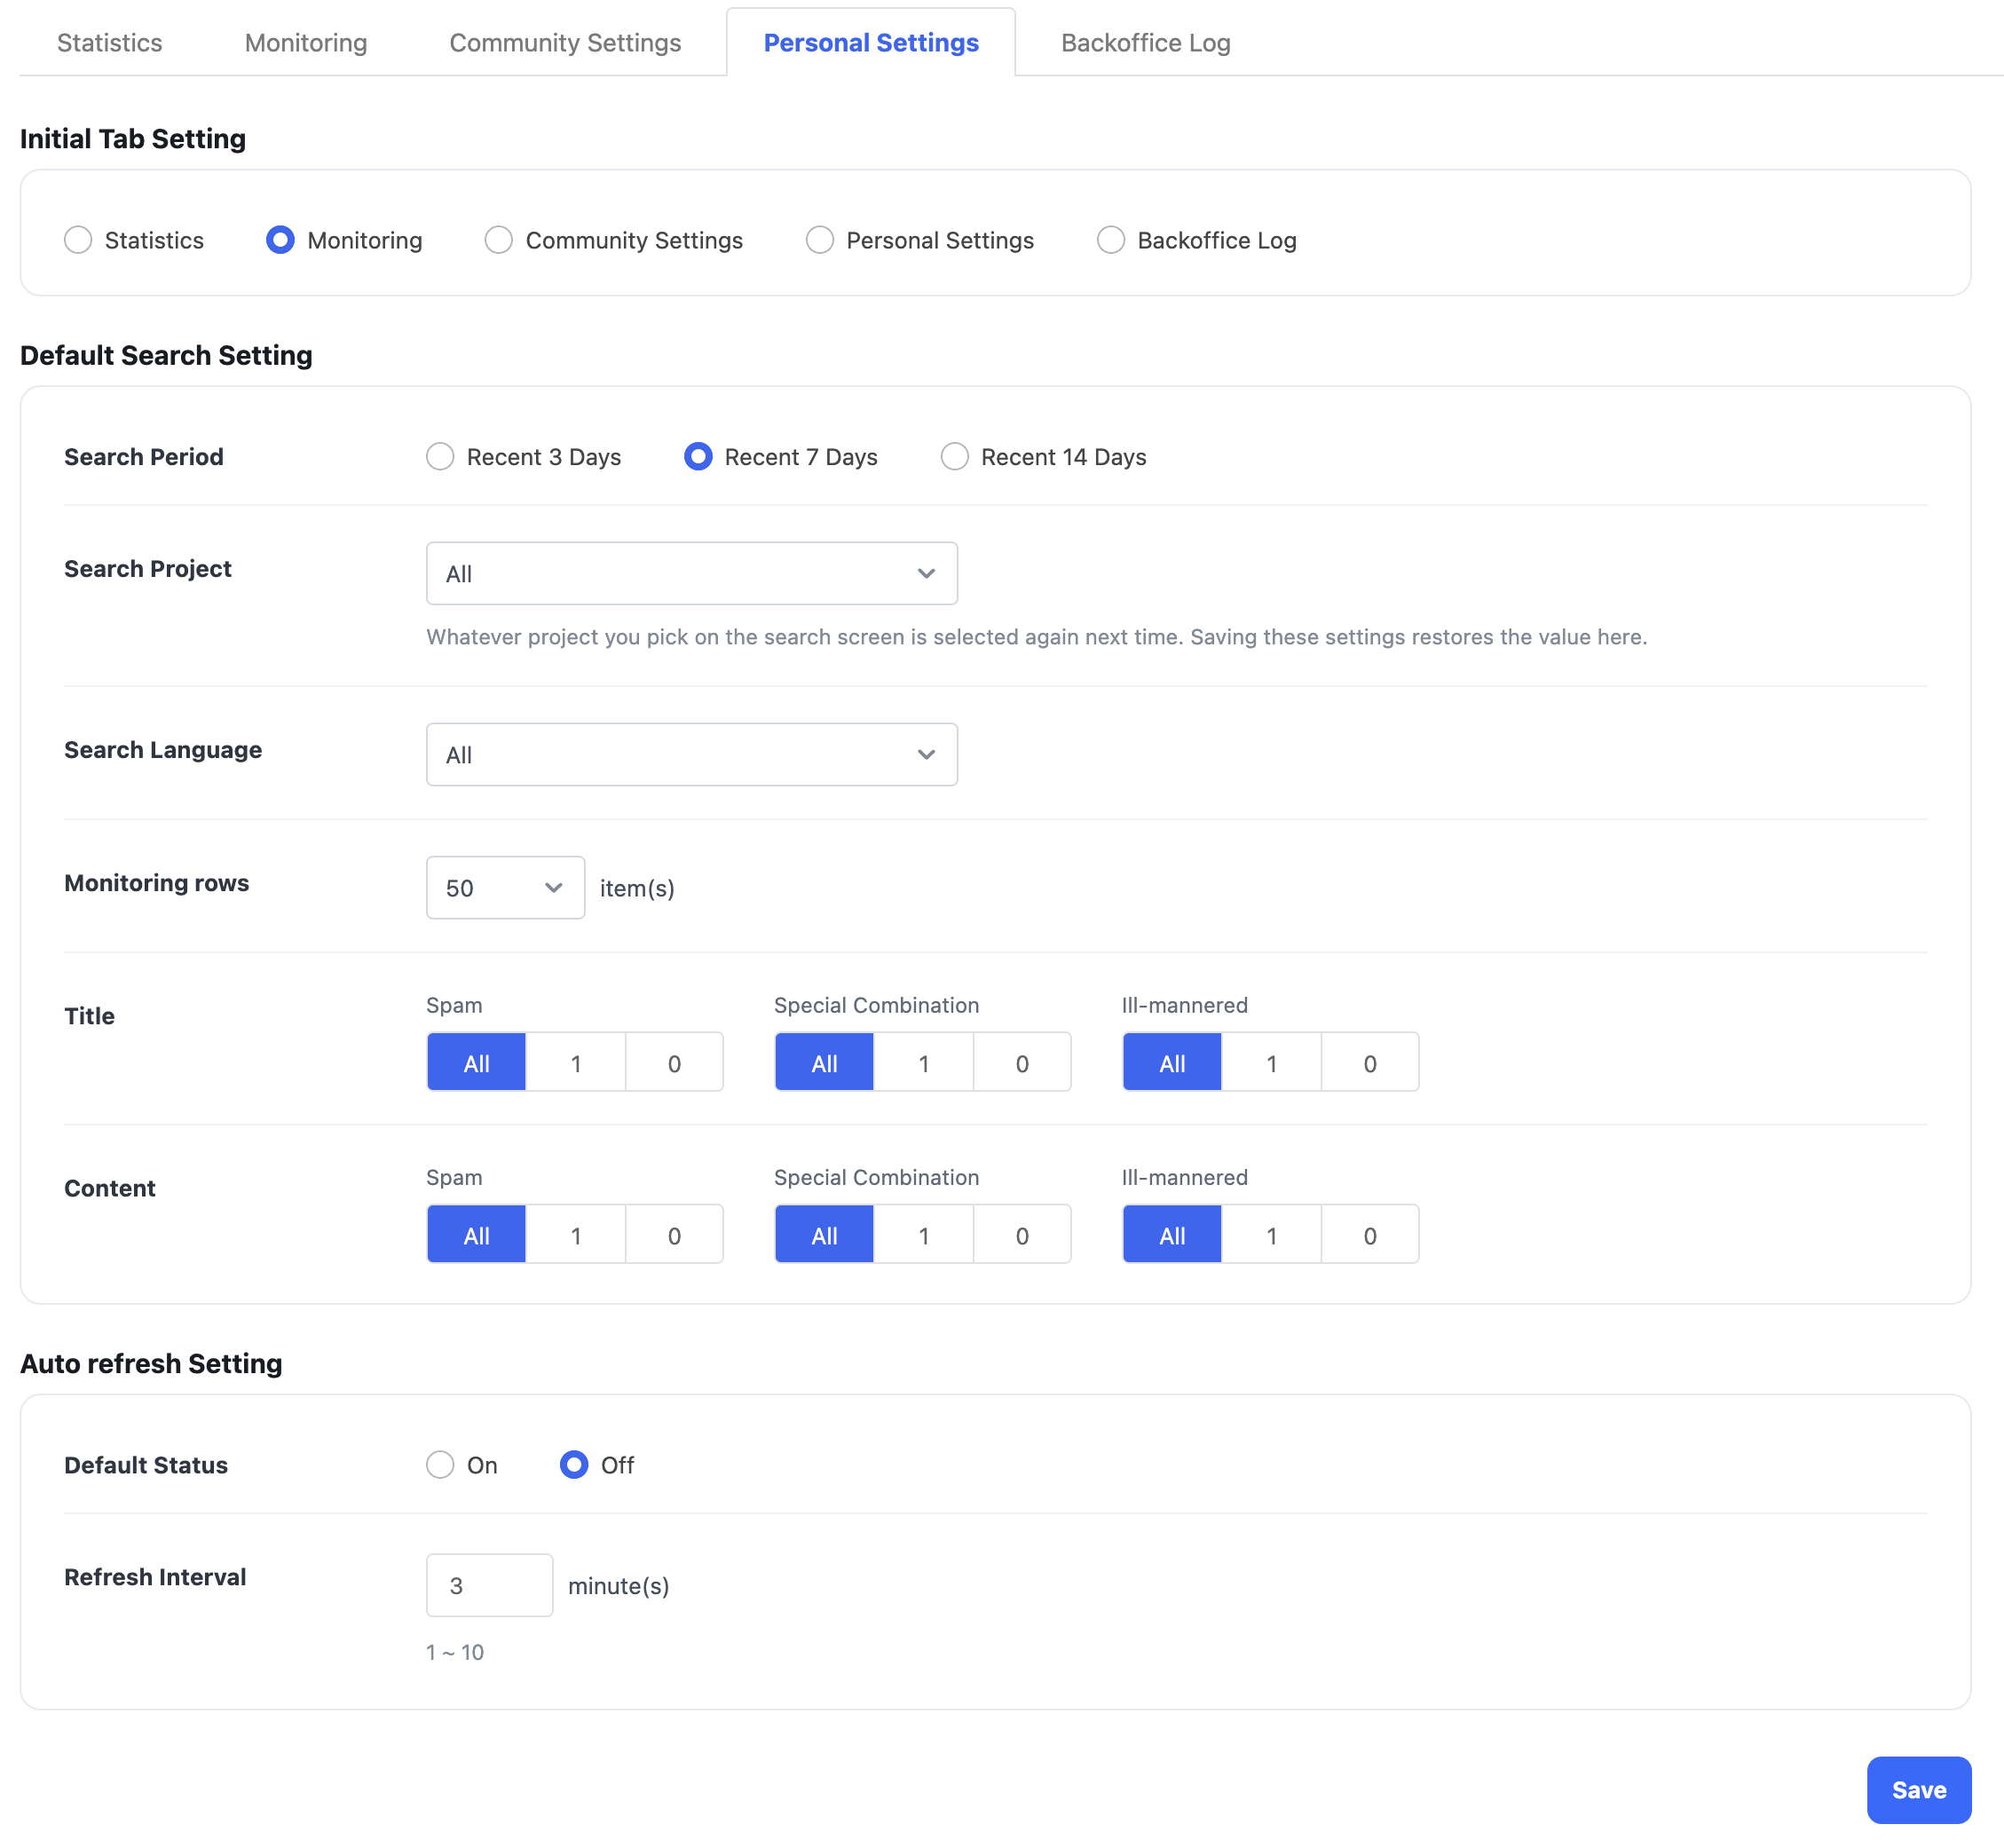
- Personal settings are saved for each menu.
- Initial Tab Setting: Set the start page when entering via Console.
- Default Search Setting: Set default filter values used in the Statistics and Monitoring tabs. You can also set the default spam, special combination, and ill-mannered values for the title and content (1: Detected, 0: Not detected).
- Auto refresh Setting: Set default values for auto refresh in the Monitoring tab.
Backoffice log
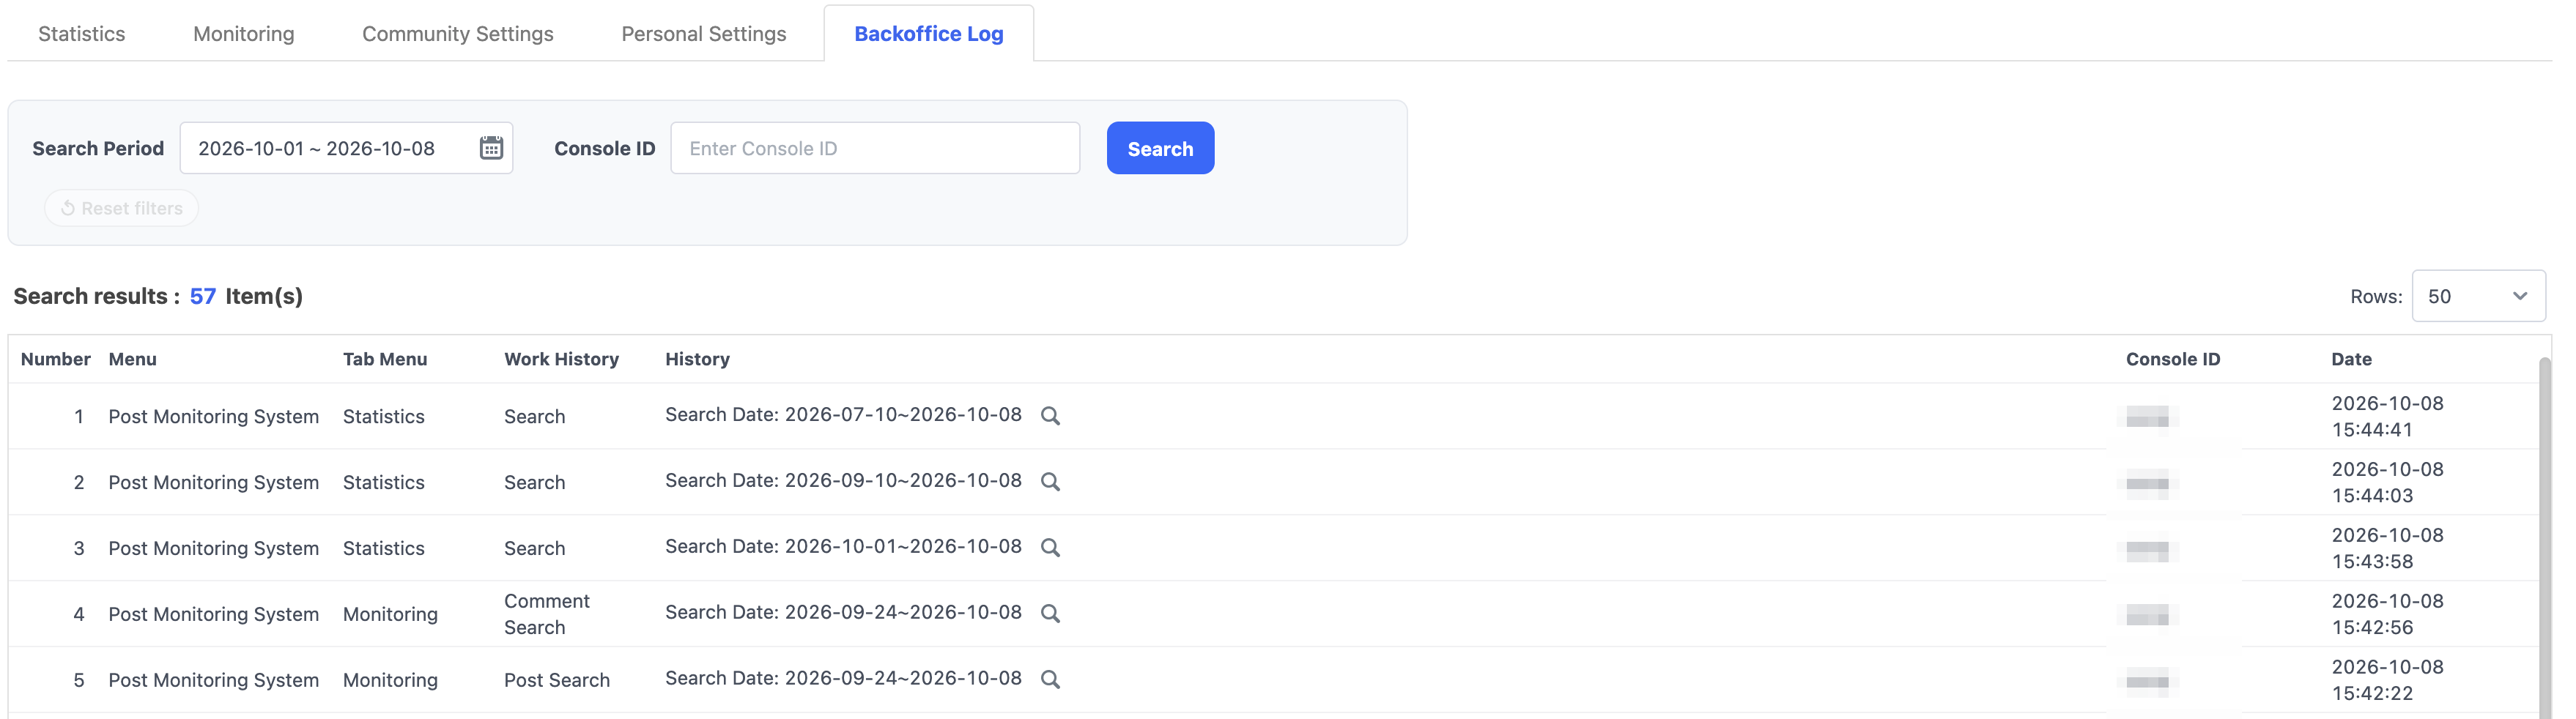
- You can check the use logs of views, registration, edit, delete, etc. during the search period.
- Search Period: You can set a specific period as search range. Default setting of the date is from 7 days ago until today, and you can quickly set it with the Today and Recent 7, 30, 60, and 90 Days buttons in the calendar that opens when you click the period field.
- Console ID: You can enter the Console ID to search.