Admin mail
'Admin mail' is the screen where you create mail in the console and send it to app users, and check the receipt status of sent mail or recall it. You send only a message or a message with items.
➡️ Console path: Mailbox > Admin Mail
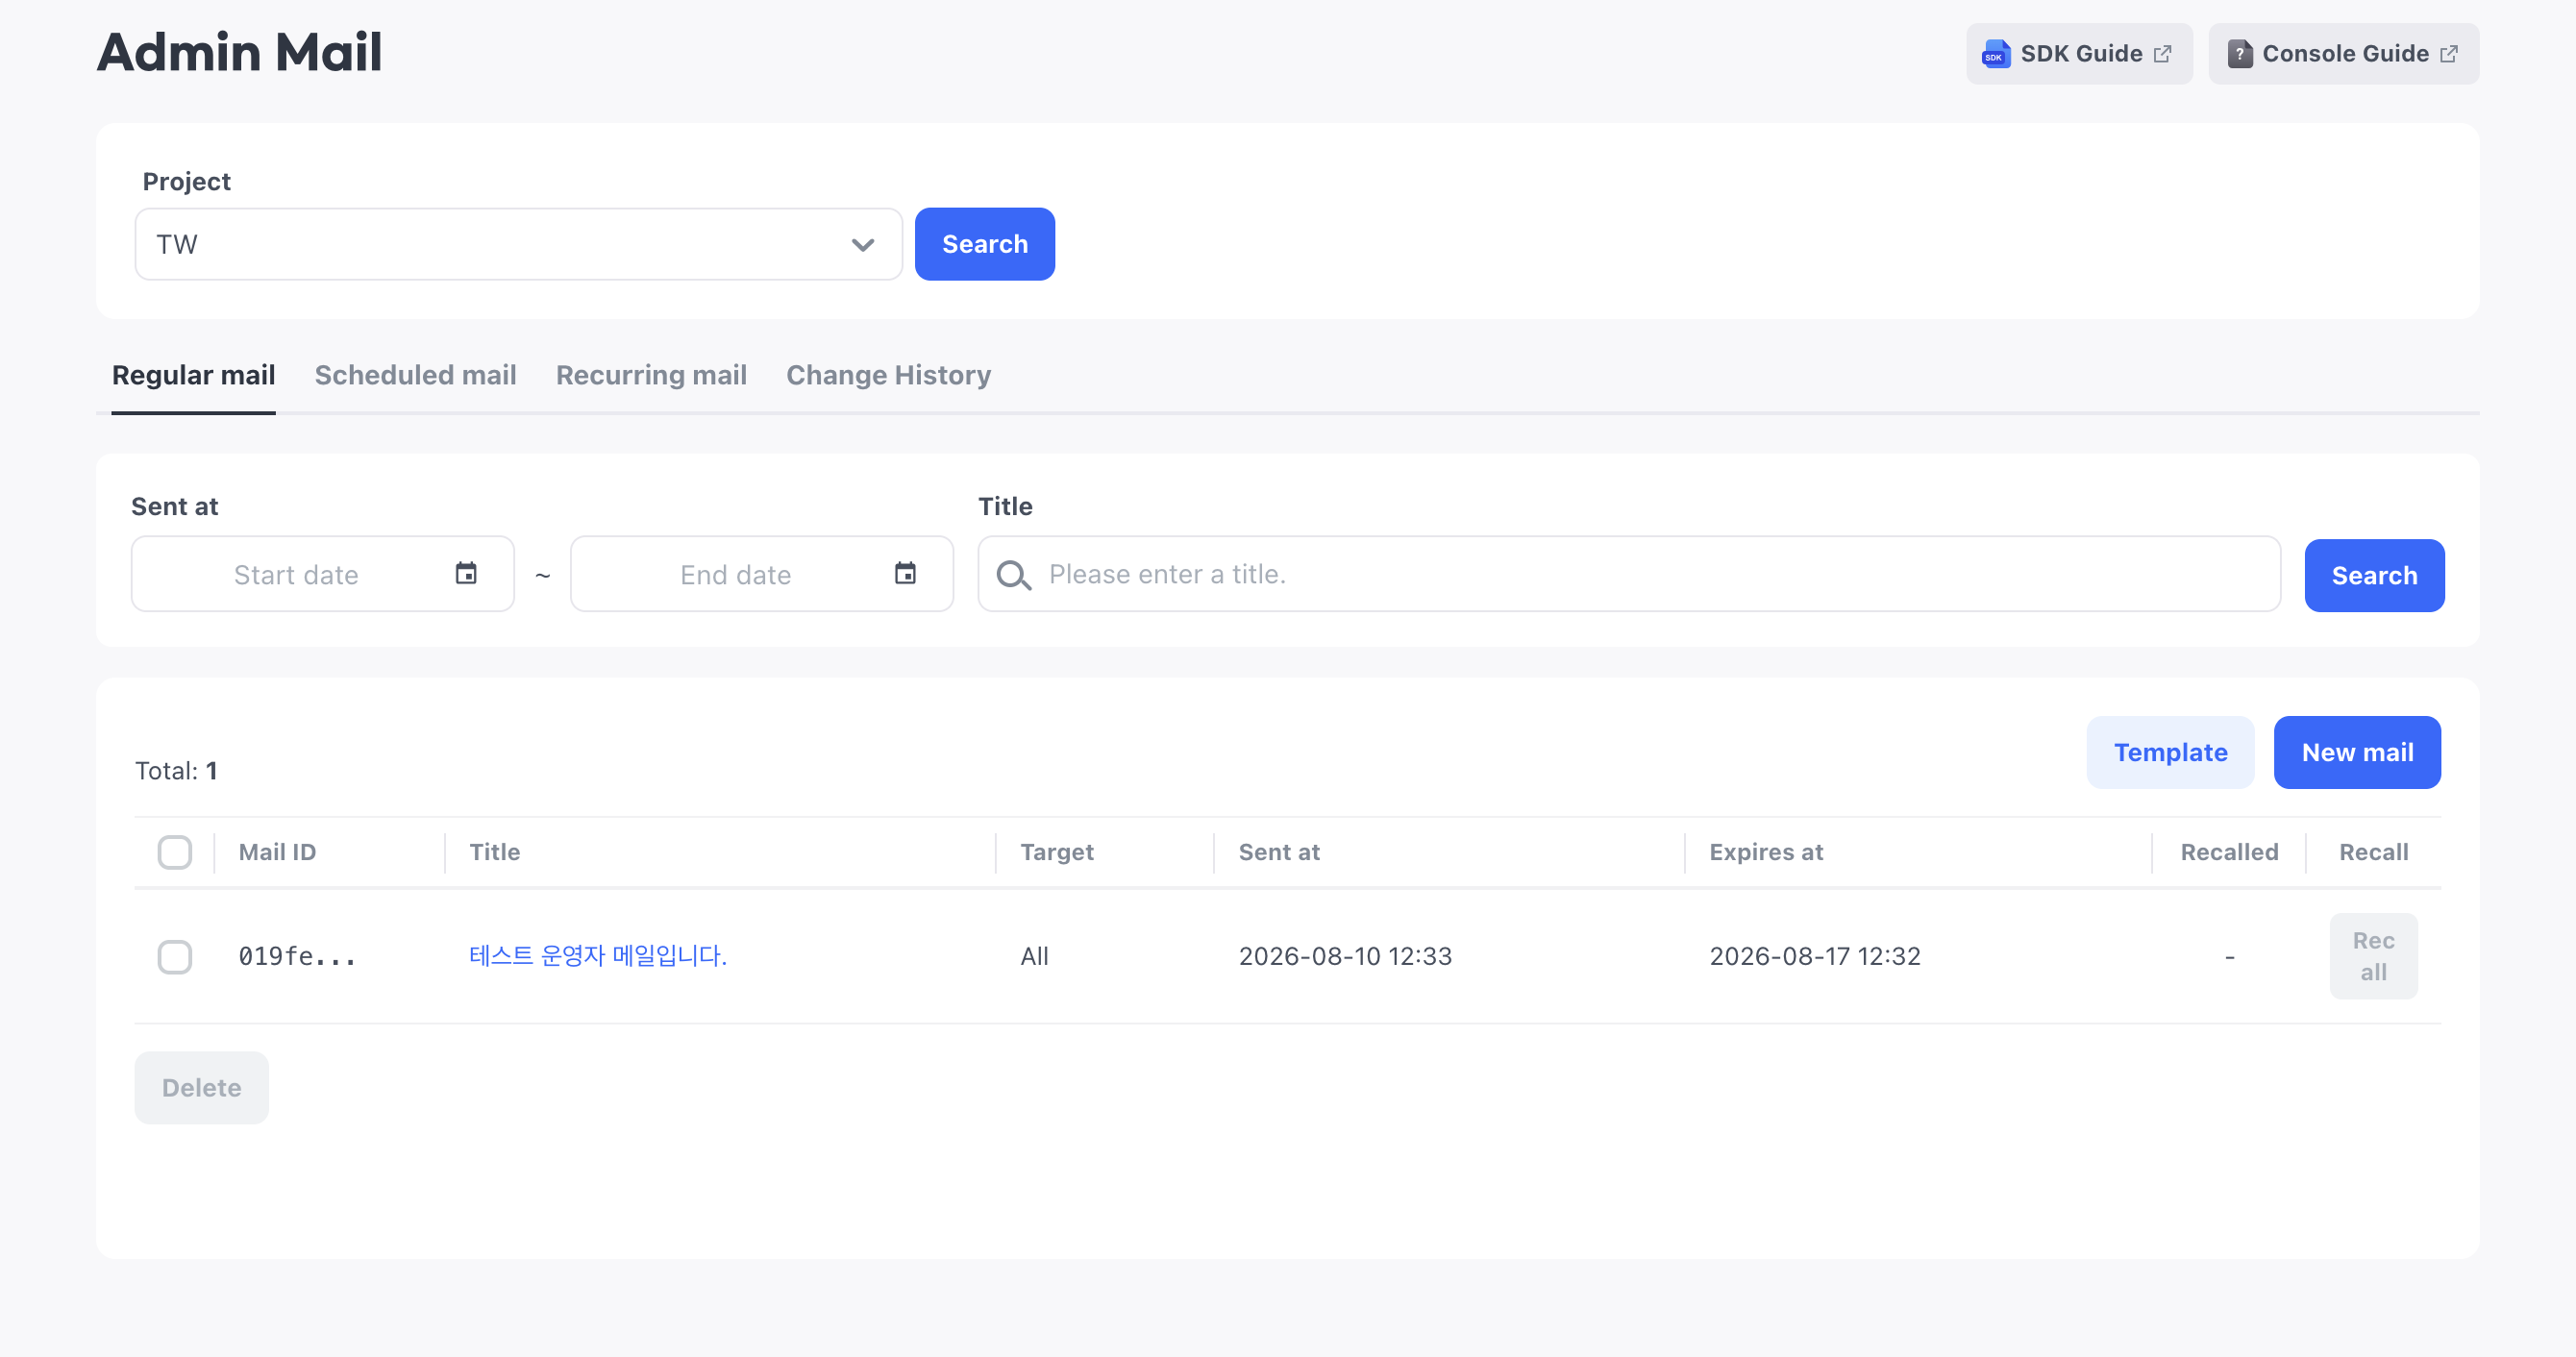
Choose a project at the top of the screen, and then select Search.
Registered mail is displayed on the Regular mail, Scheduled mail, and Recurring mail tabs according to its send type. You do not need to open the tab of the type to register first. Whichever tab you start from, you choose the send type on the mail creation screen.
Mail identifiers
Each sent mail item is identified by its Mail ID. You use this value to specify a mail item when you recall it, check its receipt status, or reply to an inquiry.
Recurring mail has one more identifier, the Schedule ID. A Schedule ID refers to one recurrence setting, and that setting creates a new Mail ID each time it sends mail.
Prepare to send mail
You enter the mail content for each supported language. To attach items, prepare an item list, and to send mail to specific users, prepare the Player IDs of the target users.
Languages for mail content
You enter the title and content of the mail for each language. The languages you can enter are those registered as supported languages in App meta info.
You can save mail only after you enter the title and content in the default language. If you leave the other languages empty, the title and content in the default language are delivered to users who use those languages.
Attached item file
To attach items, prepare a CSV file with the item codes used in your app and the quantities to grant.
The file must include item_code, which identifies an item, and quantity, the amount to grant. quantity must be greater than 0, and item_code must not be duplicated within the same file. One mail item can contain up to 10 kinds of items. If you need item names or additional information, include the optional columns item_name and option.
Recipient file
To send mail only to specific users, enter the Player IDs of the target users directly on the mail creation screen or register them with a CSV file.
Write player_id in the file header. One mail item can have up to 100 recipients, and if the same Player ID appears multiple times in the file, the duplicates are removed automatically.
Send mail
Select New mail and set the send type, expiration period, title and content for each language, and recipients to register the mail. When you save, the mail is created in the users' mailboxes at the send time you set.
How to set up:
- Select New mail.
- Set the send type and expiration period. For scheduled mail, also set the send date and time; for recurring mail, also set the recurrence cycle and recurrence end date.
- Enter the title and content on the language tabs.
- Specify the recipients.
- If the mail includes items, register the attached items.
- Select Save.
The following sections describe, in order, what to know when you decide each item.
Send type
Regular mail is sent as soon as you save it, and you cannot edit its content after it is sent.
Scheduled mail is sent once at the specified date and time. You can change the send date and time and the content until it is sent. For details, see Edit scheduled mail and cancel sending.
Recurring mail is sent at every cycle you set. Choose a cycle from daily, weekly, and monthly, and also set the date and time to end the recurrence. To send on multiple days of the week each week, select those days together. For monthly, choose from the 1st to the 31st or the last day. In months that do not have the specified date, the mail is sent on the last day of that month.
The send date and time follow the time zone selected in the console, so check the time zone before you register scheduled or recurring sending.
Expiration period
The expiration period is the period during which users can check the mail and claim the attached items. The mailbox does not provide a return feature, so expired mail is automatically deleted from users' mailboxes, and unclaimed items disappear with it.
The expiration period is counted from when the mail is sent, not from when it is created. Mail sent later, such as scheduled mail and recurring mail, also has its period calculated from when it is sent, and for recurring mail, the expiration date is set separately for each send.
Choose the expiration period in hours or days, or specify the expiration date and time directly. Direct specification is not available for recurring mail. This is because recurring mail recalculates the expiration date for each send based on that send time.
The expiration date and time calculated from the chosen period is also displayed, so check when the mail expires before you save.
Title and content
Enter the title and content while switching languages on the language tabs.
To translate the content into other languages automatically, select AI auto-translate. The text in the language you are currently viewing becomes the basis for translation, and if other languages already have content entered, it is overwritten with the translated text. If you have text you wrote yourself, keep this in mind before you use it.
Attached items
To attach items, register the prepared file with Enter from CSV file. The registered item list is displayed as a table.
The mailbox does not verify that items actually exist or grant items to users. Before you attach items, check with the app developer that the item codes are correct and that the app implements granting the items in mail to users.
Recipients
Choose either All or Enter manually as the recipients.
All sends the mail to all users of the app. It does not specify users one by one but opens the mail publicly, so no recipients are specified at the time of sending. Therefore, any user who accesses the app before the mail expires receives it, including users who signed up after it was sent, and only users who actually received it are recorded.
Enter manually specifies recipients by Player ID. Write the recipient list prepared in Recipient file in the input field, or register it with a CSV file. Even if you enter a Player ID that does not exist, the mail is created and only that recipient does not receive it, so check that the recipient list is accurate before sending.
To also record additional information about recipients, such as characters or servers, enter it in Recipient attributes. It is an optional item entered separately from the Player ID, and you can also check the registered values in the mail details.
Mail templates
Save frequently used titles and content as templates, and load them when you create new mail. The default language and the title and content for each language are saved together.
You can check saved templates as a list in Template of Admin Mail. Select a title in the list to open the template details screen. Edit the title and content for each language, and then select Save.
An edited template is reflected only in the content loaded when you create new mail after the edit. The content of mail already created does not change.
Save as a template
To reuse the title and content of the mail you are writing, save them as a template.
How to set up:
- Select New mail to open the mail creation screen.
- Enter the title and content.
- Select Save as template at the bottom of the pop-up.
Delete templates
Delete templates you no longer use by selecting them in the list, or by using Delete on the details screen.
How to set up:
- Select Template to open the template list.
- Select the checkbox of the template to delete.
- Select Delete.
Load a template
To use saved content in new mail, set the mail type and then load a template.
How to set up:
- On the mail creation screen, select Load from template.
- In the template list for that mail type, select the title to use.
- Check the filled-in title and content.
The expiration period and recipients are not saved in templates, so set them separately after loading.
Manage sent mail
On the Regular mail and Scheduled mail tabs, check the sending results of registered mail, and recall mail or delete it from the list. For scheduled mail, edit the content or cancel sending before it is sent.
When you search for mail by title, the search works word by word, so enter words exactly as they appear in the title.
Expired mail remains in the list for only 3 months after it expires, and after that you cannot look it up.
Check the receipt status
Select a title in the list to open the details screen with the registered content as is. In the recipients area, check the receipt results of individual users. The Player ID, the date and time the user checked the mail, and the date and time the user claimed the items are displayed, and you can download the entire list as a CSV file. For mail with attached items, you can also download the list of attached items as a file.
The users displayed in the recipients area differ depending on how the recipients were specified, as follows.
- All: Only users who checked the mail are displayed
- Enter manually: All specified users are displayed. For users who have not checked the mail yet, the mail check date is empty
Edit scheduled mail and cancel sending
For scheduled mail in the Scheduled status before sending, you can edit every item except the send type. You can change not only the title and content for each language and the send date and time, but also the expiration period and recipients. To change the send type, cancel the schedule and register the mail again as new mail.
When you cancel sending, only the schedule information disappears; the mail remains in the list, and its send status changes to Canceled. You cannot send canceled scheduled mail again, so to send the same mail, register it again.
How to set up: Edit scheduled mail
- On the Scheduled mail tab, select the title of the mail to edit.
- Edit the items you want to change, except the send type.
- Select Save.
How to set up: Cancel scheduled sending
- On the Scheduled mail tab, select the title of the mail to cancel.
- On the details screen, select Cancel.
- In the confirmation dialog, select Cancel sending.
Recall mail
When you recall mail, it is deleted from users' mailboxes. Recall applies only to mail that users have not checked yet; mail they have already checked is not recalled and remains in their mailboxes. Recall is based on whether the mail was checked, so whether the items were claimed does not affect recall.
Mail whose recipients are set to All works differently for recall because no recipients are specified at the time of sending. Mail not yet reflected in users' mailboxes is no longer reflected after the recall, and among mail already reflected, only mail that has not been checked is recalled. So even if the recall status in the list changes, the mail remains in the mailboxes of users who have already checked it.
There is a gap between the time you request a recall and the time the mail disappears from users' mailboxes. The processing time depends on the number of recall targets. The recall status in the list changes when processing actually finishes, not when you make the request, so if it is not reflected right after the request, look it up again after a while.
How to set up:
- In the list, select Recall for the mail to recall. You can also use Recall at the bottom of the details screen.
- In the confirmation dialog, select Recall.
Delete from the list
Deleting removes mail only from the console list. Mail already created for users is not deleted, so to remove mail from users' mailboxes, use recall instead of deletion.
How to set up:
- In the list, select the checkbox of the mail to delete.
- Select Delete below the list.
- In the confirmation dialog, select Delete.
Manage recurring mail
On the Recurring mail tab, you manage recurrence settings together with the mail sent by those settings. The screen is divided into the Schedule ID area and the sent Mail ID area. When you select a recurrence setting in the Schedule ID area, you can check the details of that setting and the mail sent by it.
You cannot edit the content of registered recurring mail. To change the content, register new recurring mail. The expiration date of each mail item is calculated by adding the expiration period to each send time, and sent mail can be looked up until 3 months after it expires.
Receipt status and recall for each send
When you select a sent Mail ID, the recipient Player IDs, mail check dates, item claim dates, and recall status of that mail are displayed. Recall is also performed per send, and the recall conditions and processing are the same as in Recall mail.
For a setting that has never sent mail yet, only a notice that there is no sent mail is displayed.
How to set up: Recall a send
- In the Schedule ID area, select the target recurrence setting.
- In the sent Mail ID list, select the mail to recall.
- Select Recall.
- In the confirmation dialog, select Recall.
End recurring sending and delete schedules
When you end recurring sending, subsequent scheduled sends are not executed. You cannot restart ended recurring mail, so to continue sending, register new recurring mail.
The schedule status is one of Scheduled, In progress, Completed, and Canceled. If you end it in the Scheduled status, it changes to Canceled, and if you end it while it is In progress, it changes to Completed. It also becomes Completed when it reaches the recurrence end date.
You delete a schedule in its details when it is in the Completed status. To delete recurring mail in progress, first end the sending. You cannot restore a deleted schedule.
How to set up: End recurring sending
- In the Schedule ID area, select the recurrence setting to end.
- Turn off the schedule status toggle in the basic information.
- In the alert dialog, select End recurring mail.
How to set up: Delete a schedule on the details screen
- In the Schedule ID area, select the recurrence setting to delete.
- On the details screen, select Delete.
- In the confirmation dialog, select Delete.
Next steps
To check mail exchanged between users, see User mail.