Workspace management
Overview
Workspace Management is a feature for creating workspaces, which are the locations where content (charts, funnels, retention, and dashboards) is stored, and for managing permissions such as administrator/member.
You can set up workspaces by analysis purpose, organization, or assigned project and manage access permissions.
What can you do?
Business/marketing users
- If you set up workspaces by the app or business area you are in charge of and grant permissions to team members, they can selectively access only the analysis assets they need.
- If you set the main dashboard to a key KPI dashboard, you can check the team's status the moment you access Analytics.
Data analysts
- If you set up workspaces by analysis purpose or domain, you can systematically classify and manage your team's analysis content.
- If you keep sensitive analysis content in a separate workspace, you can restrict access permissions to only the members who need them.
Developers
- If you create a separate workspace dedicated to event verification and QA, you can operate the development team's analysis space independently of other teams.
Quick start
If you are creating a workspace for the first time, follow these steps to create your first workspace.
- Click the Settings > Workspace Management menu in the left sidebar.
- Click the Register button in the upper-right corner.
- Enter the workspace name and description.
- Click the Save button.
- Add administrators/members to the created workspace.
Note
For detailed features such as permission management, permission requests, and main dashboard settings, see Full features.
Full features
Key concepts
| Concept | Description |
|---|---|
| Workspace | A space unit where content such as charts, funnels, retention, and dashboards is stored |
| Workspace Administrator | A user who has all permissions for the workspace. Can add and delete members |
| Workspace Member | A user who can view and create content in the workspace |
| Home Dashboard | The dashboard displayed by default for the workspace when you enter the Home menu |
Create a workspace
Create a new workspace to manage content systematically. 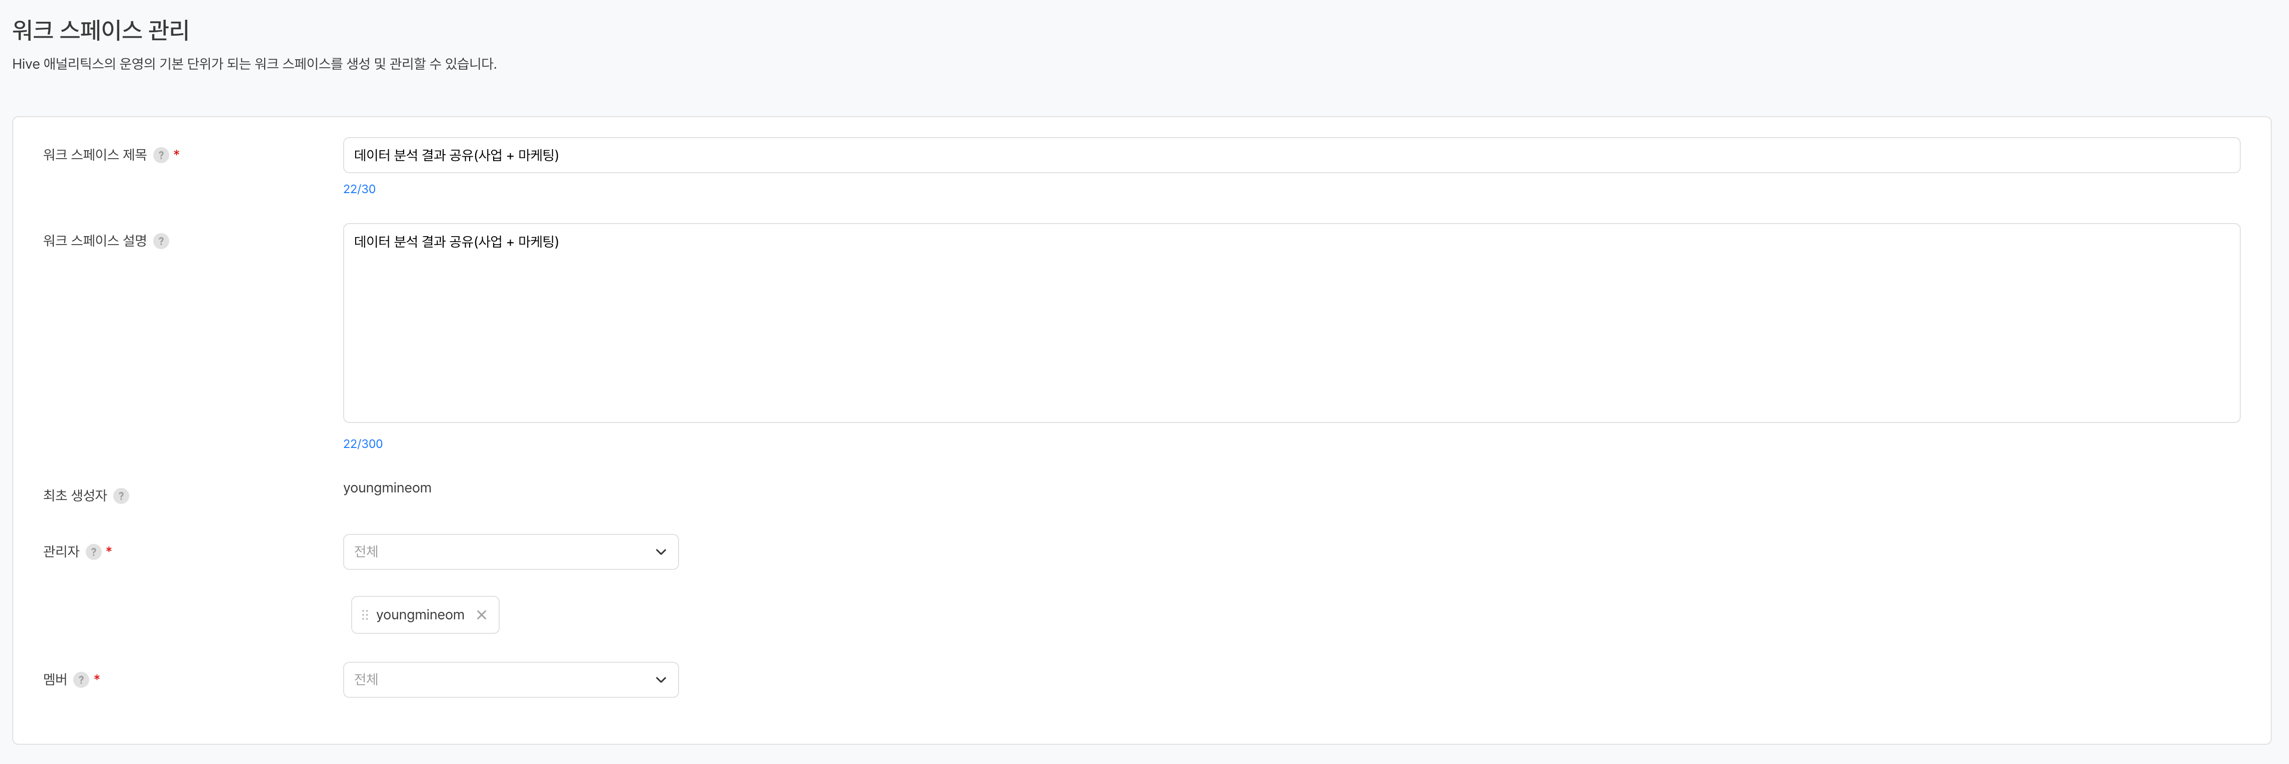
| Item | Required | Description |
|---|---|---|
| Workspace Name | Required | Name that identifies the workspace |
| Description | Optional | Description of the workspace's purpose or owning team |
Manage workspace permissions
Manage the users who can access the workspace and their permissions.
Administrator/member roles
| Role | Permissions |
|---|---|
| Administrator | Change workspace settings; add, delete, and change the permissions of members; and create, edit, and delete content |
| Member | View and create content in the workspace and delete content they created |
Add administrators/members
- On the workspace details page, click the dropdown box to the right of the Administrator or Member item.
- Search for and select the email of the user to add.
- Click the Save button.
Delete administrators/members
- Delete the user email displayed under the Administrator or Member item.
- Deleted users can no longer access the workspace.
Permission requests
Users who do not have access permission to a workspace can request permission directly from the administrator. 
Request permission (member)
- In the Settings > Workspace Management list, select a workspace you do not have access permission to.
- Click the Request Permission button.
- When the request is submitted, it is delivered to the administrator of the workspace in the pending approval status.
Note
If there is already a pending request, you cannot make a duplicate request.
Handle permission requests (administrator)
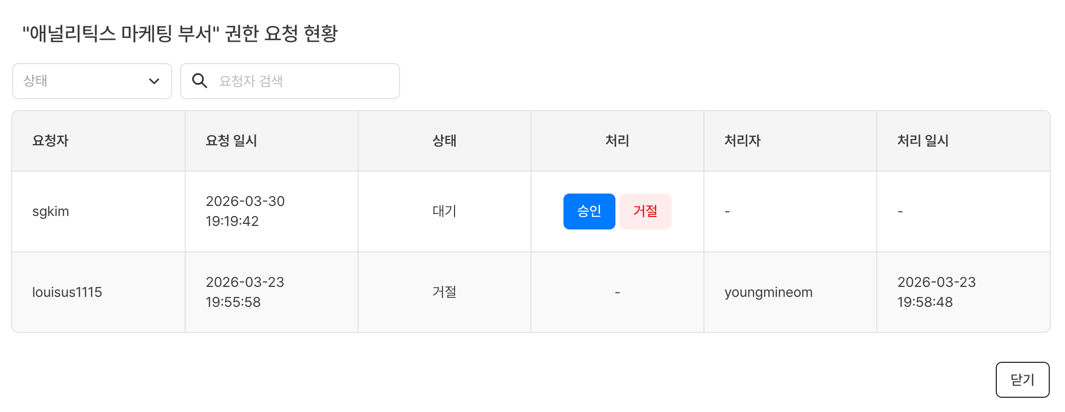
- Check the number of pending requests in the Permission Requests column of the workspace list.
- Click the Permission Requests button to display the list of permission requests for the workspace.
- Select Approve or Reject for each requester.
| Status | Description |
|---|---|
| Pending | Waiting for the administrator to handle the request |
| Approved | The request is approved, and the workspace can be accessed |
| Rejected | The request is rejected |
Set the main dashboard
Specify the dashboard displayed by default when you enter the Home menu. 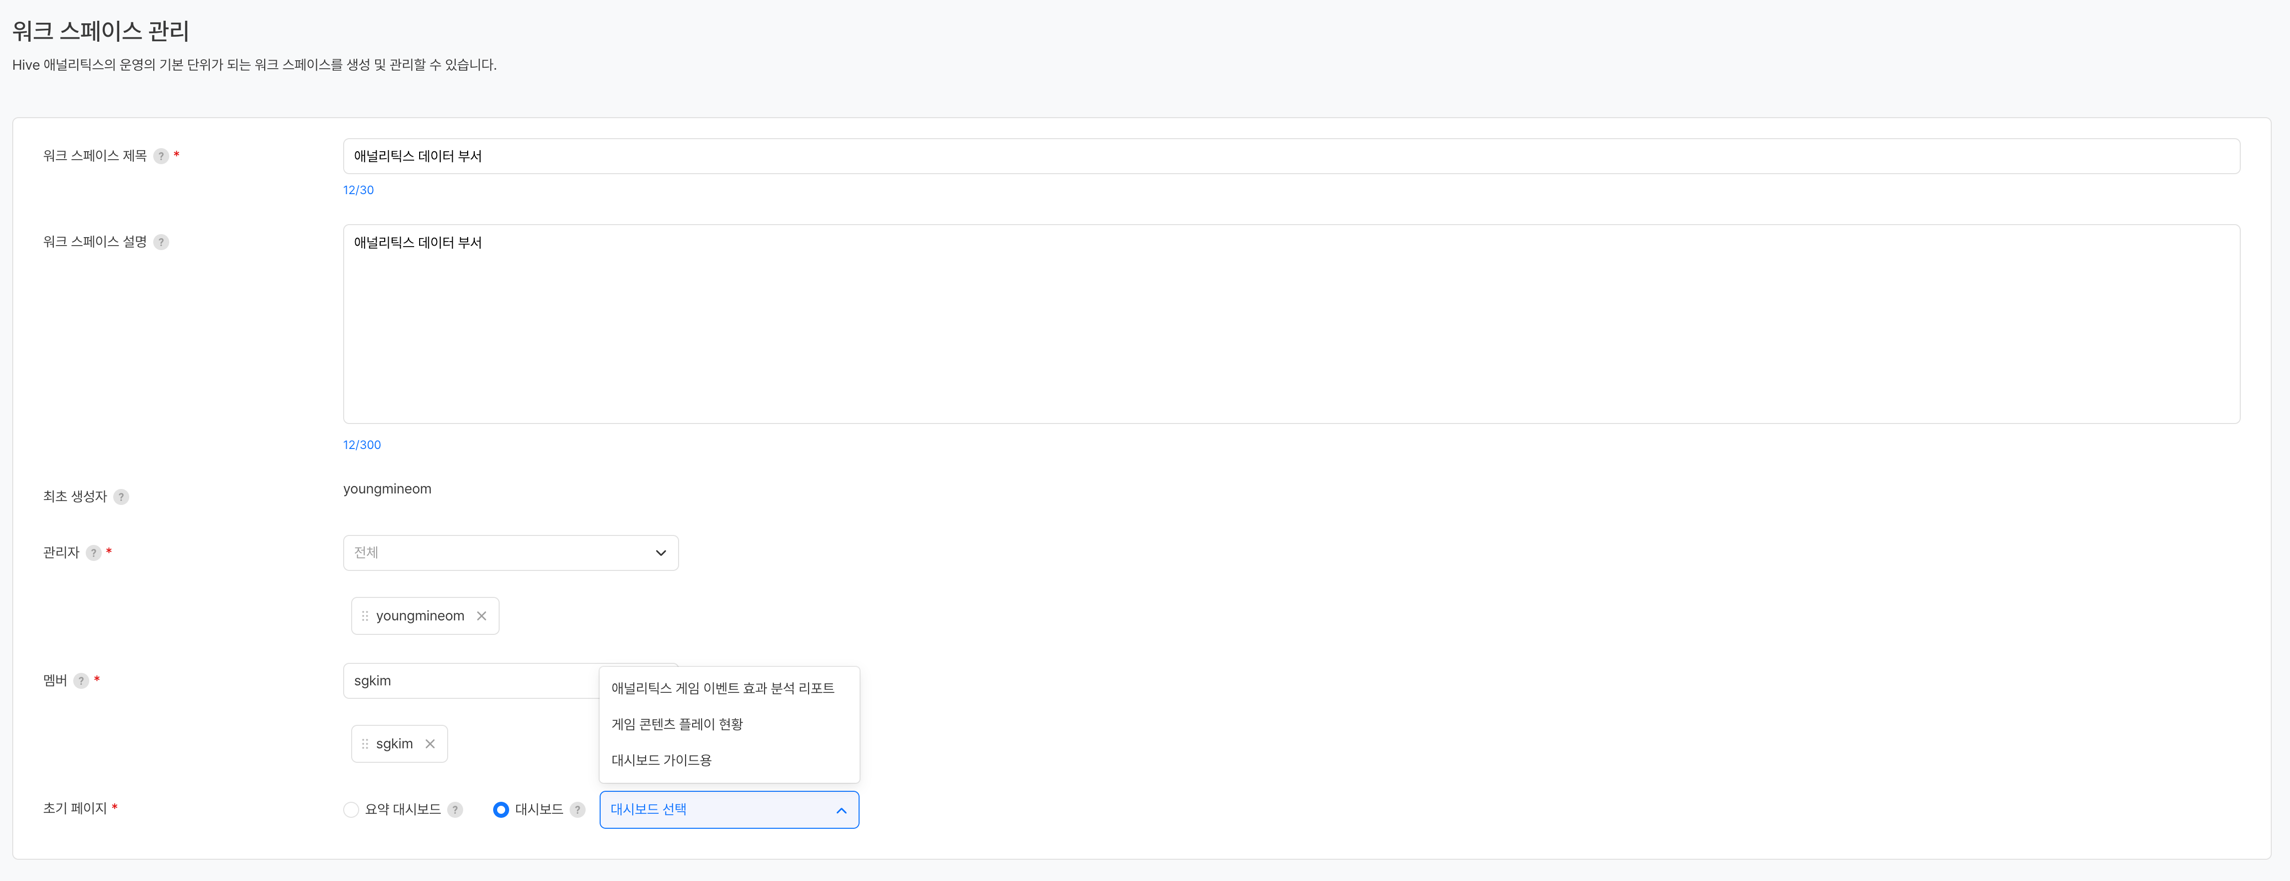
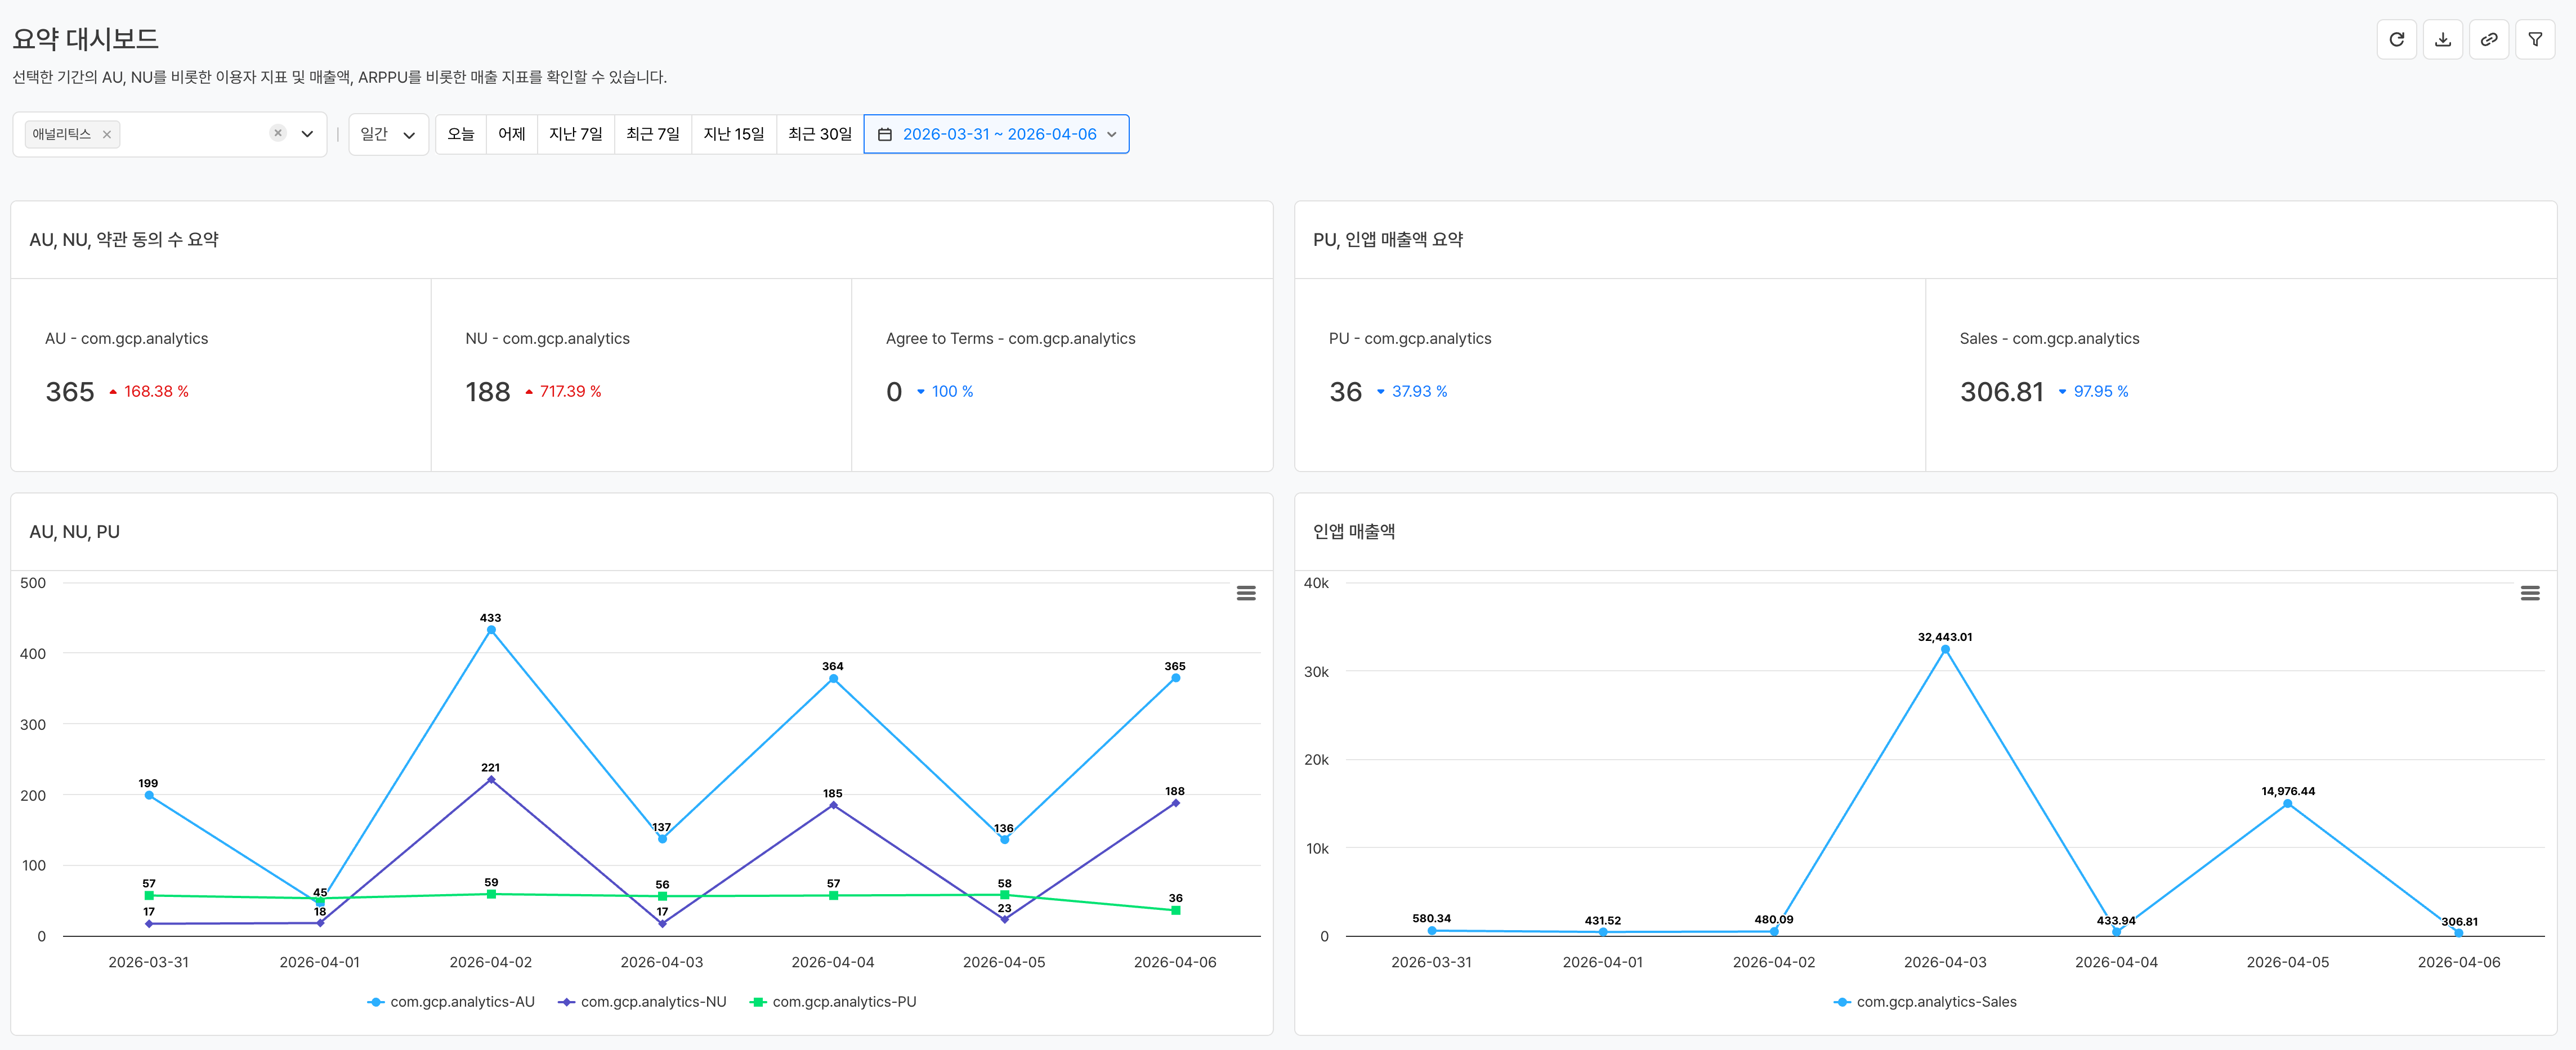
By default, it is set to the summary dashboard shown below, and you can change it to a dashboard created in the workspace if you want.
- On the workspace details page, select the dashboard to set as the main dashboard in the Home Dashboard item.
- Click the Save button.
Change the workspace order
Specify the order of the workspaces displayed on the Home screen and the Dashboard screen.
- On the Workspace Management page, click the Edit List button.
- Adjust the workspace order by dragging and dropping with the mouse.
- Click the Save List Changes button.
Set a workspace to inactive
You can change a workspace that is no longer used to inactive.
Warning
If you change a workspace to inactive, all content (charts, funnels, retention, and dashboards) created under the workspace is no longer displayed, and you cannot select the workspace when you use Create.
Workspace structure design examples
App-based Structure
Team/Purpose-based Structure
Workspace A: Marketing analysis (Marketing team)
Workspace B: Revenue analysis (Business team)
Workspace C: App metrics (Development team)
Workspace D: Overall status (Executives)
Notes & tips
- If you change a workspace to inactive, its content is no longer displayed. Before you change it to inactive, copy the important content of the workspace to another workspace.
- Each workspace must have at least one administrator.
- To place the same content in multiple workspaces, use the Copy feature.
- When the team structure changes (team members move or roles change), update the workspace member list as well.
Related menus
- Home — View the main dashboard
- Dashboard — Create a dashboard to set as the main dashboard
- All content — View content by workspace
- User management — View the workspace permissions of all users